


Knowing how to take a screenshot on Windows 7 helps you save error messages, document settings, share steps with support, and capture anything on your screen. Even though Windows 7 is an older operating system at the time of writing, the built-in tools still work reliably and give you multiple ways to save on-screen content.
This guide explains every method clearly, from using the Print Screen key to capturing smaller sections with the Snipping Tool. After the overview, go straight into the steps and choose the method that fits your workflow.
Use The Print Screen Key
This method captures everything on your screen and places it on your clipboard. It works on any keyboard and does not require extra software.
- Open the window or screen you want to capture.
- Press the PrtScn (Print Screen) key.
- Open Paint, Word, or another editor.
- Press Ctrl + V to paste the screenshot.
- Save the image to your computer.
Use The Snipping Tool
The Snipping Tool lets you capture only part of the screen. It supports free-form snips, window snips, and rectangular snips.
- Click Start and search for Snipping Tool.
- Select New to start a capture.
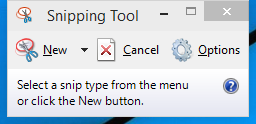
- Drag to select the area you want to save or use the default option.

- Use the built-in pen or highlighter if needed.
- Select File > Save As to store the screenshot.
Use Windows Key + PrtScn
This shortcut captures the full screen and saves the file automatically, so you don’t need to paste it manually.
- Open the content you want to capture.
- Press Windows Key + PrtScn.

- Open the Pictures folder.
- Select the Screenshots folder to find your saved images.
Use Alt + PrtScn For Active Window Screenshots
This method captures only the active window, which helps when you want cleaner screenshots without the taskbar or background elements.
- Click the window you want to capture.
- Press Alt + PrtScn.
- Open Paint, Word, or another editor.
- Press Ctrl + V to paste and save the image.
Create A Snipping Tool Shortcut
A shortcut improves access if you capture screenshots frequently. You can place it on the desktop or taskbar.
- Right-click your desktop and select New > Shortcut.
- Enter snippingtool.exe as the location.
- Name the shortcut Snipping Tool.
- Select Finish and pin it if needed.
Troubleshooting Common Problems
- Print Screen does not work: Check if an app like OneDrive or Dropbox is intercepting screenshots.
- Snipping Tool will not open: Restart Windows Explorer from Task Manager.
- No Screenshots folder appears: Create a manual folder inside Pictures and try again.
- Screenshot pastes as black: Update your graphics driver, which often resolves display rendering issues.
Tips
- Use PNG for sharper images, especially for text or UI elements.
- Close background apps to reduce clutter in full-screen captures.
- Use Snipping Tool for clean tutorials or guided screenshots.
- Rename screenshots immediately to keep your folders organized.
FAQ
Why is my Print Screen key not working?
Some keyboards require you to press Fn + PrtScn. Check for this on laptops.
Where do automatic screenshots save on Windows 7?
They save inside the Pictures > Screenshots folder after using Windows Key + PrtScn.
Does Windows 7 have Snip & Sketch?
No, Snip & Sketch is only available on newer versions of Windows. Windows 7 uses the Snipping Tool instead.
Can I take timed screenshots?
Yes. The Snipping Tool includes a delay option for capturing menus or tooltips.
Summary
- Use Print Screen for full-screen captures.
- Use the Snipping Tool for selected areas.
- Use Windows Key + PrtScn for automatic saved screenshots.
- Use Alt + PrtScn for active windows.
- Create a Snipping Tool shortcut for faster access.
Conclusion
Windows 7 still provides simple and dependable tools for capturing screenshots. Whether you need full images or precise selections, the built-in shortcuts and the Snipping Tool cover most needs with minimal effort. After choosing the method that fits your workflow, you can save, edit, and share screenshots quickly whenever you need them.


Discussion (0)
Be the first to comment.