


NFC payments offer a convenient way to pay with your smartphone in stores without having to worry about carrying your credit or debit card with you. NFC stands for Near Field Communication, which is a technology that allows two devices to communicate wirelessly when they are close to each other. Most Android smartphones these days have NFC chips built in, which means you can use them to make NFC payments with a simple tap-to-pay gesture in any store that has a contactless payment terminal. Without further ado, here’s how to set up NFC payments on Android phones:
NOTE: I wrote this using a Google Pixel 6a running Android 14 and a Samsung Galaxy S21 Plus running Android 13 (One UI 5.1). The procedures are similar on all Android-powered devices, although you might have some small differences depending on your device’s manufacturer and operating system version.
 You need an Android with NFC, a payment app, and a credit or debit card
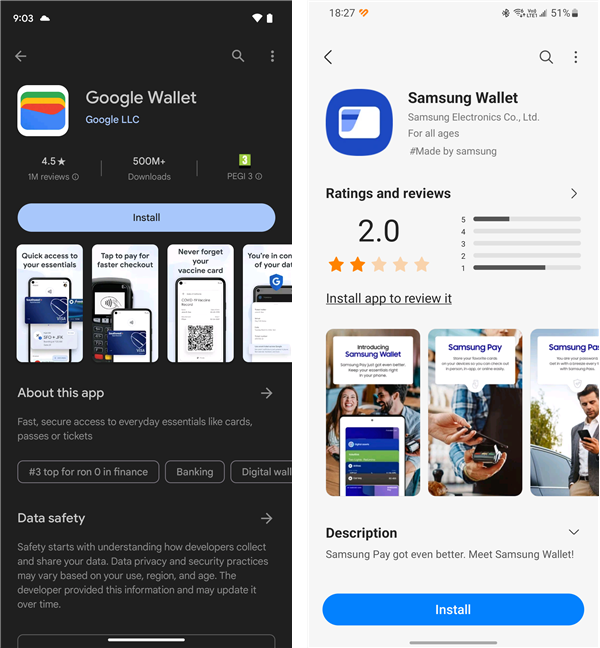
 NFC payment apps: Google Wallet and Samsung Wallet
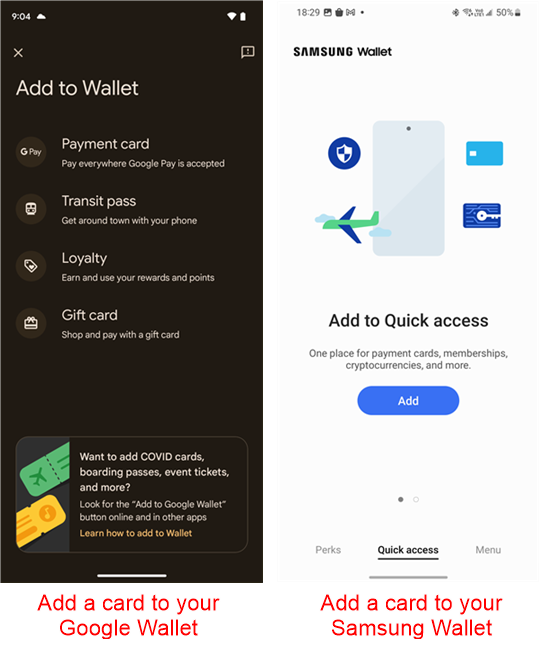
 Adding a card to your payment app
NOTE: During the process of adding a card to your chosen NFC payment app, you may also be required to verify your identity and set up a PIN or biometric authentication for security.
Adding a card to your payment app
NOTE: During the process of adding a card to your chosen NFC payment app, you may also be required to verify your identity and set up a PIN or biometric authentication for security.
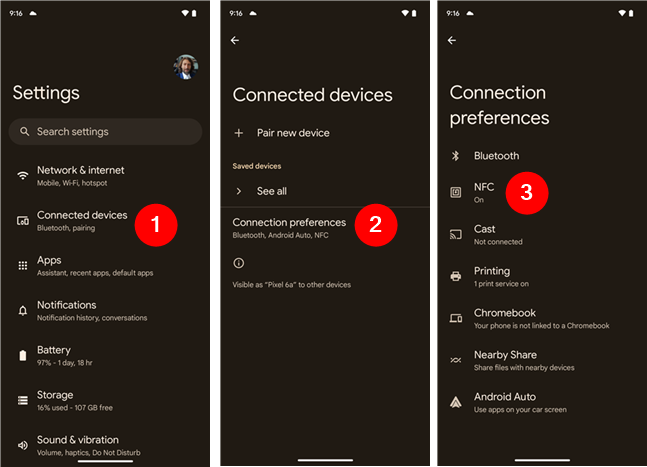
 Access NFC settings on Android
This brings you to the NFC settings screen, where you can turn NFC on or off, as well as choose the default payment app. To set the default NFC pay app on your Android phone, go to Contactless payments > Default payment app and choose the app you prefer using for NFC payments.
Access NFC settings on Android
This brings you to the NFC settings screen, where you can turn NFC on or off, as well as choose the default payment app. To set the default NFC pay app on your Android phone, go to Contactless payments > Default payment app and choose the app you prefer using for NFC payments.
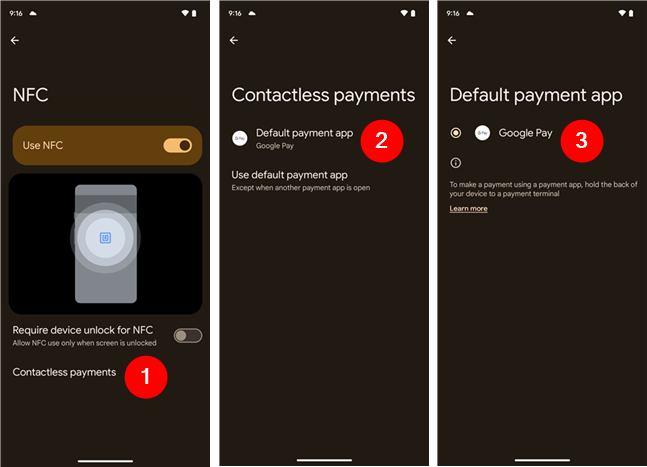 Choose the default payment app on Android
TIP: While you’ve now chosen a default app for NFC payments on your Android smartphone, you can also switch to a different app when you need to. To do this, make sure the “Use default payment app” option is set to “Except when another payment app is open.” This is the default behavior in Android. If, by any chance, your phone says Always, tap on its name and choose “Except when another payment app is open.”
Choose the default payment app on Android
TIP: While you’ve now chosen a default app for NFC payments on your Android smartphone, you can also switch to a different app when you need to. To do this, make sure the “Use default payment app” option is set to “Except when another payment app is open.” This is the default behavior in Android. If, by any chance, your phone says Always, tap on its name and choose “Except when another payment app is open.”
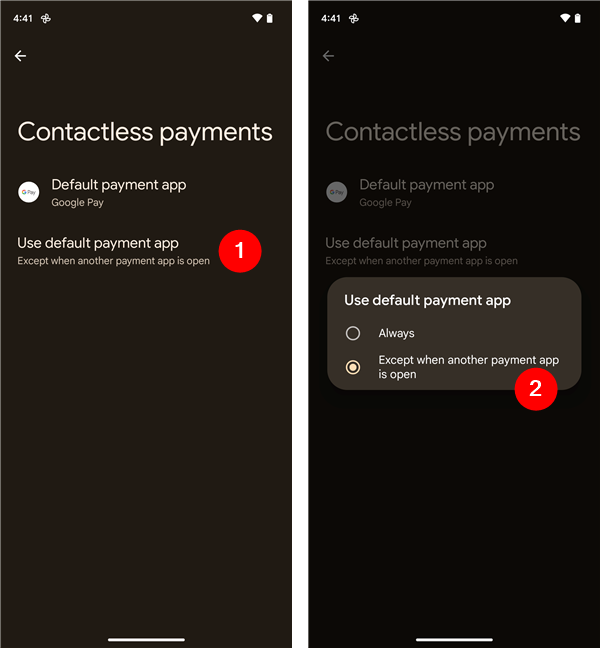 Use default payment app except when another one is open
Then, before you tap your phone on an NFC terminal, open the app you want to use for that payment.
Use default payment app except when another one is open
Then, before you tap your phone on an NFC terminal, open the app you want to use for that payment.
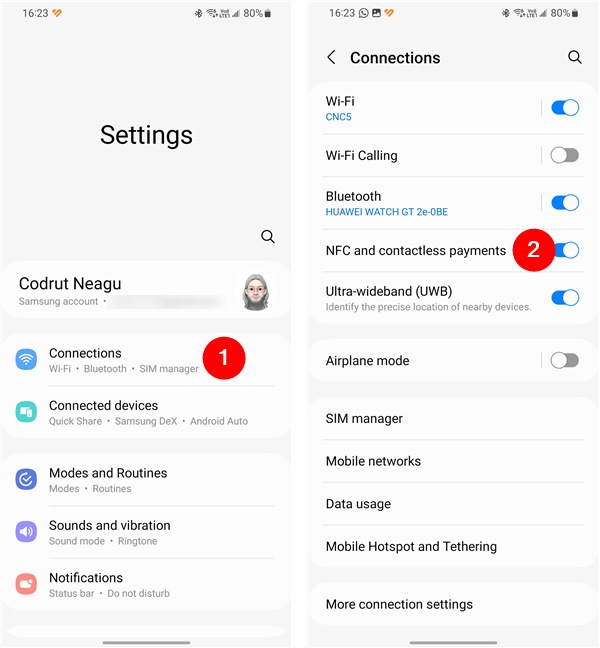 On a Samsung phone, go to NFC and contactless payments
Then, on the “NFC and contactless payments” screen, tap Contactless payments at the bottom. This will make your Samsung Galaxy device show you the list of payment services installed and available on your phone. Select the one you want.
On a Samsung phone, go to NFC and contactless payments
Then, on the “NFC and contactless payments” screen, tap Contactless payments at the bottom. This will make your Samsung Galaxy device show you the list of payment services installed and available on your phone. Select the one you want.
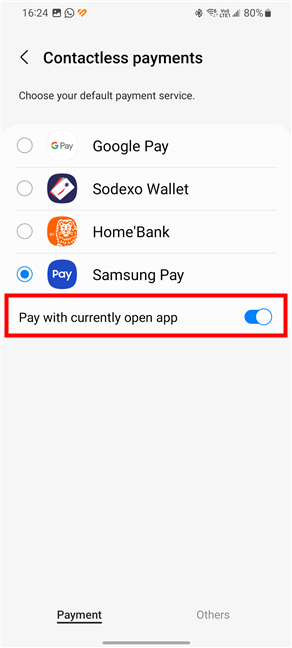
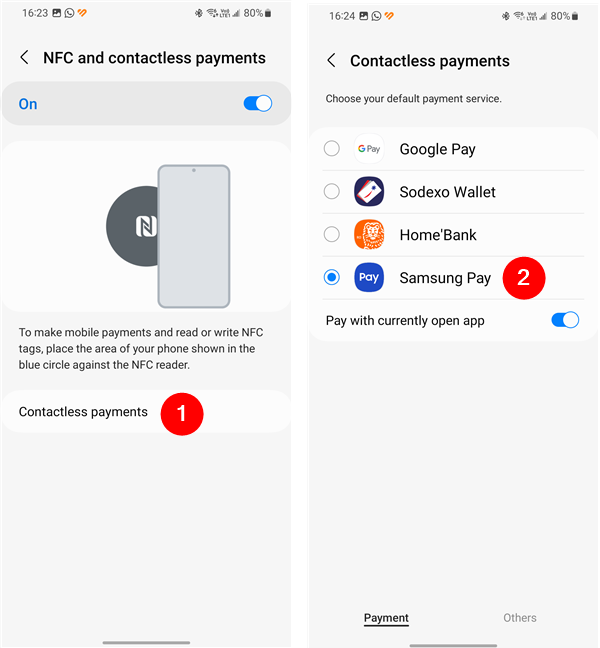 Choose the default payment app on a Samsung Galaxy phone
TIP: Although your Samsung Galaxy smartphone will use the selected app as the default payment method, you can still use a different NFC payment occasionally if you need to. If you leave the “Pay with currently open app” switch on, as it is by default, you can use another payment app on your phone as long as you open that app before actually making an NFC payment.
Choose the default payment app on a Samsung Galaxy phone
TIP: Although your Samsung Galaxy smartphone will use the selected app as the default payment method, you can still use a different NFC payment occasionally if you need to. If you leave the “Pay with currently open app” switch on, as it is by default, you can use another payment app on your phone as long as you open that app before actually making an NFC payment.
 Pay with currently open app
 Turn on NFC on Android
Or, if you have a Samsung Galaxy smartphone, open the Settings app and go to Connections. Then, enable the “NFC and contactless payments” switch.
Turn on NFC on Android
Or, if you have a Samsung Galaxy smartphone, open the Settings app and go to Connections. Then, enable the “NFC and contactless payments” switch.
 Turn on NFC on a Samsung Galaxy phone
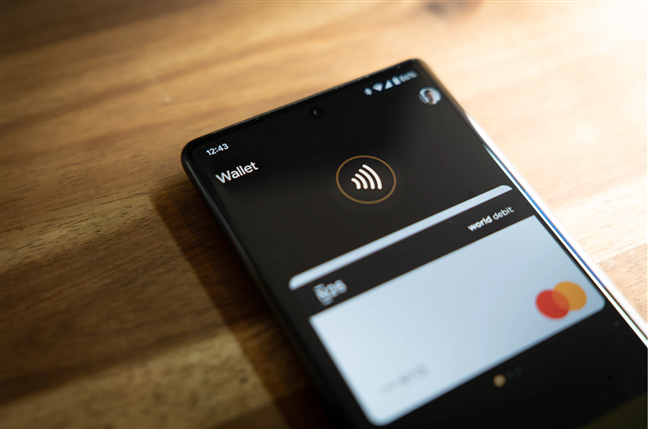
 Making an NFC payment
You’ve successfully made a contactless payment with your Android smartphone.
Making an NFC payment
You’ve successfully made a contactless payment with your Android smartphone.
What you need in order to make NFC payments on Android
In order to set up NFC payments on your Android device, you need a couple of things covered:- An Android smartphone that has NFC.
- An app that supports NFC payments, such as Google Pay (part of Google Wallet), Samsung Pay (part of Samsung Wallet), or PayPal.
- A credit or debit card that you’ll be using for making NFC payments.
How to set up NFC payments on Android smartphones
Here are the steps to set up NFC payments on your Android device:Step 1. Download and install a payment app
To use NFC payments, you must download a payment app that works with your phone, as well as your bank or card provider. Among the most popular payment apps for Android smartphones we can count Google Wallet, Samsung Pay, and PayPal. However, your bank might also offer an app that allows you to pay using their services directly. ING Bank, whose services I’m currently using, has an app called HomeBank that lets me pay using my Android phone. Depending on what payment app you prefer, you can download it from the Google Play Store or, if you’re using a Samsung Galaxy device, from the Galaxy Store. For example, if you’d like to use Google Pay, you should download Google Wallet. Or, if you have a Samsung Galaxy phone and would like to use Samsung Pay, you’ll need to download and install the Samsung Wallet app.Step 2. Open the payment app and add a credit or debit card
Next, after you’ve downloaded and installed a payment app, you’ll have to add at least one debit or credit card to it. Depending on the app you’ve chosen, you may need to scan your card with your phone’s camera, enter your card details manually, or link your bank account.Step 3.1. Choose the default payment app on your Android device
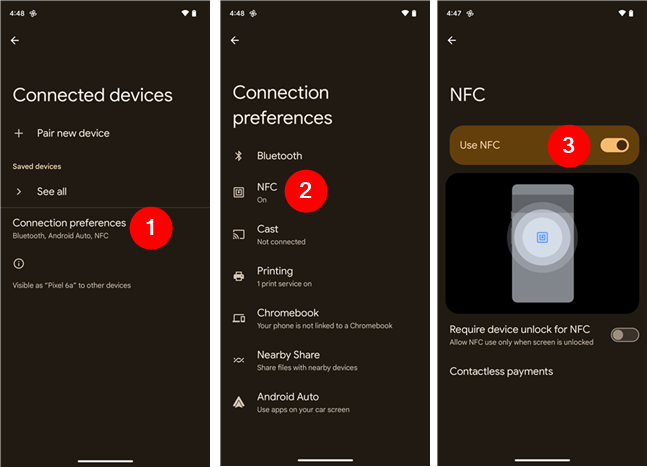
If you have more than one payment app on your Android phone, you should now select the one you want to use as your default NFC payment app. The app you choose as default will launch automatically when you hold your phone near a contactless payment terminal. To select the default payment app on an Android smartphone, go to Settings > Connected devices > Connection preferences and tap on NFC.Step 3.2. Choose the default payment app on your Samsung Galaxy
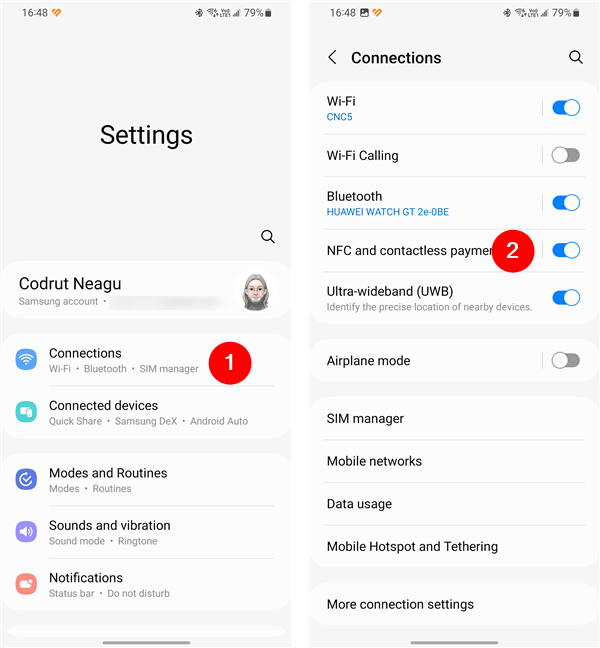
If you have multiple payment apps installed on your Samsung Galaxy smartphone, you should now choose which one to use as the default NFC payment app. The payment service you specify as default will trigger automatically when holding your phone close to a contactless payment terminal. So… If you’re using a Samsung Galaxy smartphone, open the Settings app, head to Connections, and tap “NFC and contactless payments.” Make sure you tap on the name of the setting instead of the switch next to it: the switch only toggles NFC on or off.Step 4. Turn on NFC on your Android phone
Having all of the above covered, the next step is to make sure you have NFC enabled on your Android smartphone. Otherwise, you won’t be able to make contactless payments. I’ve covered the steps for that in this guide: Does my phone have NFC? How to turn on NFC on Android. Basically, you’ll have to retrace some of the steps in the previous chapters of this guide. If you have a standard Android, go to Settings > Connected devices > Connection preferences and tap on NFC. Then, make sure you set the Use NFC switch on.Step 5. Make payments with NFC
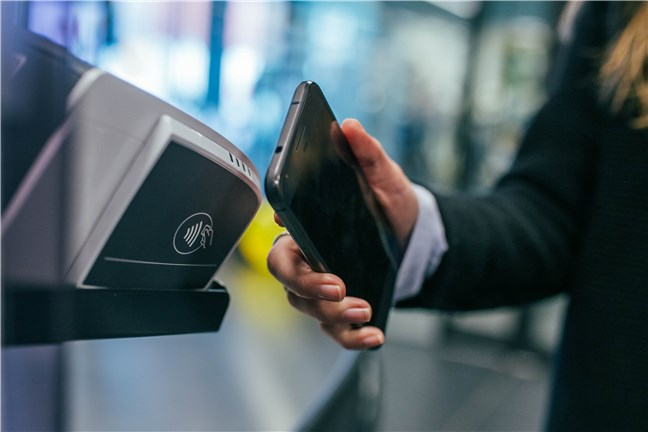
Now, your smartphone is ready for NFC payments. To pay with NFC, unlock your device and hold it near the terminal until you see a checkmark or a confirmation message on the screen. You may also need to enter your PIN or use biometric authentication, depending on the app and the amount of the transaction, but that’s it!

Discussion (0)
Be the first to comment.