

Did you plug an external hard drive into your Windows 11 or Windows 10 computer and want to remove it safely so that the data on it doesn’t get corrupted? Do you work with USB flash drives and need to eject them safely? In that case, you are in the right place. In this guide, I’ll show you a couple of different ways to safely eject external storage devices from Windows:
 Finding the Safely Remove Hardware and Eject Media icon
You can move the Safely Remove Hardware and Eject Media icon to make it visible in the system tray, by dragging and dropping it with the mouse.
Finding the Safely Remove Hardware and Eject Media icon
You can move the Safely Remove Hardware and Eject Media icon to make it visible in the system tray, by dragging and dropping it with the mouse.

 Click on Safely Remove Hardware and Eject Media
After finding the USB icon, click on it to see a list of all the removable storage devices connected to your Windows 10 computer. The list includes USB memory sticks, external hard drives, and other types of USB devices. In the list of removable devices, click on the one that you want to remove. If you can’t tell them apart, look at their drive letter.
Click on Safely Remove Hardware and Eject Media
After finding the USB icon, click on it to see a list of all the removable storage devices connected to your Windows 10 computer. The list includes USB memory sticks, external hard drives, and other types of USB devices. In the list of removable devices, click on the one that you want to remove. If you can’t tell them apart, look at their drive letter.
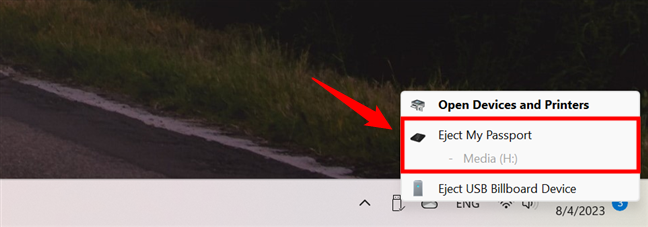
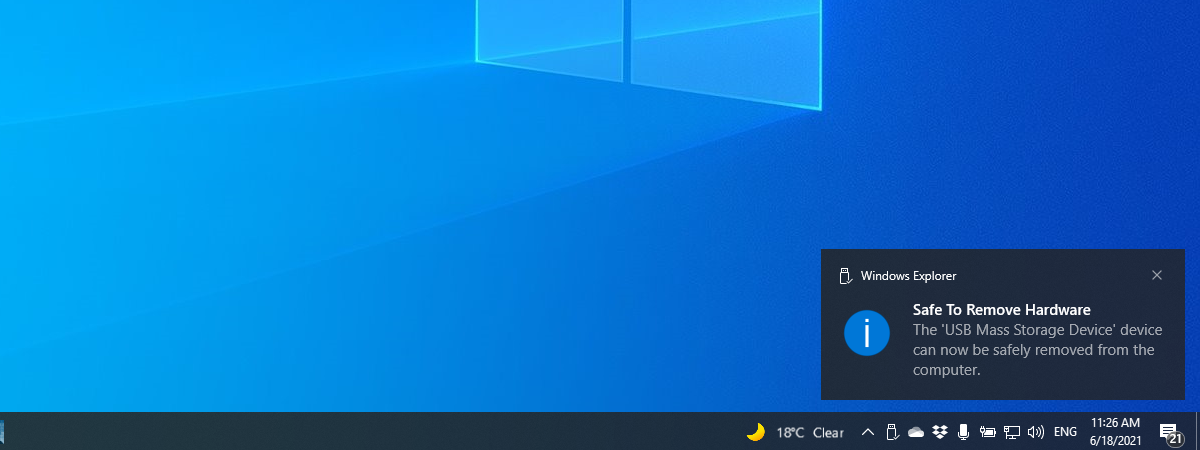
 Choose the drive you want to eject
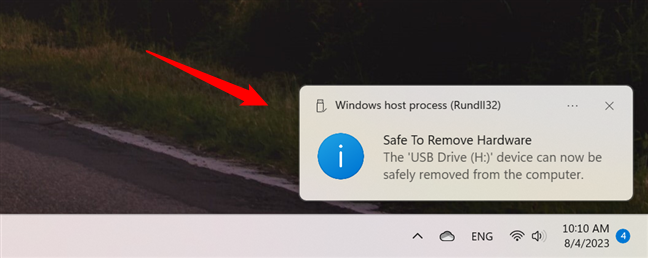
Then, a notification should be shown in the bottom right corner, telling you that it is Safe To Remove Hardware. Now, you can unplug the storage device that you no longer want to use on your computer.
Choose the drive you want to eject
Then, a notification should be shown in the bottom right corner, telling you that it is Safe To Remove Hardware. Now, you can unplug the storage device that you no longer want to use on your computer.

 It is safe to remove hardware
If the storage device you want to unplug is actively used by Windows or an app you are running, you’re told that “This device is currently in use.” It’s not a good idea to unplug the storage device because the data on it might get corrupted.
It is safe to remove hardware
If the storage device you want to unplug is actively used by Windows or an app you are running, you’re told that “This device is currently in use.” It’s not a good idea to unplug the storage device because the data on it might get corrupted.
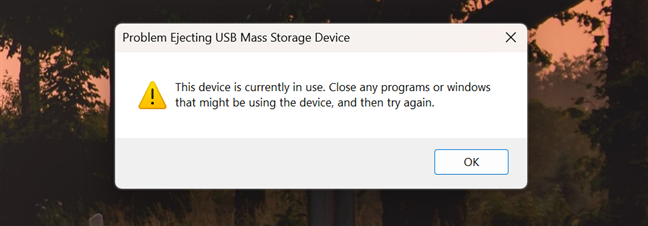
 This device is currently in use
If this error message is shown, close all open apps and try again. If you still receive the same error, shut down your Windows 11 or Windows 10 computer, and unplug the storage device. Then, start your computer again and use it normally.
TIP: Did you know that you can stop worrying about corrupting data on your portable drives when unplugging them? The truth is that you can eject a USB drive from your laptop or desktop computer without having to use the Safely Remove Hardware and Eject Media tool. However, that requires a few settings to be made beforehand. You can find out more in this guide: You don’t have to safely remove USB drives from Windows.
This device is currently in use
If this error message is shown, close all open apps and try again. If you still receive the same error, shut down your Windows 11 or Windows 10 computer, and unplug the storage device. Then, start your computer again and use it normally.
TIP: Did you know that you can stop worrying about corrupting data on your portable drives when unplugging them? The truth is that you can eject a USB drive from your laptop or desktop computer without having to use the Safely Remove Hardware and Eject Media tool. However, that requires a few settings to be made beforehand. You can find out more in this guide: You don’t have to safely remove USB drives from Windows.
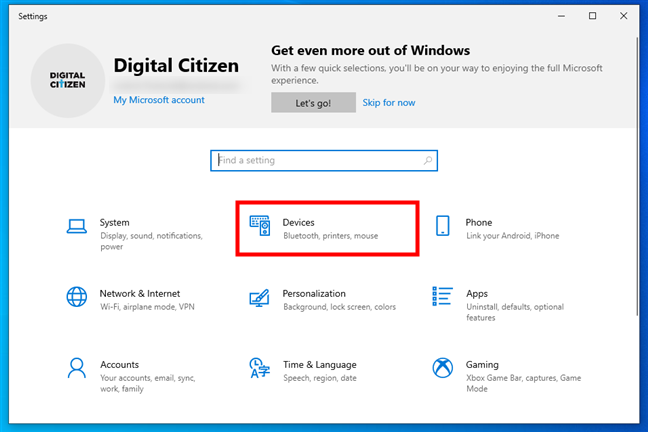
 In Windows 10's Settings, go to Devices
Then, in the left sidebar, make sure that Bluetooth & other devices is selected.
In Windows 10's Settings, go to Devices
Then, in the left sidebar, make sure that Bluetooth & other devices is selected.
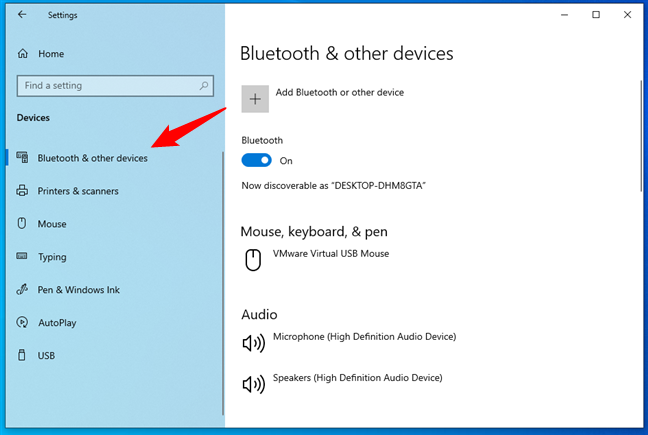
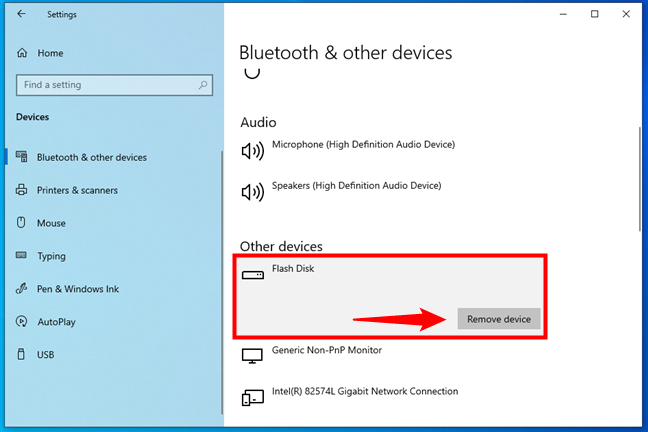
 Go to Bluetooth & other devices
The right-hand pane of the Settings app now displays a long list of devices. Scroll down to the Other devices section, where you’ll see all the external devices connected to your Windows 10 PC. Find the external hard drive or USB stick you want to remove, click or tap on its name, and then press the Remove device button.
Go to Bluetooth & other devices
The right-hand pane of the Settings app now displays a long list of devices. Scroll down to the Other devices section, where you’ll see all the external devices connected to your Windows 10 PC. Find the external hard drive or USB stick you want to remove, click or tap on its name, and then press the Remove device button.
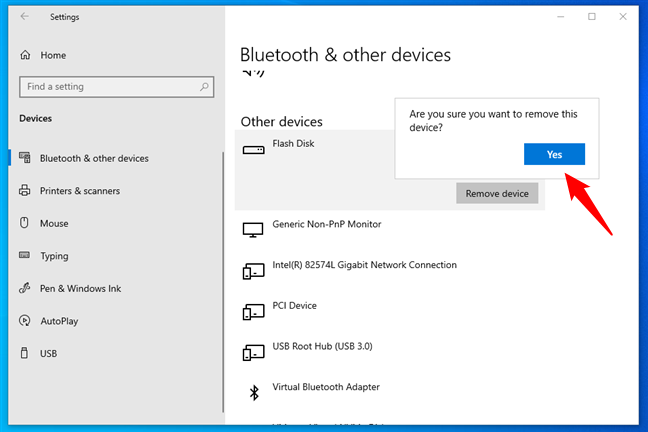
 Select the USB drive and click the Remove device button
You’ll need to confirm the action by clicking or tapping the Yes button in the dialog that shows up.
Select the USB drive and click the Remove device button
You’ll need to confirm the action by clicking or tapping the Yes button in the dialog that shows up.
 Confirm the removal of the device
The external storage device has been ejected, and you can safely unplug it from your Windows 10 computer.
Confirm the removal of the device
The external storage device has been ejected, and you can safely unplug it from your Windows 10 computer.
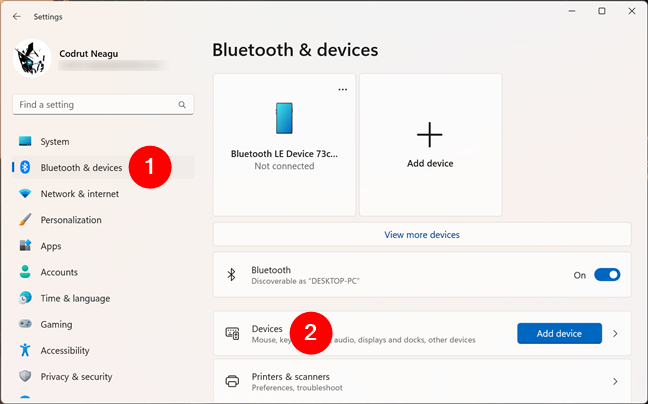
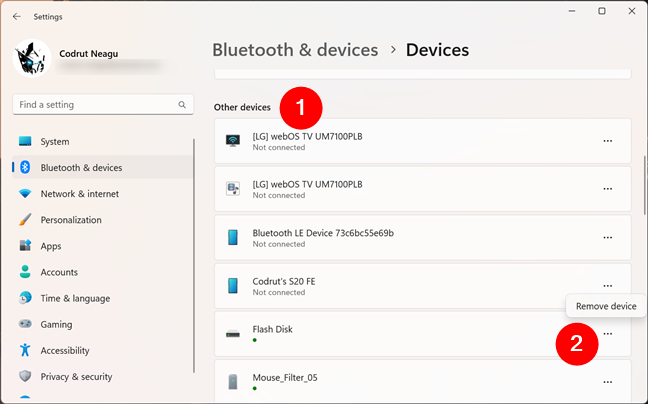
 In Windows 11's Settings, go to Bluetooth & devices > Devices
On the right side of the Settings app, you see the list of devices connected to your Windows 11 PC. Scroll down until to the Other devices area to get an overview of your external devices. Locate the portable USB hard drive, solid-state drive, or USB stick that you want to eject. Once you’ve found it, click or tap the More options button (three dots) next to it, and in the menu that shows up, select the only option available: Remove device. No further confirmation is required: the drive is immediately ejected.
In Windows 11's Settings, go to Bluetooth & devices > Devices
On the right side of the Settings app, you see the list of devices connected to your Windows 11 PC. Scroll down until to the Other devices area to get an overview of your external devices. Locate the portable USB hard drive, solid-state drive, or USB stick that you want to eject. Once you’ve found it, click or tap the More options button (three dots) next to it, and in the menu that shows up, select the only option available: Remove device. No further confirmation is required: the drive is immediately ejected.
 Select the drive you want to eject in Other Devices
The portable drive or USB memory stick that you’ve selected is now disconnected from your Windows 11 PC, so you can safely unplug it from your Windows computer.
Select the drive you want to eject in Other Devices
The portable drive or USB memory stick that you’ve selected is now disconnected from your Windows 11 PC, so you can safely unplug it from your Windows computer.
 Right-click and choose Eject
If everything goes well, you see a notification that it is Safe To Remove Hardware. Unplug the device that you no longer want to use on your Windows 11 or Windows 10 PC, and you are done.
Right-click and choose Eject
If everything goes well, you see a notification that it is Safe To Remove Hardware. Unplug the device that you no longer want to use on your Windows 11 or Windows 10 PC, and you are done.
 Now it is safe to remove hardware
 Right-click on the USB flash drive and choose Eject
Now you can safely unplug the USB memory stick from your computer or device.
Right-click on the USB flash drive and choose Eject
Now you can safely unplug the USB memory stick from your computer or device.
How to eject a portable HDD, SSD, or USB stick safely
Ejecting a portable HDD, SSD, or USB stick safely is essential if you want to prevent data loss or damage. Here are two ways that work for both external hard disk drives, solid-state drives, and USB memory sticks:1. How to eject an external drive with the “Safely Remove Hardware and Eject Media” icon
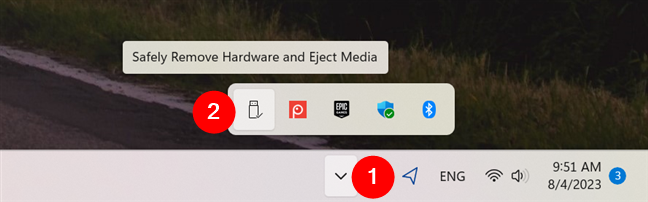
The most popular method is also one of the simplest and fastest. The gist is to find the Safely Remove Hardware and Eject Media icon in the system tray. By default, in both Windows 11 and Windows 10, this icon is hidden and not shown alongside the clock and the network icon, on the right side of the taskbar. However, you can click the arrow pointing upwards to show hidden icons and then find the icon that looks like a USB stick, highlighted below.2. How to safely remove external storage devices from Windows 10’s Settings
Another method that is less known than the others shared so far is from the Settings app. Open Settings (press Windows + I) and click or tap on Devices.3. How to safely remove external storage devices from Windows 11’s Settings
If you’re using Windows 11, you can remove a portable drive from its Settings too. Start by launching Settings (Windows + I) and selecting Bluetooth & devices in the left sidebar. Then, click or tap on the Devices entry on the right.How to eject a USB stick safely
Up until now, we’ve seen two ways to remove a USB HDD, SSD, or memory stick safely from a Windows computer. These two ways work for all the mentioned devices. However, for USB memory sticks, there are two other methods you can use. I’ll cover them next, but remember that they work only for USB memory sticks (not for HDDs or SSDs):1. How to eject a USB memory stick from File Explorer
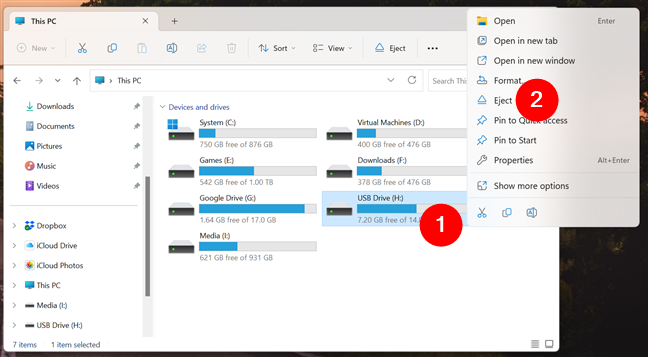
A simple method to remove a USB memory stick is offered by File Explorer. Open it, select This PC on the left sidebar, and head to the Devices and drives section. Here, you can see all the partitions and drives from your PC, including external ones. Right-click or press and hold on the drive that you want to remove, and in the menu that opens, choose Eject.2. How to eject USB memory sticks from Disk Management
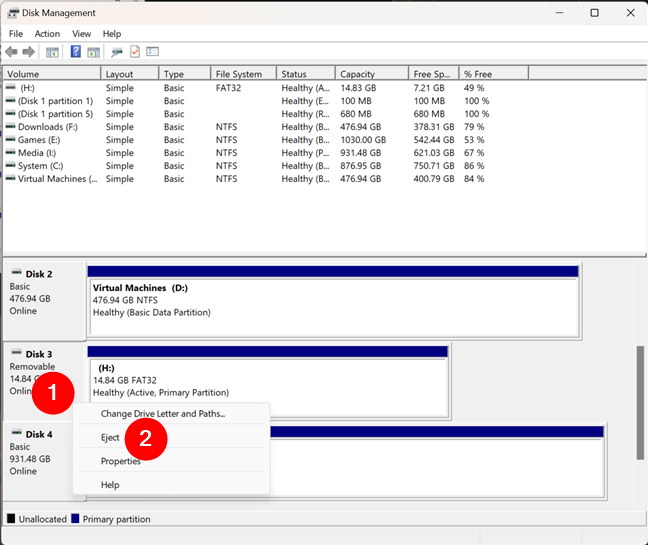
This method also applies to USB memory sticks only, not to external hard drives. Open Disk Management and scroll down the list of disks at the bottom. The disks that can be removed from Disk Management are labeled as Removable. Find the one you want, right-click on it, and choose Eject.
Discussion (7)
Yes they are the same: Once I find a device that works for me, if additional devices of the same type are needed, I purchase the same model. Thus I have multiple SSDs of the same type, multiple USB sticks etc. In fact, I might have 4 identical USB sticks plugged in at the same time. It would be a pain to have to purchase a different brand/model just to be able to tell which SSD you’re dealing with. There just HAS t6o be a better way….
What if you give each drive a different name, in Windows?
See this guide: https://www.digitalcitizen.life/4-ways-label-and-rename-any-drive-windows/
Can you then tell them apart?
When trying to safely remove a device using the icon in the task tray, there are TWO options listed: “Eject Portable SSD T5” and “Eject Portable SSD T5”. (I have TWO portable SSDs connected).
How do I determine which is which? Is there some value in the characteristics of the drive that can be changed to have Win 10/11 list different values for different devices of the same type? (and how do I go about doing this?)
They look like they’re the same model of SSD, right? This makes it tricky. I don’t know how to tell which is which. I’ve never encountered this situation.
I believe I recall reading that, a version or 2 (or 3) ago, Windows 10 changed the default to make it safe to remove USB devices without using any of the steps described unless one had changed their system back to the original default. Is that not correct?
thank you, this is most helpful, as I use windows on one computer and windows 7 on another.
Hii i use windows phone and whenever i want to disconnect it from my win 7 ultimate at the right bottom corner it never shows the icon for removing that even i went to cutomize and change the setting to always display but nothing works do you have any idea for the same.