

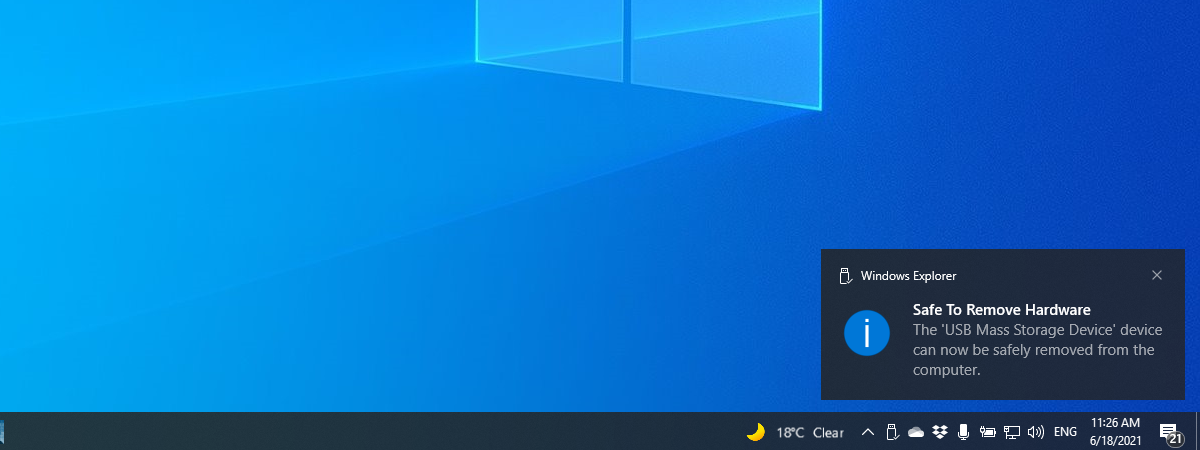
A long, long time ago, the story says, you had to use the “Safely Remove Hardware” option when you wanted to unplug a USB memory stick or eject an external hard drive from Windows. It was something you had to do; otherwise, you risked corrupting files on your portable USB drives. But that’s no longer true. Both Windows 10 and Windows 11 let you unplug external USB devices such as flash memory sticks or external hard disk drives directly, without compromising the data on them. Here’s what you should know about the USB “safely remove” feature in Windows:

 Safely Remove Hardware and Eject Media icon in Windows 11
Well, Windows operating systems have always treated removable devices such as USB memory sticks or portable drives in one of two ways. The standard policy is to configure each USB drive plugged in either for quick removal or better performance. This dictates the way the operating system interacts with the USB drive:
Safely Remove Hardware and Eject Media icon in Windows 11
Well, Windows operating systems have always treated removable devices such as USB memory sticks or portable drives in one of two ways. The standard policy is to configure each USB drive plugged in either for quick removal or better performance. This dictates the way the operating system interacts with the USB drive:
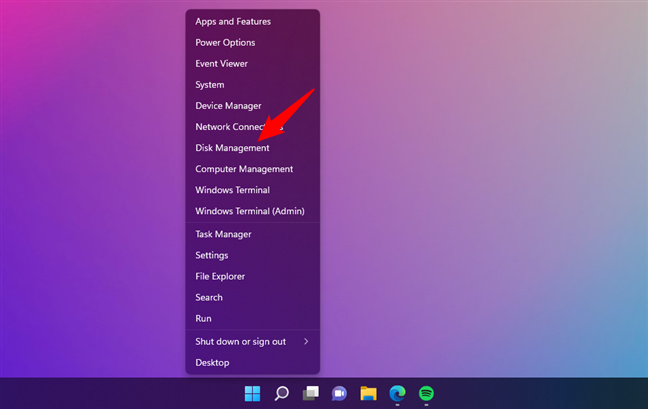
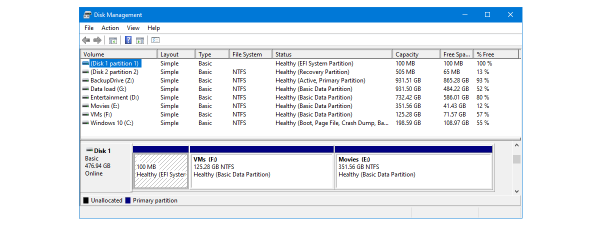
 Disk Management in the WinX menu
In the Disk Management app, look through the list of drives to identify the USB drive you want to check. Once you’ve found it, right-click (or press and hold) on it and select Properties from the context menu. Make sure you click on the disk (shown on the left side of the window), not any of the partitions or volumes listed on the right.
Disk Management in the WinX menu
In the Disk Management app, look through the list of drives to identify the USB drive you want to check. Once you’ve found it, right-click (or press and hold) on it and select Properties from the context menu. Make sure you click on the disk (shown on the left side of the window), not any of the partitions or volumes listed on the right.
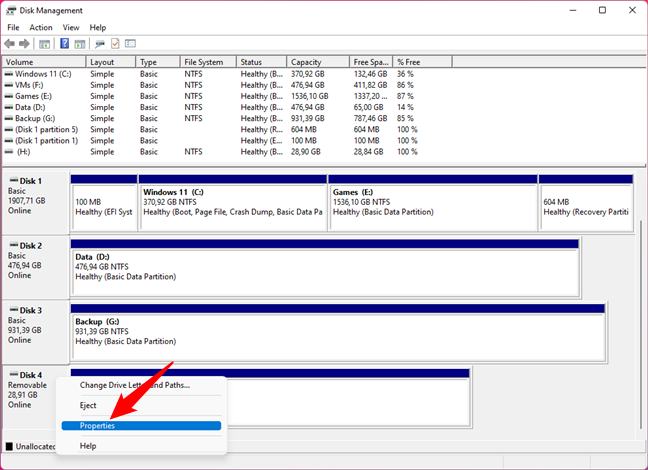
 Opening Properties of a removable drive
This opens the Properties window for the selected USB drive. In it, go to the Policies tab.
Opening Properties of a removable drive
This opens the Properties window for the selected USB drive. In it, go to the Policies tab.
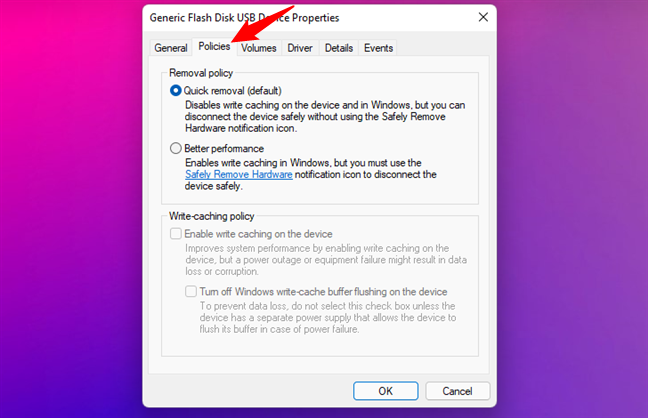
 The Policies tab from the Properties window
On the Policies tab, you’ll see two removal policies listed: “Quick removal (default)” and “Better performance.” The “Quick removal (default)” policy should be the one selected.
The Policies tab from the Properties window
On the Policies tab, you’ll see two removal policies listed: “Quick removal (default)” and “Better performance.” The “Quick removal (default)” policy should be the one selected.
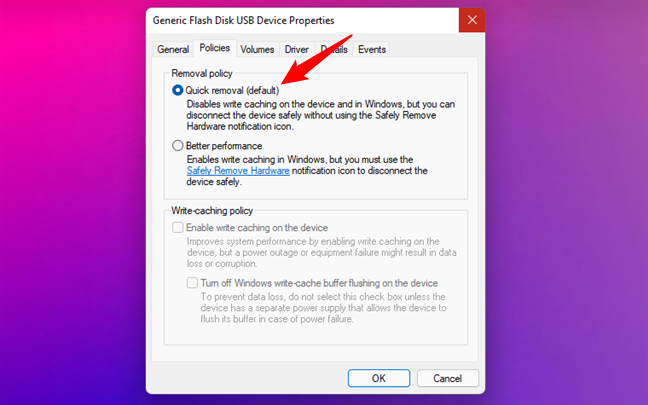
 Quick removal is the default policy for USB drives
If the “Quick removal” policy is not selected, although it should be by default, you can enable it on your own. On the other hand, if you prefer the “Better performance” policy, make sure that you always use the “Safely Remove Hardware” option when you unplug your USB drive from your computer.
NOTE: If you prefer, instead of Disk Management, you can also use the Device Manager to see and change the removal policy for USB drives. Open the Device Manager, expand the list of Disk drives, and double-click on the USB drive you’re interested in. Then, the Properties window for that drive opens, and in it, you’ll find the same Policies tab we’ve talked about in this chapter.
Quick removal is the default policy for USB drives
If the “Quick removal” policy is not selected, although it should be by default, you can enable it on your own. On the other hand, if you prefer the “Better performance” policy, make sure that you always use the “Safely Remove Hardware” option when you unplug your USB drive from your computer.
NOTE: If you prefer, instead of Disk Management, you can also use the Device Manager to see and change the removal policy for USB drives. Open the Device Manager, expand the list of Disk drives, and double-click on the USB drive you’re interested in. Then, the Properties window for that drive opens, and in it, you’ll find the same Policies tab we’ve talked about in this chapter.
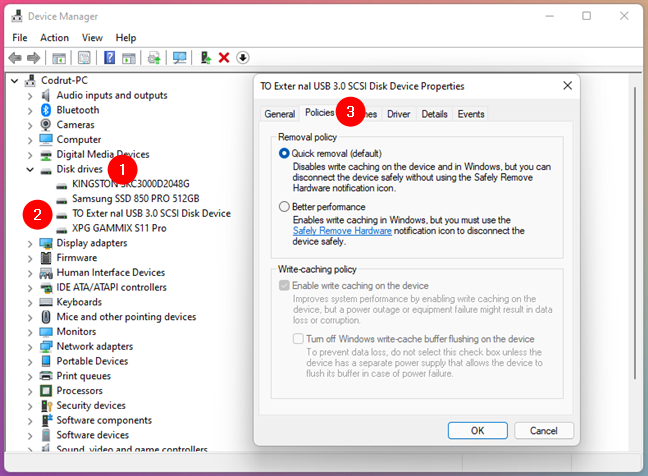
 Accessing a USB drive's Policies from Device Manager
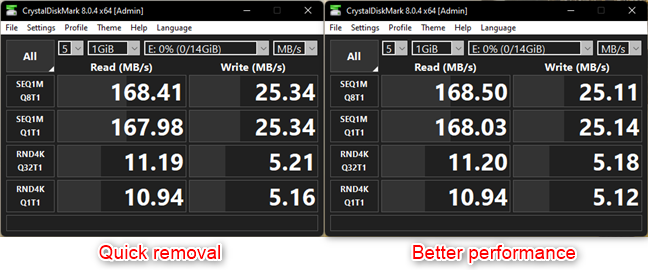
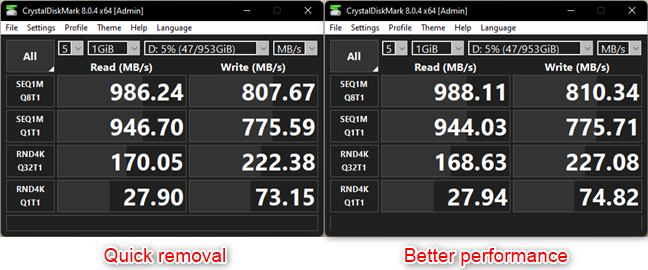
 Benchmarking a USB memory stick: Quick removal vs. Better performance
Here’s what speeds we measured for the 1TB Western Digital My Passport 0748 external hard-disk drive:
Benchmarking a USB memory stick: Quick removal vs. Better performance
Here’s what speeds we measured for the 1TB Western Digital My Passport 0748 external hard-disk drive:
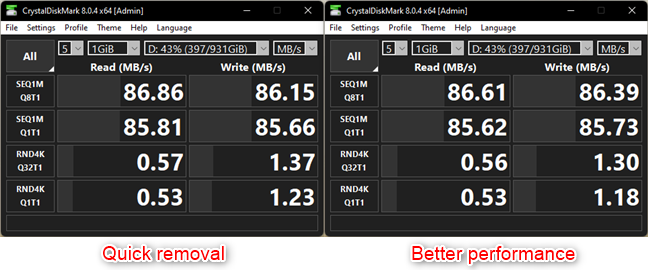 Benchmarking a USB HDD: Quick removal vs. Better performance
And last but not least, here are the measured data transfer speeds for the 2TB Kingston XS2000 portable SSD (note that this drive supports USB 3.2 Gen 2x2, and its speed was limited by the USB 3.2 Gen 2x1 Type-C port on our laptop):
Benchmarking a USB HDD: Quick removal vs. Better performance
And last but not least, here are the measured data transfer speeds for the 2TB Kingston XS2000 portable SSD (note that this drive supports USB 3.2 Gen 2x2, and its speed was limited by the USB 3.2 Gen 2x1 Type-C port on our laptop):
Benchmarking a USB SSD: Quick removal vs. Better performance
Did you see any changes in transfer speeds? Neither did we. This means that there is no meaningful and noticeable performance impact when using either policy - Quick removal or Better performance - on external USB devices such as memory sticks, external hard-disk drives, or portable solid-state drives.
Why you don’t need to safely remove USB drives in Windows
In older Microsoft operating systems, such as Windows 7 or Windows 8.1, you had to use the “Safely Remove Hardware” feature. Although you could simply ignore it, reconnecting an unsafely removed USB drive might have alerted you that the files stored on it had a problem. Sometimes, there was nothing actually wrong with the files on that drive, and you could use them without issues. However, in other cases, some of the files on the USB drive were indeed corrupt. That no longer holds true today. In Windows 10 and Windows 11, you can simply unplug any USB drive, regardless of whether it’s a USB memory stick, a portable hard-disk drive, or a solid-state drive, without having to use the “Safely Remove Hardware” notification icon. But why?- Quick removal disables Windows’ ability to cache write operations on the drive - while performance can slightly deteriorate, the drive is safe to remove at any time (without having to use the “Safely Remove Hardware” option)
- Better performance allows Windows to cache write operations on the USB drive, improving its performance, but you need to use the “Safely Remove Hardware” option
How to check if the USB safe removal policy is enabled in Windows
In case you’re wondering and want to be sure that the “safely remove” option is turned on, here’s how to check its status for any USB drive in Windows 10 and Windows 11: First, open the Disk Management tool. The WinX menu offers a quick way to do that in both operating systems. Press Win + X on your keyboard, or right-click (press and hold) on the Windows button from your taskbar. Then, select Disk Management from the list of options.How to safely remove USB drives from Windows
You know now what “Safely Remove Hardware and Eject Media” means and why you don’t need to use these options in neither Windows 10 nor Windows 11. Do you still want to use them? Then, you should read this guide we wrote, explaining 5 ways to eject an external hard drive or USB from Windows. What if the “Safely Remove Hardware and Eject Media” icon is missing or not working? It might be just a simple case of a “hidden Safely Remove Hardware icon.” In that case, we have another tutorial for you that might help you out: The Windows system tray - How to show or hide icons.Addendum: The impact of “Quick removal” vs. “Better performance” on the speed of USB drives
In theory, not using write caching in Windows for external USB devices should impact their performance. We wanted to test this hypothesis, so we did a little experiment. Using CrystalDiskMark, we tested the real-world speeds of three USB drives with the “remove safely” policy enabled and disabled. For this experiment, the drives we chose were: a 16GB Kingston DataTraveler Locker+ G3, a 1TB Western Digital My Passport 0748 external hard-disk drive, and an ultra-fast 2TB Kingston XS2000 portable SSD. We ran all the tests on an ASUS ROG Strix G17 G713 laptop with Windows 11 installed, trying to find the differences between the two policies. Here are the results we got with the 16GB USB 3.0 Kingston DataTraveler Locker+ G3:
Discussion (10)
If you have damaged files, using the “Scan and fix option” will not “solve your problems”. Think of AutoChk and ChkDsk as like a bouncer in a nighclub; not there to render first aid to patrons (recover damaged files), but maintain order (maintain the integrity of the file system).
So if a patron in a club causes a disturbance by collapsing and having a seizure, a paramedic would render first aid – but a bouncer woulkd chuck the patron out of the club.
ChkDsk and AutoChk work on a “kill, bury, deny” principle; they fix the file system by chopping up or throwing away damaged files, and hiding what they’ve done (try “Show Details” after a flash drive is “fixed”; good luck identifying what files were “fixed” in an irreverable, destructive manner).
This has the effect of “throwing the needles back in the haystack”; now the file system is “fixed”, you can no longer identify what files were damaged by doing an eyeballs-on ChkDsk.
As far as I’m concerned, I still want to see that “Safe To Remove” icon at all times (reminds me I have external storage plugged in), so I can still explicitly tell Windows to flush pending contents to storage, wait for the notification that this has been done, then remove the device.
A Very Informative article – and I am now seriously looking at taking steps so I don’t have to use the SRHNI. But another concern of mine is when I try to disconnect a device, the system indicates I cannot remove it at this time. In too many instances, I leave it connected until I shut down the machine (and this sometimes necessitates shutting down and restarting the machine). I do this as I have seen devices corrupted – so I use caution rather than be sorry.
I have discovered a way to remove that icon, which involves the following steps:
1. Download Dud (https://www3.telus.net/_/dud/) and Replacer (https://www3.telus.net/_/replacer/).
2. Rename dud.exe to stobject.dll.
3. Give Ownership of the stobject.dll in WindowsSystem32 to Administrators and give Full Permission to it.
4. Run Replacer to replace the original stobject.dll with the renamed dud.exe.
5. Restart the PC.
This post is dangerously misleading for less technical users. As a computer support person at my organization, and as an amateur developer who has programmed a variety of apps for over 30 years, here is what results when people think it’s safe to simply remove a USB device without going through the “Safely Remove Hardware” hassle:
Sally has to pick up her daughter at day-care and to do so, she absolutely must catch the 5:05 bus. But she’s also got a report that’s due to her boss by COB and she’s been working on it for days, at work and at home, carrying it back and forth on her USB stick. Oops, she notices it’s 4:59! Quit Word and grab that USB stick, so she can at least put the finishing touches on that report tonight and email it to her boss.
That evening, IT support personnel receive panicked emails, phone calls, and texts! “My document is corrupted!!! My only copy is on this USB stick and Word tells me it can’t open the file!!!!”
To make a long story shorter, Sally was told by a well-meaning but inexperienced tech that she “doesn’t need to bother with Safely Remove Hardware! I read an article about how you can disable that feature. Here, I’ll turn it on for you.”
The problem is, end users do not, and have no reason to, understand how software works. The fact that the main Word window was no longer visible did NOT mean that Word was finished with combining the various temp files it creates into a final copy of the file and cleaning up it’s debris. In fact, one can almost guarantee that there will be a second or two or more (especially for large complex docuemnts) delay as the antivirus app scans the final version of the file being written to disk.
By telling non-technical people they can simply grab a USB stick and go, without them understanding how files are written to the devices, can and invariably does lead to data corruption, tears, and hurt feelings on both the part of the end user and the IT support personnel.
Articles like this, though well-intended, provide an unnecessary speed bump of a few seconds that WILL lead to pain and suffering in the future.
In the article we do state the following:
Now write caching is disabled for the selected USB drive (memory stick or external hard disk). This means that, once you are done working with it, you can unplug it directly. You won’t have any problems.
However, if you unplug the drive in the middle of writing some files to it, you will most probably encounter the “scan and fix” prompt shown at the beginning of this article.
Using a throughput test is one part of the story,
Copy a bunch of small files in one operation to a USB device in both modes and notice the 10-fold time increase from cached to non-cached, in non-cached mode the changes to the folder are written multiple times for each file that is copied, also the bitmaps of the used blocks on the device is written over and over again.
I thought it didn’t really matter unless the flash drive were formatted in NTFS. Try the same study to a FAT32 formatted drive and a NTFS formatted drive. Significant difference may be noted when comparing better performance with two differently formatted drives.
Yes, Drives based on flash chips, ie “thumb drives”, opposed to magnetic spinning HD’s with a USB connector, do have a fixed number of writes. How many depends on “quality” of the flash card. Say:
https://www.zdnet.com/blog/storage/usb-drive-life-fact-or-fiction/849
https://en.wikipedia.org/wiki/Flash_memory
Caching does both, speed up writes and minimize them to extend life.
OK, that is really nice to know. Now the question is, what will turning off caching do to the overall life of out USB devices? That is the whole point of doing caching, minimzing wear on chips that have limited life.
I don’t think caching has anything to do with the overall life of the device. It is about improving the write performance, nothing else. At least to my knowledge.