After you work for a while with the Command Prompt or PowerShell, you are likely to end up customizing the way they look. After all, by default, their looks and colors look quite dull for many. You might change the font, its size, the color of the background, and other things. What do you do if you want to reset PowerShell to its default settings and colors? Can you reset Command Prompt's (cmd) colors and settings? Unfortunately, there's no "Restore console default" button available anywhere! Fortunately, as always, there is something you can do. Read this guide to learn how to reset PowerShell or the Command Prompt to its default settings:
NOTE: Before following any of the methods from this guide, you should create a System Restore point. That assures you that you can revert your system to its current settings if you don't like the result.
How to reset PowerShell to its default color settings
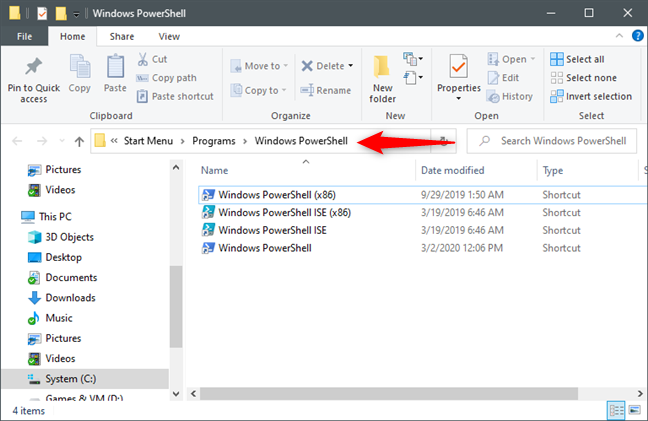
PowerShell's colors and overall console looks are stored in its shortcut file instead of a separate file or registry key. In other words, to reset PowerShell to its default color settings, you need to reset PowerShell's shortcut from the Start Menu. Start by opening File Explorer and use it to navigate to this location: "C:\Users\User\AppData\Roaming\Microsoft\Windows\Start Menu\Programs\Windows PowerShell," where User is the name of your Windows 10 user account.
PowerShell's color and layout settings are saved in its shortcuts
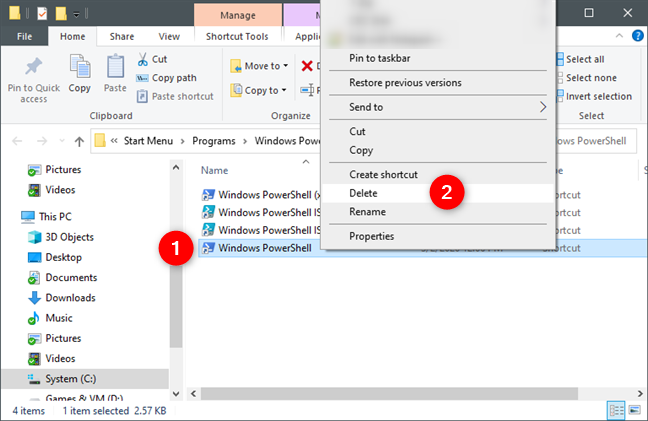
In the Windows PowerShell folder, delete the "Windows PowerShell" and/or "Windows PowerShell (x86)" shortcuts, depending on which one you want to reset.
Deleting the PowerShell shortcuts
Now you must recreate the PowerShell shortcuts. It would seem obvious that you could simply create the PowerShell shortcuts and point them at the executable files of PowerShell. However, if you do that, PowerShell doesn't revert its color scheme to its default state.
You have two options that you can choose from right now. You can either create a new user account on your Windows 10 PC and copy the PowerShell shortcuts from its "C:\Users\User\AppData\Roaming\Microsoft\Windows\Start Menu\Programs\Windows PowerShell" folder, or download the default PowerShell shortcuts from us. Read on to see both ways:
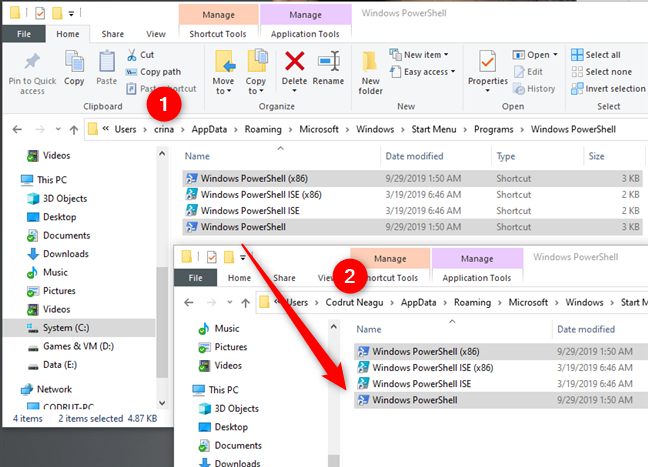
If you choose to create a new user account on your PC, after you've created it, use File Explorer to navigate to "C:\Users\New User\AppData\Roaming\Microsoft\Windows\Start Menu\Programs\Windows PowerShell," where New User is that user's account folder. Then, copy PowerShell shortcuts from there, and paste them in your "C:\Users\User\AppData\Roaming\Microsoft\Windows\Start Menu\Programs\Windows PowerShell" folder.
Copying the default PowerShell shortcuts from a new user account to yours
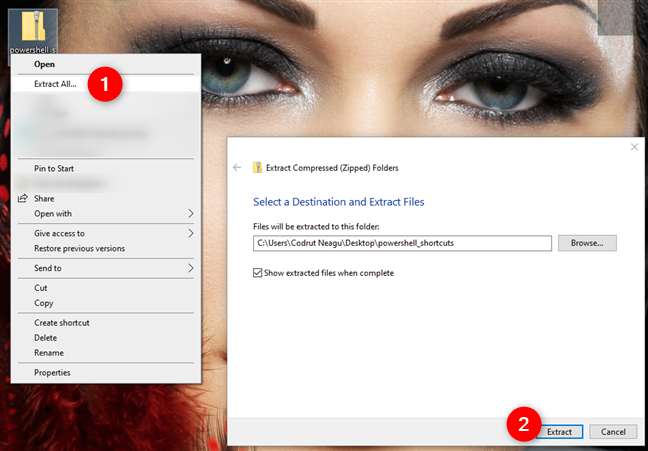
If you prefer not to create a new user account on your Windows 10 PC, you can download the original PowerShell shortcuts directly from us, using this link. We packed the PowerShell shortcuts in a zip file. Once you download it and save it somewhere on your PC, unzip it.
Downloading and extracting the default PowerShell shortcuts, from Digital Citizen
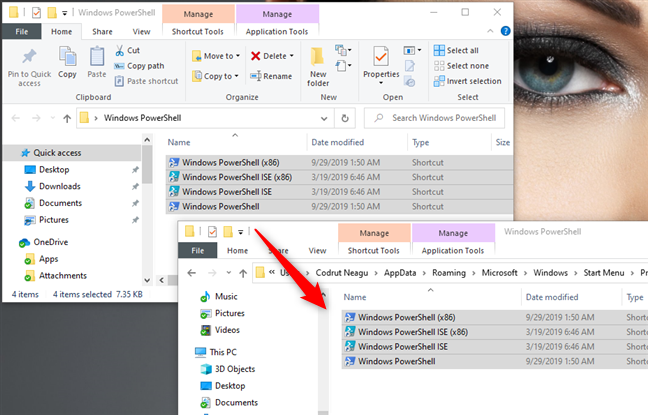
You then get a folder called Windows PowerShell that contains all the original PowerShell shortcuts from Windows 10, including the PowerShell ISE shortcuts. Copy the ones you want to reset to their default color settings, and paste them in your "C:\Users\User\AppData\Roaming\Microsoft\Windows\Start Menu\Programs\Windows PowerShell" folder.
Copying the downloaded PowerShell shortcuts to your user account folder
Download:PowerShell Shortcuts
That's it! Regardless of how you chose to restore your PowerShell shortcuts, when you open PowerShell, it should have its colors and layout reset to the defaults.
How to reset Command Prompt to its default settings, using our registry file
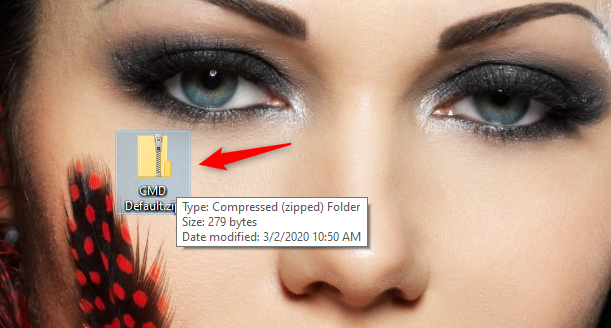
This method for resetting Command Prompt (cmd) to its default color settings is the one you should follow if you don't want to get your hands dirty. Start by downloading and saving our CMD Default.zip file somewhere on your Windows 10 PC. Any location is OK, including your Desktop. Note that you can also find a link to it at the end of this section.
Download the CMD Default file
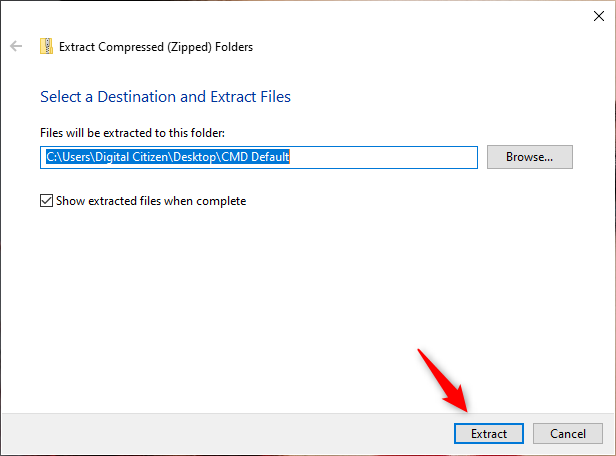
Once you've downloaded it, extract the contents of the CMD Default.zip file.
Extracting the CMD Default file
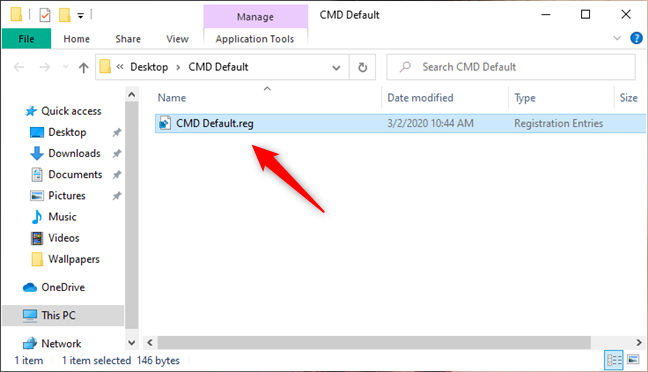
After you extract the archive, you get a Windows Registry file called CMD Default.reg. Double-click or double-tap on it to run it.
The CMD Default.reg file
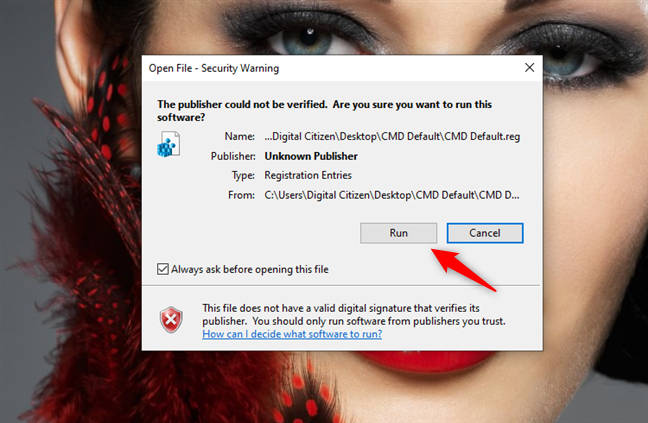
Windows 10 might warn you that our registry file is not recognized as coming from a trusted publisher. That's because it was made by us, and there are not that many people who download and use it worldwide. Trust us that it is safe and doesn't do any harm to your computer or device. Click or tap on Run to continue.
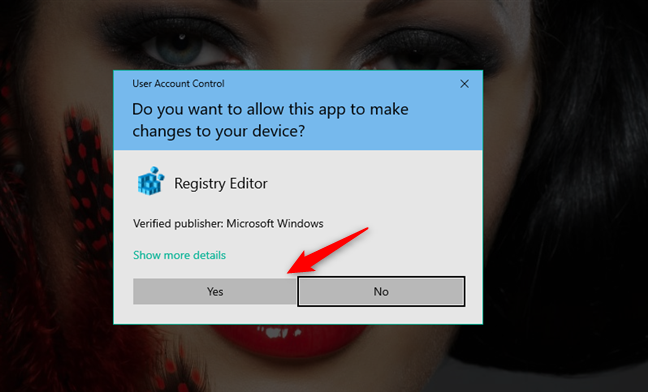
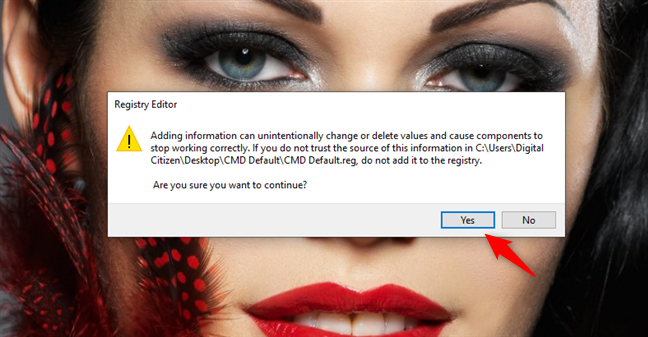
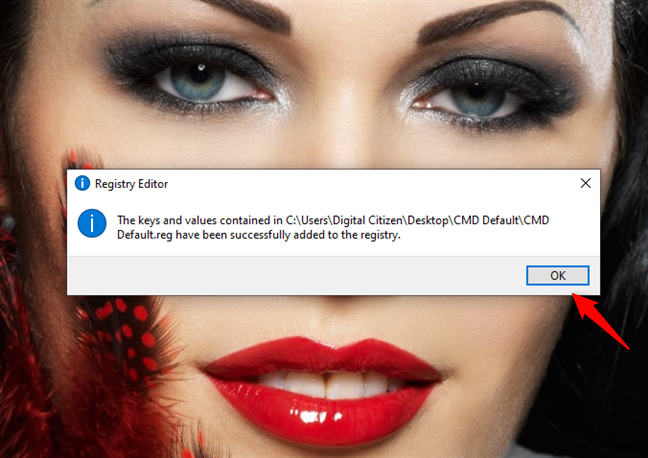
Then, you are asked whether you are sure you want to continue. Click or tap on Yes, and a few changes are made to the Windows Registry. They are explained, in detail, in the next section of this article.
Registry Editor asks you if you want to add the new information to the Registry
The Registry Editor confirms that the changes were performed successfully. Click or tap OK.
The Registry has been updated, and CMD was reset to its default settings
How to reset Command Prompt to its default settings, by manually editing the Windows Registry
This method for resetting Command Prompt (cmd) to its default settings and colors involves a bit more knowledge on your part. If you consider yourself a power user, then go ahead. If not, it is safer to stick to the previous method.
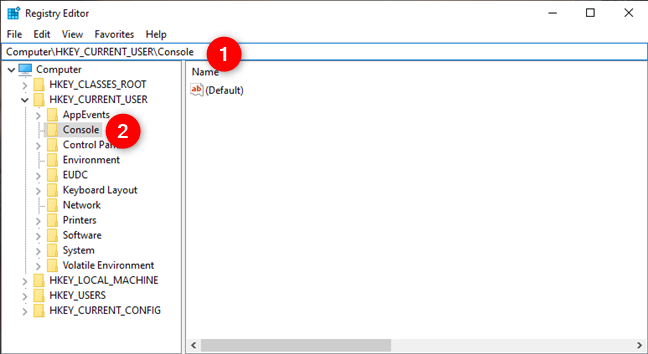
Open the Registry Editor and navigate to this location: "Computer > HKEY_CURRENT_USER > Console."
Opening Registry Editor and going to Computer > HKEY_CURRENT_USER > Console
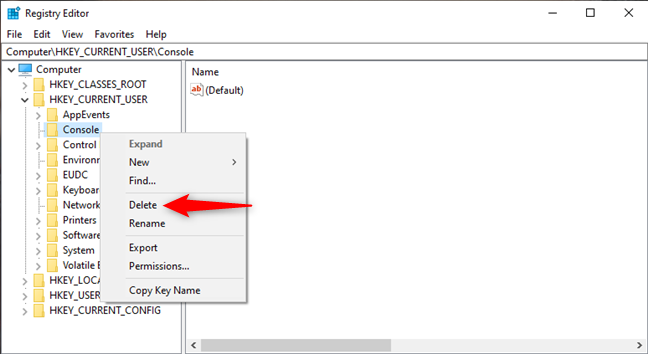
This is where Command Prompt keeps the settings that control what its window looks like and what colors it uses. If you want Windows 10 to reset CMD's colors to their defaults, you need to delete the Console key from the Windows Registry. Right-click or tap and hold on Console and select Delete from the contextual menu.
Deleting the Console key from the Windows Registry
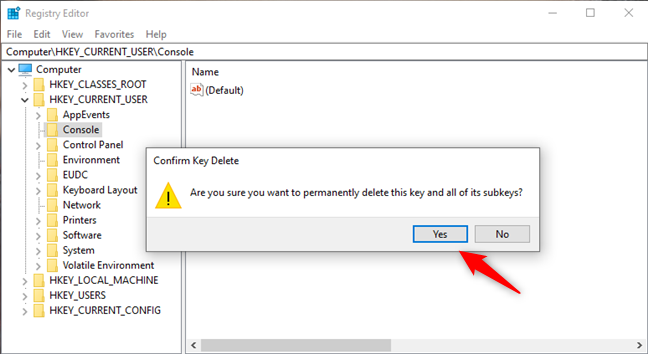
Confirm that you want to delete this key and all its subkeys.
Deleting the Console key from the Windows Registry resets CMD to its default colors
Close the Registry Editor, and you are done: the next time you open the Command Prompt on your Windows 10 PC, it should have its default look.
Did you manage to reset PowerShell and Command Prompt to their default settings?
Now you know how to reset both Command Prompt and PowerShell to their default settings. There's one thing to keep in mind, though: they are reset only for your user account. The visual settings of these tools are stored on a "per user" basis. If you want to reset their windows for other user accounts, you need to go through the same procedures again, while logged on with those user accounts. If you have any questions or something to add to our guide, do not hesitate to comment in the section below.
I’ve just been messing about with this the whole evening. Your tip is very useful and I thought I might just add some things I discovered for your readers if it’s OK?
When the registry key you mentioned is deleted then Windows console defaults to sixteen basic colors. They are:
0 = Black 8 = Gray
1 = Blue 9 = Light Blue
2 = Green A = Light Green
3 = Aqua B = Light Aqua
4 = Red C = Light Red
5 = Purple D = Light Purple
6 = Yellow E = Light Yellow
7 = White F = Bright White
With no registry key you’ll be able to write ‘Color 1b’ in a console window and see a light aqua text on a blue background. All this can change if you start messing around with the registry. Let’s say you’ve got a shortcut on your desktop to the Cmd.exe executable, and you haven’t altered any of its properties. Clicking this link will give you a standard console window – probably too tiny to read properly if you’re over forty and have a reasonably high resolution screen setting – and in standard white or gray text on a black background. By creating and merging the following .reg file:
. . . your desktop link will now give you a bigger window with clear readable cyan or aqua coloured text on a dark blue background. Write color 1b again and this time you’ll get yellow text on a reddish brown background.
When the [HKEY_CURRENT_USERConsole] key exists then clicking directly on the executable cmd.exe in the %systemroot% folder or opening the Run box (StartButton|Run or in Windows 10 rightclick StartButton|Run) and writing cmd.exe will always give a window with these defaults UNLESS there is a subkey in the registry called [HKEY_CURRENT_USERConsole%SystemRoot%_system32_cmd.exe] in which case the values under this key will be the default. But the values under [HKEY_CURRENT_USERConsole] will remain the defaults for all created shortcuts to cmd.exe. However for each shortcut the default can be overridden by rightclicking the shortcut icon and choosing Properties OR by opening the console from the shortcut and then selecting Properties from the menu line. These values are not saved in the registry but (presumably) in the metadata of the linkfile. So restoring these properties to Windows original defaults cannot be done by the registry but only by manually changing values in the properties window.


Discussion (4)
Thanks for this! I was searching for this answer for a long time.
this helped so much thx!!!!!!!!
Ah! Sorry! the value for “ColorTable01 in the reg file should have been 81146 thus:
Windows Registry Editor Version 5.00
[HKEY_CURRENT_USERConsole]
“ScreenBufferSize”=dword:00a50054
“WindowSize”=dword:001c0054
“FontSize”=dword:00180000
“FontFamily”=dword:00000036
“FontWeight”=dword:00000190
“FaceName”=”Lucida Console”
“WindowPosition”=dword:0087005a
“ColorTable00″=dword:5a0000
“ColorTable01″=dword:81146
“ColorTable11″=dword:ffff
“ColorTable12″=dword:00ffff00
“ScreenColors”=dword:0000000c
I’ve just been messing about with this the whole evening. Your tip is very useful and I thought I might just add some things I discovered for your readers if it’s OK?
When the registry key you mentioned is deleted then Windows console defaults to sixteen basic colors. They are:
0 = Black 8 = Gray
1 = Blue 9 = Light Blue
2 = Green A = Light Green
3 = Aqua B = Light Aqua
4 = Red C = Light Red
5 = Purple D = Light Purple
6 = Yellow E = Light Yellow
7 = White F = Bright White
With no registry key you’ll be able to write ‘Color 1b’ in a console window and see a light aqua text on a blue background. All this can change if you start messing around with the registry. Let’s say you’ve got a shortcut on your desktop to the Cmd.exe executable, and you haven’t altered any of its properties. Clicking this link will give you a standard console window – probably too tiny to read properly if you’re over forty and have a reasonably high resolution screen setting – and in standard white or gray text on a black background. By creating and merging the following .reg file:
Windows Registry Editor Version 5.00
[HKEY_CURRENT_USERConsole]
“ScreenBufferSize”=dword:00a50054
“WindowSize”=dword:001c0054
“FontSize”=dword:00180000
“FontFamily”=dword:00000036
“FontWeight”=dword:00000190
“FaceName”=”Lucida Console”
“WindowPosition”=dword:0087005a
“ColorTable00″=dword:5a0000
“ColorTable01″=dword:b90000
“ColorTable11″=dword:ffff
“ColorTable12″=dword:00ffff00
“ScreenColors”=dword:0000000c
. . . your desktop link will now give you a bigger window with clear readable cyan or aqua coloured text on a dark blue background. Write color 1b again and this time you’ll get yellow text on a reddish brown background.
When the [HKEY_CURRENT_USERConsole] key exists then clicking directly on the executable cmd.exe in the %systemroot% folder or opening the Run box (StartButton|Run or in Windows 10 rightclick StartButton|Run) and writing cmd.exe will always give a window with these defaults UNLESS there is a subkey in the registry called [HKEY_CURRENT_USERConsole%SystemRoot%_system32_cmd.exe] in which case the values under this key will be the default. But the values under [HKEY_CURRENT_USERConsole] will remain the defaults for all created shortcuts to cmd.exe. However for each shortcut the default can be overridden by rightclicking the shortcut icon and choosing Properties OR by opening the console from the shortcut and then selecting Properties from the menu line. These values are not saved in the registry but (presumably) in the metadata of the linkfile. So restoring these properties to Windows original defaults cannot be done by the registry but only by manually changing values in the properties window.