One of the many creative options built into Windows is the ability to record and play multimedia files of all kinds. Windows 10 makes it simple to select a default device for audio recording and playback. However, what if you would prefer that another device be used from your devices with similar capabilities? For example, you may have a webcam and a microphone on your computer, and you want the microphone to be the default recording device. Or, you may have both headphones and speakers available, and you want the headphones to be the default audio playback device. Let's take a look at how to change the default audio devices in Windows 10:
What do you want to achieve?
Before we make any changes, it is important to know what we're dealing with. For example, some Windows PCs have a large monitor with built-in speakers (which usually are of poor quality) and also external speakers which are connected to the PC. You may want to use the external speakers instead of the built-in ones for playing audio.
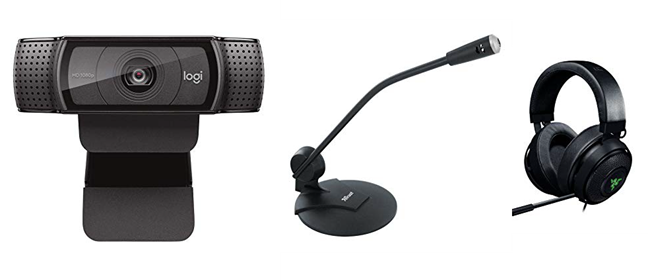
We record audio using microphones, for example, and play them through speakers. We can also record sounds from devices inside the computer, like the optical drive, and play them back through headphones. Many people have more than one audio device attached (like the microphone included in a webcam plus a standalone microphone plus a microphone built into a headset), and it is important to pick a default so that the sound is recorded and played back with the highest fidelity.
Different sound recording devices that we used on PCs
You do not want your voice to sound like you're in an empty hallway because your default is the webcam microphone three feet away from you instead of the microphone in your headset or on your desk.
Therefore, before moving forward with this tutorial, you must be clear on what you want to achieve: which audio devices do you want to use for each task?
How to select the default playback device in Windows 10, using the Sound flyout
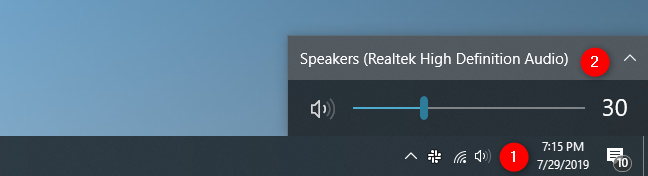
The simplest way to change your playback device in Windows 10 is to select it from the Sound flyout. Click or tap on the sound volume icon from the system tray, and then click/tap on the current playback device.
The Sound flyout from the Windows 10 system tray
The Sound flyout then shows you all the playback audio devices that are available for you to use. All you have to do is to select the one you prefer from the list.
Choosing the default playback device in the Sound flyout
How to select the default playback device in Windows 10, using the Settings app
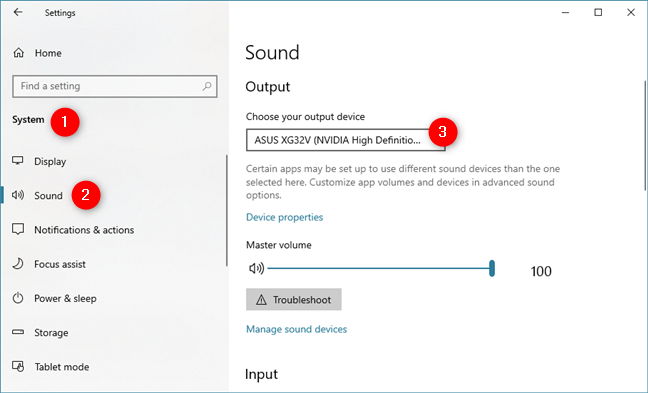
Similarly, you can also choose what audio device you prefer to use for playback, from the Settings app. However, this method involves a few more steps. Start by opening the Settings app: a fast way is to click or tap on its button from the Start Menu.
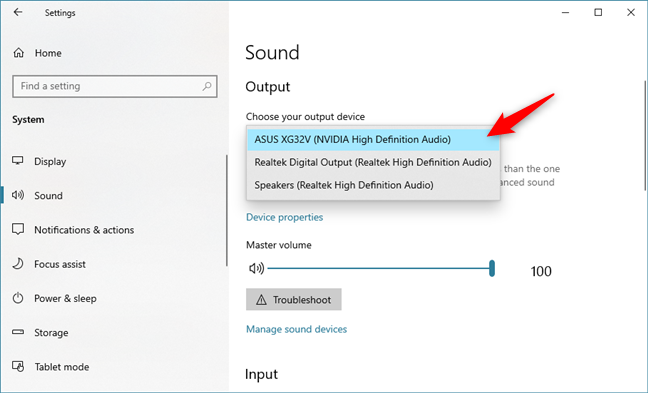
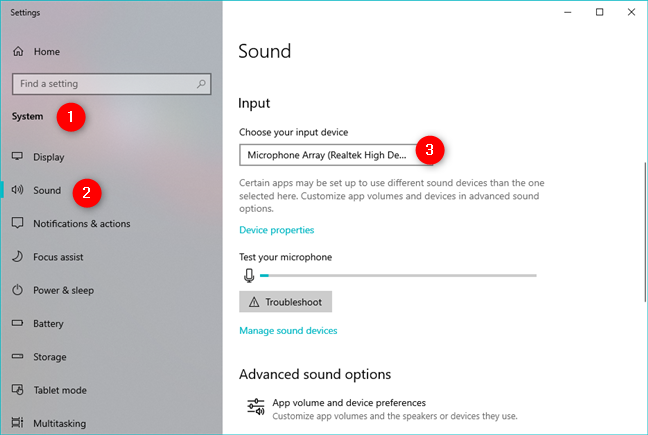
In the Settings app, navigate to System, and then to Sound. On the right side of the window, click or tap on the currently selected playback device under "Choose your output device."
The Choose your output device list from the Settings Sound section
The Settings app should show you a list of all the audio playback devices available on your system. Select the one you prefer.
Choosing the default playback device
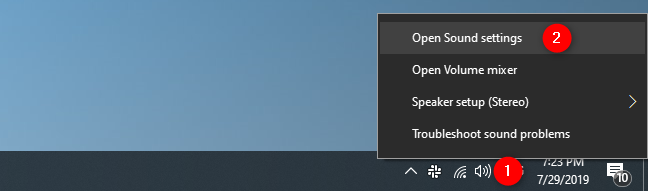
NOTE: There are also slightly faster ways to get to the Sound section from the Settings app. For instance, you can use the search, or you can right-click or press and hold on the sound volume icon from the system tray, and then click or tap on "Open Sound settings."
A faster way to open the Sound settings in Windows 10
How to select the default playback device in Windows 10, using the Sound settings from the Control Panel
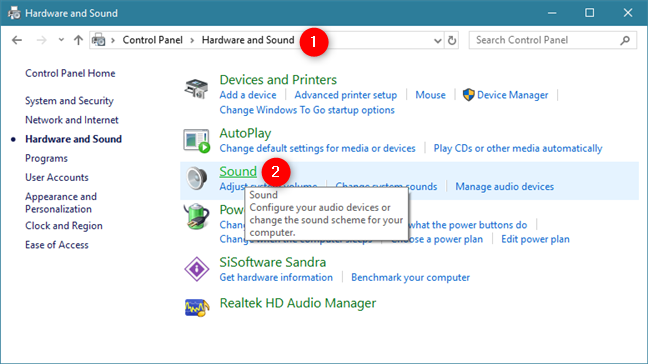
You can also use the classic Sound window to change the default playback device on your Windows 10 system. However, getting to it is a bit more cumbersome than it used to be in the past. Open the Control Panel, navigate to Hardware and Sound, and click or tap on Sound.
The Sound link from the Hardware and Sound section in the Control Panel
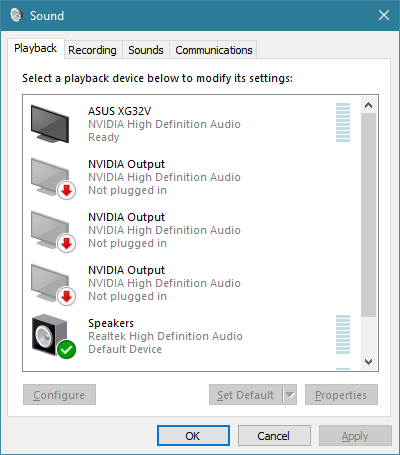
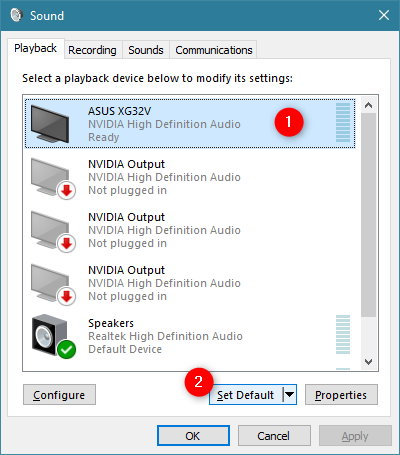
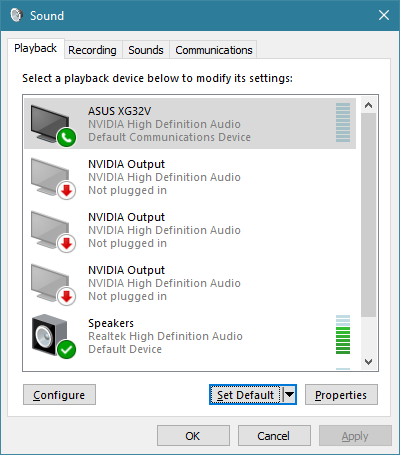
This action opens the Sound window, where you set your default audio devices.
The Sound window from Windows 10
In the Playback tab, you are shown all the playback devices that are available on your Windows computer. Each system is different, and what you see reflects that. You can also see which devices are actually available. Some devices might not be plugged in, so they are greyed out. A green checkmark indicates the current default device.
To choose another audio device as your default playback device, click or tap on it, and then the Set Default button.
Choosing the default playback device in the Sound window
The selected device is now your default playback device in Windows. All playback audio is now routed through that device.
How to select the default recording device in Windows 10, using the Settings app
In the Settings app, navigate to System, and then to Sound. On the right side of the window, click or tap on the currently selected recording device under "Choose your input device."
The Choose your input device list from the Sound section in the Settings app
The Settings app should show you a list of all the input devices available on your system. Just select the one you prefer from the list.
Choose your input device in the Settings app
The choice is immediately applied, as soon as you select the recording device you prefer.
How to select the default recording device in Windows 10, using the Sound settings from the Control Panel
Alternatively, you can also go to the Sound window: "Control Panel -> Hardware and Sound -> Sound."
Click Sound in Hardware and Sound section of the Control Panel
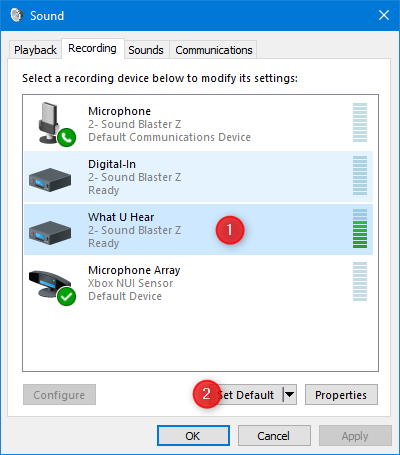
In the Sound window, click or tap the Recording tab. Here you see the devices you have available to record sound. Again, your current default device is indicated by a green checkmark. Choose your preferred device and click or tap Set Default.
Setting the default recording device in the Sound window
TIP: You can see if the sound recording device is working by watching for movement in the bar beside each device when you talk as if you are trying to record sound.
How to set a different communications device in Windows 10
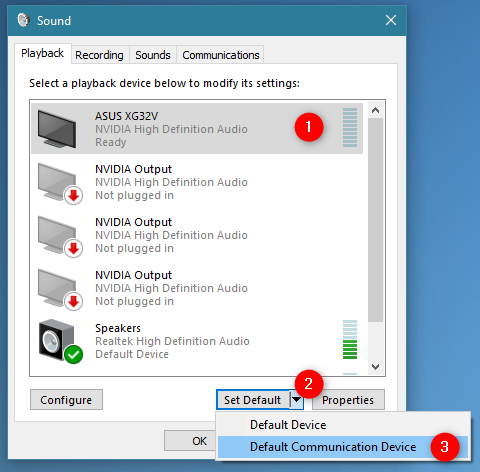
The Sound window also lets you set different default devices for communications. Note that this is the only place in Windows 10 where you can do this change, as it has not yet been added to the Settings app.
For example, you may want to use a headset or the speakers that are built into your monitor for Skype and your external speakers for everything else. To set this, first, select the device you want to use, and then click or tap on the down-arrow on the Set Default button. You can then assign a device to communications (Default Communication Device) or general playback (Default Device).
Setting a default communication device in Windows 10
You can see that the default communication device has a different green icon from the default playback audio device.
The default communication device is marked with a phone icon
When you are done setting your default playback communication devices, click or tap OK or repeat the same process for setting your default input devices for communications.
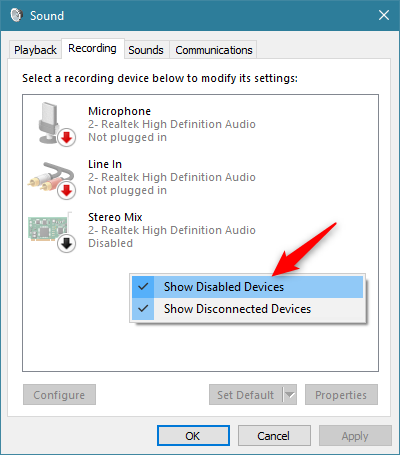
Troubleshooting: Why can't I see my preferred audio device listed?
What if the audio device that you want to use for recording isn't listed? Remember, speech recognition devices are also configured through the Sound window. By default, Windows does not show you devices that are disabled or disconnected or those without their correct drivers installed. If your device is not listed, right-click or press and hold anywhere in the blank space in the Sound window. You can then choose to see the devices that would otherwise be invisible, by clicking or tapping "Show disabled devices."
Show disabled and disconnected devices in the Sound window
The same goes for showing disabled audio playback devices in the Playback tab of the Sound window.
Did you manage to change your default sound devices in Windows 10?
As you can see, setting the default audio devices for playback and recording is a quick and easy process in Windows 10, and you can adjust the settings from multiple places. You can change them anytime you need to, to make the best of Windows 10's recording and playback capabilities. Have you had a good or bad experience with recording or playback defaults? Let's talk about it in the comments section below.
I have done something to my sound that makes all sounds echo. How do I get rid of this?
Janet ·
What do I do when the SET DEFAULT tab (in the SOUND pop-up) is not allowing me to click on it?
Ajit Dhillon ·
Every time I turn off or restart my computer, I have to set the Audio Device as a default, otherwise there is no sound in video. Is it normal ?
Gaius Julius caesar ·
… another solution is to
1) Open any folder with MP3s.
2) Right click on a tune, a menu will come up including ” Open with”
3) Hover the cursor over it and the available sound device icons will apear and at the bottom is an option called: ” select default program”
4) Select it and select your desired player.
Lex ·
I am having a problem because with my computer when I plug in my microphone I can hear through the headphones and it is working but when I go to record with sound recorder the green level bars don’t move and when I go to listen to what I recorded there is no sound at all. I’ve put my microphone as default for everything so I don’t no what the problem is.
Mini ·
hi,
when i try to record udio from another device by giving the this connection
a1 audio out as a2 audio in (mic in)
but giving lot of noise. is there any solution?
Kathy Thompson ·
I purchased my Toshiba laptop 2 weeks ago. At first the video didn’t work and the screen was green. I was told to add the AMD driver. I just plugged in 3 different headphones for the first time and the sound only comes out of the computer. I have checked the Control Panel – Sound and headphones don’t even show as an option. How can I get my computer to play sound from my headphones.
Mike Galton ·
I have 2 audio devices, speakers and headphones, and communications headphones.
2 weeks ago the first device stopped working and for some reason i cant change the communications headphones to default device.
I cant hear any sounds coz of this. What should I Do??
Ty ·
I’ve always had my tone control options at 4 bass and 4 treble. For some reason, every time I start up my computer, it keeps setting my bass levels at -12. Anyone know how I can keep it at 4?
Rachel Friedenberg ·
Is there a way to select multiple sound devices to play at same time…I have wireless headsets for my classroom and bought an extender to plug all three in at the same time, but the computer of course only defaults to one headset. I thought it would default to the extender and that would let the sound come out for all the headsets. Help???
Rexrat ·
I can change my default communication device but not my default device. how can i change the default device?
Janet ·
I just got a m.one USB microphone and am running windows 7 and can’t get it to show . Finally got it to show but the recording is so quiet I can barely hear it
I have speakers set to default and cannot remove that choice. My problem is that now when I plug in my headset it is not picked up. Status says ready but I cannot select it for use. Haven’t been able to change or remove default so that both speakers and headset work as they did before. Please help this confused soul.
umang ·
please help me
i dont have the (playback) speaker option
need help
umang ·
please help me
i dont have the (playback) speaker option
need help
This fourm already dead? The “set default ” is grey for me i cant click it . help
AliQ ·
but on my list of enabled sounds, there is only the Speaker for Playback , and the “Set As Default” button below the screen is inactive (cannot be clicked or grayish in color) when I highlight Microphone or Speaker. I would like to use my speakers as a recording device like in XP. Is it possible? I’ve been searching for the solution to this problem online without help regarding my situation but nothing help ,e and the strange thins when iuse a headset is working but the speaker dont work .
Max Boulton ·
Hi there!
I have been trying to record in Windows 7 Sound Recorder, a track from a CD played on a stereo minicomponent, connected by a cable to the micrphone port of my Satellite L675 laptop. A wav file of 96 kbps is saved. This file, when played in Windows Media Player, or Real Player, gives a strident distorted but recognisable sound. Is the microphone port suitable for such recording? Under Sound/Recording from the Control Panel, only the micrphone is shown, but on checking for disabled devices, I get something called Stereo Mix, which I frankly don’t understand.
Fabio ·
I followed your instructions, but some apps do not seem to follow them…
I mean, I can use my VoIP application with my headset and microphone, that’s good… but why the System Sounds and my default mail application keep using the notebook’s speakers?!
Ok, the notebook’s speakers are set as the default device and my headsets (24/7 plugged-in) are set as the default communication device… I want my headsets to get all the output sounds (that is, I want them to be the default device for everything, so as not to disturb anyone around).
When I try to do that (set my headset as the default device), I select them in the list of playback devices, click the “Set Default” button and nothing happens… The notebook’s speakers continue to be the default device and my headset the default communication device. And that’s it! No way to change that 🙁
How can I change that behaviour?
gohar ·
Thank you for page it has helped the first part.
Where Im stuck is that each time i try to enable my microphone on the recording tab, it turns off the speakers/headphones. the headphone is still listed as enabled, but the bars which show the music sound amplitude beside it are blank and there is no sound at all.
I have spend best part of 6 hrs playing around with different combinations of settings, but none allow me to record from the microphone without it turning off all sound (and also disallowing microphone set up.
I have win 7 on my laptop. USually use internal speakers, but my new microphone is part of a headphone/microphone combination. The headphone part of it works fine by the way (except for when i turn on the recording function from microphone line in)
Coleman Greenberg ·
I got your instruction and followed as best I could, but still no sound. I recently found the invoice for this system, which I bought on-line from NewEgg.com on March 21. Perhaps you can walk me through the set-up.
charles ·
Greetings:
I have read the sound instructions, but I am a bit older and would appreciate it HIGHLY, if someone who has used the logitech wireless headset H760 could send me step by step instructions for using this with skype on windows 7 and windows xp. I have fiddled with the sound settings and one second I can hear and speak through the headset and the next it goes back to the main computer speaker. I even took the computer and laptop with both win 7 and xp into the store and when I did so you can guess it…the coputer and headset worked perfectly, as you can imagine.!!. So can anyone take the time to assist me? Kind Regards Charles
JonesI ·
I have to turn the recording input down to 1 or 2 to prevent distortion when recording vinyl from a Pro-ject Debut III to a HP G62. The manufacturers of the turntable say it’s not right and may be a problem with the registry, but HP are not interested unless I pay them, which having paid a lot for the machine I am not happy to do as it is obviously a problem that has been there since the notebook was made, but I have only just discovered.
Anyone know how I can fix this please?
Ta!
Mac ·
how to Set Default my speaker or headphones when it is grayed out?there were times that my speaker and headphones are good but most of the time are not working.i did update the driver and everything but i always failed. sorry for my English. my unit is HP PRO 3010 microtower pc. I hope you can help me with my problem.
eric ·
This is precisely the problem I’m looking at. All of these tips are useless to me because on the two systems I’ve tried so far, it’s not actually possible to set the default audio output device (because the option is grayed out).
Erowid ·
On the playback tab , i have no speakers… just HDMI sound..any answare?
Chris ·
Hi
I got my laptop last week and and yesterday the sound stopped working. The laptop is a ASUS G53SX: i7-2670QM 2,2 ghz. 8 GB RAM. GTX 560M.
I have tried to update/re-install the drivers without any luck. I have also tried system recovery and still no sound. The latest software that I have installed is Adobe Production premium 5.5 and The Elder Scrolls V: Skyrim.
I have checked the playback settings and the only device showing is Sony-tv 1. I also checked for deactivated and disconnected devices but still only Sony-tv.
Please help
Ciprian Adrian Rusen ·
Then, most probably you have a hardware problem. You should use your warranty to fix this issue and take it back to the company from where you purchased it or the official support provider for ASUS.
TROLOLOL ·
I want to set it up like it was before. Whenever I plug in a new device, like, say my Razer headset, I want to instantly recognize that and switch to the headset. However when I unplug the headset I would like it to go back the desktop speakers. Is there a way to configure this???
Ciprian Adrian Rusen ·
I am not sure I understand the problem you are having.
Your computer has one jack you can use to either plugin your speakers or your headset. As you change the device being connected, Windows gives sound to the one being plugged in.
Some desktop speakers have a jack where you can plugin a headset. If you do that, the speakers are muted and the sound is being given to the headset.
So… what exactly is the problem you are having? Can you explain things better, so that others can understand and help you?
roy ·
on my recording tab win7 the 3 icons all read unplugged so i cannot do anything with it i have even uninstalled the sound driver and rebooted it again but there is no change ps listing to music is fine
Ciprian Adrian Rusen ·
Have you plugged in a microphone in the appropriate jack, on your sound card? If you don’t plug it in the correct slot, you will never be able to record anything and Windows will tell you that recording devices are unplugged.
Maarten ·
hi,
I just bought a new laptop. hp pavillion and when I try to select my iphone ears as default audio device it wont allow me to do that. can som1 please help me?
greets
melissa ·
I’m having trouble getting a pair of Klipsch headphones to show up in the audio devices on my clients computer. Are all versions of windows compatible with Klipsch headphones? I don’t know what else could be wrong. Would you be able to help me? Thanks!
Ciprian Adrian Rusen ·
Are those wireless headphones? Can you share the specific model?
melissa ·
Yes. They are wireless.
Ciprian Adrian Rusen ·
Not sure how things work with Klipsch headphones. You should consult their manual.
Generally, wireless headphones have a wireless signal receiver you need to plugin into your computer. Windows 7 needs to identify it correctly and install drivers for it. Check if you have any Windows 7 drivers in the packaging of your headphones or if Windows 7 detects them correctly.
I understand the tutorial, but it didn’t answer my original question. There are TWO accounts(desktops) on my computer, both with administrative settings. When setting a default sound device, it sets the same device for BOTH ACCOUNTS. I want to know if one account can have one default setting and the other account a different default setting? Right now, each of us has to change the default audio device every time we log on. I use the PC speakers, the other uses wireless headphones. We didn’t have this problem with windows xp. Is there a fix for this that I don’t know about? Any help would be greatly appreciated.
Geras ·
You can access that panel through system tray, which is way more practical then going for through control panel. Despite this, you have written very detailed and good tutorial. Thank you.
Anonymous ·
Yes i understand the Tutorial also, but i see it this way, number one Micro$oft (Bill Gate$) could have made this much better than what came out when Vista and Win 7 were released, and less complicated, although mind you i do know how to configure the sound, also consider the fact of the popping and clicking issues.
I am not sure if they have resolved this because issue, even though i used to dual boot XP and Win 7, i no longer use Win 7, which i have no problem with it, other that the same issues we all have with Micro$oft, At times i sometimes feel short changed, yes Window 7 is a good OS, but i am still in love with my trusty old XP, can’t beat it with a stick. waiting to see what next in Windows 8.
It rotates through the pre-set devices when launched.
you can edit the conf.ini file to your wishes, comments should clearify.
Source code included.
Bas
Anonymous ·
I love you!
Shaun ·
Hi Bas.
Can you make this app run at Windows startup and have it sit in the system tray?
chris ·
i am getting ready to throw my 12 week old blur ray HP pavalion pc out of the window due to sound issues.
i have my pc connected to my AV Amp for surround sound.
the thing is that it did work earlier, but when i switch pc off and then back on the soudn doesnt work and all it says is sound device isnt plugged in.
i called the tech guys earlier and after 40 minutes of them trying to sort it, they suggested totally reinstalling my pc to factory settings.
i did this and when i got it back up and running sound was working. that was until i turned it off again, then the cross apeared again on the speaker icon.
as is said above by someone else, when i go to audio settings and playback devices it says unplugged, but then doesnt allow me to change anything. i carnt click on the configure icon because its greyed out and inactive.
the strange thing is that even though i carnt get sound, the picture seems to get from the pc, through the av amp and to my plasma tv screen perfectly well.
never had so much hassle with a device in all my life. and there was i thinking using a single hdmi cable would make life easier.
intend to call the tech guys tomorrow and insist a guy comes to my house to sort it.
not looking forward to another 40 minute telephone chat tommorow.
Ciprian Adrian Rusen ·
Can you share the exact model of the HP Pavilion computer?
chris ·
its a hp pavalion s5313uk
i have a engineer coming out to see it tomorrow.
Timmy ·
Hey thanks, this works …. i was able to point my sound card to work as a microphone. Thanks again… i found it helpful. I can now record from my speakers, even when i play songs from my Media player….
I understand the tutorial, but on my list of enabled sounds, there is only the Speaker for Playback and Microphone for Recording, and the “Set As Default” button below the screen is inactive (cannot be clicked or grayish in color) when I highlight Microphone or Speaker. I would like to use my speakers as a recording device like in XP. Is it possible? I’ve been searching for the solution to this problem online without help regarding my situation. Please, need some feedback!!!!!
Ciprian ·
I think this is a design “issue”. I cannot set my speakers as a recording device and have not worked with any Windows 7 computers which could do this?
What exactly are you trying to do? What do you want to record using the speakers?
martin ·
am human
Megan ·
My external speakers were working perfectly until this morning. Now, suddenly, I can only listen to music (using the Nokia Ovi app) through the internal speakers. I have followed all the steps suggested, but try as I might, I cannot take the external speakers off Default Communications Device. I have clicked on the “Set default” button until I’m blue in the face, but it will not change the default. I see many others are having this problem, but can’t find a solution anywhere.
Anonymous ·
I’m having that problem too
Dan Benson ·
I have reset my default recording level several times to use my EZVinyl/Tape Converter but when I click “record” the levels jump back to 100. Driving me crazy! Any thoughts? The recorder does work and I have recorded a few tracks but needed to manually set levels (to 3) quickly while running. Later I must use Audacity to edit out the loud (100) between track start-up.


Discussion (56)
I have done something to my sound that makes all sounds echo. How do I get rid of this?
What do I do when the SET DEFAULT tab (in the SOUND pop-up) is not allowing me to click on it?
Every time I turn off or restart my computer, I have to set the Audio Device as a default, otherwise there is no sound in video. Is it normal ?
… another solution is to
1) Open any folder with MP3s.
2) Right click on a tune, a menu will come up including ” Open with”
3) Hover the cursor over it and the available sound device icons will apear and at the bottom is an option called: ” select default program”
4) Select it and select your desired player.
I am having a problem because with my computer when I plug in my microphone I can hear through the headphones and it is working but when I go to record with sound recorder the green level bars don’t move and when I go to listen to what I recorded there is no sound at all. I’ve put my microphone as default for everything so I don’t no what the problem is.
hi,
when i try to record udio from another device by giving the this connection
a1 audio out as a2 audio in (mic in)
but giving lot of noise. is there any solution?
I purchased my Toshiba laptop 2 weeks ago. At first the video didn’t work and the screen was green. I was told to add the AMD driver. I just plugged in 3 different headphones for the first time and the sound only comes out of the computer. I have checked the Control Panel – Sound and headphones don’t even show as an option. How can I get my computer to play sound from my headphones.
I have 2 audio devices, speakers and headphones, and communications headphones.
2 weeks ago the first device stopped working and for some reason i cant change the communications headphones to default device.
I cant hear any sounds coz of this. What should I Do??
I’ve always had my tone control options at 4 bass and 4 treble. For some reason, every time I start up my computer, it keeps setting my bass levels at -12. Anyone know how I can keep it at 4?
Is there a way to select multiple sound devices to play at same time…I have wireless headsets for my classroom and bought an extender to plug all three in at the same time, but the computer of course only defaults to one headset. I thought it would default to the extender and that would let the sound come out for all the headsets. Help???
I can change my default communication device but not my default device. how can i change the default device?
I just got a m.one USB microphone and am running windows 7 and can’t get it to show . Finally got it to show but the recording is so quiet I can barely hear it
Another vote for Fastkeys, I use it all the time.
https://fastkeys.vze.com
I have speakers set to default and cannot remove that choice. My problem is that now when I plug in my headset it is not picked up. Status says ready but I cannot select it for use. Haven’t been able to change or remove default so that both speakers and headset work as they did before. Please help this confused soul.
please help me
i dont have the (playback) speaker option
need help
please help me
i dont have the (playback) speaker option
need help
I would recommend this software I just dicovered on
https://fastkeys.vze.com/
It can easily automate this and similar tasks.
This fourm already dead? The “set default ” is grey for me i cant click it . help
but on my list of enabled sounds, there is only the Speaker for Playback , and the “Set As Default” button below the screen is inactive (cannot be clicked or grayish in color) when I highlight Microphone or Speaker. I would like to use my speakers as a recording device like in XP. Is it possible? I’ve been searching for the solution to this problem online without help regarding my situation but nothing help ,e and the strange thins when iuse a headset is working but the speaker dont work .
Hi there!
I have been trying to record in Windows 7 Sound Recorder, a track from a CD played on a stereo minicomponent, connected by a cable to the micrphone port of my Satellite L675 laptop. A wav file of 96 kbps is saved. This file, when played in Windows Media Player, or Real Player, gives a strident distorted but recognisable sound. Is the microphone port suitable for such recording? Under Sound/Recording from the Control Panel, only the micrphone is shown, but on checking for disabled devices, I get something called Stereo Mix, which I frankly don’t understand.
I followed your instructions, but some apps do not seem to follow them…
I mean, I can use my VoIP application with my headset and microphone, that’s good… but why the System Sounds and my default mail application keep using the notebook’s speakers?!
Ok, the notebook’s speakers are set as the default device and my headsets (24/7 plugged-in) are set as the default communication device… I want my headsets to get all the output sounds (that is, I want them to be the default device for everything, so as not to disturb anyone around).
When I try to do that (set my headset as the default device), I select them in the list of playback devices, click the “Set Default” button and nothing happens… The notebook’s speakers continue to be the default device and my headset the default communication device. And that’s it! No way to change that 🙁
How can I change that behaviour?
Thank you for page it has helped the first part.
Where Im stuck is that each time i try to enable my microphone on the recording tab, it turns off the speakers/headphones. the headphone is still listed as enabled, but the bars which show the music sound amplitude beside it are blank and there is no sound at all.
I have spend best part of 6 hrs playing around with different combinations of settings, but none allow me to record from the microphone without it turning off all sound (and also disallowing microphone set up.
I have win 7 on my laptop. USually use internal speakers, but my new microphone is part of a headphone/microphone combination. The headphone part of it works fine by the way (except for when i turn on the recording function from microphone line in)
I got your instruction and followed as best I could, but still no sound. I recently found the invoice for this system, which I bought on-line from NewEgg.com on March 21. Perhaps you can walk me through the set-up.
Greetings:
I have read the sound instructions, but I am a bit older and would appreciate it HIGHLY, if someone who has used the logitech wireless headset H760 could send me step by step instructions for using this with skype on windows 7 and windows xp. I have fiddled with the sound settings and one second I can hear and speak through the headset and the next it goes back to the main computer speaker. I even took the computer and laptop with both win 7 and xp into the store and when I did so you can guess it…the coputer and headset worked perfectly, as you can imagine.!!. So can anyone take the time to assist me? Kind Regards Charles
I have to turn the recording input down to 1 or 2 to prevent distortion when recording vinyl from a Pro-ject Debut III to a HP G62. The manufacturers of the turntable say it’s not right and may be a problem with the registry, but HP are not interested unless I pay them, which having paid a lot for the machine I am not happy to do as it is obviously a problem that has been there since the notebook was made, but I have only just discovered.
Anyone know how I can fix this please?
Ta!
how to Set Default my speaker or headphones when it is grayed out?there were times that my speaker and headphones are good but most of the time are not working.i did update the driver and everything but i always failed. sorry for my English. my unit is HP PRO 3010 microtower pc. I hope you can help me with my problem.
This is precisely the problem I’m looking at. All of these tips are useless to me because on the two systems I’ve tried so far, it’s not actually possible to set the default audio output device (because the option is grayed out).
On the playback tab , i have no speakers… just HDMI sound..any answare?
Hi
I got my laptop last week and and yesterday the sound stopped working. The laptop is a ASUS G53SX: i7-2670QM 2,2 ghz. 8 GB RAM. GTX 560M.
I have tried to update/re-install the drivers without any luck. I have also tried system recovery and still no sound. The latest software that I have installed is Adobe Production premium 5.5 and The Elder Scrolls V: Skyrim.
I have checked the playback settings and the only device showing is Sony-tv 1. I also checked for deactivated and disconnected devices but still only Sony-tv.
Please help
Then, most probably you have a hardware problem. You should use your warranty to fix this issue and take it back to the company from where you purchased it or the official support provider for ASUS.
I want to set it up like it was before. Whenever I plug in a new device, like, say my Razer headset, I want to instantly recognize that and switch to the headset. However when I unplug the headset I would like it to go back the desktop speakers. Is there a way to configure this???
I am not sure I understand the problem you are having.
Your computer has one jack you can use to either plugin your speakers or your headset. As you change the device being connected, Windows gives sound to the one being plugged in.
Some desktop speakers have a jack where you can plugin a headset. If you do that, the speakers are muted and the sound is being given to the headset.
So… what exactly is the problem you are having? Can you explain things better, so that others can understand and help you?
on my recording tab win7 the 3 icons all read unplugged so i cannot do anything with it i have even uninstalled the sound driver and rebooted it again but there is no change ps listing to music is fine
Have you plugged in a microphone in the appropriate jack, on your sound card? If you don’t plug it in the correct slot, you will never be able to record anything and Windows will tell you that recording devices are unplugged.
hi,
I just bought a new laptop. hp pavillion and when I try to select my iphone ears as default audio device it wont allow me to do that. can som1 please help me?
greets
I’m having trouble getting a pair of Klipsch headphones to show up in the audio devices on my clients computer. Are all versions of windows compatible with Klipsch headphones? I don’t know what else could be wrong. Would you be able to help me? Thanks!
Are those wireless headphones? Can you share the specific model?
Yes. They are wireless.
Not sure how things work with Klipsch headphones. You should consult their manual.
Generally, wireless headphones have a wireless signal receiver you need to plugin into your computer. Windows 7 needs to identify it correctly and install drivers for it. Check if you have any Windows 7 drivers in the packaging of your headphones or if Windows 7 detects them correctly.
If not… check their forums for help.
I understand the tutorial, but it didn’t answer my original question. There are TWO accounts(desktops) on my computer, both with administrative settings. When setting a default sound device, it sets the same device for BOTH ACCOUNTS. I want to know if one account can have one default setting and the other account a different default setting? Right now, each of us has to change the default audio device every time we log on. I use the PC speakers, the other uses wireless headphones. We didn’t have this problem with windows xp. Is there a fix for this that I don’t know about? Any help would be greatly appreciated.
You can access that panel through system tray, which is way more practical then going for through control panel. Despite this, you have written very detailed and good tutorial. Thank you.
Yes i understand the Tutorial also, but i see it this way, number one Micro$oft (Bill Gate$) could have made this much better than what came out when Vista and Win 7 were released, and less complicated, although mind you i do know how to configure the sound, also consider the fact of the popping and clicking issues.
I am not sure if they have resolved this because issue, even though i used to dual boot XP and Win 7, i no longer use Win 7, which i have no problem with it, other that the same issues we all have with Micro$oft, At times i sometimes feel short changed, yes Window 7 is a good OS, but i am still in love with my trusty old XP, can’t beat it with a stick. waiting to see what next in Windows 8.
Toggle Audio 7
I’ve made this app with AutoIT:
https://users.flexxcom.nl/ta7/toggle-audio-7.zip
It rotates through the pre-set devices when launched.
you can edit the conf.ini file to your wishes, comments should clearify.
Source code included.
Bas
I love you!
Hi Bas.
Can you make this app run at Windows startup and have it sit in the system tray?
i am getting ready to throw my 12 week old blur ray HP pavalion pc out of the window due to sound issues.
i have my pc connected to my AV Amp for surround sound.
the thing is that it did work earlier, but when i switch pc off and then back on the soudn doesnt work and all it says is sound device isnt plugged in.
i called the tech guys earlier and after 40 minutes of them trying to sort it, they suggested totally reinstalling my pc to factory settings.
i did this and when i got it back up and running sound was working. that was until i turned it off again, then the cross apeared again on the speaker icon.
as is said above by someone else, when i go to audio settings and playback devices it says unplugged, but then doesnt allow me to change anything. i carnt click on the configure icon because its greyed out and inactive.
the strange thing is that even though i carnt get sound, the picture seems to get from the pc, through the av amp and to my plasma tv screen perfectly well.
never had so much hassle with a device in all my life. and there was i thinking using a single hdmi cable would make life easier.
intend to call the tech guys tomorrow and insist a guy comes to my house to sort it.
not looking forward to another 40 minute telephone chat tommorow.
Can you share the exact model of the HP Pavilion computer?
its a hp pavalion s5313uk
i have a engineer coming out to see it tomorrow.
Hey thanks, this works …. i was able to point my sound card to work as a microphone. Thanks again… i found it helpful. I can now record from my speakers, even when i play songs from my Media player….
I think this software might help
https://hotfile.com/dl/93761638/29be06c/win7audiochanger.rar.html
its also a script made exe file.
I understand the tutorial, but on my list of enabled sounds, there is only the Speaker for Playback and Microphone for Recording, and the “Set As Default” button below the screen is inactive (cannot be clicked or grayish in color) when I highlight Microphone or Speaker. I would like to use my speakers as a recording device like in XP. Is it possible? I’ve been searching for the solution to this problem online without help regarding my situation. Please, need some feedback!!!!!
I think this is a design “issue”. I cannot set my speakers as a recording device and have not worked with any Windows 7 computers which could do this?
What exactly are you trying to do? What do you want to record using the speakers?
am human
My external speakers were working perfectly until this morning. Now, suddenly, I can only listen to music (using the Nokia Ovi app) through the internal speakers. I have followed all the steps suggested, but try as I might, I cannot take the external speakers off Default Communications Device. I have clicked on the “Set default” button until I’m blue in the face, but it will not change the default. I see many others are having this problem, but can’t find a solution anywhere.
I’m having that problem too
I have reset my default recording level several times to use my EZVinyl/Tape Converter but when I click “record” the levels jump back to 100. Driving me crazy! Any thoughts? The recorder does work and I have recorded a few tracks but needed to manually set levels (to 3) quickly while running. Later I must use Audacity to edit out the loud (100) between track start-up.