02.02.2022
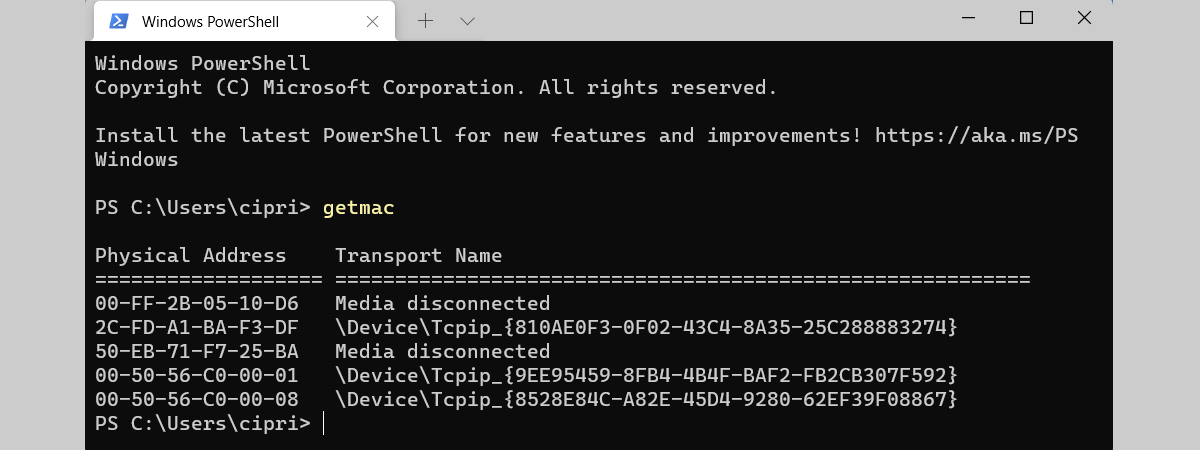
Do you want to know the MAC address of your Windows computer or device? To help you, this article describes seven different methods to get the MAC address of your network adapter. Some of them are quick, like the getmac command. Others, like the one using the Settings app, require a bit more clicking. If you want to know how to find the MAC address of your laptop or desktop PC in Windows 10 and Windows 11, read this guide and find the method that works best for you:
NOTE: The methods we show in this guide work in both Windows 10 and Windows 11. If you do not know what version of Windows you have, read this tutorial: How to tell what Windows I have (11 ways).
1. Find your MAC address using the getmac command in Terminal, PowerShell, or Command Prompt
This is the fastest method we know for finding the MAC addresses of all your network adapters in Windows, including virtual ones that are installed by virtualization software like VirtualBox or VMware. First, open Command Prompt, PowerShell, or Windows Terminal. Then, type in the command getmac and press Enter on your keyboard. The getmac command outputs a list of all your network adapters and their MAC addresses, which you can check in the Physical Address column highlighted below. Unfortunately, it’s relatively difficult to tell which adapter is which, as the command doesn’t display “friendly” names for them.
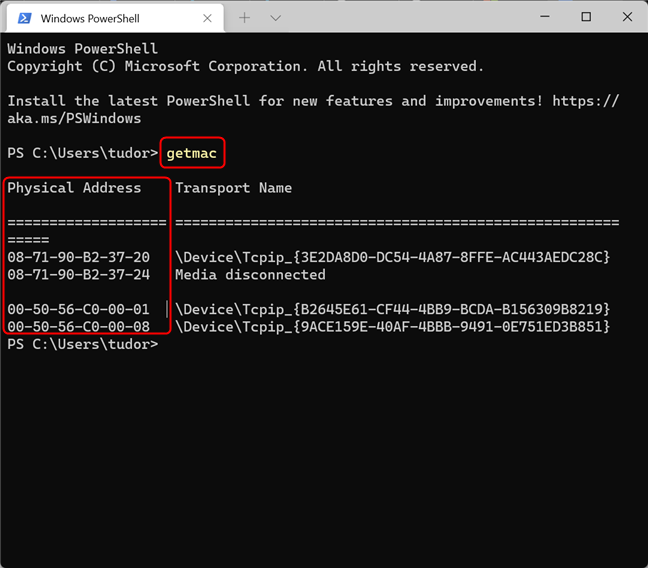
Find the MAC address with the getmac command
Please note that the getmac command can only show the MAC addresses for enabled network adapters. To find the MAC address of a disabled network adapter using getmac, you must first enable that network adapter.
TIP: If you want to know more about MAC addresses, here is an article about what the MAC address is and how it’s used.
2. How to find your MAC address with the “get-netadapter” command in PowerShell
Another quick way to find your MAC address in Windows is to open PowerShell (or a PowerShell tab in Windows Terminal) and type in the command below, followed by Enter.
This command shows the basic properties of every visible network adapter available on your Windows PC. You can see the MAC addresses in the MacAddress column. Please note that, depending on your screen resolution, you might have to resize the text in the PowerShell or Terminal window by pressing Ctrl together with the minus sign (to make it smaller) or the plus sign (to make it larger) in order to be able to read the whole table. If you can’t see the MAC address, simply make the text smaller and run the command again.
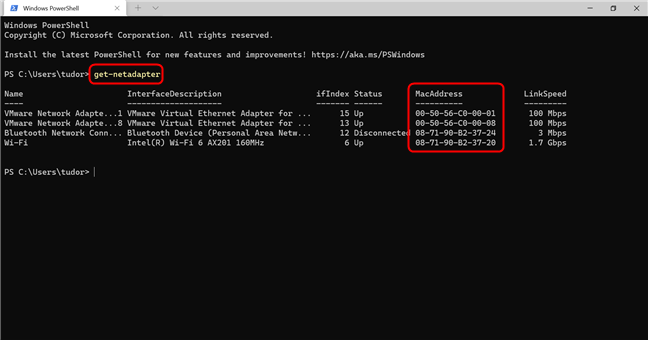
Identify the MAC address with the get-netadapter command in PowerShell
The advantage of the Get-NetAdapter command over the getmac command is that it shows the MAC addresses for all visible network adapters, including disabled ones. For each network adapter, you can view its current status, alongside its MAC address and other properties.
If you only want the name of the adapter and its MAC address, copy and paste the following command in the PowerShell window, then press Enter:
This displays a list that’s much easier to read:
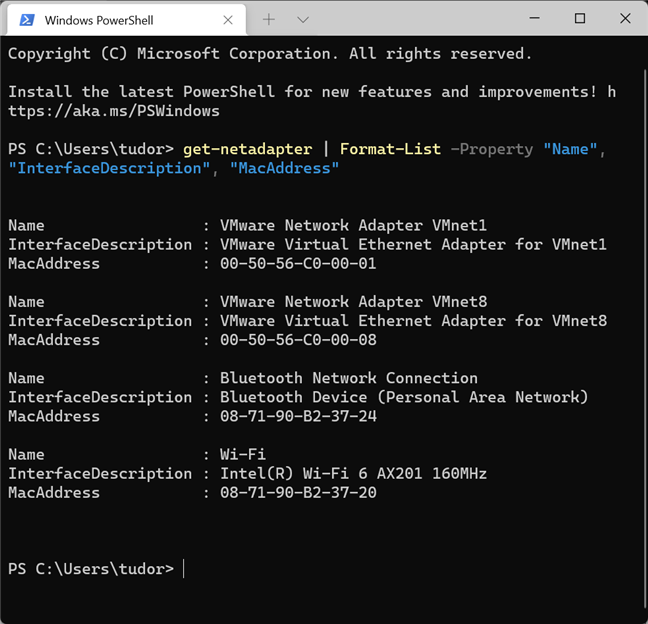
The command takes longer to input, but the result is easier to read
NOTE: The Get-NetAdapter command only works in PowerShell (or in Windows Terminal, if you open a PowerShell tab). It doesn't work in Command Prompt.
3. Get your MAC address by running the ipconfig command in Windows Terminal, PowerShell, or Command Prompt
The ipconfig command is designed to provide detailed information about your network connections and network adapters, both physical and virtual. To run it, first launch Windows Terminal, PowerShell, or Command Prompt. Then, type the following command and press Enter on your keyboard:
The command displays all of the current TCP/IP network connections and detailed technical information about each. To find your network adapter's MAC address, identify the network adapter's name from the Description field and then check the Physical Address field, as illustrated in the screenshot below.
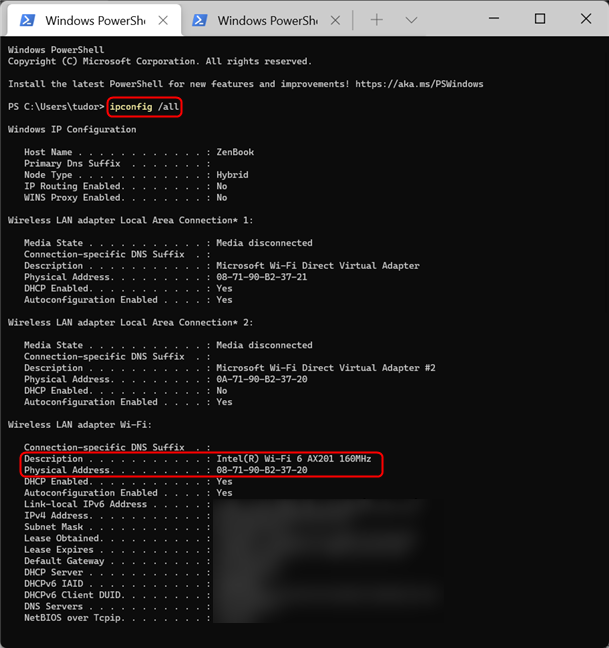
Run ipconfig /all to find your MAC address
As you can see, the ipconfig /all command outputs a lot of information. It can be cumbersome to find your MAC address that way. That's why, next, we show you a way to extract only the MAC address from the flood of details shown by ipconfig. If you want to filter only the MAC addresses of your network adapters, run the following command:
The command looks for and displays only the two lines that are relevant for our search: Physical Address and device Description, for each adapter. The result should look something like this:

Get MAC addresses only, with the command: ipconfig /all | findstr "Description Physical"
4. How to find your MAC address using the “wmic nic get” command in Windows Terminal, PowerShell, and Command Prompt
Another command that you can use in a command-line interface to find the MAC addresses of your physical network adapters is:
Run it in Windows Terminal, PowerShell, or Command Prompt, and it tells you the MAC addresses of all your physical network adapters. This displays, thus far, the most easy-to-read result:
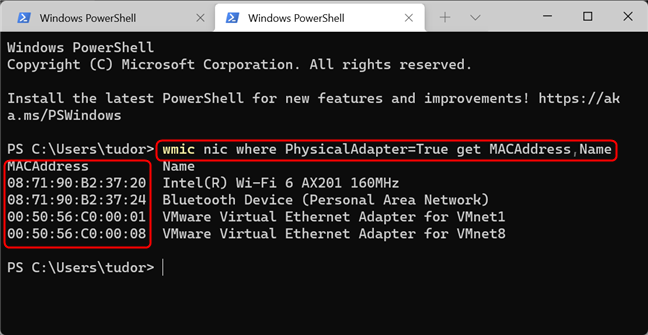
The displayed list is easier to read
5. How to get your MAC address in Windows using the Settings app
Let’s move away from command-line interfaces and describe a few methods of finding your MAC address from Windows itself. If you're using Windows 10 or Windows 11, you can find your MAC address from the Settings app. Since the method is slightly different depending on the Windows version you’re using, we treat the two operating systems separately, starting with Windows 11.
Identify your MAC address using Settings in Windows 11
In Windows 11, open Settings (for example by pressing Windows + I on your keyboard) and then go to Network & Internet. Scroll down to Advanced Network Settings and click on it.
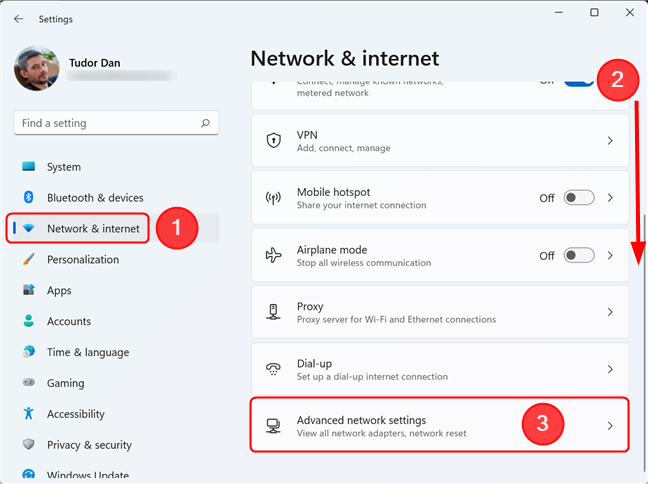
Click or tap on Advanced network settings to view all active network adapters and more
This presents you with a list of all network adapters on your device. Scroll down to Hardware and connection properties and click on it.
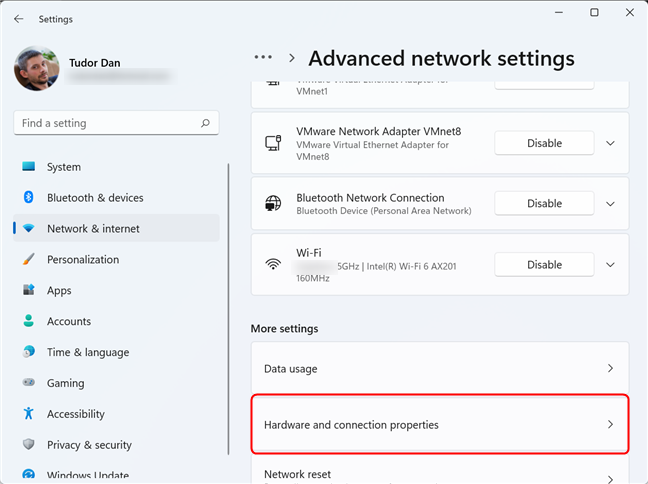
The Hardware and connection properties link displays useful information on all connections and adapters
The list that you now see contains detailed information on every single network adapter installed on your device. Scroll down to the one you’re interested in and check the value of its Physical Address (MAC) field. You can even select the value, then copy and paste it if needed.
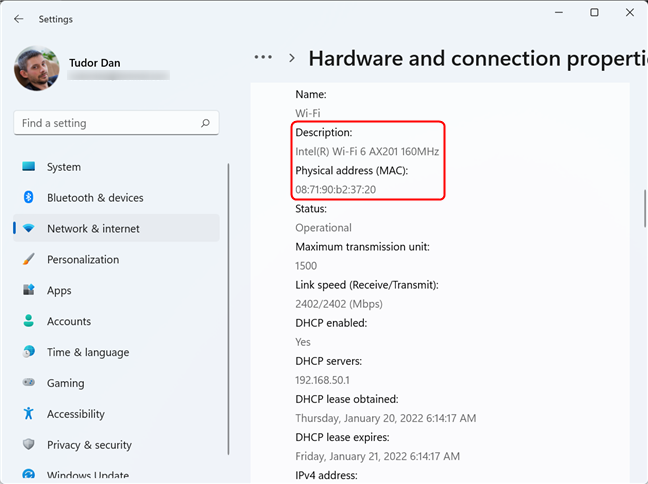
Scroll through the page and identify the adapter, then look for its MAC address
Alternatively, if you don’t want to scroll through the entire list, go back to the Advanced network settings page and click on the adapter you’re interested in, then click on View additional properties.
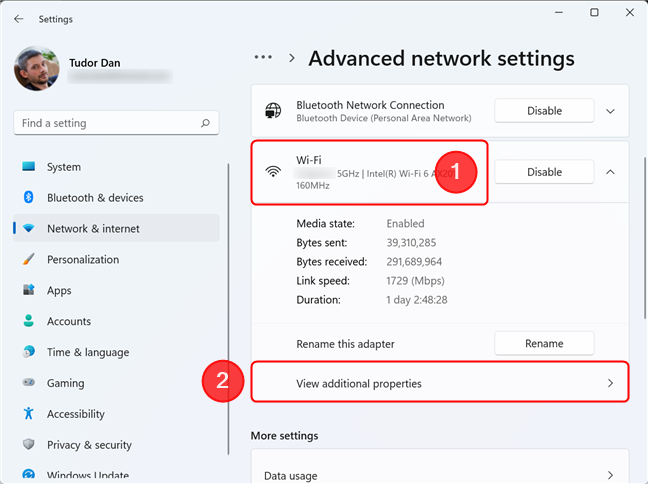
View additional properties for the selected network connection
Here, look for the field named Physical Address (MAC) and check its value.
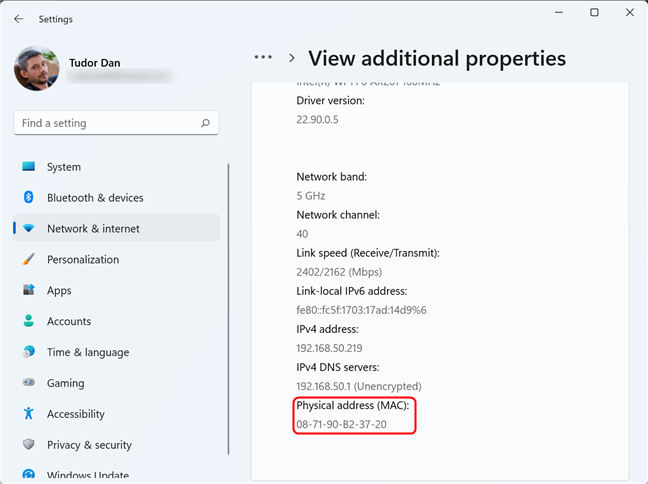
The MAC address should be towards the bottom of the page
Identify your MAC address using Settings in Windows 10
Just like in Windows 11, in Windows 10, you start by opening the Settings app and going to the Network & Internet section.
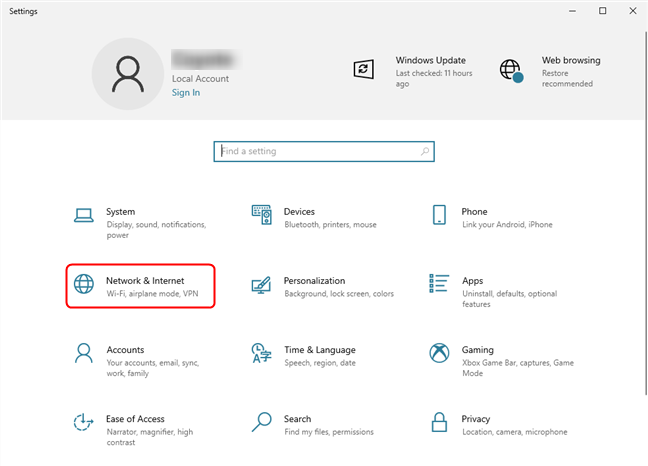
Access Network & Internet section of the Settings app in Windows 10
Now, look for the “View hardware and connection properties” link and click on it.
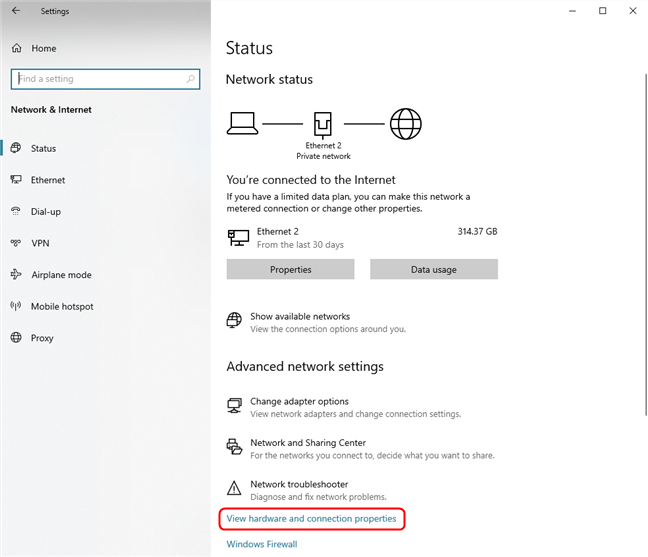
Scroll down and click/tap on the View hardware and connection properties link
This action displays detailed information about every network adapter found in the system. Locate the adapter you are interested in by looking at the Description field value, then check its Physical Address (MAC) field for the information you need.
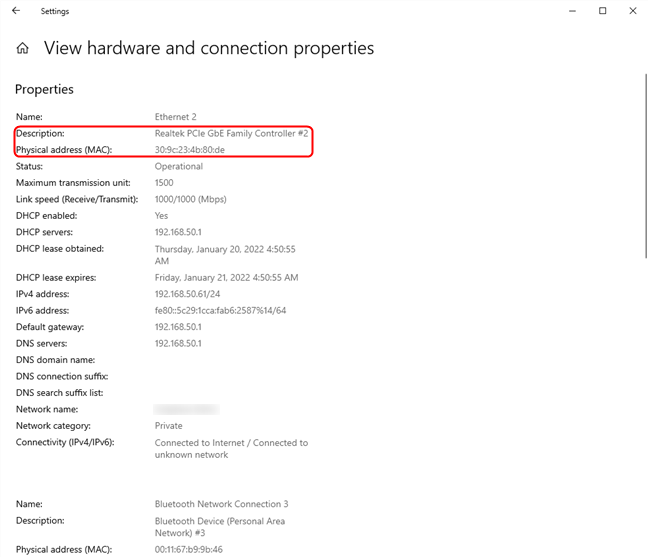
Identify the adapter, then look for the Physical address (MAC) field
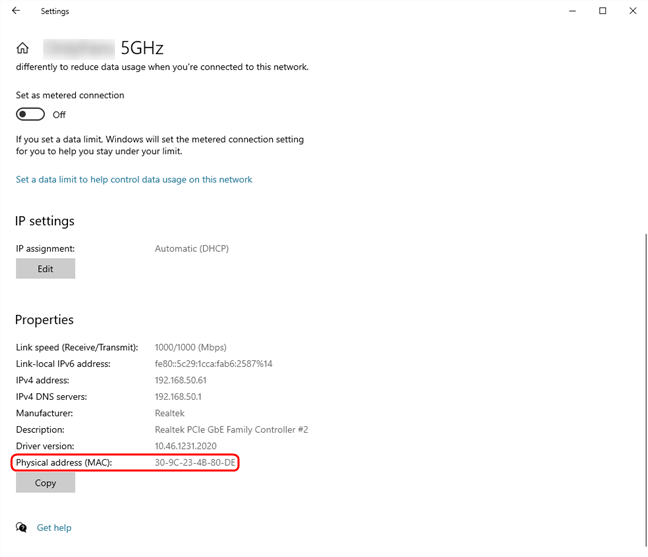
Alternatively, if you only want to know the MAC address of the network adapter that is currently connected, go back to the Network & Internet section and click on the Properties button for your active connection, as shown below.
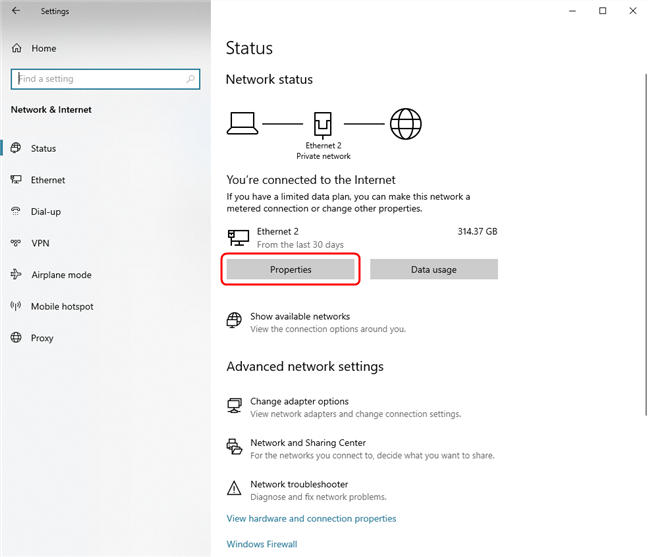
Click on Properties to find the MAC address of your active network adapter
As always, look for the Physical Address (MAC) field to find the information you need.
You can find many details, including the MAC address, in the Properties section
TIP: In both operating systems, you can use the Win X menu to get to the Network & Internet section of the Settings app. Simply press Windows + X on your keyboard, then select Network Connections.
6. Find the MAC address of any of your network adapters using System Information
Another way to view the MAC address for any network adapter installed on your device is by opening System Information. One way to do it is by using Windows Search to look for sysinfo, then clicking or tapping on the System Information search result. After opening it, in the left pane, double-click or double-tap on Components, then on Network, and finally click or tap on Adapter. This displays a list of every adapter present on your system, along with detailed information for each. First, use the Name field value to identify the adapter you’re looking for, then look for the MAC Address field to find the address.
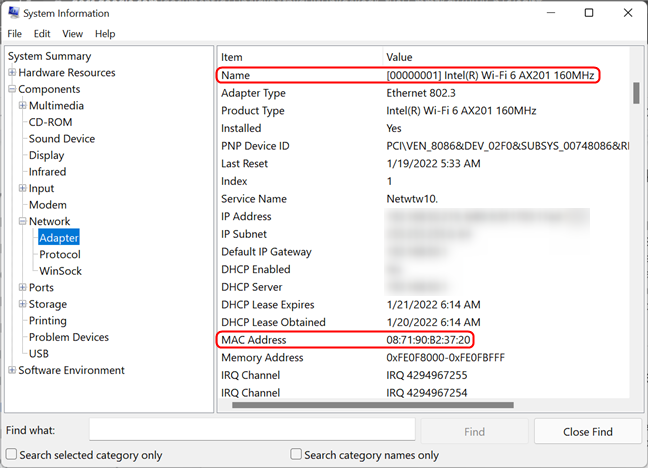
Get the MAC address of your network adapter using the System Information tool
7. How to find the MAC address of the active network adapter from the Control Panel
If you prefer the old way of doing things, you can find the MAC address of active network adapters from the venerable Control Panel. Open it and click or tap on the “View network status and tasks” under “Network and Internet.”
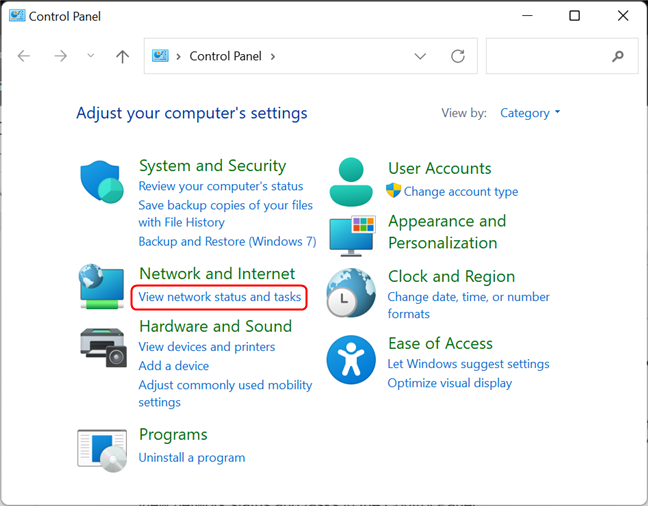
View network status and tasks in the Control Panel
This opens the Network and Sharing Center. Look at the “View your active networks” section from the top-right area of the window. There, you should see the name of each of your active network connections and, on their right side, several details about them. The line named Connections shows Ethernet if you are using a wired network connection. If you're using a wireless network connection, it says Wi-Fi, followed by the name of the network to which you are connected. Click on the link near Connections, as shown in the screenshot below.
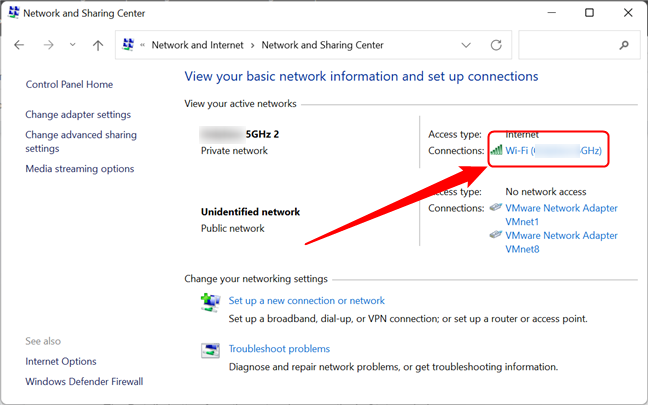
The active network connections are shown in the Network and Sharing Center
The Status window for your network adapter is now displayed. Click or tap on the Details button.
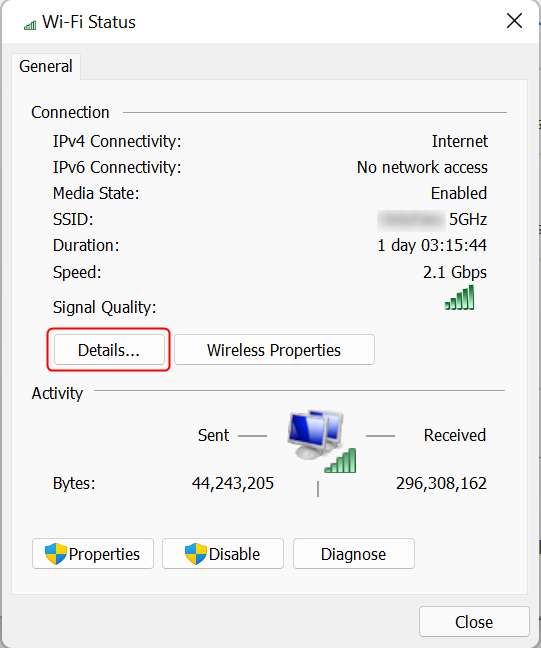
Click on the Details button
The Network Connection Details window is displayed. Here, you can see extensive details about your network connection, including the IP address, DNS servers addresses, and more. The MAC address is displayed in the Physical Address line highlighted in the screenshot below. You can copy and paste all the information displayed in this window, using the Ctrl + C / Ctrl + V shortcuts on your keyboard.
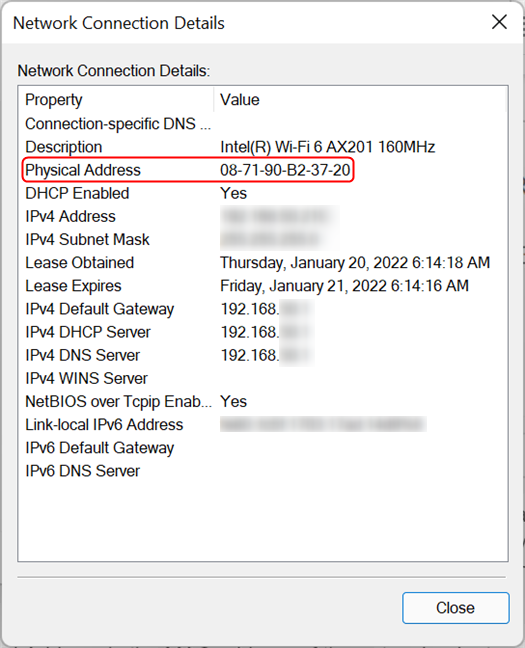
The Physical Address is the MAC address of the network adapter
TIP: Did you know you can change (spoof) your MAC address? Here is an article showing you seven ways to change or spoof the MAC address in Windows and an article on how to restore the original MAC address of your network card.
Do you know other ways of finding the MAC address in Windows?
As you can see, Windows offers multiple methods for finding the MAC address of any network adapter. The methods shown in this article are the easiest we know, using only tools and commands that are available in Windows. If you know other ways to find the MAC address of a network adapter, do not hesitate to share them in the comments section.