05.09.2022
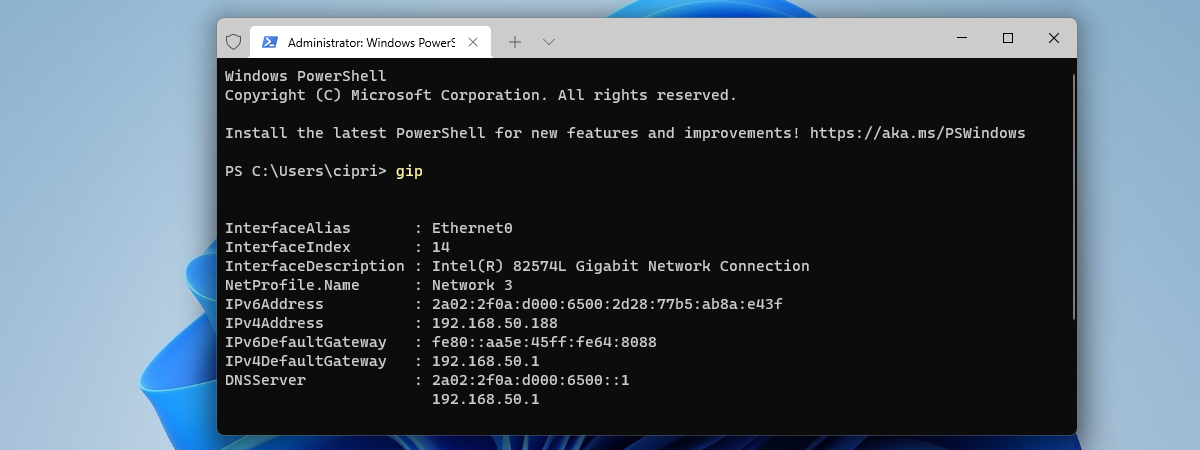
Have you ever wondered how to change the IP address in Windows 10 or Windows 11? Do you want to learn how to do that from the Settings app or the Control Panel? Maybe you’re a command-line fan and want to learn how to change the IP address from Command Prompt or PowerShell? Read on and find out how all of these are done in both Windows 11 and Windows 10:
NOTE: To be able to change your IP address in either Windows 10 or Windows 11, you must log in using an administrator account. Also, you should already know what IP addresses and subnet masks are, how to find what your local IP is, and how to find the IP address of your router.
1. How to change the IP address in Windows 10 using the Settings app
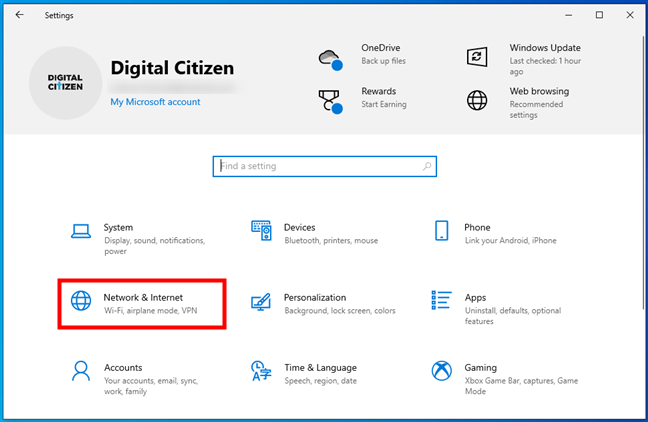
Because it relies on the visual interface of the operating system, this is probably the easiest method for changing the IP address of your Windows 10 computer or device. First, open the Settings app: a quick way to do that is to push the Settings button from the Start Menu or to press Windows + I on your keyboard simultaneously. In the Settings app, open the Network & Internet category.
The Network & Internet settings in Windows 10
On the left sidebar, select your network type. If you’re using a wireless card, click or tap on Wi-Fi. If you’re using a wired connection, go to Ethernet. On the right side of the window, click or tap on the name of your network connection.
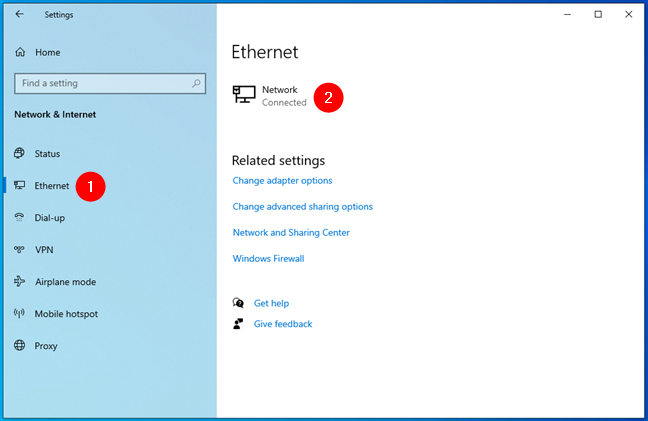
The currently connected network
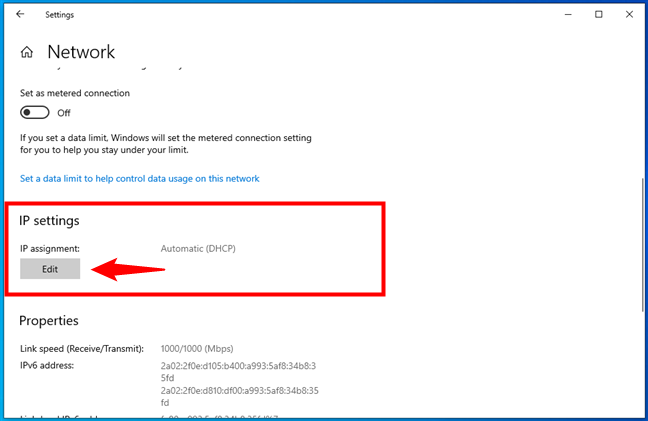
Scroll down on your network connection details page until you find the section called IP settings. Then, click or tap on Edit, under IP assignment.
The Edit button from the IP assignment area
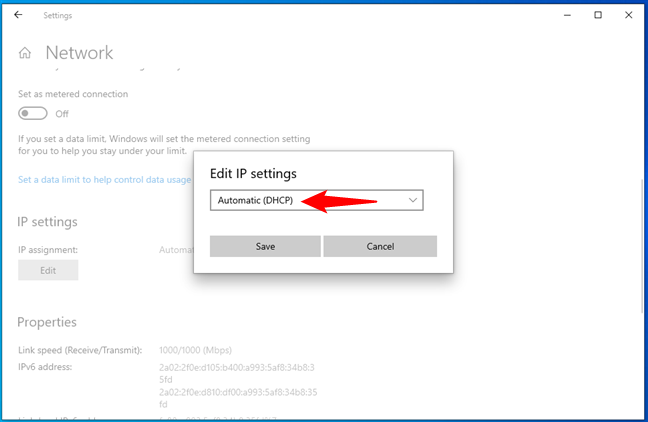
The Settings app now shows the “Edit IP settings” dialog. This is where you can change the IP address of your computer or device. If you want the IP address of your Windows 10 PC to be assigned automatically by your router, select Automatic (DHCP). This is also called a dynamic IP address.
Edit IP settings to get an IP address automatically via DHCP
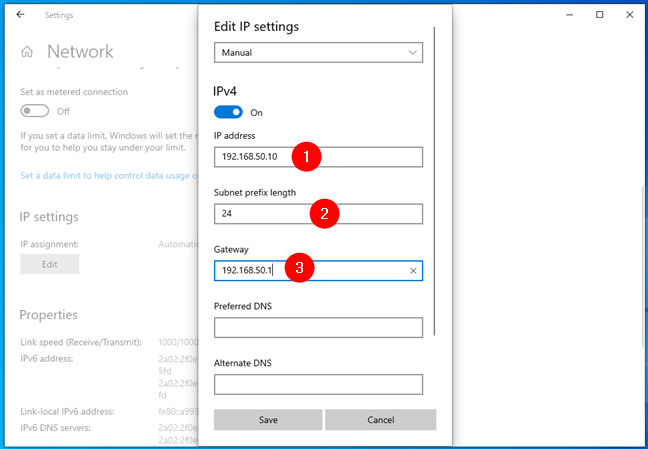
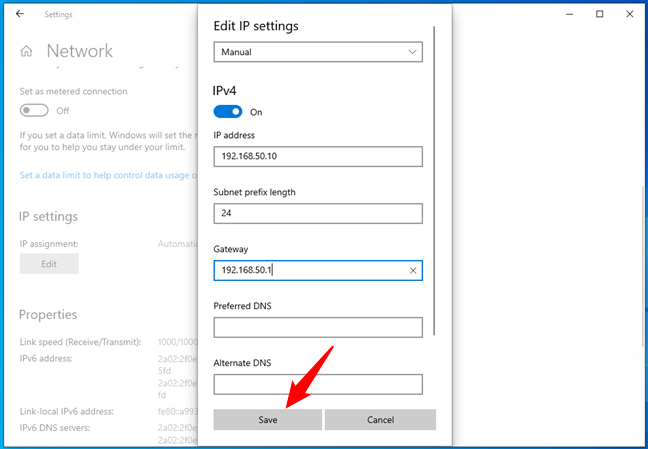
If you want to set your own static IP address, select Manual and then enable the IPv4 and/or IPv6 switches, depending on what internet protocols you want to use. Note that each of them has its own distinct IP address, so you must enter the required details for both IPv4 and IPv6 if you choose to enable both.

Edit IP settings to change the IPv4 address in Windows 10
To change your IP address to a static one, regardless of whether you set it for your IPv4 or IPv6 protocols, you have to enter the following details:
- IP address: Type the static IP address that you want to use. For example, I want to change the IP address (IPv4) of my Windows 10 PC to 192.168.50.10.
- Subnet prefix length: Type the prefix length that determines the size of the subnet. For example, I configured my router to use a subnet mask of 255.255.255.0, which means that I have to enter a “Subnet prefix length” of 24 (the number of 1 bits in the netmask). If I had a subnet mask of 255.255.0.0, the prefix length would have been 16, and so on.
- Gateway: Type the IP address of your router. In my case, that’s 192.168.50.1.
Setting a static IP address in Windows 10
The Preferred DNS and Alternate DNS settings are not mandatory - if you leave them blank, they are automatically assigned by your router. However, if you want to change them too, you can do so. TIP: Here are more ways to change DNS settings in Windows.
Once you’ve entered all the details, click or tap on Save, and Windows 10 changes your IP address.
Start using the new IP address in Windows 10
IMPORTANT: If you choose to use a static IP address, ensure all the details you enter are correct; otherwise, your Windows 10 PC loses internet connectivity. If that happens, change your IP address back to Automatic (DHCP) so that your router can change it to something that works.
2. How to change the IP address in Windows 11 using the Settings app
As it involves mainly clicks or taps and anyone can follow its steps, this is likely the easiest way of changing the IP address of your Windows 11 PC. Here’s how it goes:
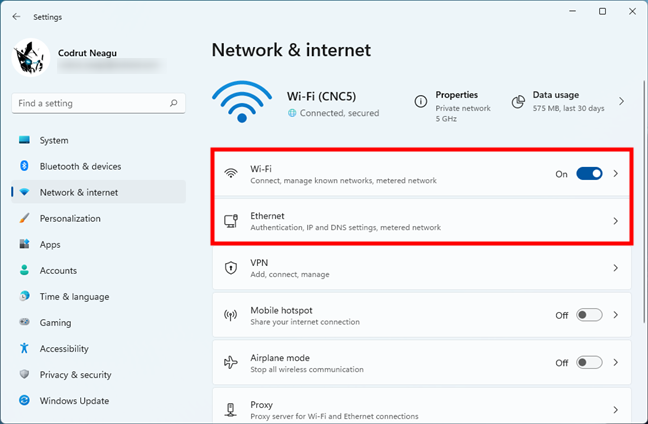
Open the Settings app: a quick way to do that is to use its Pinned shortcut from the Start Menu or press Windows + I on your keyboard. Once you’ve opened it, select Network & internet on the left sidebar.

The Network & internet settings in Windows 11
On the right, click or tap on the type of network you’re currently using. If you connect to the internet (or local area network) using a wireless card, select Wi-Fi. If you’re accessing the internet (or LAN) using a wired connection, click or tap on Ethernet.
Wi-Fi or Ethernet network connection
Next, click or tap on the properties entry of your network connection.
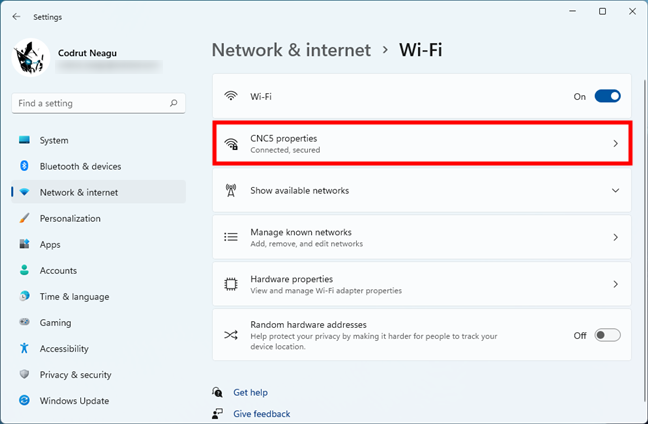
The network's properties
This opens a page filled with details about the selected network connection. On it, scroll down and click or tap the Edit button next to IP assignment.
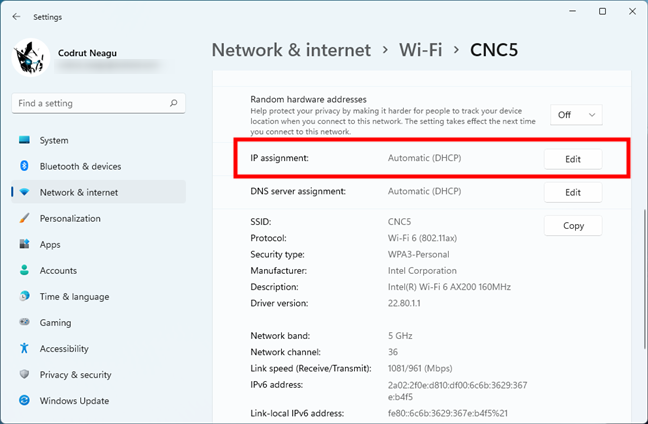
The Edit button next to IP assignment
As a result, the Settings app loads a dialog called “Edit network IP settings,” where you can set the IP address of your Windows 11 PC. If you want to use a dynamic IP address assigned automatically by the router, choose Automatic (DHCP).
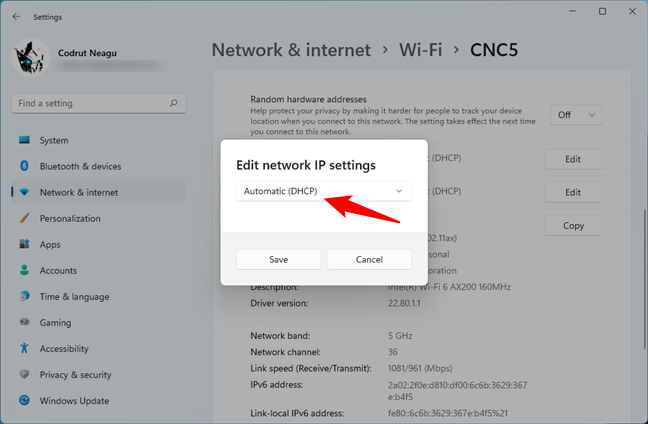
Let Windows 11 get an IP address automatically via DHCP
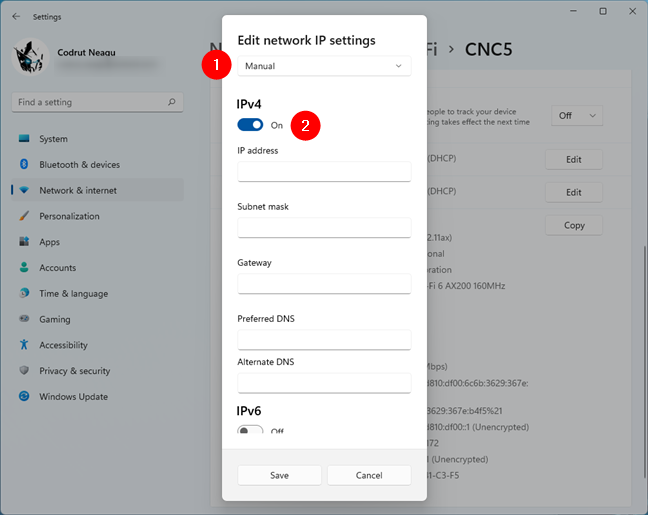
If you want to set a static IP address for your Windows 11 computer, select Manual. Then, turn on the IPv4 and/or IPv6 switches, depending on the internet protocols you intend to use. Keep in mind that each one needs a distinct IP address, so you’ll have to specify details for both IPv4 and IPv6 if you decide to enable both.
Edit IP settings to change the IPv4 address in Windows 11
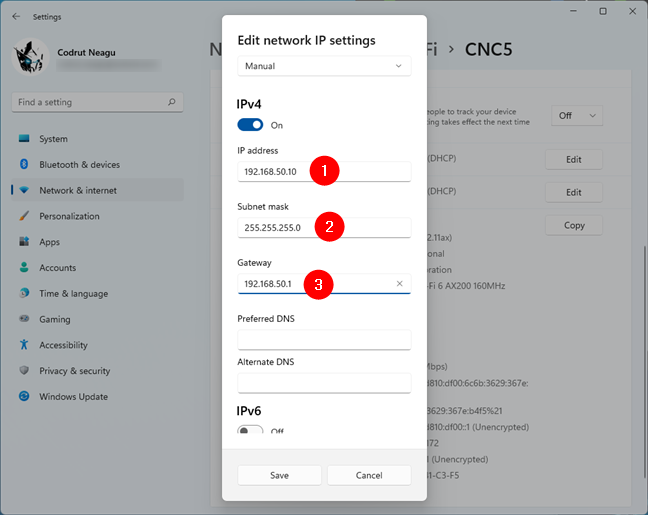
In order to set a static IP address for either IPv4 or IPv6, you have to provide the next details:
- IP address: Enter the static IP address you want to use. For instance, I’m changing the IP address (IPv4) of my Windows 11 computer to 192.168.50.10.
- Subnet mask: Type the subnet mask used by your network. For example, I’ve configured my mesh Wi-Fi to use a 255.255.255.0 subnet mask, which means that this is the number sequence I need to enter.
- Gateway: Specify the IP address of your router or mesh Wi-Fi. In my case, that’s 192.168.50.1.
Setting a static IP address in Windows 11
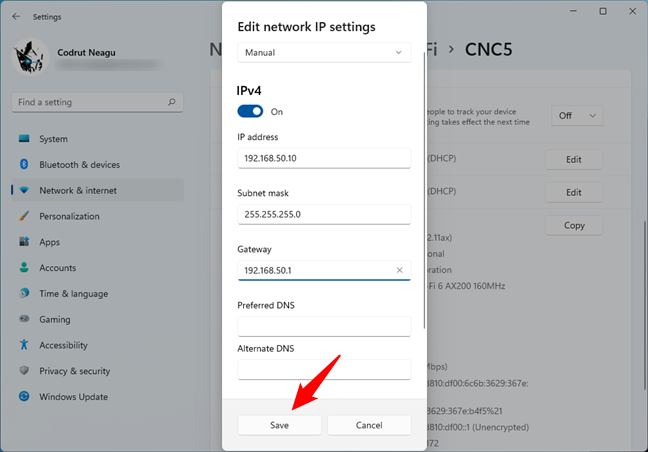
These are all the settings you need to configure in order to change your IP address in Windows 11. However, there are two more options in the “Edit network IP settings” dialog: Preferred DNS and Alternate DNS. While not necessarily required (if they’re blank, your router automatically assigns them), you can change them, too, if you want. Here are more details about DNS: What is DNS? How is it useful?.
Once you’ve finished editing your network IP settings, click or tap the Save button, and your IP address is immediately changed in Windows 11.
How to set a static IP address in Windows 11
IMPORTANT: If you’ve changed your IP address and your Windows 11 PC lost internet connectivity, you’ve probably entered an incorrect IP address. In that case, switch back to using Automatic (DHCP) to let your router assign a new one for your computer, one that works.
3. How to change the IP address in Windows using the Control Panel
In both Windows 11 and Windows 10, you can also change your IP address from the Control Panel. Open the Control Panel and click or tap on “View network status and tasks” under “Network and Internet.”
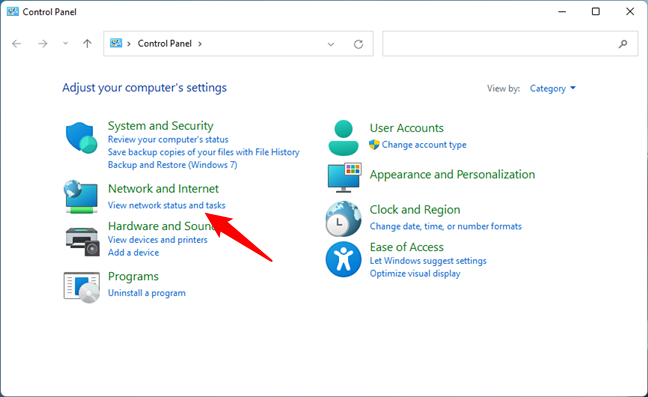
View network status and tasks in Control Panel
In the Network and Sharing Center, click or tap on your internet connection from the “View your active networks” area.
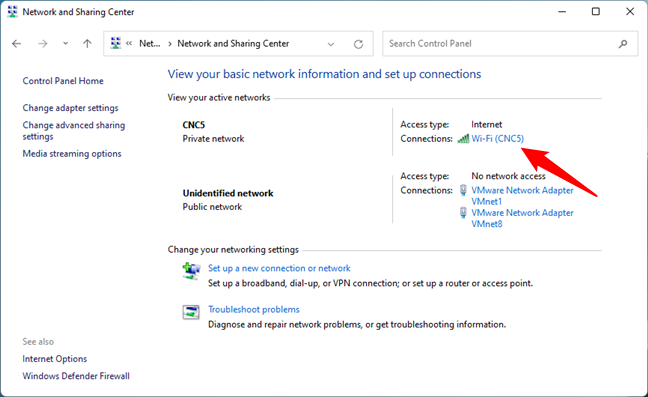
The network connection in use
In your network’s Status window, click or tap on Properties. Then, in the Properties window, select Internet Protocol Version 4 (TCP/IPv4) or Internet Protocol Version 6 (TCP/IPv6), depending on the IP address that you want to change, and press the Properties button. Note that if you want to change both types of IP addresses, you’ll have to repeat the next steps for each of them.
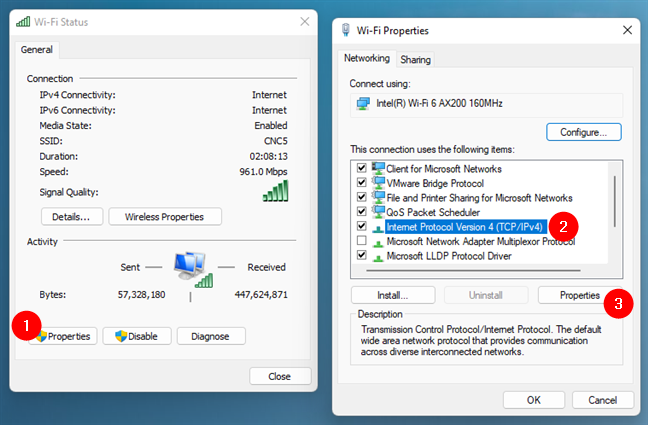
Opening the Properties of Internet Protocol Version 4 (TCP/IPv4)
The previous action opens a window called Internet Protocol Version 4 (TCP/IPv4) Properties or Internet Protocol Version 6 (TCP/IPv6) Properties, depending on what you chose earlier. This is where you can change your IP address:
If you want to use a dynamic IP address that’s automatically assigned to your Windows PC by your router, select “Obtain an IP address automatically.” Then, click or tap on OK and close all the windows you’ve opened previously.
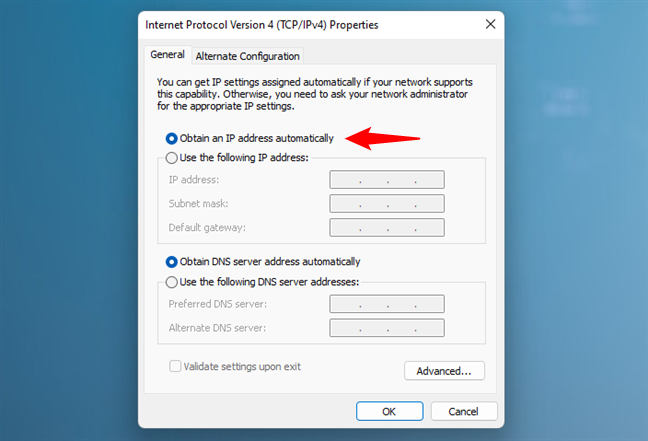
Obtain an IP address automatically via DHCP
If you want to set a static IP address for your network adapter, select “Use the following IP address.” Then, enter the required details manually: IP address, Subnet mask, and Default gateway, just like we’ve shown you in the previous chapters of this guide.
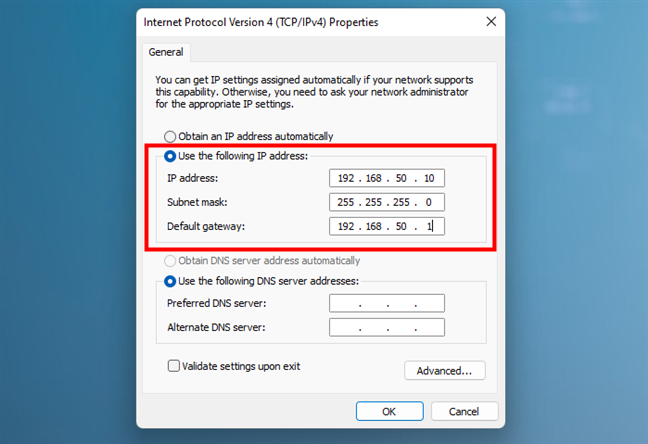
Use Control Panel to set a static IP address in Windows
Save your new IP address settings by clicking or tapping on OK, then close all the windows opened during the process.
4. How to change the IP address in Windows 10 and Windows 11 using commands
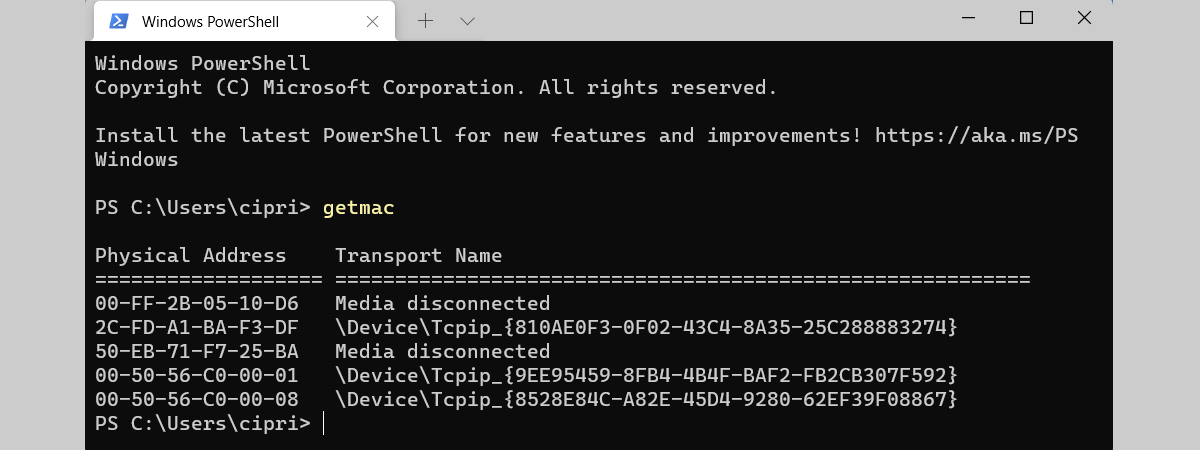
You can also change the IP address using any of the command-line tools in Windows. Launch PowerShell, run Command Prompt, or open a tab for any of them in Windows Terminal. Then, regardless of what your favorite console is, run this command:
In the displayed results, identify the network adapter for which you want to change the IP address. For example, the name of my network interface is Wi-Fi, as shown in the screenshot below.
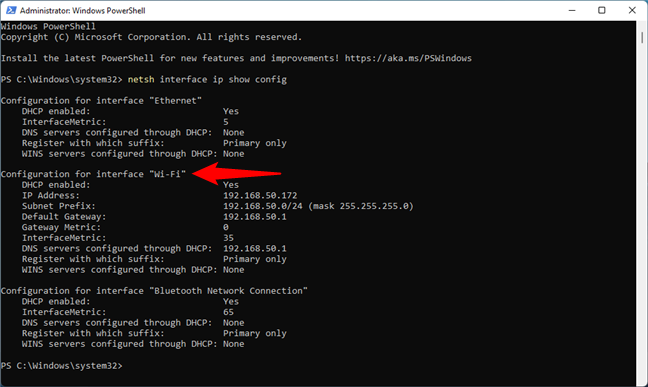
Find the name of your network adapter in CMD or PowerShell
If you want to change the IP address to a dynamic one that’s automatically assigned by your router via DHCP, run the following command:
Replace Network Interface Name with the name of your network connection. For example, I need to run:
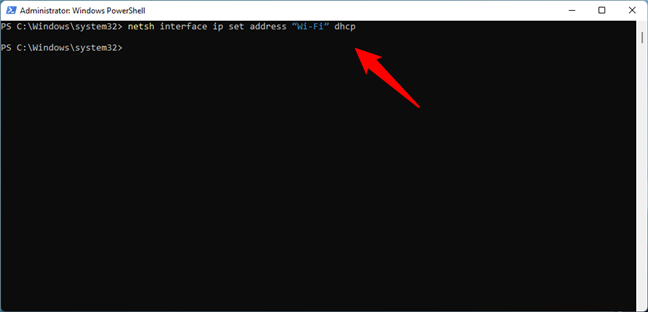
Use this command to set a dynamic IP address
If you want to set a static IP address, run this command:
Replace [IP address] [Subnet Mask] [Gateway] with the ones that match your network configuration. In my case, as I want to change my IP address to 192.168.50.10, I have to run:
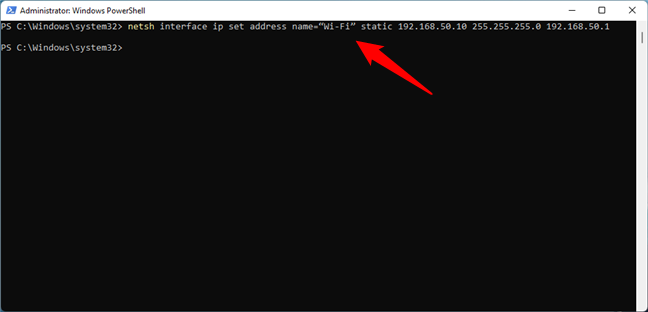
Use this command to set a static IP address in CMD or PowerShell
That’s it!
How do you change the IP address in Windows 10 or Windows 11?
Now you know not just one, but four different methods to change your IP address and set it to dynamic or static. What’s your favorite way of doing this? Do you know other methods? If you do, or if you have something to add to this guide, don’t hesitate to comment.