

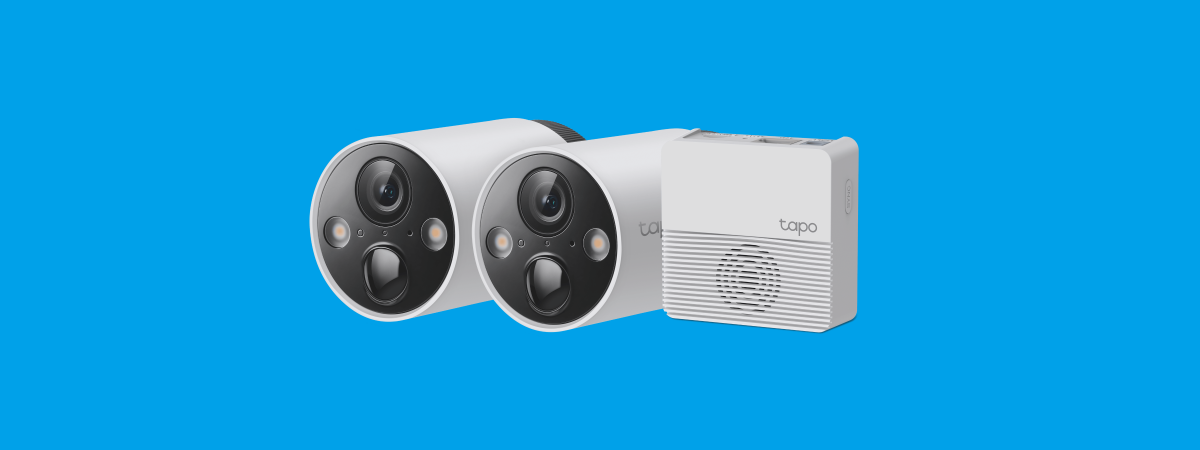
If you’re looking for an easy-to-use security camera for your home or office, one that doesn’t cost a fortune, you should check out the TP-Link Tapo C420S2. This wireless two-camera kit offers 2K QHD video, night vision, motion detection, two-way audio, and local and cloud storage for your recordings. Each Tapo C420S2 camera also has its own battery, allowing you to monitor areas with no power outlet. In this review, I share my experience with this security camera kit, evaluate its features, and how it works. If you want to know my final verdict on whether it is worth buying or not, keep reading:
 The packaging used for TP-Link Tapo C420S2
On the back and the sides of the box, you find plenty of information about this product, its hardware and software specifications, and the things you can do with it. When you open the box, you see the devices and accessories bundled by TP-Link inside more protective packaging.
The packaging used for TP-Link Tapo C420S2
On the back and the sides of the box, you find plenty of information about this product, its hardware and software specifications, and the things you can do with it. When you open the box, you see the devices and accessories bundled by TP-Link inside more protective packaging.
 Unboxing the TP-Link Tapo C420S2
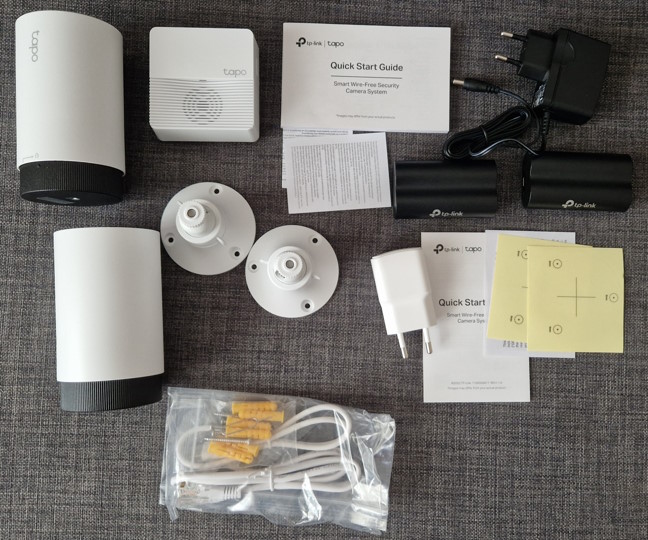
When you unbox everything, you get the following items: the two Tapo C420S2 cameras, their batteries, a USB charger and USB to micro USB cable (for charging the batteries), two camera brackets and mounting templates, the Tapo H200 Hub and its power adapter, a network cable, mounting screws, the quick start guide, and other leaflets.
Unboxing the TP-Link Tapo C420S2
When you unbox everything, you get the following items: the two Tapo C420S2 cameras, their batteries, a USB charger and USB to micro USB cable (for charging the batteries), two camera brackets and mounting templates, the Tapo H200 Hub and its power adapter, a network cable, mounting screws, the quick start guide, and other leaflets.
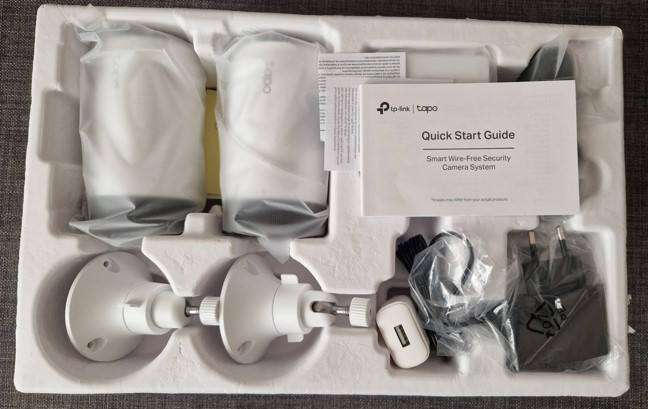
 Everything you find inside the box
As you’ve seen in my pictures, there are many things bundled with the Tapo C420S2 security camera system, and there’s a lot to learn about installing and setting it up. So first, read the quick start guide before doing anything else, to familiarize yourself with what you must do and the correct sequence of steps for installing the Tapo C420S2 as fast as possible.
Everything you find inside the box
As you’ve seen in my pictures, there are many things bundled with the Tapo C420S2 security camera system, and there’s a lot to learn about installing and setting it up. So first, read the quick start guide before doing anything else, to familiarize yourself with what you must do and the correct sequence of steps for installing the Tapo C420S2 as fast as possible.
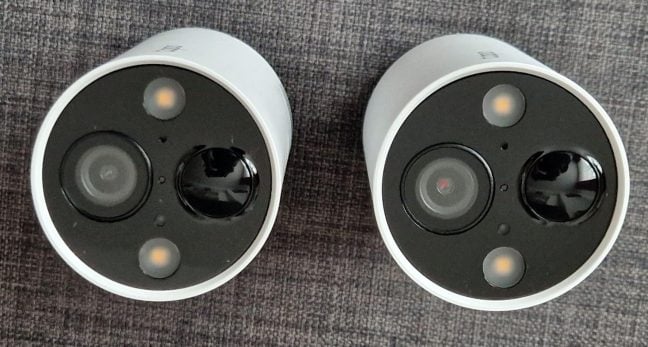
 The two Tapo C420S2 cameras
Each camera, with its battery plugged in, weighs about 276 grams or 9.73 ounces, making it easy to mount anywhere. They also have an IP65 weatherproof rating, making them suitable for outdoor use as long as they don’t encounter extreme weather events like flooding or storms. In addition, the Tapo C420S2 cameras offer two-way audio, which can be useful. The speaker is placed on their bottom, next to one of its mounting holes.
The two Tapo C420S2 cameras
Each camera, with its battery plugged in, weighs about 276 grams or 9.73 ounces, making it easy to mount anywhere. They also have an IP65 weatherproof rating, making them suitable for outdoor use as long as they don’t encounter extreme weather events like flooding or storms. In addition, the Tapo C420S2 cameras offer two-way audio, which can be useful. The speaker is placed on their bottom, next to one of its mounting holes.

 See the speaker on the bottom
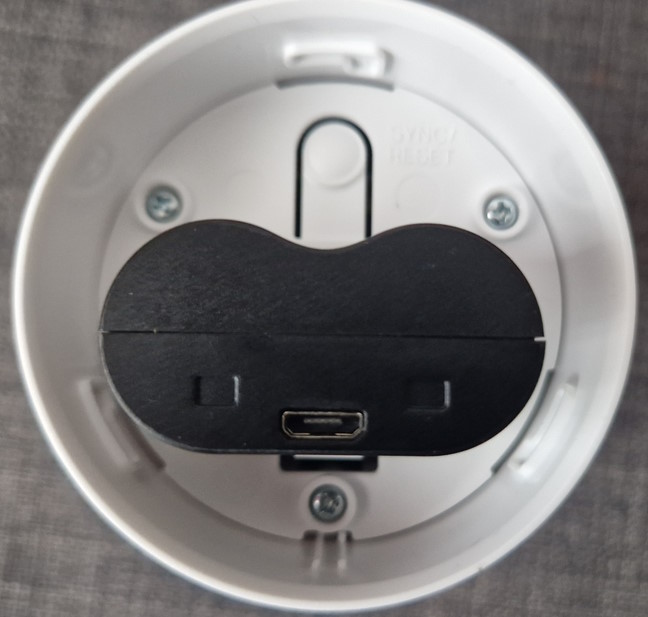
On the back of each Tapo C420S2, you have a black cover that can be opened and closed to insert the battery. On this cover, you find another mounting hole and a micro USB port for charging the battery.
See the speaker on the bottom
On the back of each Tapo C420S2, you have a black cover that can be opened and closed to insert the battery. On this cover, you find another mounting hole and a micro USB port for charging the battery.
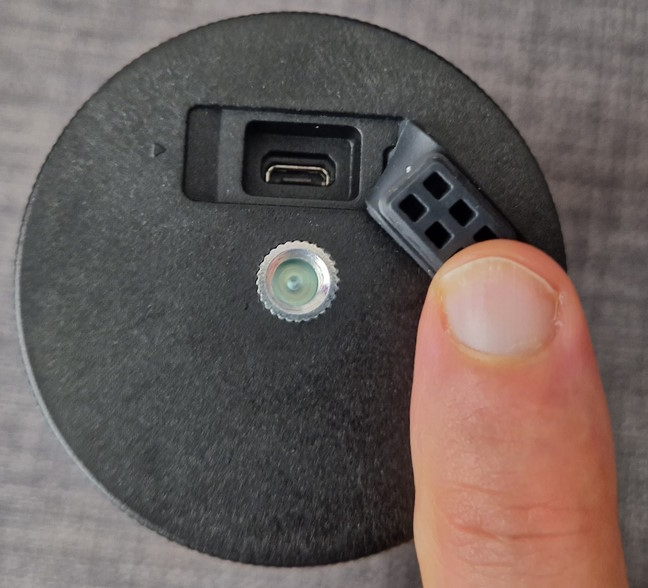
 Charging is done using a microUSB port
Speaking of which, the batteries for Tapo C420S2 are made from Lithium-ion, and they have two cells of 3.7 V and 2600 mAh each, leading to a total capacity of 5200 mAh. They can be charged using the bundled charger and USB to micro USB cable. However, I find it frustrating that TP-Link didn’t use USB Type C connectors for this security camera system.
Charging is done using a microUSB port
Speaking of which, the batteries for Tapo C420S2 are made from Lithium-ion, and they have two cells of 3.7 V and 2600 mAh each, leading to a total capacity of 5200 mAh. They can be charged using the bundled charger and USB to micro USB cable. However, I find it frustrating that TP-Link didn’t use USB Type C connectors for this security camera system.
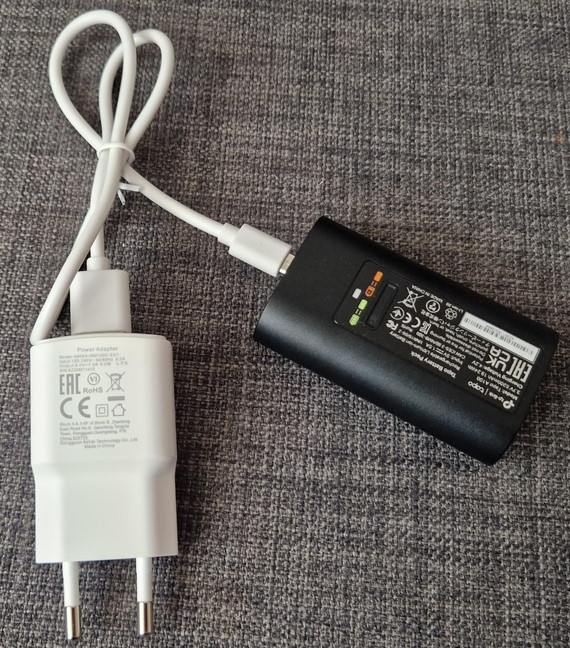
 The battery has a capacity of 5200 mAh
Each Tapo C420S2 camera has a ⅓" image sensor with a maximum resolution of 2560 x 1440 pixels. TP-Link names it 2K QHD, but a more accurate name would be 1440p. To understand why I say this, read this article: What do the 720p, 1080p, 1440p, 2K, 4K resolutions mean? You’ll find it quite interesting.
Tapo C420S2 is also capable of night vision, and it has a focal length of 3.18mm±5% and a view range of 113°. The video it records is compressed using the H.264 format, and the frame rate can be set to 15 frames per second or 20 fps. The cameras connect to the network using Wi-Fi on the 2.4 GHz band and wireless standards up to 802.11n (or Wi-Fi 4), as well as WPA2 encryption. I would have preferred Wi-Fi 6 connectivity and WPA3 support.
The battery has a capacity of 5200 mAh
Each Tapo C420S2 camera has a ⅓" image sensor with a maximum resolution of 2560 x 1440 pixels. TP-Link names it 2K QHD, but a more accurate name would be 1440p. To understand why I say this, read this article: What do the 720p, 1080p, 1440p, 2K, 4K resolutions mean? You’ll find it quite interesting.
Tapo C420S2 is also capable of night vision, and it has a focal length of 3.18mm±5% and a view range of 113°. The video it records is compressed using the H.264 format, and the frame rate can be set to 15 frames per second or 20 fps. The cameras connect to the network using Wi-Fi on the 2.4 GHz band and wireless standards up to 802.11n (or Wi-Fi 4), as well as WPA2 encryption. I would have preferred Wi-Fi 6 connectivity and WPA3 support.

 Tapo C420S2 is capable of night vision
Tapo C420S2 can use the following triggers: motion detection, person detection, pet detection, and vehicle detection. It can also operate in temperatures between -20℃ and 45℃ (or -4°F and 113 °F) and in relative humidity that varies between 10% and 90%.
To use the Tapo C420S2 cameras, you also need the Tapo H200 smart hub that’s part of the kit. You can connect up to four Tapo devices (camera or video doorbells) to this hub and up to 64 sensors. With the Tapo H200, you can remotely control all your devices from anywhere using the Tapo app for Android and iOS. Its size is 2.8 x 2.8 x 1.2 inches or 71.45 x 71.45 x 31.25 mm, and it weighs just 75 grams or 2.6 oz. On its top side, you see the Tapo logo, a speaker, and the status LED.
Tapo C420S2 is capable of night vision
Tapo C420S2 can use the following triggers: motion detection, person detection, pet detection, and vehicle detection. It can also operate in temperatures between -20℃ and 45℃ (or -4°F and 113 °F) and in relative humidity that varies between 10% and 90%.
To use the Tapo C420S2 cameras, you also need the Tapo H200 smart hub that’s part of the kit. You can connect up to four Tapo devices (camera or video doorbells) to this hub and up to 64 sensors. With the Tapo H200, you can remotely control all your devices from anywhere using the Tapo app for Android and iOS. Its size is 2.8 x 2.8 x 1.2 inches or 71.45 x 71.45 x 31.25 mm, and it weighs just 75 grams or 2.6 oz. On its top side, you see the Tapo logo, a speaker, and the status LED.
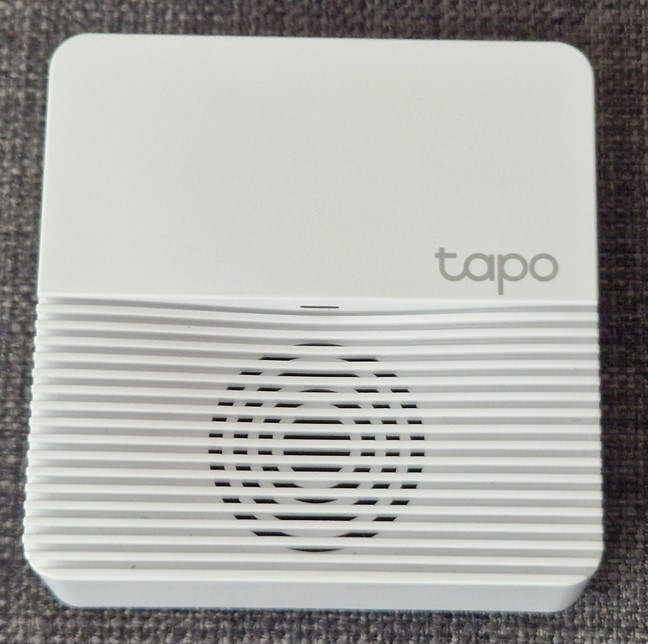
 The Tapo H200 smart hub
On its back, you find the Power jack, a LAN port, the Reset jack, and the MicroSD slot. You’ll be happy to know that you can use microSD cards with a capacity of up to 512 GB, which should satisfy most people’s needs. However, the microSD card needs to be purchased separately.
The Tapo H200 smart hub
On its back, you find the Power jack, a LAN port, the Reset jack, and the MicroSD slot. You’ll be happy to know that you can use microSD cards with a capacity of up to 512 GB, which should satisfy most people’s needs. However, the microSD card needs to be purchased separately.
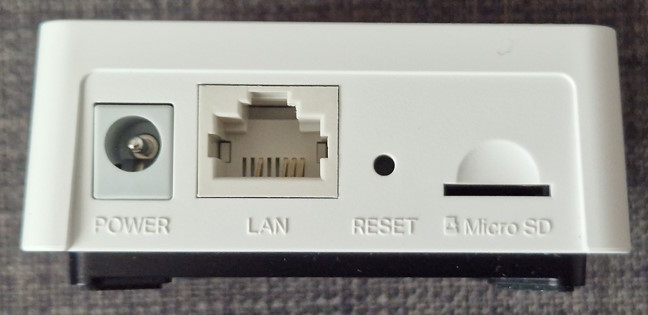
 The ports on the back of the Tapo H200
Tapo H200 communicates with the devices it manages using Wi-Fi on the 2.4 GHz band, in radio frequencies less than 1 GHz, which provides a longer range and lower power consumption than traditional Wi-Fi connections. However, its connection to the router must be made using an Ethernet cable. On the bottom of the smart hub, you find four rubber feet for holding it into place on flat surfaces. Unfortunately, it can’t be mounted on walls, and it is best that you keep it near a power outlet and your router because its power cable isn’t long. The bundled Ethernet cable is also rather short.
The ports on the back of the Tapo H200
Tapo H200 communicates with the devices it manages using Wi-Fi on the 2.4 GHz band, in radio frequencies less than 1 GHz, which provides a longer range and lower power consumption than traditional Wi-Fi connections. However, its connection to the router must be made using an Ethernet cable. On the bottom of the smart hub, you find four rubber feet for holding it into place on flat surfaces. Unfortunately, it can’t be mounted on walls, and it is best that you keep it near a power outlet and your router because its power cable isn’t long. The bundled Ethernet cable is also rather short.
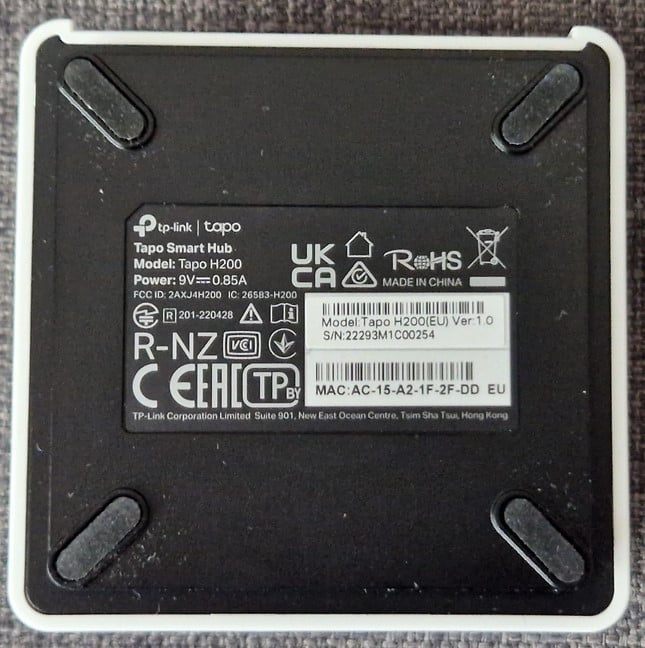
 Tapo H200 has no holes for mounting it on walls
Tapo H200 can work in a relative humidity that varies between 10% and 90% and in temperatures between 0℃ and 40℃ (32°F to 104°F).
The Tapo C420S2 smart security system is well-designed, with interesting features and specs, which should provide a satisfying user experience. For more detailed information about this product and all its specifications, visit these pages: Tapo C420S2 and Tapo H200.
Tapo H200 has no holes for mounting it on walls
Tapo H200 can work in a relative humidity that varies between 10% and 90% and in temperatures between 0℃ and 40℃ (32°F to 104°F).
The Tapo C420S2 smart security system is well-designed, with interesting features and specs, which should provide a satisfying user experience. For more detailed information about this product and all its specifications, visit these pages: Tapo C420S2 and Tapo H200.
 Installing the battery is easy
Put the cover back, and rotate it clockwise to the lock position. Then, it’s time to plug the Tapo H200 smart hub into the power outlet and connect it to your home router using the Ethernet cable provided in the packaging. Or, if it’s too short, use another, longer cable. Finally, plug the microSD card on which you want to store the video into the back of the Tapo H200.
Installing the battery is easy
Put the cover back, and rotate it clockwise to the lock position. Then, it’s time to plug the Tapo H200 smart hub into the power outlet and connect it to your home router using the Ethernet cable provided in the packaging. Or, if it’s too short, use another, longer cable. Finally, plug the microSD card on which you want to store the video into the back of the Tapo H200.
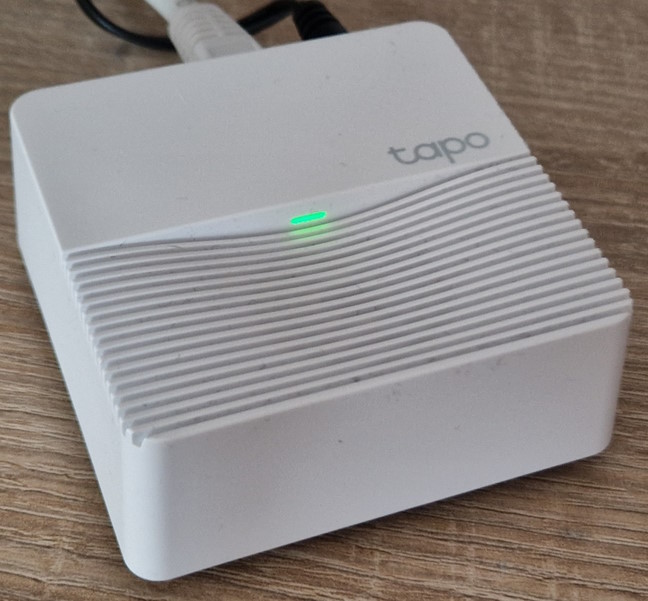
 Tapo H200 is turned on and working
When the smart hub signals that it’s ready for setup, open the Tapo app on your smartphone or tablet and first add the Tapo H200 hub. Don’t try to add the cameras first because it won’t work.
Tapo H200 is turned on and working
When the smart hub signals that it’s ready for setup, open the Tapo app on your smartphone or tablet and first add the Tapo H200 hub. Don’t try to add the cameras first because it won’t work.
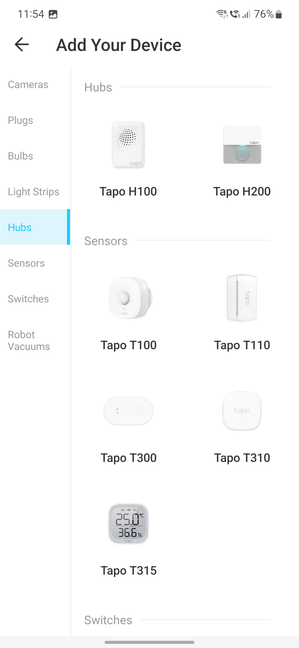
 First, add the Tapo H200 to the Tapo app
During the setup process, you give a name to the smart hub, choose where you want to place it in your home, select an icon for it, and get access to the latest firmware update available. I strongly recommend installing it before adding your other devices to get the best experience possible and benefit from the bug fixes introduced by the latest firmware.
First, add the Tapo H200 to the Tapo app
During the setup process, you give a name to the smart hub, choose where you want to place it in your home, select an icon for it, and get access to the latest firmware update available. I strongly recommend installing it before adding your other devices to get the best experience possible and benefit from the bug fixes introduced by the latest firmware.
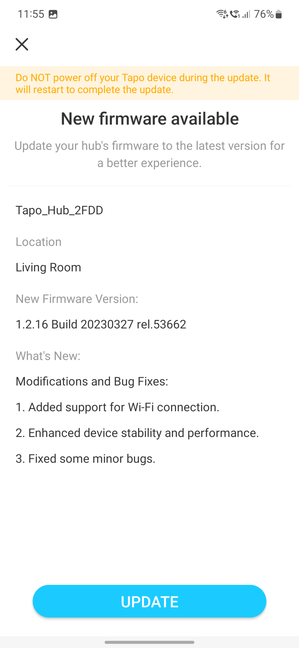 Always install the latest firmware
After the Tapo H200 is installed, you can add the two Tapo C420S2 cameras, one after the other. Select them from the list and follow the instructions in the app.
Always install the latest firmware
After the Tapo H200 is installed, you can add the two Tapo C420S2 cameras, one after the other. Select them from the list and follow the instructions in the app.
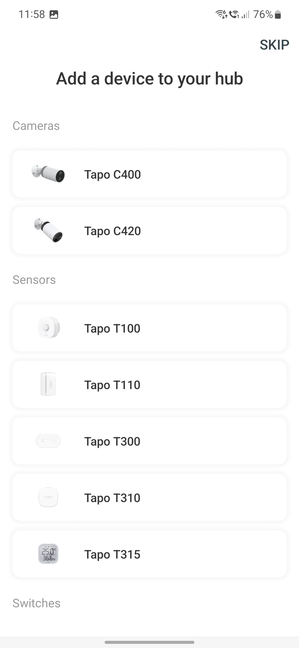 Next, add the Tapo C420S2 cameras
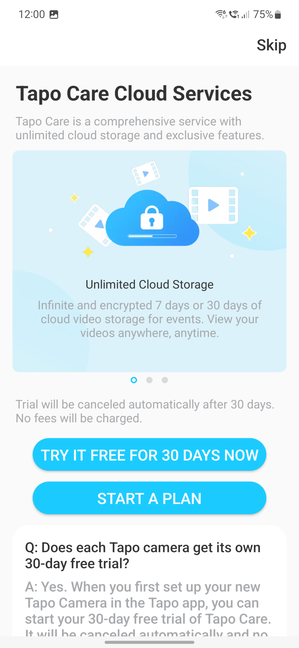
The installation wizard guides you on installing the battery inside each camera, checking their LED status, selecting the camera(s) you want to add, choosing a name for each, their icon, and location. At the end of the setup wizard, you decide whether you wish to try TP-Link’s Tapo Care Cloud Services, which include features like unlimited cloud storage. Unfortunately, a yearly plan can get expensive (prices vary from country to country), which may lower the appeal of the Tapo C420S2.
Next, add the Tapo C420S2 cameras
The installation wizard guides you on installing the battery inside each camera, checking their LED status, selecting the camera(s) you want to add, choosing a name for each, their icon, and location. At the end of the setup wizard, you decide whether you wish to try TP-Link’s Tapo Care Cloud Services, which include features like unlimited cloud storage. Unfortunately, a yearly plan can get expensive (prices vary from country to country), which may lower the appeal of the Tapo C420S2.
 Do you want TP-Link’s Tapo Care Cloud Services?
If you don’t want to pay extra and prefer local storage, insert a microSD card into the slot on the back of the Tapo H200 smart hub, and initialize it from the Tapo app.
Do you want TP-Link’s Tapo Care Cloud Services?
If you don’t want to pay extra and prefer local storage, insert a microSD card into the slot on the back of the Tapo H200 smart hub, and initialize it from the Tapo app.
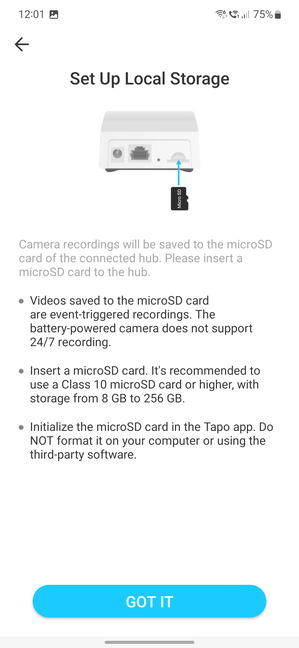 Local storage is available on a microSD card
With this out of the way, your first Tapo C420S2 camera is configured. You can mount it on the wall and follow the instructions for how to do so, presented by the Tapo app, or you can add the second camera and then mount them as you see fit.
Local storage is available on a microSD card
With this out of the way, your first Tapo C420S2 camera is configured. You can mount it on the wall and follow the instructions for how to do so, presented by the Tapo app, or you can add the second camera and then mount them as you see fit.
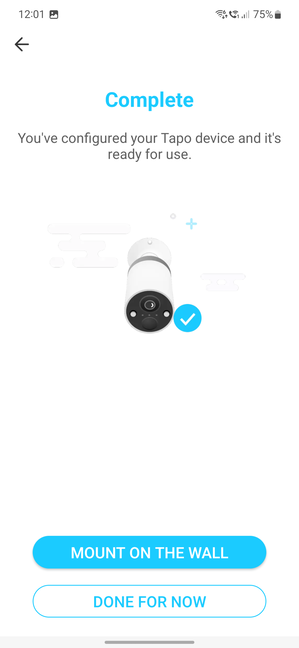 Your first Tapo C420S2 camera is configured
When mounting the surveillance cameras, take into consideration the following recommendations: avoid placing them in direct sunlight, avoid obstructions on the left and right sides of each camera, keep the camera lens away from walls and glass to prevent reflections, and keep them away from metal doors to avoid the Wi-Fi signal being negatively affected.
Your first Tapo C420S2 camera is configured
When mounting the surveillance cameras, take into consideration the following recommendations: avoid placing them in direct sunlight, avoid obstructions on the left and right sides of each camera, keep the camera lens away from walls and glass to prevent reflections, and keep them away from metal doors to avoid the Wi-Fi signal being negatively affected.
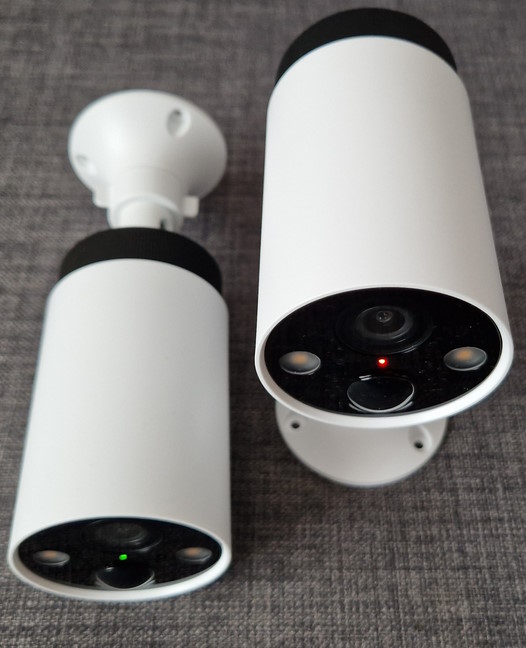
 Mount your Tapo C420S2 cameras where you want to use them
When you’re done with the whole setup, you’ll see the smart hub and the two cameras in the Tapo app, alongside other smart devices you may have from TP-Link’s family.
Mount your Tapo C420S2 cameras where you want to use them
When you’re done with the whole setup, you’ll see the smart hub and the two cameras in the Tapo app, alongside other smart devices you may have from TP-Link’s family.
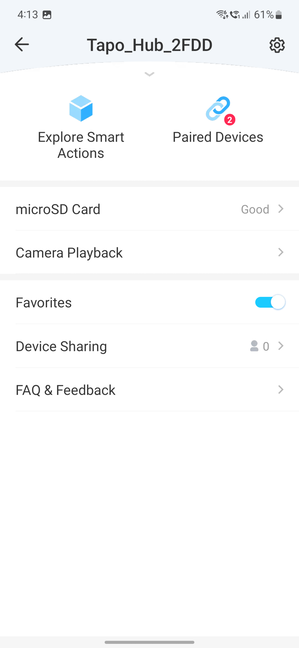
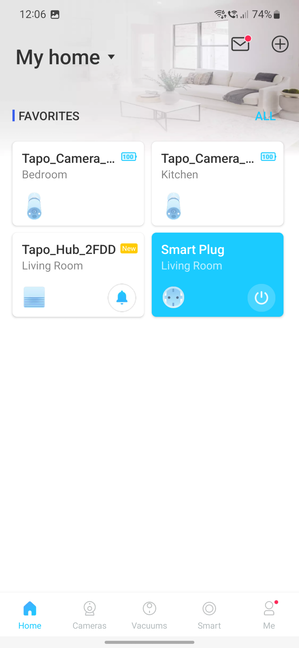 Control everything from the Tapo app
While the installation process is not difficult, it does take some time, so arm yourself with some patience. Also, it’s important to read the quick setup guide before getting started to get things installed in the right order. Please read everything first and follow the recommendations provided by TP-Link. After that, you shouldn’t have any problems installing the Tapo C420S2 smart security camera system.
Control everything from the Tapo app
While the installation process is not difficult, it does take some time, so arm yourself with some patience. Also, it’s important to read the quick setup guide before getting started to get things installed in the right order. Please read everything first and follow the recommendations provided by TP-Link. After that, you shouldn’t have any problems installing the Tapo C420S2 smart security camera system.
 See what's going on with Tapo C420S2
By default, Tapo C420S2 records video in 720p resolution and 15 frames per second. This ensures you get close to the 180 days of battery life the company promises.
Unfortunately, you can’t film in 1080p, but you can increase the resolution to 1440p or 2K QHD and 20 fps. This will have a major impact on battery life: expect the autonomy to go down from about 180 days to around 50 or less, depending on which energy-intensive features you turn on (for example, Color mode during the night uses a lot of power).
See what's going on with Tapo C420S2
By default, Tapo C420S2 records video in 720p resolution and 15 frames per second. This ensures you get close to the 180 days of battery life the company promises.
Unfortunately, you can’t film in 1080p, but you can increase the resolution to 1440p or 2K QHD and 20 fps. This will have a major impact on battery life: expect the autonomy to go down from about 180 days to around 50 or less, depending on which energy-intensive features you turn on (for example, Color mode during the night uses a lot of power).
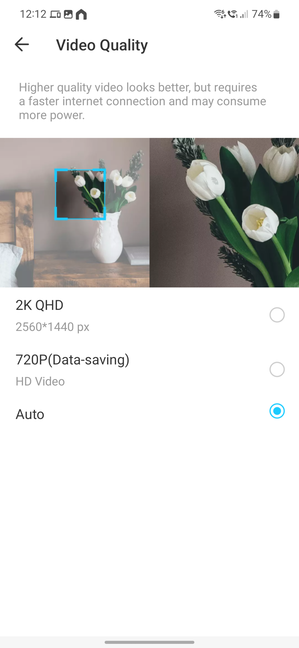 Setting the video quality is easy
The Tapo app gives you access to lots of settings and features. For example, you can set the cameras to play an alarm each time they detect movement in their area or to send silent notifications to your smartphone. You can also configure them to automatically record what’s going on each time movement is detected and set how long you want those clips to be.
Setting the video quality is easy
The Tapo app gives you access to lots of settings and features. For example, you can set the cameras to play an alarm each time they detect movement in their area or to send silent notifications to your smartphone. You can also configure them to automatically record what’s going on each time movement is detected and set how long you want those clips to be.
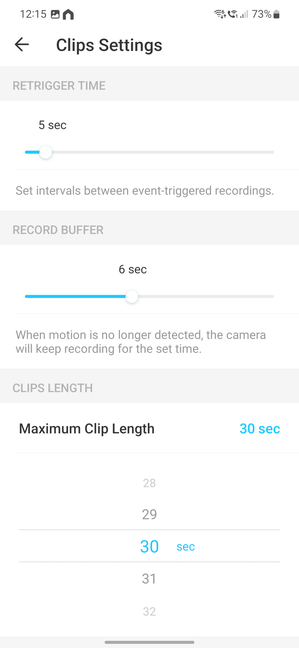 Adjust your clips settings
If you want to protect your privacy, you can set privacy zones for each camera, representing areas that cannot be viewed or monitored.
Adjust your clips settings
If you want to protect your privacy, you can set privacy zones for each camera, representing areas that cannot be viewed or monitored.
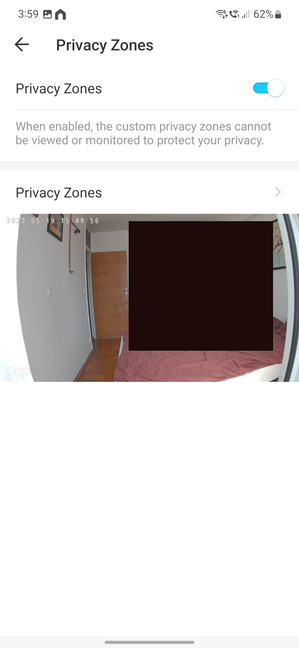 Do you want to set privacy zones?
One of the most important features of Tapo C420S2 is its AI detection capabilities. For example, you can enable the camera system to detect when people, pets, or vehicles are in the area. You can then set up rules, alerts, and notifications for what you want the whole system to do when detecting them.
Do you want to set privacy zones?
One of the most important features of Tapo C420S2 is its AI detection capabilities. For example, you can enable the camera system to detect when people, pets, or vehicles are in the area. You can then set up rules, alerts, and notifications for what you want the whole system to do when detecting them.
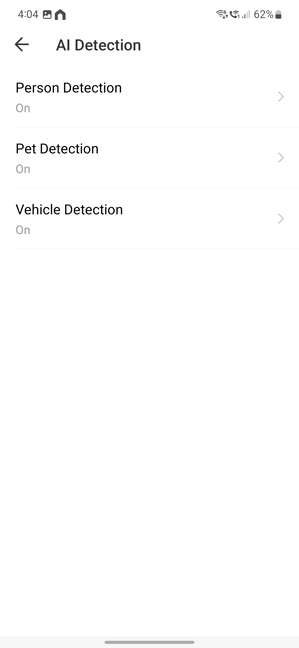 Don't forget to configure the AI Detection
One downside to the whole system is that you need to configure each camera individually. You don’t have access to a global set of settings for all cameras connected to the Tapo H200 smart hub. Therefore, once you configure one camera, go to the next, and change the same settings. Or you may have them placed in different locations and need different rules and settings. 🙂
Don't forget to configure the AI Detection
One downside to the whole system is that you need to configure each camera individually. You don’t have access to a global set of settings for all cameras connected to the Tapo H200 smart hub. Therefore, once you configure one camera, go to the next, and change the same settings. Or you may have them placed in different locations and need different rules and settings. 🙂
 Your cameras are paired with the Tapo H200 smart hub
The quality of the video recordings is generally good. I didn’t encounter any visibility issues, not even during the night. You can easily identify who or what is in front of the camera. And if you can’t see something or someone during the night, you can temporarily enable Color Mode, and Tapo C420S2 will shine a lot of light on the subject, allowing you to see it well. Do keep in mind, though, that this mode uses a lot of energy and will empty the batteries rather quickly.
Your cameras are paired with the Tapo H200 smart hub
The quality of the video recordings is generally good. I didn’t encounter any visibility issues, not even during the night. You can easily identify who or what is in front of the camera. And if you can’t see something or someone during the night, you can temporarily enable Color Mode, and Tapo C420S2 will shine a lot of light on the subject, allowing you to see it well. Do keep in mind, though, that this mode uses a lot of energy and will empty the batteries rather quickly.
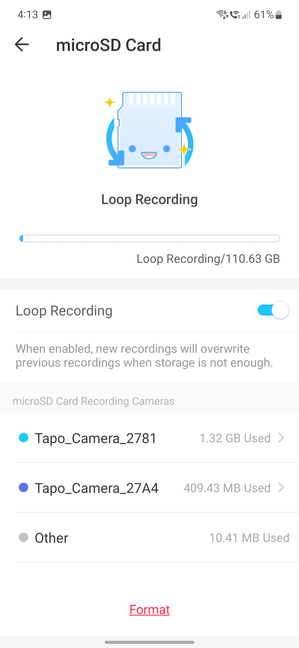 Each camera has its own recording feed on the microSD card
Lastly, the Tapo app allows you to create all kinds of automation. For example, you can set it to ring your smart hub each time the camera in your garage detects movement. You can also integrate it with Google Assistant, Google Home, or Amazon Alexa to manage your smart cameras through voice commands or have them communicate with other smart devices. Unfortunately, integration with Apple HomeKit is missing, and this may be a downside for some people.
Each camera has its own recording feed on the microSD card
Lastly, the Tapo app allows you to create all kinds of automation. For example, you can set it to ring your smart hub each time the camera in your garage detects movement. You can also integrate it with Google Assistant, Google Home, or Amazon Alexa to manage your smart cameras through voice commands or have them communicate with other smart devices. Unfortunately, integration with Apple HomeKit is missing, and this may be a downside for some people.
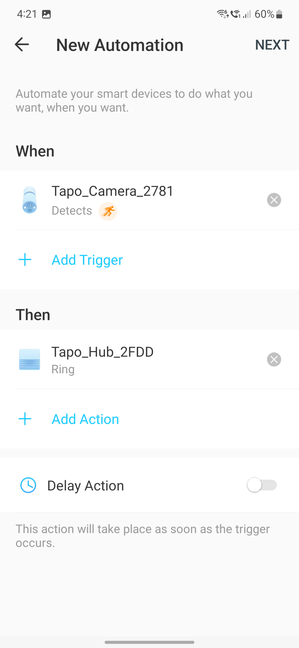 Automation is useful and easy to set up
I enjoyed using the TP-Link Tapo C420S2 smart security camera system. Its AI capabilities are useful, the price is reasonable, and the video recording quality is good. It provides a good bang for the buck, and most users will be pleased.
Automation is useful and easy to set up
I enjoyed using the TP-Link Tapo C420S2 smart security camera system. Its AI capabilities are useful, the price is reasonable, and the video recording quality is good. It provides a good bang for the buck, and most users will be pleased.
Tapo C420S2: Who is it good for?
This smart, wire-free security camera system is a good choice if:- You want to keep an eye on your home, garage, garden, or some other location
- You need a camera system capable of filming during the night
- You don’t want to pay a lot of money for a smart security camera system
- You need to integrate it with other smart devices
Pros and cons
These are the things I like about the Tapo C420S2:- Reasonably priced (around 200 USD)
- Good video quality
- Two-way audio
- Color night vision is available
- Local storage capabilities
- Integrated with Google, Alexa, and IFTTT
- Cloud storage and other features are available only with a subscription
- Battery life is not great when recording 2K video
- No Apple HomeKit support
Verdict
TP-Link Tapo C420S2 is a security camera kit at a reasonable price, with tons of useful features, including AI motion alerts and color night vision. It can record video up to 1440p resolution, with sharp image quality, and store it locally, on a microSD card, or in TP-Link’s cloud storage, depending on your preference. Tapo C420S2 is a great choice, especially for those who need to monitor areas without a power outlet. And if you don’t enable energy-intensive features like video recording at maximum resolution and frame rate or color night vision, the autonomy you get should be very satisfying. Tapo C420S2 delivers great value for money, and it should be able to satisfy the needs of most users.Unboxing the TP-Link Tapo C420S2
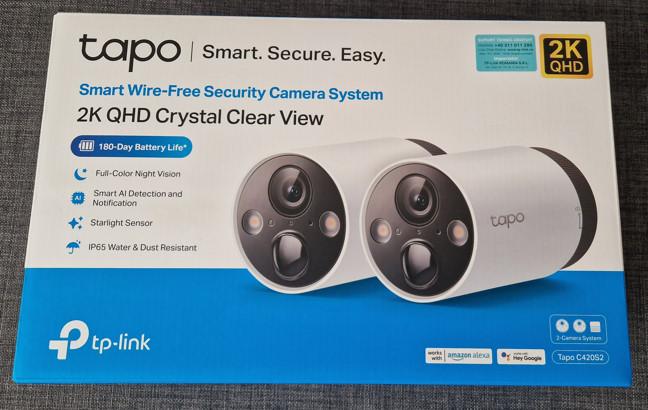
Tapo C420S2 comes in a large cardboard box with white and blue as the main colors. On the front, there’s a picture of the two cameras inside and a list of their features. One aspect likely to be appreciated by many users is the 180-day battery life advertised by TP-Link. It’s great for people who need to mount them in areas without a power plug nearby. For example, you can use them to monitor your garage, what’s going on near your home’s fence, or inside your yard (you may want to watch this funny video, if you’ve got a couple of minutes to spare).Design and hardware specifications
The two cameras that are part of the Tapo C420S2 have a cylinder shape and are 4.3 inches long by 2.5 inches wide or 110.6 x 64.2 mm. Each camera has two spotlights, a light sensor, a motion sensor, a status LED, a microphone, and a lens.Installing the TP-Link Tapo C420S2
First, you should charge the batteries of the two Tapo C420S2 cameras. Next, twist anti-clockwise and then pull the cover of each camera to remove it and insert the battery.Using the TP-Link Tapo C420S2
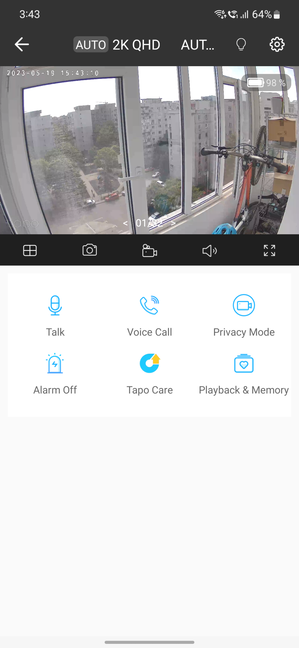
After the installation, you’ll spend most of your time using the Tapo app. First, select the camera you want to control to see a live preview of what’s in front of it. After that, you can take screenshots, start a manual recording that will be stored on your microSD card (or cloud storage), set the audio volume for it, talk to whoever is in front of the camera, and so on.

Discussion (0)
Be the first to comment.