10.09.2020
While having the ability to restore your system from a restore point is one of Windows' most useful features, it may be that some people will want to turn it off for all or some of their partitions. Others may wish to change how much space is used for System Restore and assign more or less. To help you out, this guide shows you how to configure System Restore in Windows 10, how much drive space it uses, and how to enable or disable it for one partition or another:
NOTE: For the purpose of this tutorial, we assume that you know what System Restore is and that you already have a basic understanding of what it does. If you don't, you should first check this article: What is System Restore and 4 ways to use it.
How to open System Restore's settings to configure it
If you want to launch System Restore and change its settings, you need to get to it first. We've covered all the steps in detail in the first part of this guide: 2 ways to enable System Restore in Windows 10.
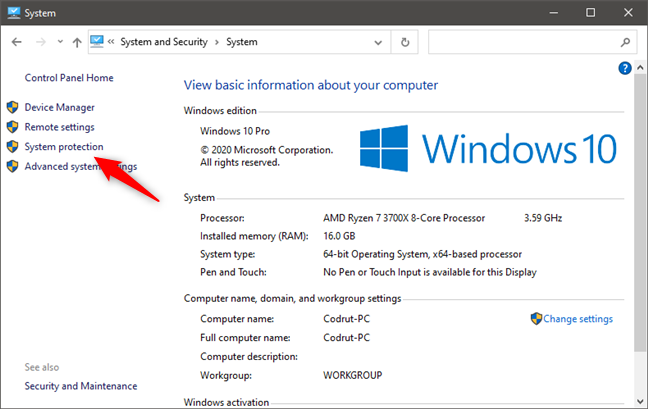
The basic steps are these: log in as an administrator, open the Control Panel, go to System and Security, and then click or tap on System. In the System window, click or tap the "System protection" link on the left.
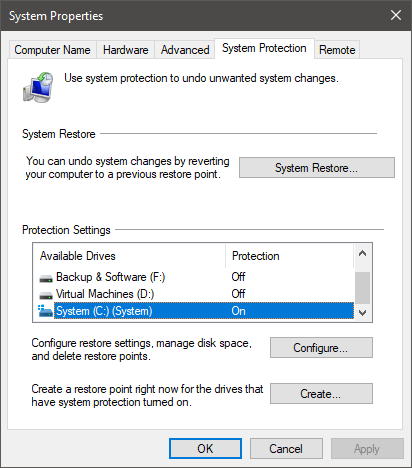
In the System Properties window, you see the drives on your computer and whether System Restore is turned on for each of them. If you have more than one partition, then you should see that the System Restore is turned off for all of them except the one where Windows 10 is installed. That's because this tool backs up system files, settings, and registry keys, which are all stored on the partition where Windows 10 is found.
How to turn on System Restore for a specific drive
First of all, note that you don't get any benefit from enabling System Restore on other partitions, except for the one where you installed Windows 10. However, System Restore allows you to enable it on any drives, even on the ones where there's no Windows installation found.
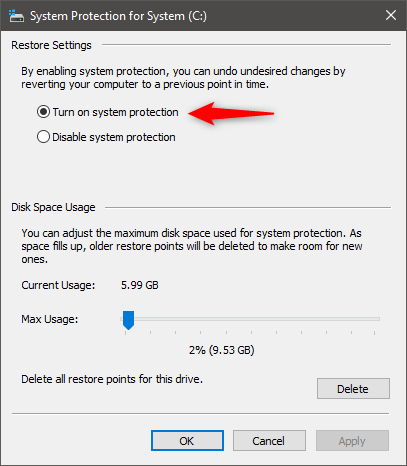
If System Restore is not turned on for a particular drive, and you want to change that, follow the steps from this guide: 2 ways to enable System Restore in Windows 10. In short, select it from the list of available drives, press Configure, and then check the box that says "Turn on system protection." Click or tap on OK, and it's done.
How to manually create restore points with System Restore
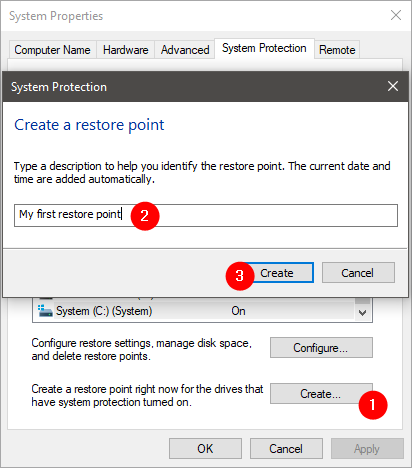
If you've just enabled System Restore, the next best thing is for you to manually create a first restore point. Doing it is easy, as you can find out from this tutorial: 3 ways to create a restore point in Windows 10. All you have to do is go back to the System Protection tab from the System Properties window, push the Create button, and follow the steps of the "Create a restore point" wizard.
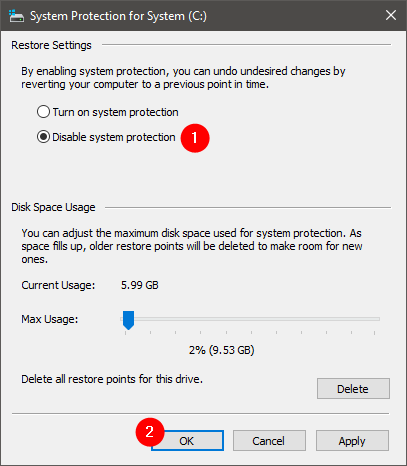
How to configure how much disk space System Restore is allowed to use
You may want to save some space on your computer's storage and allow less space for System Restore to store its restore points. Or, on the contrary, you may want to allow more space, so that more restore points can be stored to use them later.
In the System Protection window, you can see how much space System Restore is currently using on the selected drive, and you can also set how much you want it to use.
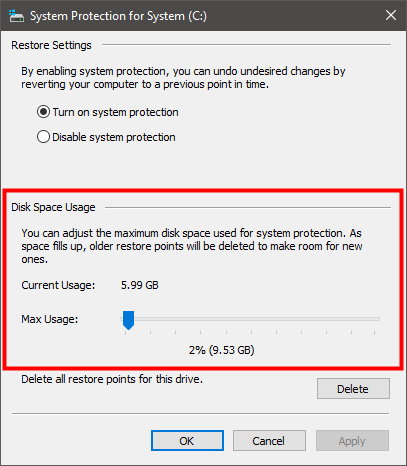
Move the Max Usage slider to the level you prefer and click or tap Apply or OK.
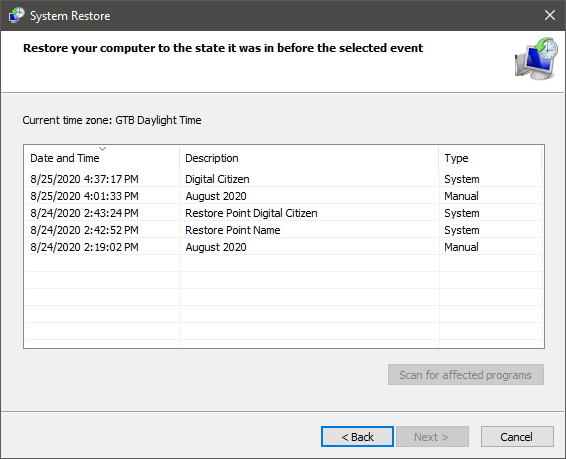
How to see the system restore points available for a drive
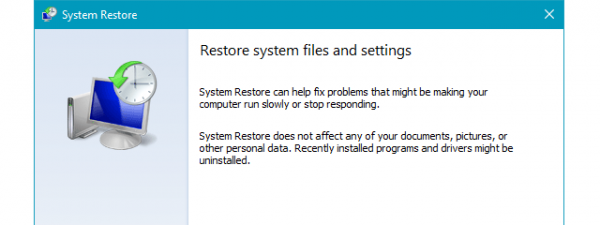
In case you want to see the list of restore points on a drive, you can do that from the System Restore wizard. You don't have to actually do a system restore: just open the wizard and check the list. If you don't know how to do that, follow the first two steps from this guide: 3 Steps to restoring your Windows PC to a working state, with System Restore, but stop when you see the available restore points.
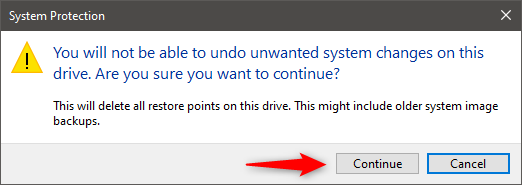
How to free up disk space by deleting all the restore points on a drive
Go back to the System Protection window, like we've shown you at the beginning of this tutorial (first and second sections). In the System Protection window, you should have a button for deleting all System Restore points on that partition, so that you can save some space.
If you press it, you are informed that all restore points on this drive are going to be deleted, and, after that, you won't be able to undo unwanted system changes using the lost restore points. If you want to go ahead, click or tap Continue. Otherwise, press Cancel.
How to disable System Restore in Windows 10
If you don't want to use System Restore to protect your system, you can turn it off and save some storage space. In the System Protection window, select "Disable system protection," and press Apply or OK.
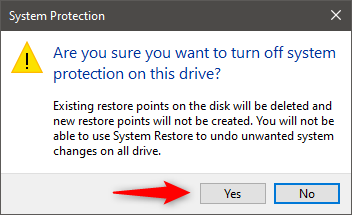
You are asked whether you are sure you want to turn off system protection on the selected drive. If you disable it, all the existing restore points are deleted, and new restore points can no longer be created. In other words, from now on, you won't be able to use System Restore to recover your Windows 10 computer or device. If you still want to go ahead, press Yes.
Close the System Properties window, and you are done.
Are you using System Restore to protect your Windows 10 PC?
While System Restore is one of the most useful built-in Windows utilities, it is limited in the protection it provides. You should keep it on for your system drive, where Windows 10, apps, programs, games, and drivers are installed. However, on other partitions, it is best turned off. Hopefully, this guide has achieved its mission of showing you how best to configure System Restore in Windows 10. Are you using System Restore to keep your Windows 10 PC safe? Let us know in the comments section below and, if you have any questions, don't hesitate to ask.