Most modern handheld devices and computers have a feature that can reduce the blue light emitted by their screens. On devices with Windows, this blue light filter is called Night light. The feature made its first appearance in Windows 10 and now Windows 11 supports it as well. Read on to find out how to enable and configure Night light in Windows 11:
What is Windows 11 Night light? What does Night light do?
If you use your Windows 11 device regularly in the evening or at night, you might notice that it takes you longer to fall asleep after using it. The Night light feature, when activated, makes the screen display warmer colors, acting like a blue light filter in order to help users fall asleep easier at night. Blue light filtering is labeled as a method to reduce eye fatigue at night and improve sleep cycles. The scientists are still debating whether less blue light actually helps with all that, but worst case, it’s harmless, so why not try it?

Using the PC during the night strains your eyes
In this guide, we are focusing on Windows 11, but we also wrote an article on Windows 10 Night light: What it does and how to use it - check it out for more information.
How to enable and configure the Windows 11 Night light
In order to turn on the feature, you must first open the Settings window. One way to do it is to click or tap on Start and then select Settings. If you can’t find the icon, just type “settings” in the search bar.
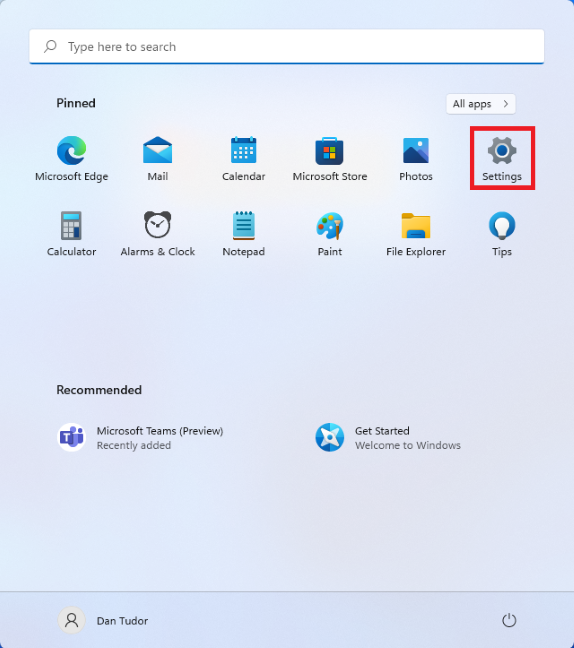
The Settings icon can be found by pressing Start
In the Settings app, make sure that System is selected on the left, and then click or tap on Display (it’s the first item on the right-hand list).
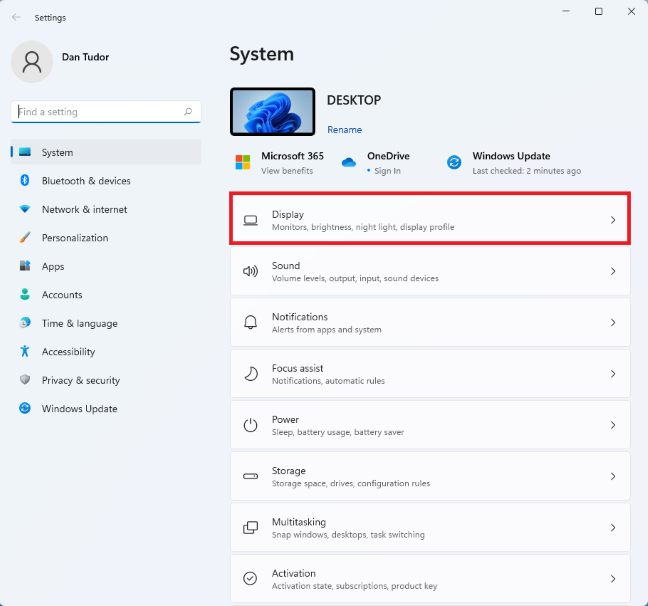
Click on Display to see more settings
On the next screen, you should find all the Display settings from Windows 11. You can simply turn on the Night light by flipping the switch next to it, or you can click on the text (but not the switch) to access more detailed settings.
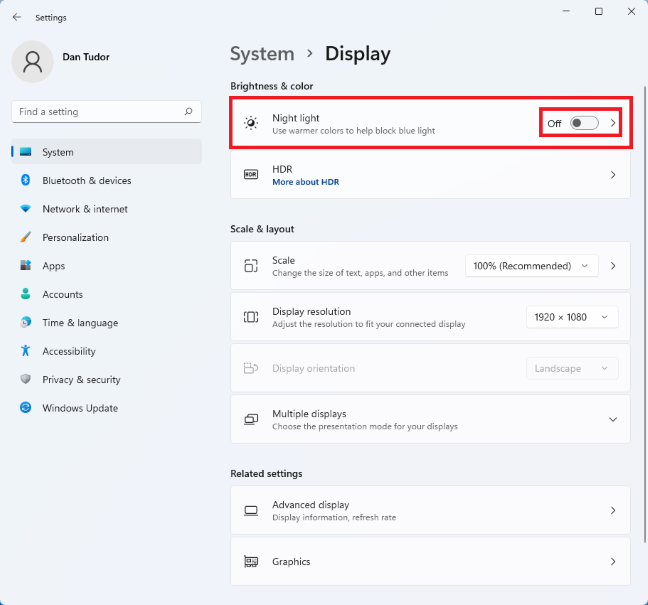
The Night light feature can be turned on or off with the switch
You then have the option to fine-tune Night light:
- You can increase or decrease the Strength of the effect, by moving the slider. Dragging it to the right makes your screen use warmer colors to reduce eye strain, while dragging it to the left makes it use cooler hues. You should fiddle with the slider at night, and not during the day, because it is easier to find the right setting.
- Set the “Schedule night light” switch to On and then configure it to activate at certain times throughout the day or even synchronize it to the sunset and sunrise, if you have Location services activated.
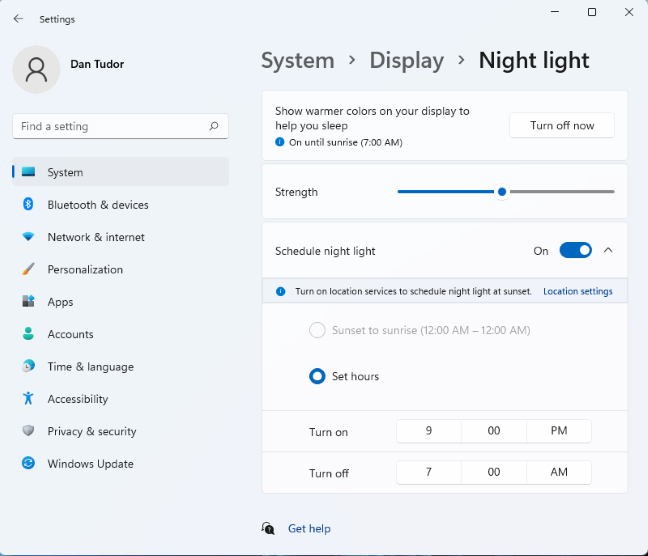
Tweak the Windows 11 Night light settings
All your changes are applied instantly. When you are done configuring the Night light, close Settings and you are done.
How to enable or disable the Night light from Quick Settings
If you are not interested in tweaking the Night light settings, but instead you just want to turn the feature on or off, there is a faster way to do it. Press Windows + A on your keyboard or click or tap on the icons next to the clock (Battery, Volume, Network), in the lower-right corner of the screen.
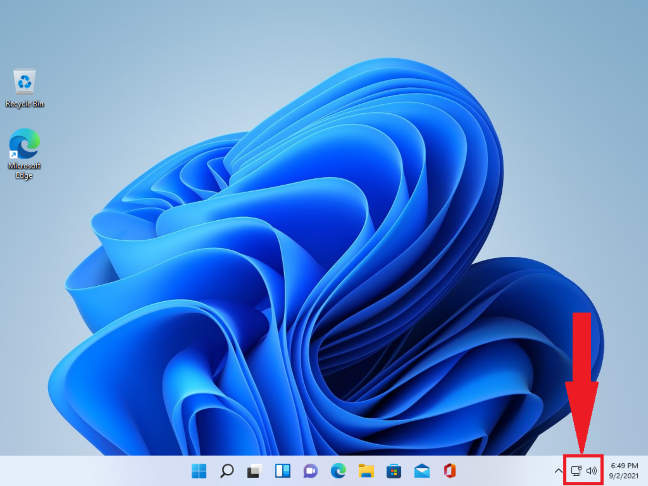
Click the icons next to the clock to open Quick Settings
The Quick Settings pane opens on the lower-right corner of the screen. Here you can toggle different Windows 11 features, including the Night light. Just click or tap on the Night light button, and the effect should be visible instantly. One click turns it on, and the next turns it off.
NOTE: The Quick Settings buttons you see might be ordered differently on your Windows 11 PC or device.
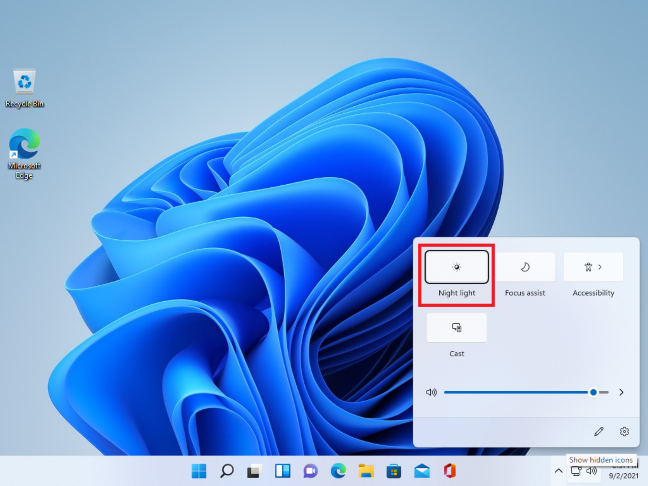
Turn Night light on or off by pressing this button
To make the Quick Settings go away, click or tap anywhere on the desktop.
Why is Windows 11 Night light not working?
If the Night light feature is greyed-out, you either don’t have the right drivers installed for the graphics card, or your device uses certain drivers that are incompatible with the feature. If you need help to install or update your drivers, you can find all the relevant information in this article: What are drivers? What does a driver do?.
Does Windows 11 Night light work for you?
We are fans of blue light filters on our mobile devices, especially in combination with Dark Mode. Only some of us use the feature on Windows devices, though. Before you close this article, tell us what’s your experience with Night light. Let us know in the comments if you see any improvement in sleep cycles or eye strain after using it.


 10.09.2021