

Do you have a Windows 11 Home license key and want to install it without using a Microsoft account? Or maybe you’re trying to install Windows 11 Pro with a local account? Microsoft pushes you to use a Microsoft account and doesn’t give you the option to create a local account during the Windows 11 setup, whether it’s the Home or Pro version. But there’s a way around this. In this guide, I’ll show you how to set up Windows 11 with a local account instead of a Microsoft account. Here’s how to do it:
NOTE: I wrote this guide using the latest Windows 11 currently available: version 23H2. The steps apply to both Windows 11 Home and Pro editions.
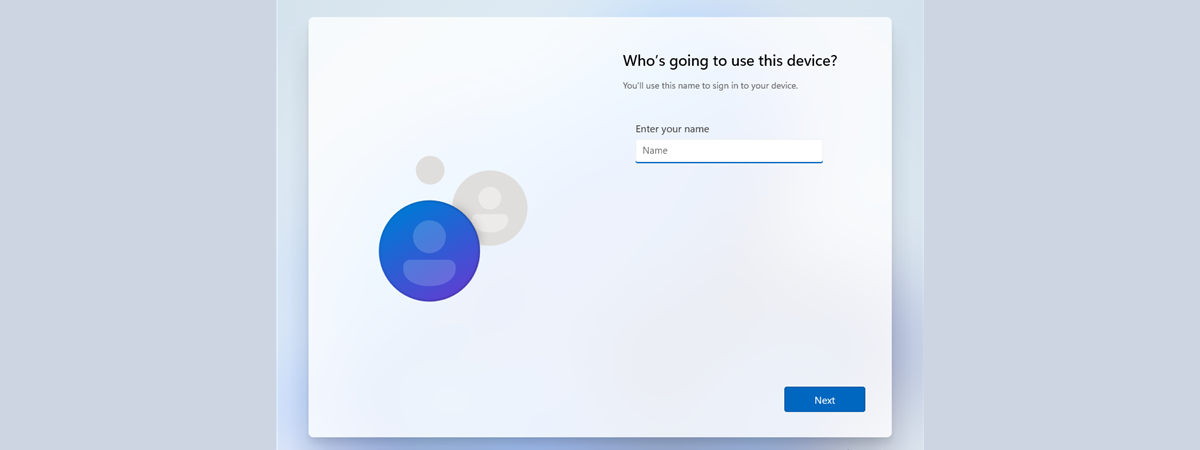
 When asked to sign in, stop!
Unplug your computer’s network cable to disconnect it from the internet. If you’re installing Windows 11 on a laptop, make sure you don’t connect to any Wi-Fi network until you’ve created the local account. This is an essential step and skipping it will render your whole endeavor useless, so don’t!🙂
Then, press SHIFT + F10 on your keyboard to open Command Prompt.
When asked to sign in, stop!
Unplug your computer’s network cable to disconnect it from the internet. If you’re installing Windows 11 on a laptop, make sure you don’t connect to any Wi-Fi network until you’ve created the local account. This is an essential step and skipping it will render your whole endeavor useless, so don’t!🙂
Then, press SHIFT + F10 on your keyboard to open Command Prompt.
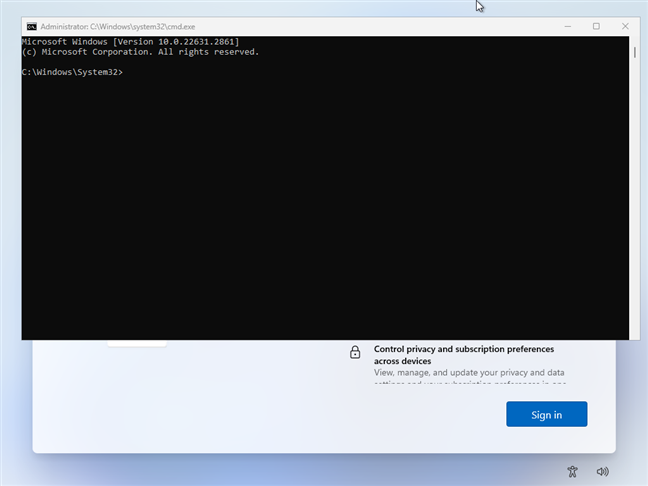 Press Shift + F10 on the keyboard to open CMD
Next, you’ll run a command that makes the Windows 11 setup process skip its network requirements. In other words, once you execute the command, the install wizard will no longer ask you to connect to the internet in order to sign in with a Microsoft account. The command you must type in the Command Prompt window is:
Press Shift + F10 on the keyboard to open CMD
Next, you’ll run a command that makes the Windows 11 setup process skip its network requirements. In other words, once you execute the command, the install wizard will no longer ask you to connect to the internet in order to sign in with a Microsoft account. The command you must type in the Command Prompt window is:
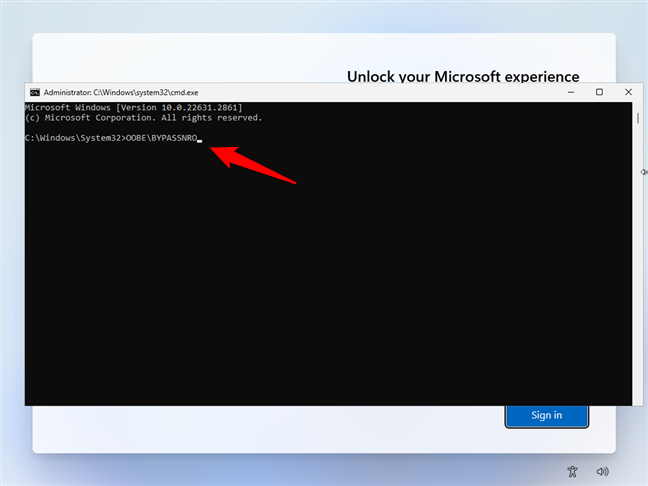 Run this command to set up Windows 11 with a local account
Press Enter on the keyboard, and your computer immediately restarts, no further questions asked.
Run this command to set up Windows 11 with a local account
Press Enter on the keyboard, and your computer immediately restarts, no further questions asked.
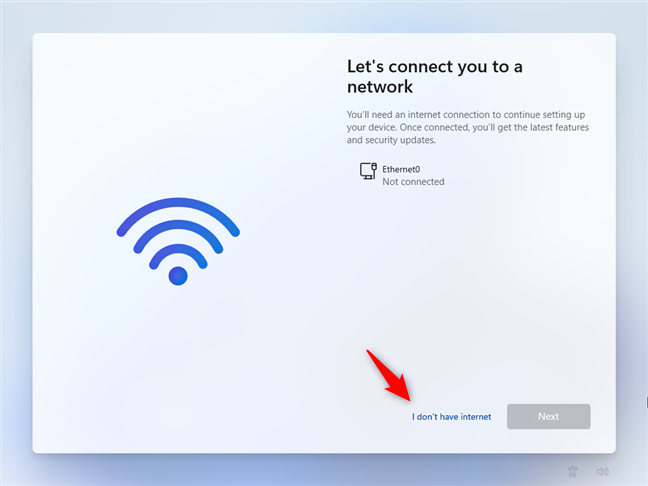 Once your PC restarts, choose I don't have internet
The Windows 11 setup will attempt once more to make you connect to the internet and use a Microsoft account. If you’re sure you want a local account instead, don’t fall for it! Click or tap the Continue with limited setup link instead of the Connect now button.
Once your PC restarts, choose I don't have internet
The Windows 11 setup will attempt once more to make you connect to the internet and use a Microsoft account. If you’re sure you want a local account instead, don’t fall for it! Click or tap the Continue with limited setup link instead of the Connect now button.
 Click or tap Continue with limited setup
Then, the Windows 11 setup abandons trying to change your mind and accepts the fact that you want a local account. 🙂
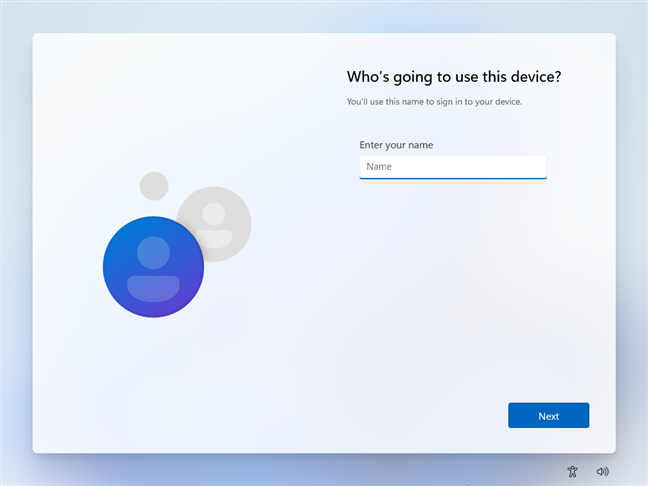
Enter a name for the local account that you’re creating on your PC, choose a password, set the security questions, and continue with the usual personalization process for your Windows 11 installation.
Click or tap Continue with limited setup
Then, the Windows 11 setup abandons trying to change your mind and accepts the fact that you want a local account. 🙂
Enter a name for the local account that you’re creating on your PC, choose a password, set the security questions, and continue with the usual personalization process for your Windows 11 installation.
 Create a local account during the Windows 11 setup
Congratulations! You’ve managed to setup Windows 11 without a Microsoft account!
TIP: If Windows 11 (Home or Pro) is already installed on your computer and personalized with a Microsoft account, you can also switch to a Windows 11 local account.
Create a local account during the Windows 11 setup
Congratulations! You’ve managed to setup Windows 11 without a Microsoft account!
TIP: If Windows 11 (Home or Pro) is already installed on your computer and personalized with a Microsoft account, you can also switch to a Windows 11 local account.
How to set up Windows 11 with a local account
Windows 11 enforces the use of a Microsoft account by default. When you set up a PC with Windows 11, regardless of whether you’re installing a Home or Pro edition, you’re asked to sign in with a Microsoft account, and you don’t see any mentions about creating a local account instead. The good news is that, even if Microsoft doesn’t make it easy for us, you can install Windows 11 without a Microsoft account. For that, you need to stop Windows 11 from asking for a Microsoft account. Here are the exact steps:1. Stop Windows 11 from asking for a Microsoft account
Follow this guide to install Windows 11 from a USB drive, DVD, or ISO file, and stop when you get to the step where you’re asked to sign in with your Microsoft account.OOBE\BYPASSNRO
2. Set up Windows 11 Home or Pro with a local account
After your computer restarts and the Windows 11 setup process resumes, follow the wizard’s steps until asked to connect to a network. Instead of doing that, click or tap I don’t have internet at the bottom of the dialog.
Discussion (2)
When installing Windows 11 in a new computer, I came across the requirement for a microft account. I did not like this, and suspended the procedure. A web search located this article. I could not get the command line method to stop communications. The solution that I came up with was to power down my domestic wifi, and so force a local account creation.
Happy you found a way. And thank you for sharing it. Others will find it useful.