




If you want to record gameplay, livestream from a console, turn a camera into a webcam, or save HDMI video directly to your computer, you need to know how to use HDMI video capture card hardware correctly. A capture card sits between your video source (like a PS5, Nintendo Switch, DSLR, or another PC) and the system that’s recording or streaming. It takes the HDMI signal, converts it, and makes it available to your software.
This guide walks you through the HDMI video capture setup from start to finish. You’ll learn how to connect the devices, install capture card software, configure inputs and outputs, record or stream, and fix common problems like HDMI capture card not detected. By the end, you’ll be ready to capture gameplay or any HDMI feed with professional results.
Before connecting anything, make sure you have these items ready. It saves time and helps avoid connection errors later.
- Video source: Game console (PS5, Xbox, Switch), camera, or another PC.
- HDMI video capture card: USB version for laptops or PCIe for desktop PCs.
- Two HDMI cables: One for input, one for passthrough to your display.
- Computer: The device that records or streams video.
- Capture card software: OBS Studio or Streamlabs for recording and streaming.
Step 1: Connect Your Devices
This step creates the video passthrough from your source (like a gaming console) to your monitor and computer.
- Unplug the HDMI cable from your gaming console or camera that is going to your monitor/TV.
- Plug that cable into the port labeled "HDMI IN" on your capture card.
- Take a second HDMI cable and connect it from the "HDMI OUT" port on the capture card to your monitor or TV. This allows you to see the video directly.
- Finally, use the provided USB cable to connect the capture card to a USB 3.0 port on your computer.
Result: You should now see the video from your source device displayed on your monitor.

Step 2: Add the Capture Card as a Video Source in OBS
Now, you need to tell OBS to capture the video signal from the card.
- In OBS, look at the "Sources" panel and click the + (plus) button.
- Select "Video Capture Device" from the menu.
- Create a name for the source (e.g., "Capture Card").
- In the new window, click the "Device" dropdown and select your capture card from the list (it may appear as "USB 3.0 Device" or its brand name).
Result: The video feed from your console or camera should now appear in your OBS scene.

Step 3: Configure OBS Audio and Video Settings
To ensure high-quality video and capture the audio, you need to adjust a few settings.
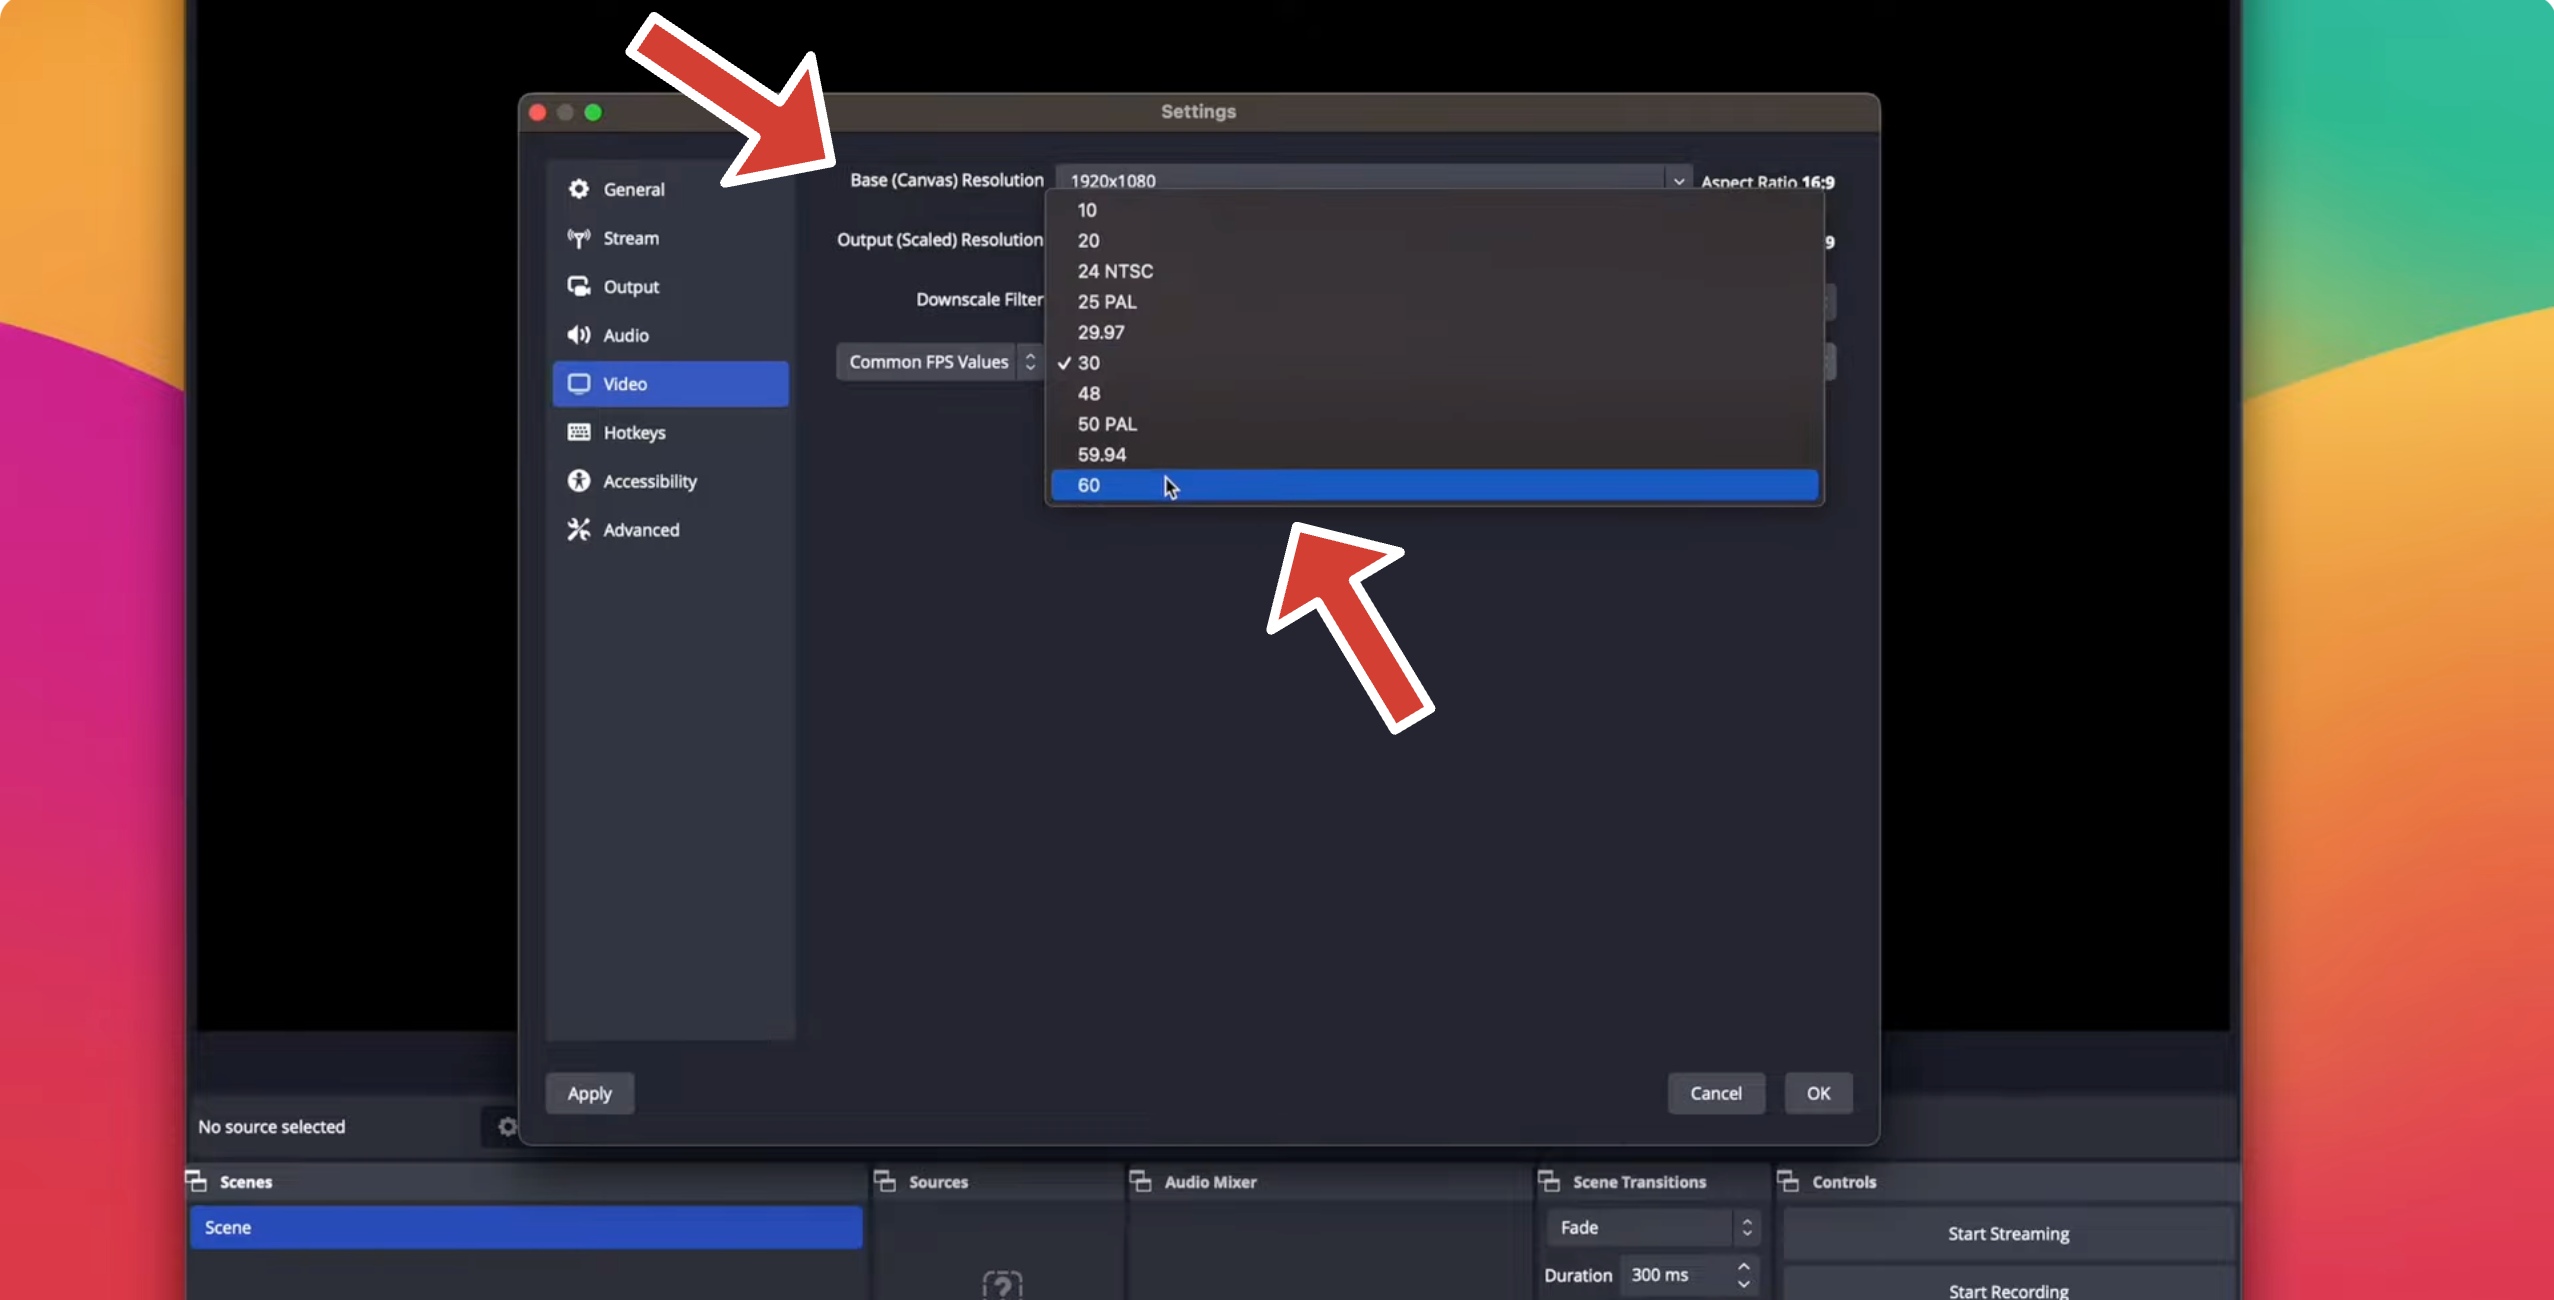
- For Video: Go to File > Settings > Video. Ensure your base (Canvas) and output (Scaled) resolution are set to 1080p and the frame rate to 60 FPS.
- For Audio: Click the + in the bottom left of the Sources panel again and add an "Audio Input Capture" source. Select your capture card from the device list to bring the audio from your source into OBS.
Step 4: Adjust Output Settings for Recording or Streaming
Once your signal appears in OBS, you can either record locally or stream live.
To Record Gameplay or Video
Finally, optimize the output quality based on what you plan to do.
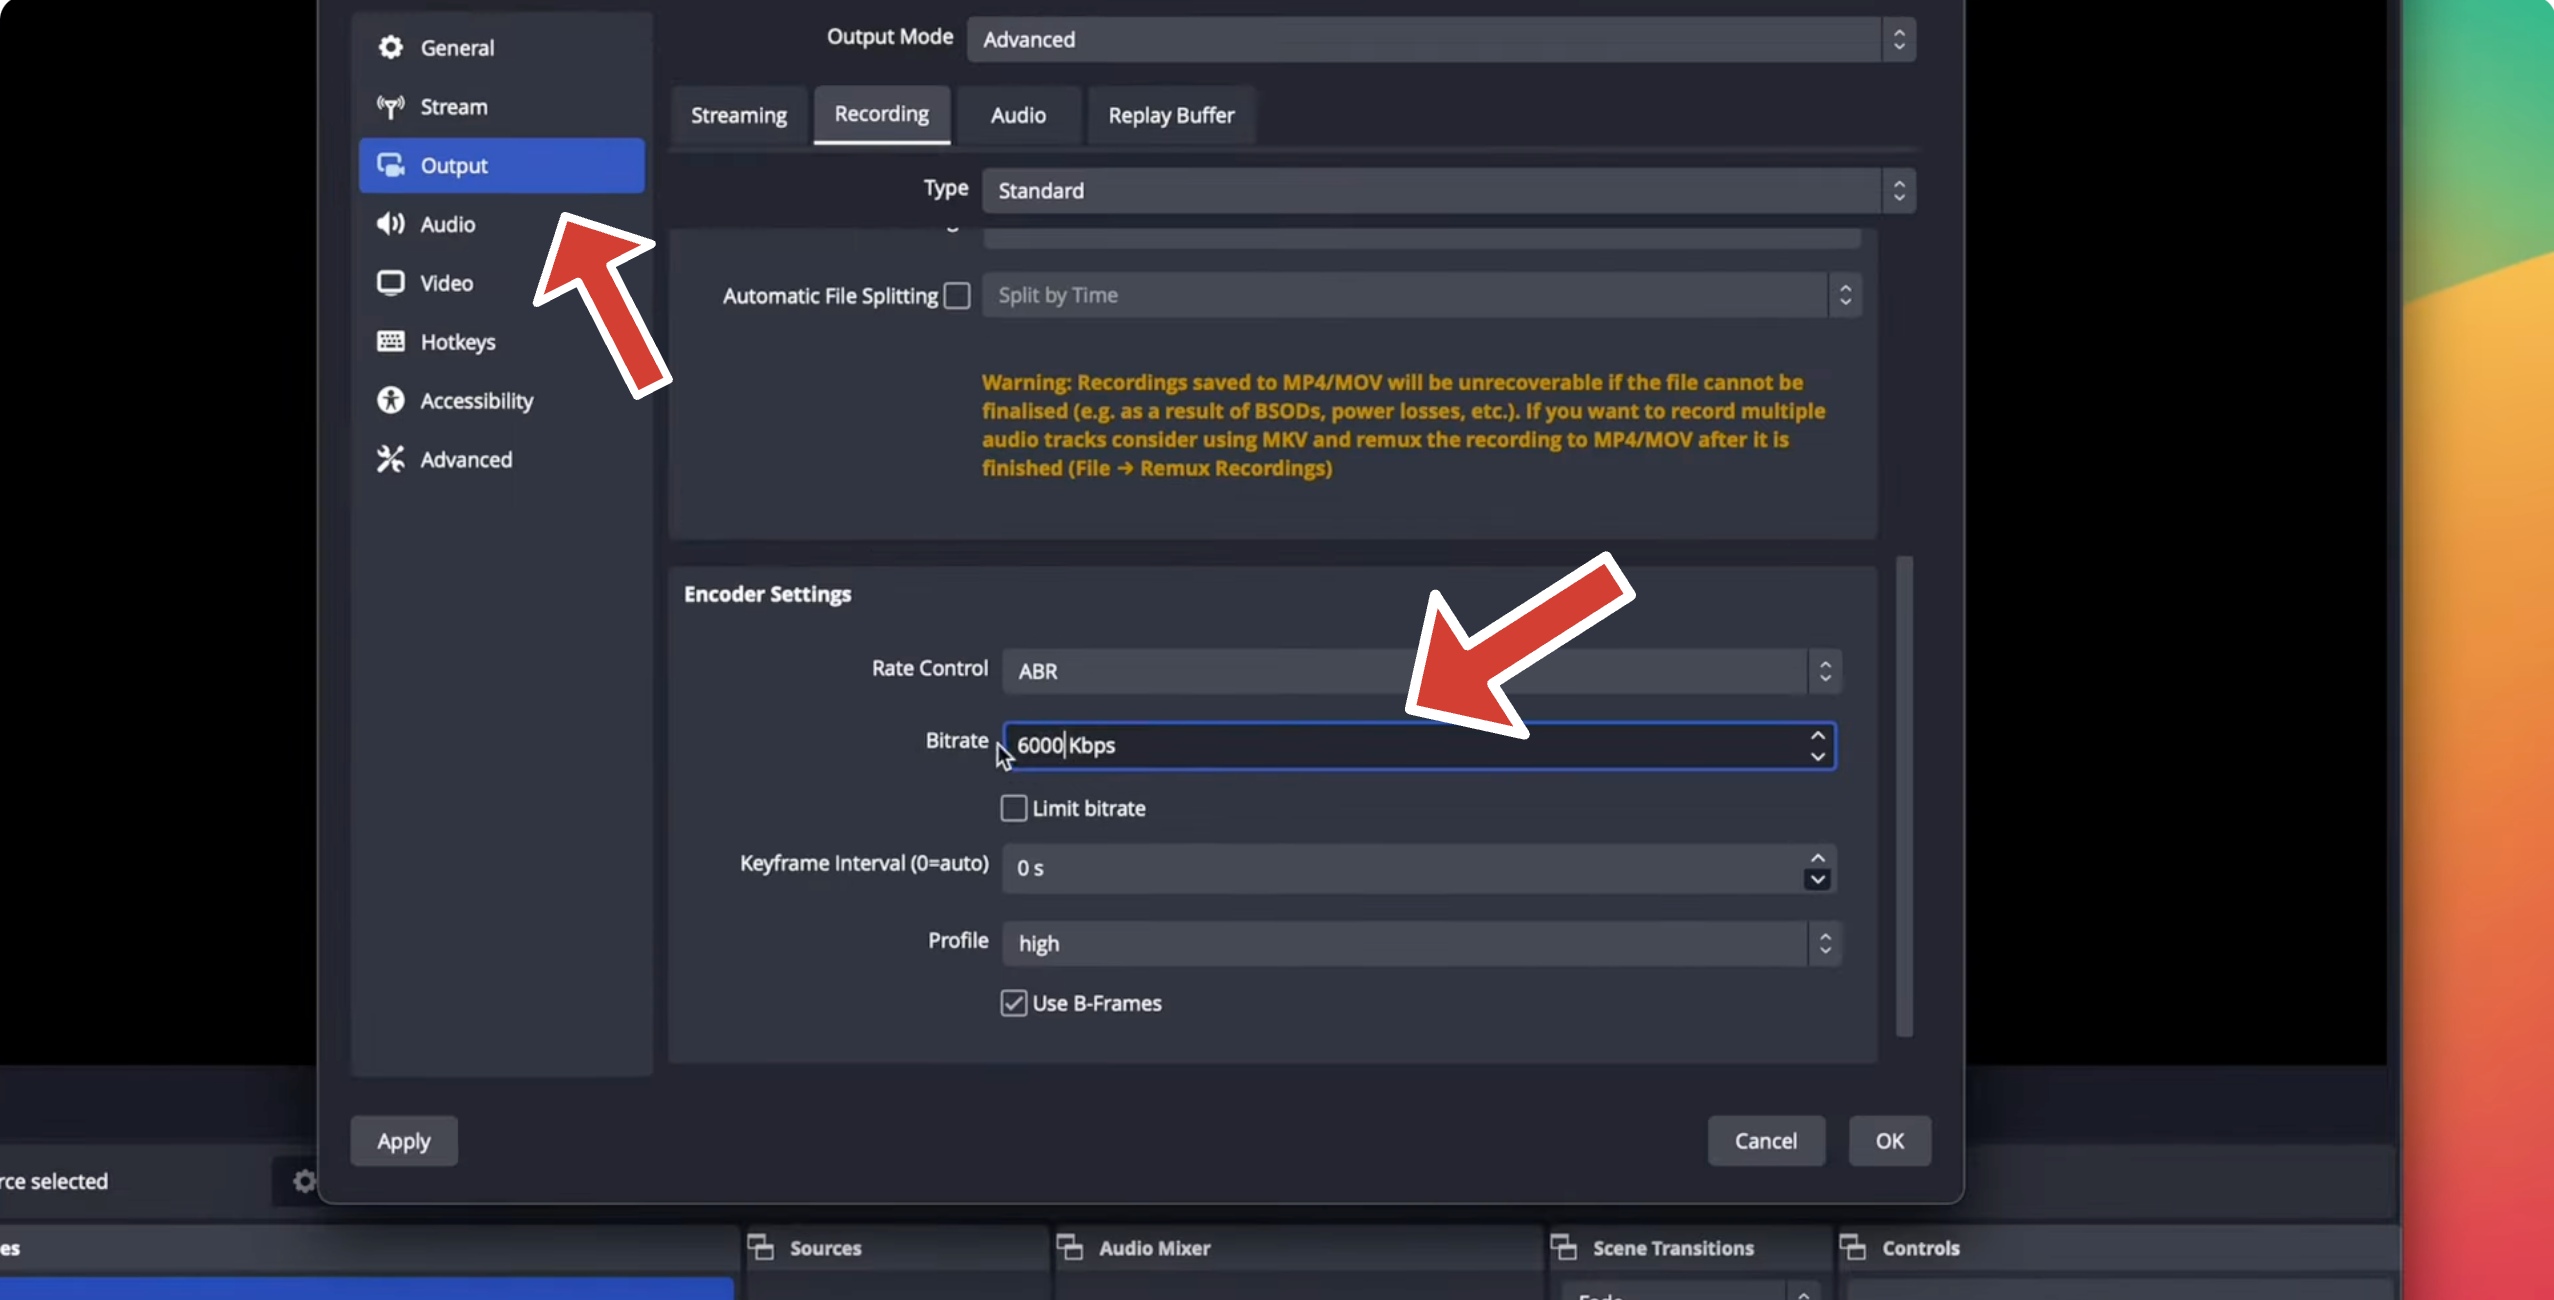
- Go to File > Settings > Output and set the output mode to "Advanced".
- For Streaming: Under the "Streaming" tab, set the video bitrate to around 6,000 Kbps.
- For Recording: Under the "Recording" tab, set a higher bitrate (e.g., 25,000 Kbps) for better quality and choose a format like MP4 or MOV.
Result: You are now ready to stream or record high-quality footage from your HDMI device.
Troubleshoot Common Problems
Here are quick fixes for common HDMI video capture issues.
Black Screen or No Signal
- Ensure HDMI OUT → HDMI IN connection order is correct.
- Use 1080p output instead of 4K on consoles that don’t support downscaling.
- Replace damaged HDMI cables or try another port.
No Audio Captured
- In OBS, right-click your capture card source → Properties → check the correct audio input.
- Ensure your console outputs sound over HDMI, not optical.
- Unmute the audio slider in OBS’s Audio Mixer.
Video Lag or Delay
- Use passthrough output to play on a TV or monitor instead of the OBS preview.
- Connect via USB 3.0 instead of 2.0.
- Close unnecessary background apps to reduce CPU usage.
HDMI Capture Card Not Detected
- Try a different USB port and avoid hubs.
- Reinstall or update your capture card drivers.
- Restart the PC and reconnect the capture card while OBS is closed.
- On Windows, open Device Manager and check under “Cameras” or “Sound, video and game controllers.”
FAQs
Do I need software for a capture card?
Yes. Software like OBS Studio or Streamlabs is required to display, record, or stream the HDMI feed on your computer.
Can I use an HDMI video capture card on a laptop?
Yes. A USB capture card connects easily to a laptop via USB 3.0 and works the same as on a desktop.
What’s the difference between USB and PCIe capture cards?
USB capture cards are portable and plug-and-play, ideal for beginners. PCIe capture cards install inside desktops for lower latency and more stable performance.
Can I use a capture card without OBS?
Some capture cards have built-in recording apps, but OBS remains the standard for flexible control, overlays, and streaming options.
Summary
- Connect HDMI OUT (console/camera) → HDMI IN (capture card).
- Connect capture card OUT → TV or monitor for passthrough.
- Connect capture card → computer via USB or PCIe.
- Install OBS Studio or Streamlabs.
- Add the capture card as a video source.
- Record or stream directly from OBS.
- Troubleshoot using the steps above if issues occur.
Conclusion
Knowing how to use HDMI video capture card hardware helps you stream, record, or create professional video content from any HDMI source. Whether you’re capturing gameplay, filming tutorials, or streaming live events, following these steps ensures a clean, lag-free setup. Once configured, your capture card becomes an essential bridge between your device and your creative output, ready to record or live stream anytime.


Discussion (0)
Be the first to comment.