




Reverse image search on iPhone and iPad lets you find where an image came from, identify objects, or spot fake photos. iOS does not include a dedicated reverse image search tool, but Safari and Google Lens make the process fast and reliable.
You can search images directly from websites, from your photo library, or through dedicated Google apps. The best method depends on where the image lives and how accurate you need the results to be.
Table of contents
- Choose the best reverse image search method
- Reverse image search using Safari on iPhone and iPad
- Reverse image search with Google Lens
- Reverse image search from the Photos app
- Reverse image search on iPad: tips that matter
- Why reverse image search may not work
- Tips for better reverse image search results
- FAQs
- Summary
Choose the best reverse image search method
Different situations call for different tools. Picking the right method saves time and avoids confusion.
When the image is already online
Use Safari. Long-pressing an image on a webpage gives you the quickest built-in option.
When the image is saved on your device
Use Google Lens. It handles screenshots and downloaded photos far better than browser tools.
When you need the most accurate results
Google Lens usually delivers stronger matches, especially for products, landmarks, and people.
Reverse image search using Safari on iPhone and iPad
Safari offers a native way to reverse image search without installing extra apps.
Use Safari long-press on an image
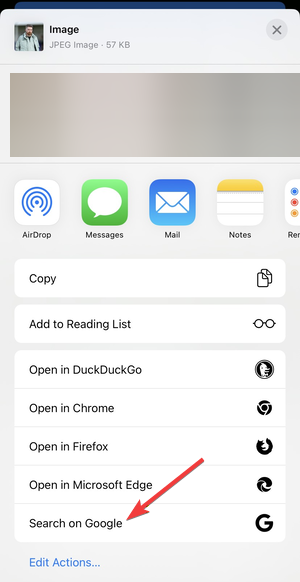
Open the webpage in Safari. Long-press the image, then tap Share and select Search on Google. Safari sends the image to Google Images and shows visually similar results.
Enable desktop website mode if needed
If the search option does not appear, tap the aA icon in the address bar and select Request Desktop Website. Reload the page and long-press the image again.

Reverse image search with Google Lens
Google Lens provides the most powerful reverse image search experience on iOS.
Use the Google app
Install and open the Google app. Tap the Lens icon in the search bar, then select an image from Photos or take a new one. Lens analyzes the image and shows matches, sources, and related information.

Use Chrome with Google Lens
You can also use Google Lens with Chrome to reverse search your image. Open the image in Chrome. Long-press it and tap Search Image with Google Lens. This method works well if you already use Chrome as your main browser.

Reverse image search from the Photos app
This method works best for screenshots and images shared through Messages or AirDrop.
Share a photo to Google Lens
Open the image in Photos. Tap Share, then choose Search on Google if available, or send the image to the Google app. Lens immediately starts the reverse image search.

Reverse image search on iPad: tips that matter
iPadOS adds a few advantages that make reverse image searching easier.
Drag and drop images in Split View
Open Photos or Files on one side and Safari or the Google app on the other. Drag an image directly into the browser or Lens interface to start searching faster.
Desktop-class Safari behavior
Safari on iPad often behaves like a desktop browser. You may see more image options without enabling desktop mode manually.
Why reverse image search may not work
Small issues can block the feature even when you follow the steps correctly.
“Search Image” option missing
Some websites disable image interactions. Desktop mode or opening the image in a new tab often fixes this.
Poor or incorrect results
Low-resolution images, heavy cropping, or added filters reduce accuracy. Use the original image when possible.
Tips for better reverse image search results
- Use the highest-quality image available
- Avoid screenshots with UI elements or borders
- Crop the image to focus on the main subject
- Try both Safari and Google Lens for comparison
- Add text keywords after the image search if needed
FAQs
Can I reverse image search without installing apps?
Yes. Safari allows reverse image search directly from webpages, though results may be limited.
Does reverse image search work offline?
No. All reverse image search methods require an internet connection.
Is Google Lens free on iPhone and iPad?
Yes. Google Lens is free through the Google and Chrome apps.
Summary
- Use Safari long-press for quick searches on web images.
- Use Google Lens for saved photos and better accuracy.
- Enable desktop mode if Safari options are missing.
- Take advantage of iPad Split View and drag-and-drop features.
Reverse image search on iPhone and iPad works best when you match the method to the situation. Safari handles quick checks, while Google Lens delivers deeper and more reliable results. Once you know where the image lives, you can identify it in seconds and move on with confidence.


Discussion (0)
Be the first to comment.