


There are several different reasons to set up a proxy server on iPhone. Some wireless school and business networks require proxy servers to let you access the internet. Or you may want to use the iPhone proxy settings to enhance your online privacy and gain access to restricted content. Regardless of your reasons, continue reading for step-by-step instructions to configure a proxy for iPhone. Furthermore, you can also learn how to turn off a proxy on iPhone, when you no longer need it. Let’s get started:
NOTE: I created this guide on an iPhone 11 running iOS 16.6. Remember that you can read about proxy servers and weigh their pros and cons if you need more details.
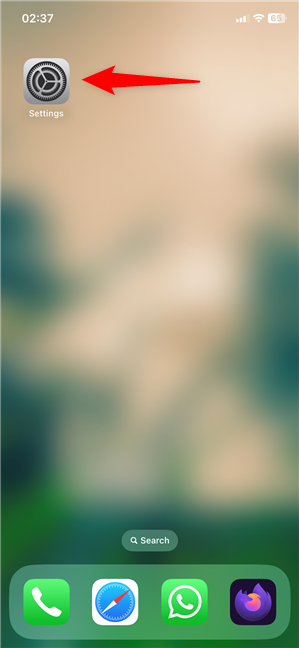
 Open the Settings app on your iPhone
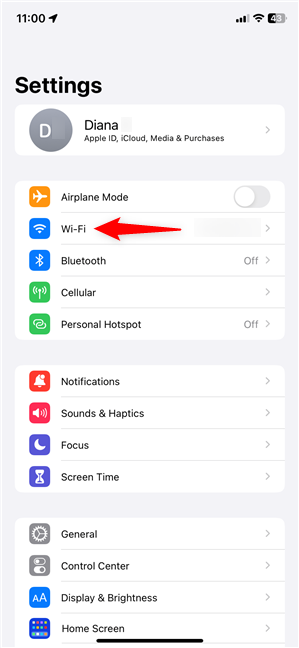
On the Settings screen, tap Wi-Fi.
Open the Settings app on your iPhone
On the Settings screen, tap Wi-Fi.
 Access Wi-Fi in the iPhone Settings
On the Wi-Fi screen, locate and tap on the wireless network you’re connected to.
Access Wi-Fi in the iPhone Settings
On the Wi-Fi screen, locate and tap on the wireless network you’re connected to.
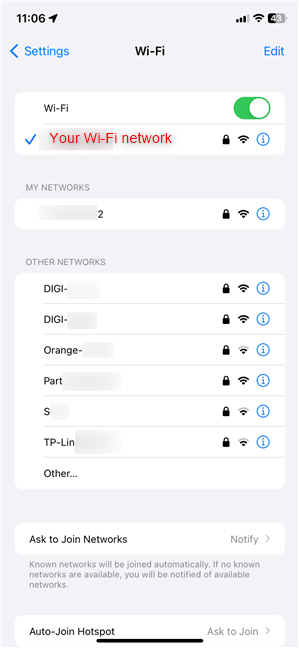 Tap on your Wi-Fi network
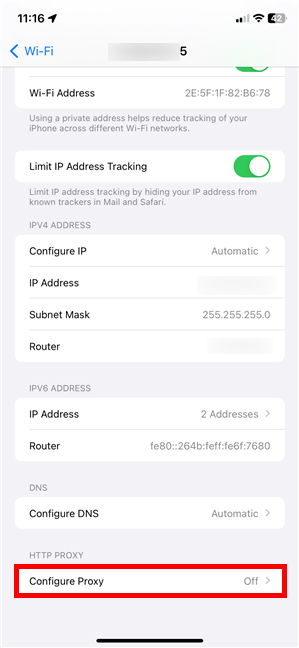
Next, you get to see all the settings for that wireless network. Scroll down all the way, and tap Configure Proxy to access the proxy settings on iPhone.
Tap on your Wi-Fi network
Next, you get to see all the settings for that wireless network. Scroll down all the way, and tap Configure Proxy to access the proxy settings on iPhone.
 Access Configure Proxy on iPhone
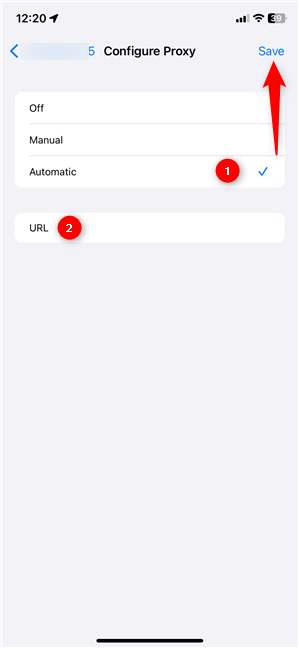
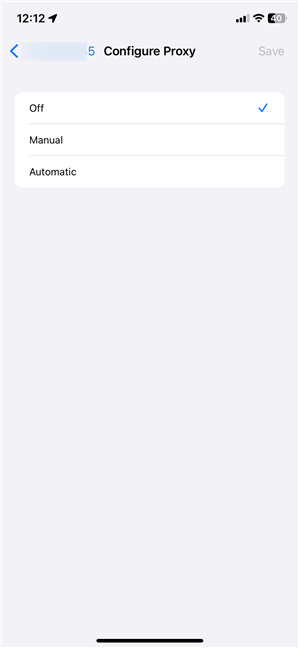 The Configure Proxy settings on iPhone
Select Manual or Automatic based on the iPhone proxy settings you want to use and access the corresponding subchapter of this guide for further instructions.
The Configure Proxy settings on iPhone
Select Manual or Automatic based on the iPhone proxy settings you want to use and access the corresponding subchapter of this guide for further instructions.
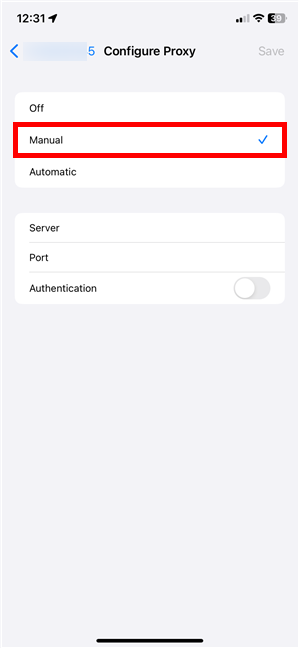 Manually configure a proxy server on iPhone
Type the proxy server’s IP address in the Server field. Then, enter the Port used for the proxy server. If the proxy server does not require authentication, Save your new iPhone proxy settings, and you’re done.
Manually configure a proxy server on iPhone
Type the proxy server’s IP address in the Server field. Then, enter the Port used for the proxy server. If the proxy server does not require authentication, Save your new iPhone proxy settings, and you’re done.
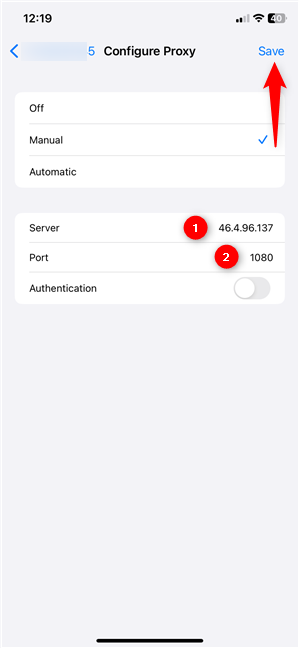 The Server and Port settings in iOS
If the proxy server you’re connecting to requires a Username and a Password, enable the Authentication switch and type the credentials for the proxy server. After inserting them, tap Save to start using the proxy server on your iPhone.
The Server and Port settings in iOS
If the proxy server you’re connecting to requires a Username and a Password, enable the Authentication switch and type the credentials for the proxy server. After inserting them, tap Save to start using the proxy server on your iPhone.
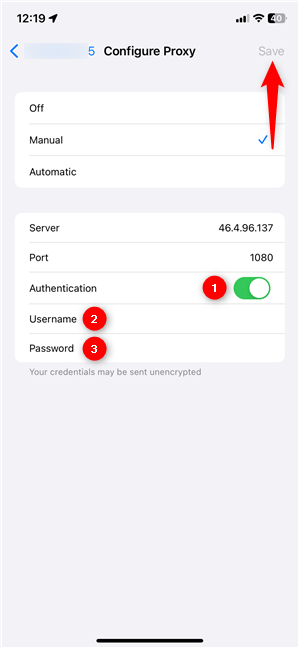 The Authentication settings for the iPhone proxy
 Automatic proxy settings on iPhone
Regardless of the method used to configure the iPhone proxy server, remember to tap the Save button in the top-right corner of the screen when you’re done. The proxy server will try to route all your requests, but it might not work with apps programmed to ignore proxy settings.
TIP: If you’re concerned with your online privacy, a VPN can also be a viable option. Read our guide to decide when to use a proxy server and when to use a VPN.
Automatic proxy settings on iPhone
Regardless of the method used to configure the iPhone proxy server, remember to tap the Save button in the top-right corner of the screen when you’re done. The proxy server will try to route all your requests, but it might not work with apps programmed to ignore proxy settings.
TIP: If you’re concerned with your online privacy, a VPN can also be a viable option. Read our guide to decide when to use a proxy server and when to use a VPN.
 How to turn off proxy on iPhone
Save your settings, and your iPhone stops using the proxy server for that Wi-Fi network.
How to turn off proxy on iPhone
Save your settings, and your iPhone stops using the proxy server for that Wi-Fi network.
How to access the iPhone proxy settings
To set up a proxy for iPhone, start by opening the Settings app.How to configure a proxy for iPhone
Configure Proxy is the screen where you can set up the proxy on iPhone for the selected Wi-Fi network. There are three options on it: Off, Manual, and Automatic. By default, Configure Proxy should be Off on your iPhone.Configure an iPhone proxy manually
If you know the connection details to the proxy server, tap the Manual option. This reveals additional options to manually enter the Server, Port, and Authentication details for the proxy server on the iPhone.Use the Automatic proxy settings on iPhone
There’s also the Automatic setting for configuring a proxy server on your iPhone. It allows your device to automatically get the proxy server configuration from the router that broadcasts the wireless network. You can usually find such Wi-Fi networks in schools and business networks. In this case, you only have to enable the Automatic option. There’s no need to enter an IP address or port. However, you can input a URL to an auto-configuration script that provides your iPhone with the proxy server’s details. The script is just a small file, and you can get its URL address from your network administrator.How to turn off a proxy on iPhone
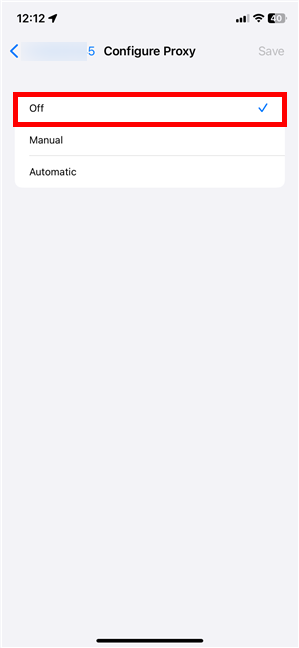
You probably guessed how to disable a proxy on iPhone: select Off on the Configure Proxy screen.

Discussion (2)
Thank you for your help with learning about a proxy connection. If I were to use it be for privacy. Trying to keep scammers away.
I need help because I’m being stalked/blackmailed/hacked by someone who keeps changing all my email accounts information like name and recovery settings also passwords. No matter how many times I reset these devices to factory settings and block them from WhatsApp they find ways to contact me demanding money so they would stop publishing my photos from google photos or my devices cameras. I’ve even received a replacement phone from the insurance company and they’re now messing with my phone carrier website settings. I added two step verification and they have locked me out by changing my password and changing my recovery methods like phone numbers or email addresses. They know I changed my number the same day I did they were the first to contact me before the with configuring my WiFi and router settings on an iPhone 6, Samsung Galaxy S10+, and a Samsung Tablet Model SM-T510/ Galaxy Tab A.