Windows 10 October 2018 Update introduces a new app called Snip & Sketch, meant to replace the Snipping Tool. Snip & Sketch not only lets you take screenshots of your Windows 10 desktop but also includes a built-in image editor that you can use to edit your screenshots and other images. If you want to learn how to edit screenshots and pictures, read this tutorial:
NOTE: The Snip & Sketch tool is available starting with Windows 10 October 2018 Update. If you have an older version of Windows, you cannot use this app. If you do not know what version of Windows 10 you have, read this tutorial: What version, edition, and type of Windows 10 do I have installed?
How to take a screenshot or load an image in Snip & Sketch
If you want to edit a screenshot or an image with Snip & Sketch, you have to take a screenshot or open the image you want to use. If you want to take a screenshot with Snip & Sketch, use the New button or any of the methods we have detailed in this guide: How to use Snip & Sketch to take screenshots in Windows 10.
The New button in Snip & Sketch
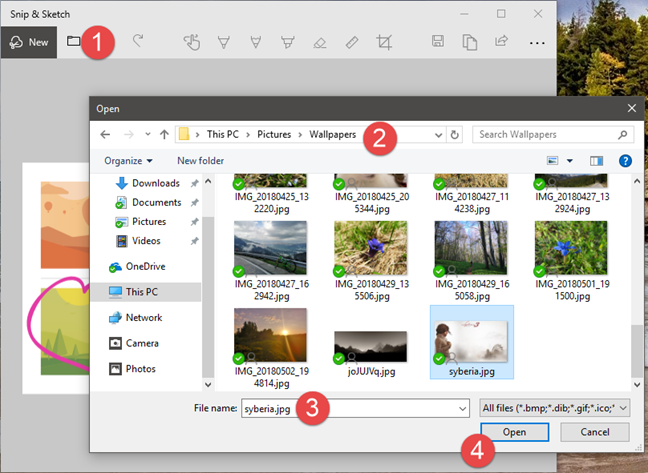
Otherwise, if you want to edit any other image found on your Windows 10 PC, click or tap the Open File button and select the image that you want to edit. Note that the Open File icon looks like a small folder.
The Open button in Snip & Sketch
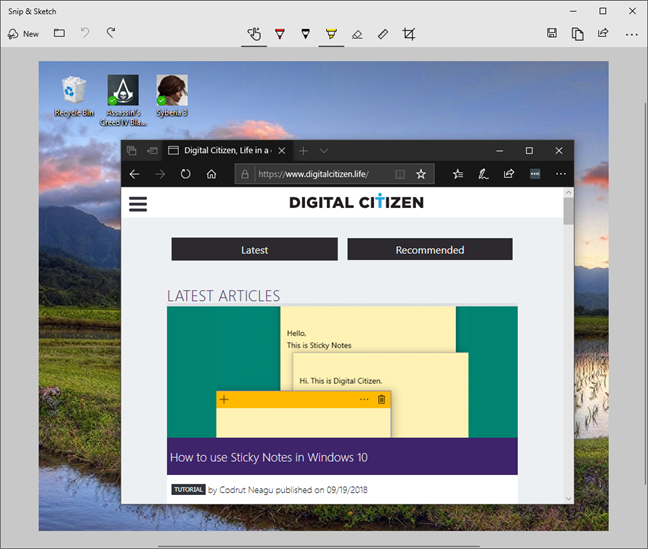
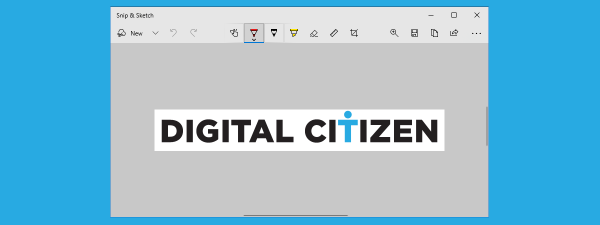
Once you have taken a screenshot or opened an image in Snip & Sketch, you see it loaded in the content area of the window, like in the image below:
A screenshot in Snip & Sketch
To edit and make annotations on the screenshot or image, Snip & Sketch offers a few options. Let's cover them one by one:
How to enable touch-based input and annotations
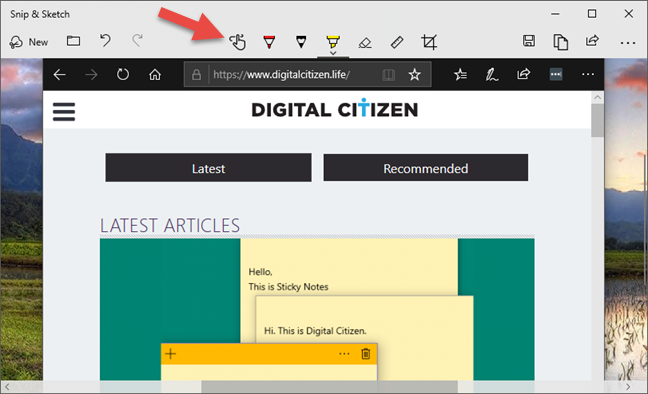
The top menu of the Snip & Sketch app lets you select the type of input that you prefer using. If you have a tablet or 2-in-1 device with a screen that supports touch input, you can choose to use that type of input in Snip & Sketch. This feature is useful to owners of Surface devices, for example. To switch between mouse input and touch input, click or tap the Touch Writing button highlighted below. When this button is enabled, you can use touch to edit your screenshot.
Enable touch and pen in Snip & Sketch
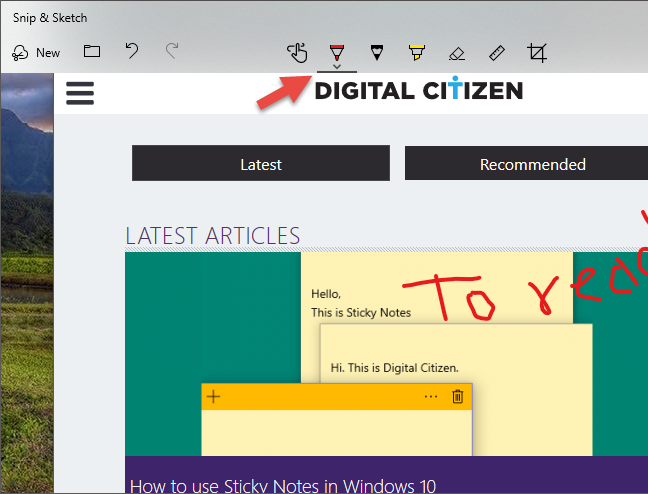
How to annotate screenshots or images in Snip & Sketch
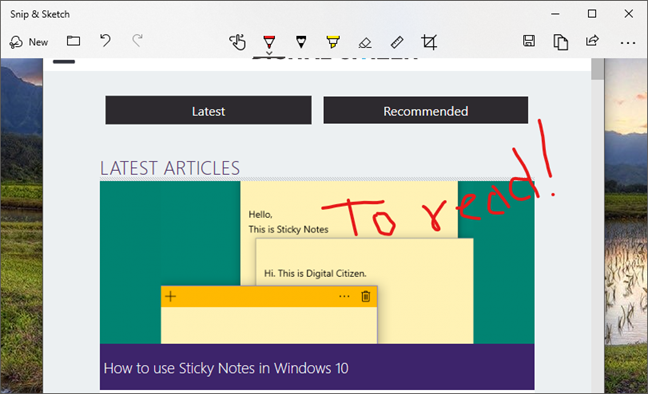
Snip & Sketch lets you write annotations or make any kind of doodles on your screenshots and images. To do that, use your pen, mouse, or touch the image and drag the cursor on the image.
Annotation in Snip & Sketch
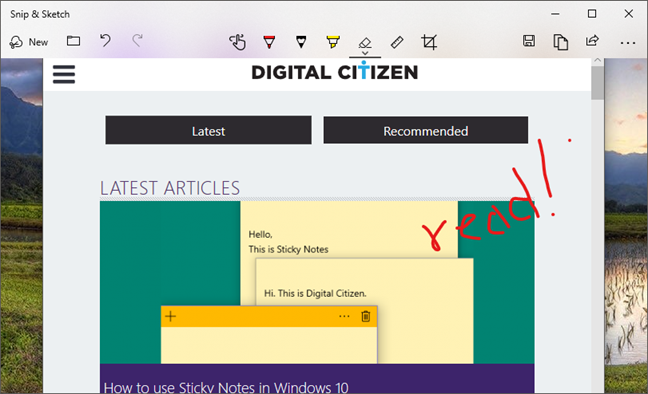
Note that, by default, Snip & Sketch uses a red Ballpoint pen, like in the image above. However, there are other types of pens that you can use and many other colors to choose from.
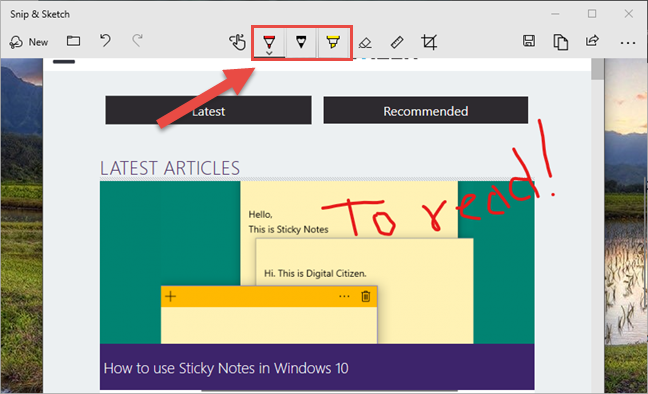
How to select the type of pen that you are using to write on screenshots and pictures
Snip & Sketch offers three different types of pens that you can use: Ballpoint pen, Pencil, and Highlighter. You can choose the one you prefer by clicking or tapping on their buttons from the menu at the top. It is easy to identify which is which because their icons resemble real-life pens.
Types of pens used in Snip & Sketch
The type of pen that is currently selected is marked by a thin dark line under its button.
Using the pen in Snip & Sketch
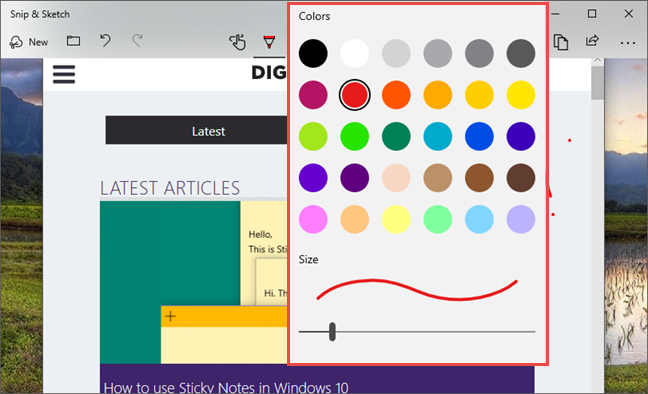
How to select the color and size of the pen that you are using
You can also choose what color and size you prefer for the pen. To do that, right-click or tap and hold the pen that you use. Snip & Sketch should then show a popup in which there are multiple color options and, at the bottom, a slider for choosing the size of the pen.
Snip & Sketch: The color and the size of the pen
Click or tap the color you prefer and drag the slider to the left or to the right to choose the pen's size.
How to erase annotations in Snip & Sketch
The Snip & Sketch app also includes an Eraser tool that you can use to delete annotations or doodles from the screenshot or image that you are editing. To select the Eraser, click or tap on its button from the menu.
The Eraser from Snip & Sketch
Then, drag the pen, mouse cursor, or your finger, on the annotation(s) that you want to erase.
Erasing annotations in Snip & Sketch
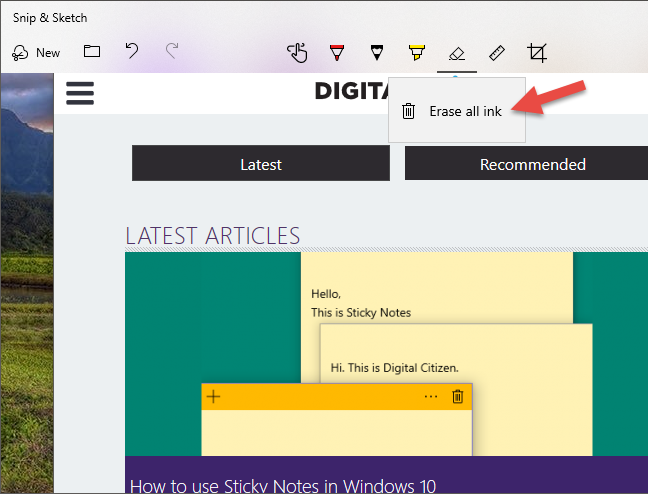
If you want to delete all the annotations you have made, select the Eraser tool and click/tap on it once more. This shows you a second option called Erase all ink. Click or tap on it and all annotations are gone. Another method is to right-click or tap and hold the Eraser button, for the same result.
Erase all ink in Snip & Sketch
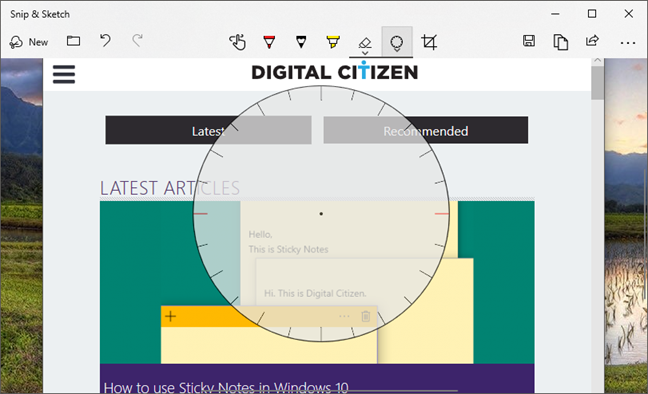
How to use the ruler and protractor
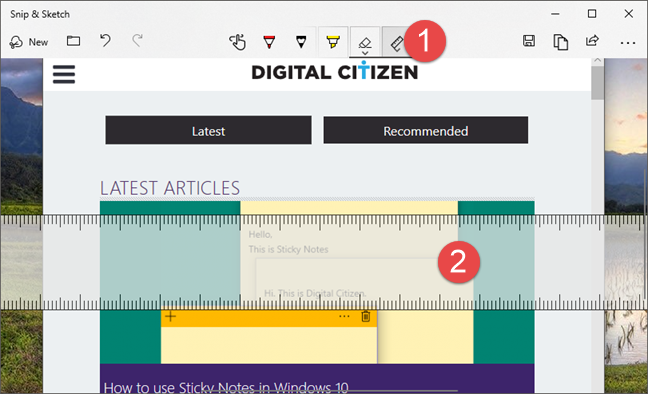
Snip & Sketch includes a virtual ruler and a virtual protractor which you might want to use in certain situations. For example, if you want to measure something, if you want to draw straight lines, or if you want to measure angles.
To open the ruler, click or tap the Ruler button from the top menu, and the virtual ruler should appear in the center of the Snip & Sketch window.
The Ruler in Snip & Sketch
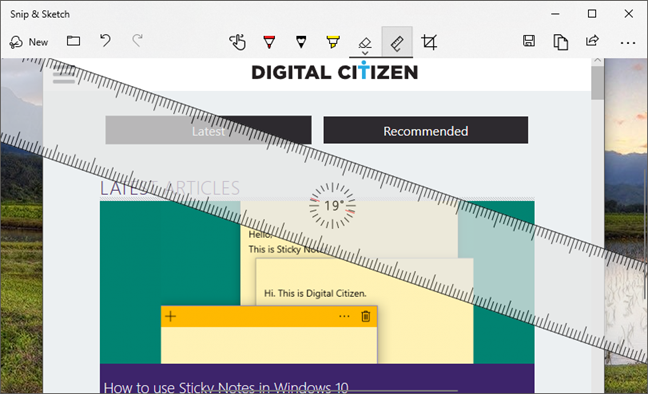
To move the ruler, drag it around with the mouse, your finger or the pen. Furthermore, if you want to rotate the ruler, use the mouse scroll wheel or use two fingers on it.
The ruler position and rotation in Snip & Sketch
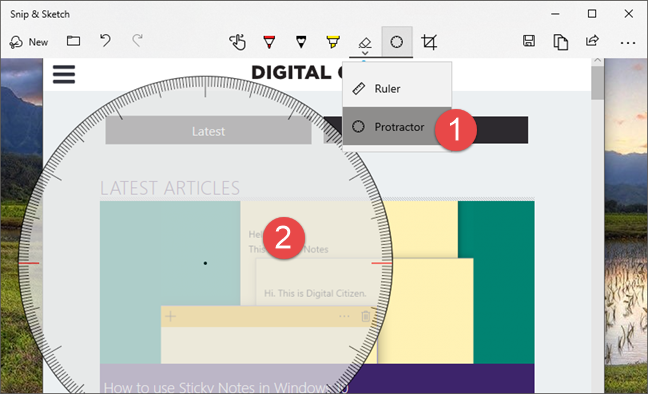
If you need to use the protractor, click or tap once more on the Ruler button from the menu. In the menu that opens, choose Protractor, and the virtual protractor tool should appear.
The Protractor from Snip & Sketch
To move the protractor around, drag it where you want it to be. Using the mouse scroll wheel or two fingers on it makes the protractor smaller or larger.
Chaning the protractor size in Snip & Sketch
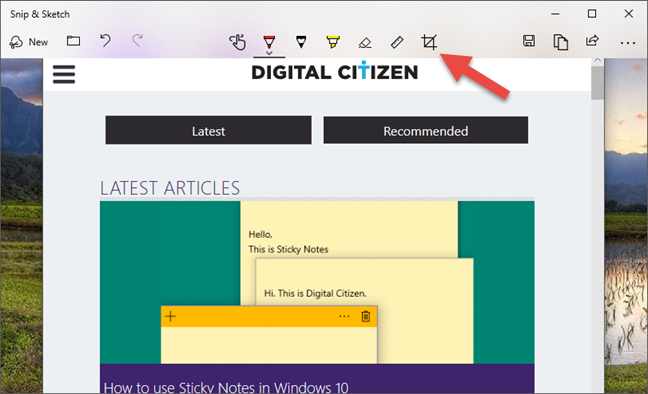
How to crop screenshots and images in Snip & Sketch
Sometimes you may want to also crop a screenshot or image. To do that, in the Snip & Sketch menu bar, click or tap the Crop button.
The Crop button from Snip & Sketch
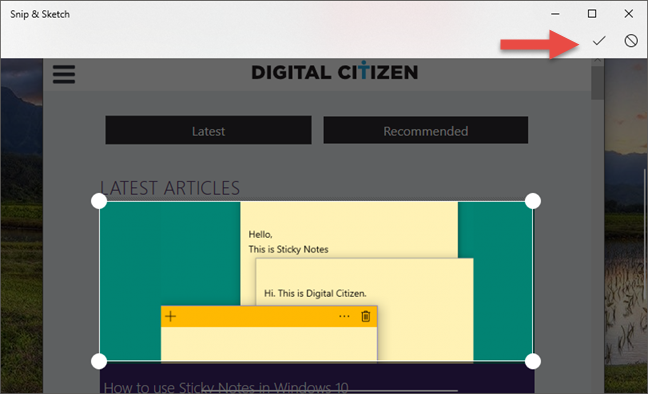
Then, drag the large white dots shown on the screenshot or image, to select the area that you want to keep.
Cropping pictures in Snip & Sketch
When you are done, press the check button from the top-right corner of the window.
Saving the crop made in Snip & Sketch
If you changed your mind and no longer want to crop the screenshot/image, click or tap the Cancel button.
Cancelling the crop in Snip & Sketch
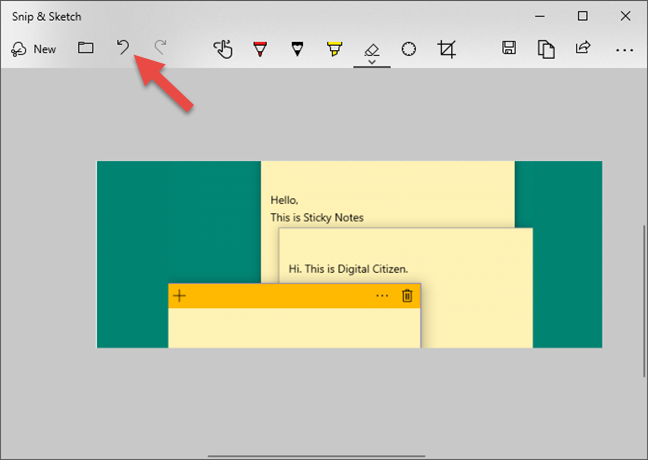
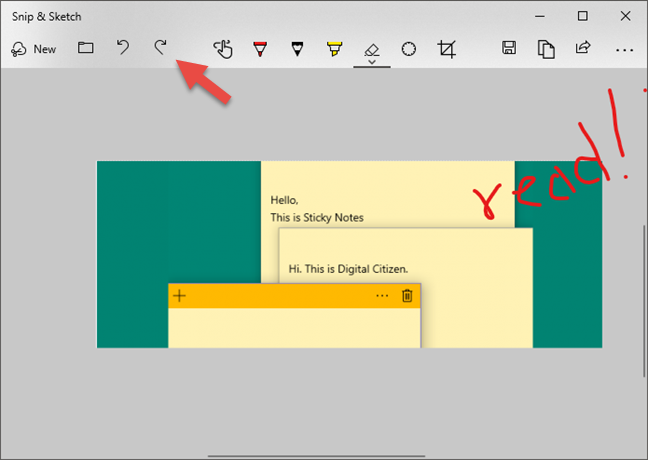
How to undo or redo your edits
If you changed your mind about an edit you made on the screenshot or image, click or tap on the Undo button from the menu bar. Alternatively, you can also use the keyboard shortcut Ctrl + Z.
The Undo button in Snip & Sketch
To redo an edit, press the Redo button or use the keyboard shortcut Ctrl + Y.
The Redo button in Snip & Sketch
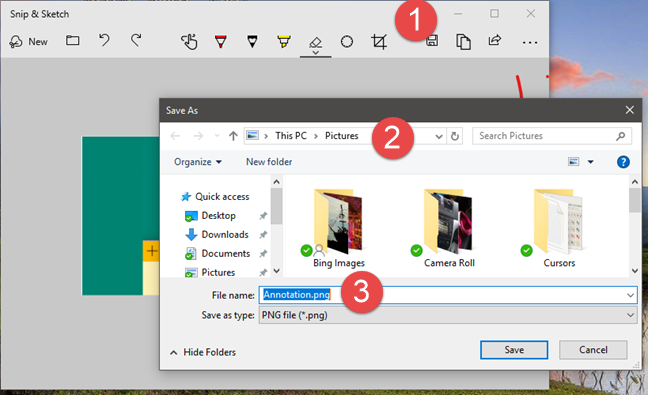
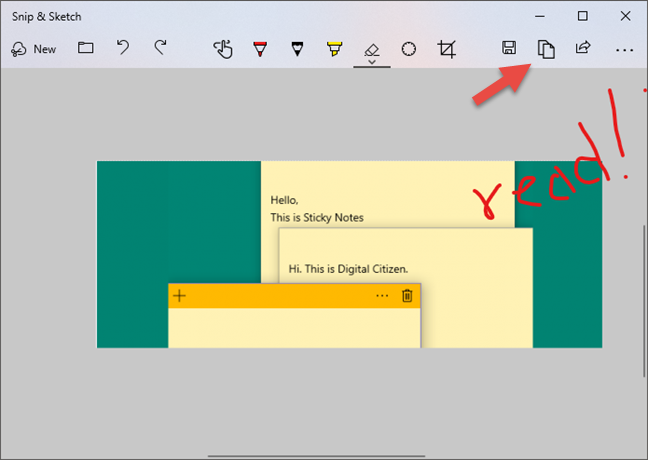
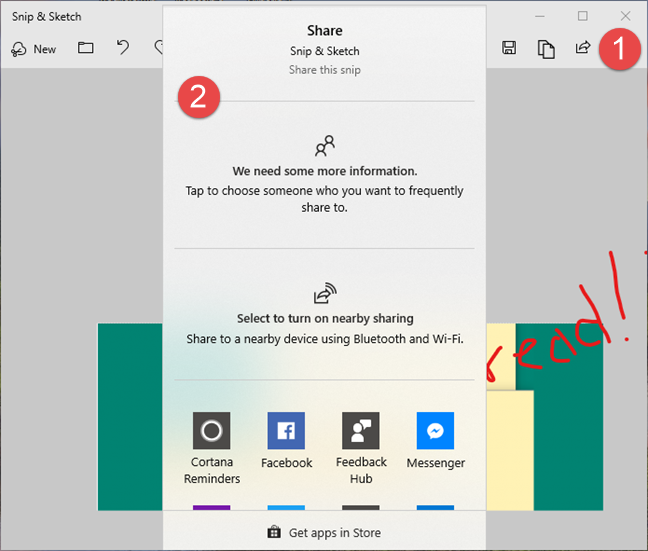
How to save, copy or share your edited screenshot or image
In the Snip & Sketch app, on the top menu, you can also find buttons for Save as, Copy and Share. If you want to save your edited screenshot or image, click or tap Save as, choose the name for the file, and the location on your PC where you want to save it. Do not forget to press Save in the Save As window.
The Save as dialogue in Snip & Sketch
If you want to copy the edited screenshot or image to your clipboard, click or tap on Copy.
Copy to the clipboard in Snip & Sketch
If you want to share the edited screenshot or image with someone else, click or tap Share and select to whom or where you want to share it.
Sharing from Snip & Sketch
Do you like the way you can edit screenshots and images in Snip & Sketch?
Now you know what you can do with the built-in image editor from Snip & Sketch. Do you like how it works? Does it offer the tools you need? Are there any other editing tools that you would want to be added to it? If you have any questions or recommendations to make on this subject, write a message in the comments section below.
Why can we not type on a snip???
How do I MEASURE an angle?
How do I MEASURE WITH THE RULER?
Echo ·
There’s no way to RESIZE the image you snip? How stupid is that? I need to make the damn snips SMALLER so I can use them! Without that functionality, the thing is junk.
Dan The Man ·
I have to say I was spoiled using SnagIt. I could add bubbles arrows, text box and more. I don’t see any of that functionality with Snip & Sketch Am I missing something in my version or does the functionality I mention not exist with Snip & Sketch? My company won’t allow me to download SnagIt and I feel handicapped without it. Are there plans or are their tools to make Snip & Sketch more user friendly for preparing slides or presentations?
when ia someone going to come up with a snipping tool that allows you to type in notes from a keyboard rather than having to add notes using your mouse or finger. It’s rediculous!
Jasper ·
I think it’s obvious you used other tools to make this article, e.g. arrows and bubbles with numbers, proving the point those functions are missing. Hand drawn arrows and text just look bad imho.
DrPoole ·
I would like to rotate the cropped picture before or after cropping. In one degree incurments or less. Not rotating the ruler.
lloyd woodward ·
they should have a date time stamp that is configured to work off the time date of the computer. I capture screen shots as receipts and the time date stamp would help a lot
Bob ·
Is there a way to type over a capture?
Daniel ·
why do cropped images end up in the center of the screen? I want them in the upper left corner.
Bruce Gardner ·
It would be really good to see some additional markup tools added like a shaped outline tool to allow you to neatly draw circles, ovals or rectangles or arrows to neatly highlight parts of your snip.
pencil sketch ·
Nice its great i like it its so useful for me and i got interesting information from your works…
NO, I don’t like it, the old version is much more helpful.
Bruce ·
It needs a text tool, much like Paint had.
hand writing with a mouse is difficult and inconsistient, for markups I need to add lots of text.
A cloud drawing tool would be a really cool addition, with engineering markups this is traditional.
Lynette ·
It would be great to be able to have a little more control on drawing – for instance I want a circle, line or any other shape but don’t want it free-form.
It would be nice to be able to type text as well.
Rollie ·
Is there a way to add typed text to a screen shot?
oyvind.halskau ·
I found this editing tool useful, and has found its niche in between many other tools that I use. The ruler and protractor tools are great. Would be nice to have shortcut for switching between horizontal and vertical ruler orientation.
phil ·
how to remove the ruler or the protractor ?
Jennifer ·
I have the same question. I wish someone would answer it.
Henk ·
How do you add the red-dotted numbered indicator to an screenshot? I can not find them in e.g. Paint.
PT Gruber ·
I like that I can handwrite things on the snip & sketch image, but why can’t I choose to type a comment on there?! My mouse writing is very rudimentary and when I’m trying to add a password to my screenshot, it is very important that it can be read. No being able to type it in seems crazy to me.
Pat ·
How about the ability to type a message inside the screen?
Tester ·
Great I can rotate a ruler, but cannot even rotate the image!
Janice Kinney ·
Add the capability to create a text box and type an annotation. Include the ability to move the textbox around, resize, transparency, and the ability to add pointers to create a callout.
Joseph ·
the ruler doesn’t work completely. it wont rotate at all no matter how i try. using numbers, arrows, mouse wheel, left click, right click, clicking and mouse wheel, clicking and arrows, clicking and numbers. there is go guide or settings to change how hotkeys work, there is no info on how to use the program from the program. i am forced to search the internet to find info that should be under a help tab or link that shows you how to use the tools. what is the point of having tools if you don’t show people how to use them? yes its completely basic and a 5 yr old should be able to use it but when the tool isn’t working how it should there needs to be info on what we might be doing wrong.
Ump98 ·
If I can’t add typed text to the image, it is worthless to me as a tool
BE ·
I agree with the previous comments re: the ability to type – Snippet had the Paint 3D option that allowed for Text Annotation (and more) – why has that disappeared from this new version?
Andrew ·
Is there a way to convert a color snip to gray scale?
Guendi ·
How can I please cut and paste in a photo in snip & sketch?
Many thanks in advance
John Robertson ·
Being able to type annotations would make Snip & Sketch a genuine improvement over Snip.
George ·
This is a great time save for me, especially when I just need a quick illustration to show an overlaid grid to a client. One thing that could make it even better, if you could insert a basic font via keyboard. The pencil tool is too bulky for annotations.
Dave K. ·
Please add the ability to resize the ruler.
Ed G ·
Is there a way to delete an image in Snip & Sketch or do you just close the App?
Anonymous ·
Close the app and it dissapears from the clipboard.
AD ·
The Touch Writing button is NOT for switching between mouse and touch. According to Microsoft’s official documentation, the Touch Writing button is for switching between mouse/touch AND pen.
When the Touch Writing button is disabled, you can draw using a pen on a pen-compatible tablet or screen, but use touch to pan the image around. Touch wouldn’t draw on the image, but rather move it around. Only the pen can draw on the image.
When the Touch Writing button is enabled, you can use touch to draw on the image. It isn’t clear what the pen would do here, but I assume it would also draw on the image.
With mouse input, the button has no effect whatsoever. You can enable or disable it, but there’s absolutely no difference. You can draw on the image any time by clicking and dragging the mouse pointer around. Not the best way to draw, but what else can you do without touch input?
Snip & Sketch sucks ·
Keyboard and mouse are the common used interfaces and no f…. grease marks on the screen
edmund ·
how do you reduce the size of an image or picture? is it only me? everytime i open up an image i have snipped, that image is almost 30000x magnified and there is no way i can make it smaller so i can work on it.
I cannot see the use of Snip and Sketch if you cannot also add text.
Anonymous ·
Snip and Sketch offers a comfortable way to take screenshots of the exact area of the screen you want to capture. I found it ideal for this and it is also useful if you want to immediately share that image.
While being able to add text would be a welcome addition, you can use Paint for that purpose.
Leonor Heleno Wielgosz ·
Hi
it’s a gerat tool, but would be even more perfect if we could add shapes, like circling a word or adding a rectangle highlighting an important section.
thanks
John ·
How to we supply feedback for Snip and Sketch? Is there a “User Voice” site? I love the snipping tool, but would like to be able to add text from the keyboard plus nice straight arrows to show what this annotation refers to. Without this my snips look amateur.
Anonymous ·
You supply feedback through the Feedback Hub app that is found on all Windows 10 PCs.
Spilly ·
Where is the option to highlight the selected area (usually in fine red ink)? The old Snipping Tool has this. Ideal when snip is pasted into a Word doc. I Won’t use this app until that feature is provided
Bordel ·
Wish we could draw a rectangle easily. Any way to perform this?
Kristel ·
Maybe an option to put in data with your keyboard so I can type some text
Kristel ·
Sorry, just read the previous comment and see is is not possible
AJ ·
I want to annotate screenshots using text input from my keyboard plus the odd arrow/pointer, most of my time is spent on devices without touch input
Marking other than highlighting (better done with a mouse selection( is something I would use less.
Anonymous ·
Unfortunately, this is not supported in the current version of the Snip & Sketch app.
Irv Spalten ·
I’ve got a desktop PC with a bluetooth Logitech wireless mouse running Setpoint as a driver. Using the mouse wheel I can not make the rule rotate or the protractor change size?
Does this not work with a mouse?
Anonymous ·
On our PCs, rotating the ruler or changing the protractor size works by scrolling the mouse wheel. Just make sure that you click on the ruler or protractor before scrolling.
Chris ·
In Snipping Tool, you can choose Free-form, Rectangle, Window, or Full-screen modes. Where, in Snip & Sketch, is the Window mode? Am I missing it?
Also, as far as cropping goes, in Photos, you can grab the corners or the edges to crop an image. In Snip & Sketch, you can only grab the corners.
Anonymous ·
Snip & Sketch doesn’t have a “window mode” and yes, you can only use the corners to crop an image. These are things that are missing right now but, seeing that the app is distributed via the Microsoft Store, it will probably get updates with new features rather often.
AD ·
Latest version has Window Mode! When you start a new snip, there’s a button with two overlapping boxes and a plus sign. That’s for Window Mode.


Discussion (53)
Why can we not type on a snip???
How do I MEASURE an angle?
How do I MEASURE WITH THE RULER?
There’s no way to RESIZE the image you snip? How stupid is that? I need to make the damn snips SMALLER so I can use them! Without that functionality, the thing is junk.
I have to say I was spoiled using SnagIt. I could add bubbles arrows, text box and more. I don’t see any of that functionality with Snip & Sketch Am I missing something in my version or does the functionality I mention not exist with Snip & Sketch? My company won’t allow me to download SnagIt and I feel handicapped without it. Are there plans or are their tools to make Snip & Sketch more user friendly for preparing slides or presentations?
Do they let you download Screenpresso? (see https://www.screenpresso.com)
when ia someone going to come up with a snipping tool that allows you to type in notes from a keyboard rather than having to add notes using your mouse or finger. It’s rediculous!
I think it’s obvious you used other tools to make this article, e.g. arrows and bubbles with numbers, proving the point those functions are missing. Hand drawn arrows and text just look bad imho.
I would like to rotate the cropped picture before or after cropping. In one degree incurments or less. Not rotating the ruler.
they should have a date time stamp that is configured to work off the time date of the computer. I capture screen shots as receipts and the time date stamp would help a lot
Is there a way to type over a capture?
why do cropped images end up in the center of the screen? I want them in the upper left corner.
It would be really good to see some additional markup tools added like a shaped outline tool to allow you to neatly draw circles, ovals or rectangles or arrows to neatly highlight parts of your snip.
Nice its great i like it its so useful for me and i got interesting information from your works…
Pencil Sketch
NO, I don’t like it, the old version is much more helpful.
It needs a text tool, much like Paint had.
hand writing with a mouse is difficult and inconsistient, for markups I need to add lots of text.
A cloud drawing tool would be a really cool addition, with engineering markups this is traditional.
It would be great to be able to have a little more control on drawing – for instance I want a circle, line or any other shape but don’t want it free-form.
It would be nice to be able to type text as well.
Is there a way to add typed text to a screen shot?
I found this editing tool useful, and has found its niche in between many other tools that I use. The ruler and protractor tools are great. Would be nice to have shortcut for switching between horizontal and vertical ruler orientation.
how to remove the ruler or the protractor ?
I have the same question. I wish someone would answer it.
How do you add the red-dotted numbered indicator to an screenshot? I can not find them in e.g. Paint.
I like that I can handwrite things on the snip & sketch image, but why can’t I choose to type a comment on there?! My mouse writing is very rudimentary and when I’m trying to add a password to my screenshot, it is very important that it can be read. No being able to type it in seems crazy to me.
How about the ability to type a message inside the screen?
Great I can rotate a ruler, but cannot even rotate the image!
Add the capability to create a text box and type an annotation. Include the ability to move the textbox around, resize, transparency, and the ability to add pointers to create a callout.
the ruler doesn’t work completely. it wont rotate at all no matter how i try. using numbers, arrows, mouse wheel, left click, right click, clicking and mouse wheel, clicking and arrows, clicking and numbers. there is go guide or settings to change how hotkeys work, there is no info on how to use the program from the program. i am forced to search the internet to find info that should be under a help tab or link that shows you how to use the tools. what is the point of having tools if you don’t show people how to use them? yes its completely basic and a 5 yr old should be able to use it but when the tool isn’t working how it should there needs to be info on what we might be doing wrong.
If I can’t add typed text to the image, it is worthless to me as a tool
I agree with the previous comments re: the ability to type – Snippet had the Paint 3D option that allowed for Text Annotation (and more) – why has that disappeared from this new version?
Is there a way to convert a color snip to gray scale?
How can I please cut and paste in a photo in snip & sketch?
Many thanks in advance
Being able to type annotations would make Snip & Sketch a genuine improvement over Snip.
This is a great time save for me, especially when I just need a quick illustration to show an overlaid grid to a client. One thing that could make it even better, if you could insert a basic font via keyboard. The pencil tool is too bulky for annotations.
Please add the ability to resize the ruler.
Is there a way to delete an image in Snip & Sketch or do you just close the App?
Close the app and it dissapears from the clipboard.
The Touch Writing button is NOT for switching between mouse and touch. According to Microsoft’s official documentation, the Touch Writing button is for switching between mouse/touch AND pen.
When the Touch Writing button is disabled, you can draw using a pen on a pen-compatible tablet or screen, but use touch to pan the image around. Touch wouldn’t draw on the image, but rather move it around. Only the pen can draw on the image.
When the Touch Writing button is enabled, you can use touch to draw on the image. It isn’t clear what the pen would do here, but I assume it would also draw on the image.
With mouse input, the button has no effect whatsoever. You can enable or disable it, but there’s absolutely no difference. You can draw on the image any time by clicking and dragging the mouse pointer around. Not the best way to draw, but what else can you do without touch input?
Keyboard and mouse are the common used interfaces and no f…. grease marks on the screen
how do you reduce the size of an image or picture? is it only me? everytime i open up an image i have snipped, that image is almost 30000x magnified and there is no way i can make it smaller so i can work on it.
I cannot see the use of Snip and Sketch if you cannot also add text.
Snip and Sketch offers a comfortable way to take screenshots of the exact area of the screen you want to capture. I found it ideal for this and it is also useful if you want to immediately share that image.
While being able to add text would be a welcome addition, you can use Paint for that purpose.
Hi
it’s a gerat tool, but would be even more perfect if we could add shapes, like circling a word or adding a rectangle highlighting an important section.
thanks
How to we supply feedback for Snip and Sketch? Is there a “User Voice” site? I love the snipping tool, but would like to be able to add text from the keyboard plus nice straight arrows to show what this annotation refers to. Without this my snips look amateur.
You supply feedback through the Feedback Hub app that is found on all Windows 10 PCs.
Where is the option to highlight the selected area (usually in fine red ink)? The old Snipping Tool has this. Ideal when snip is pasted into a Word doc. I Won’t use this app until that feature is provided
Wish we could draw a rectangle easily. Any way to perform this?
Maybe an option to put in data with your keyboard so I can type some text
Sorry, just read the previous comment and see is is not possible
I want to annotate screenshots using text input from my keyboard plus the odd arrow/pointer, most of my time is spent on devices without touch input
Marking other than highlighting (better done with a mouse selection( is something I would use less.
Unfortunately, this is not supported in the current version of the Snip & Sketch app.
I’ve got a desktop PC with a bluetooth Logitech wireless mouse running Setpoint as a driver. Using the mouse wheel I can not make the rule rotate or the protractor change size?
Does this not work with a mouse?
On our PCs, rotating the ruler or changing the protractor size works by scrolling the mouse wheel. Just make sure that you click on the ruler or protractor before scrolling.
In Snipping Tool, you can choose Free-form, Rectangle, Window, or Full-screen modes. Where, in Snip & Sketch, is the Window mode? Am I missing it?
Also, as far as cropping goes, in Photos, you can grab the corners or the edges to crop an image. In Snip & Sketch, you can only grab the corners.
Snip & Sketch doesn’t have a “window mode” and yes, you can only use the corners to crop an image. These are things that are missing right now but, seeing that the app is distributed via the Microsoft Store, it will probably get updates with new features rather often.
Latest version has Window Mode! When you start a new snip, there’s a button with two overlapping boxes and a plus sign. That’s for Window Mode.