


Do you need to delete a user account from your Windows 11 or Windows 10 computer or device? Maybe a specific user became corrupted, or perhaps you want to block someone’s access to your PC. Well, regardless of whether you want to remove a Microsoft account from Windows or a local one, this guide shows you seven methods to delete a user account. So keep reading to find out what works best for you:
NOTE: The methods illustrated in this tutorial require the use of an Administrator account. The basic idea is to use an account with administrator permissions to remove another account. For a list of all the accounts on your computer (including hidden ones), check out our guide on viewing all the users in Windows.
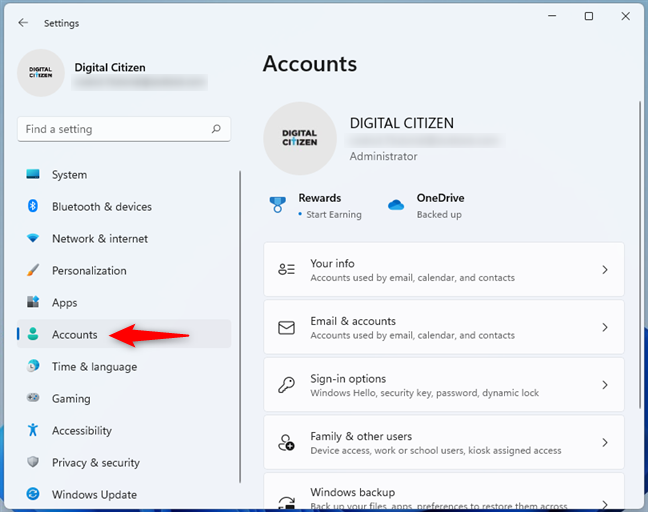
 Access the Accounts section from Windows 11's Settings app
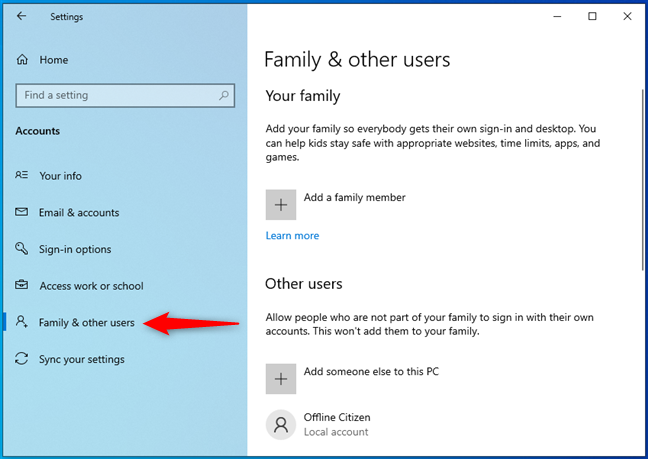
Next, click or tap on “Family & other users,” on the right.
Access the Accounts section from Windows 11's Settings app
Next, click or tap on “Family & other users,” on the right.
 Family & other users in Windows 11's Settings
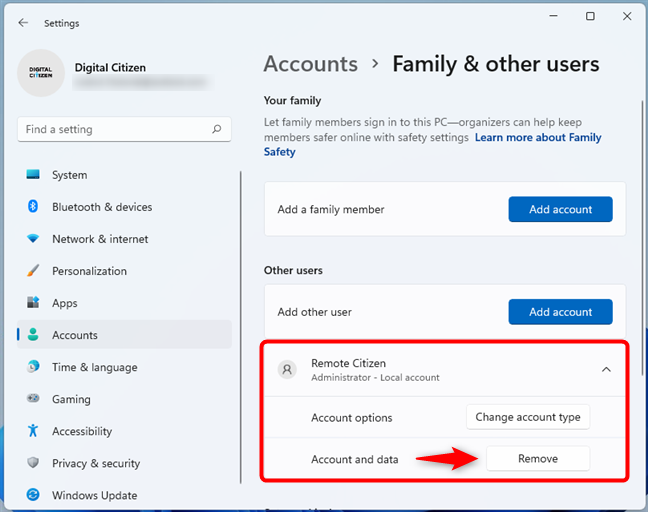
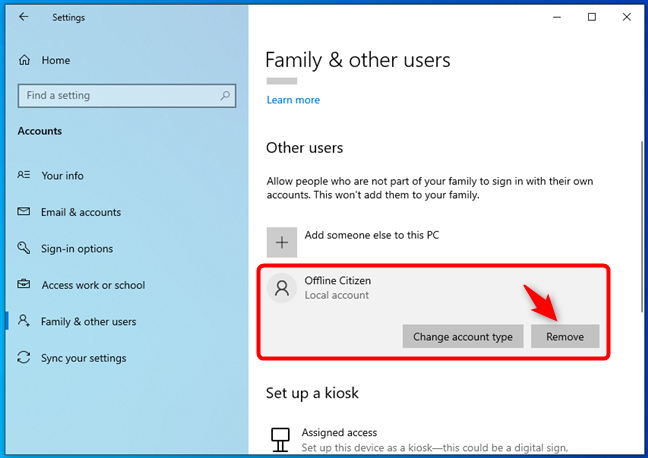
On the right of the Settings window, identify the user account you want to delete. It should be listed under Other users. Select it and click or tap on its Remove button.
Family & other users in Windows 11's Settings
On the right of the Settings window, identify the user account you want to delete. It should be listed under Other users. Select it and click or tap on its Remove button.
 How to remove an account from Windows 11 using Settings
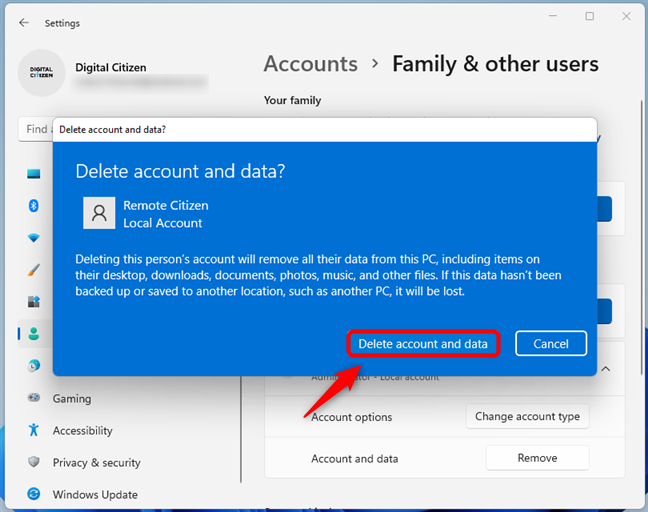
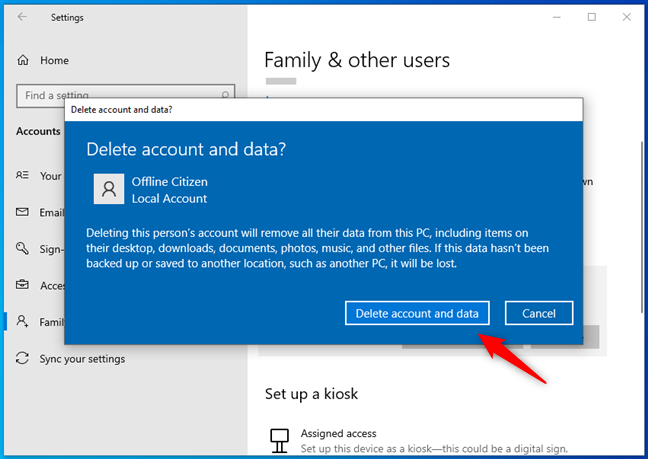
A pop-up lets you know that deleting the account removes all the user’s data from your PC. To go ahead with the removal, press “Delete account and data.”
How to remove an account from Windows 11 using Settings
A pop-up lets you know that deleting the account removes all the user’s data from your PC. To go ahead with the removal, press “Delete account and data.”
 Click or tap Delete account and data
The user account is immediately removed from Windows 11, together with all its data.
Click or tap Delete account and data
The user account is immediately removed from Windows 11, together with all its data.
 Access the Accounts section from Windows 10's Settings app
Click or tap on “Family & other users,” on the left side of the window.
Access the Accounts section from Windows 10's Settings app
Click or tap on “Family & other users,” on the left side of the window.
 Family & other users in Windows 10's Settings
On the right, find the user account you intend to remove. Then, select it and click or tap on Remove.
Family & other users in Windows 10's Settings
On the right, find the user account you intend to remove. Then, select it and click or tap on Remove.
 How to delete a user account from Windows 10
Then, Windows 10 shows a dialog in which it asks you if you want to “Delete account and data.” Click or tap on the button bearing the same name, and the user account is removed from your PC.
How to delete a user account from Windows 10
Then, Windows 10 shows a dialog in which it asks you if you want to “Delete account and data.” Click or tap on the button bearing the same name, and the user account is removed from your PC.
 Confirm that you want to Delete account and data
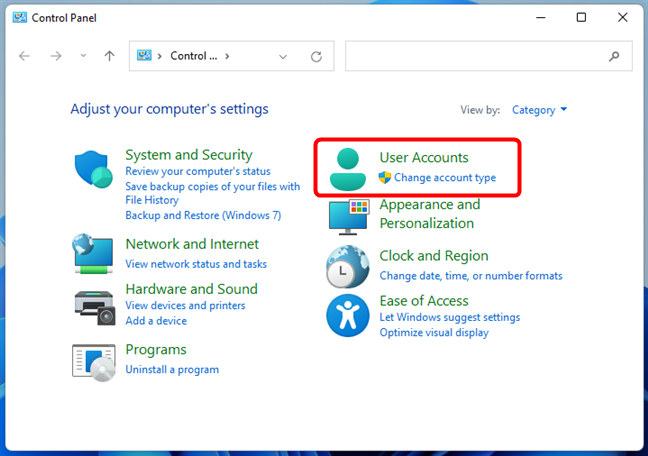
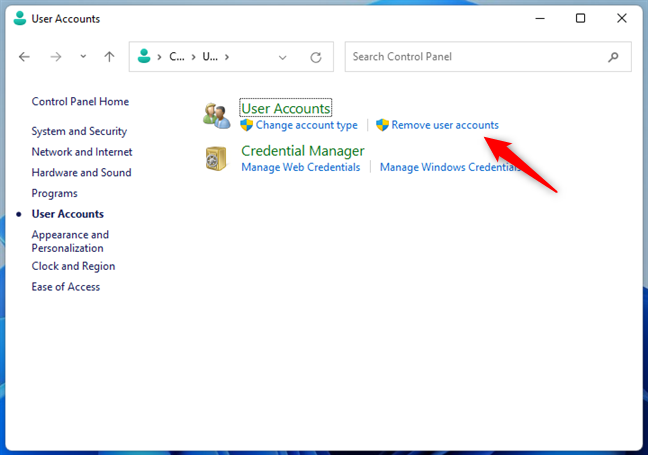
 Access User Accounts in the Control Panel
In the User Accounts section, click or tap on the “Remove user accounts” link.
Access User Accounts in the Control Panel
In the User Accounts section, click or tap on the “Remove user accounts” link.
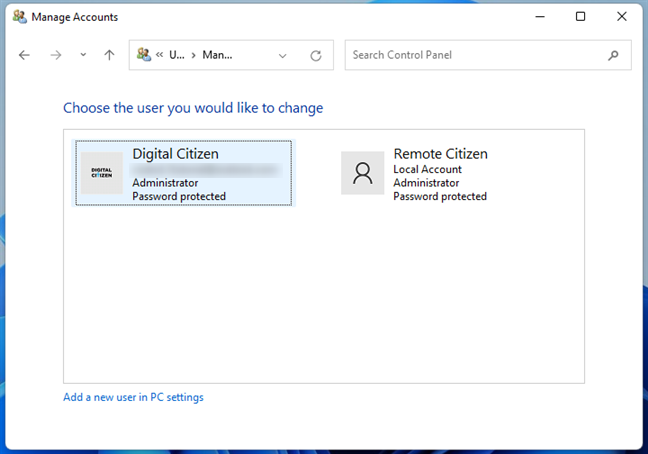
 Press on Remove user accounts
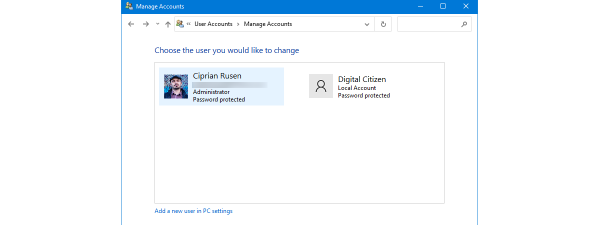
This shows the list of user accounts found on your Windows computer or device. Select the account you intend to delete.
Press on Remove user accounts
This shows the list of user accounts found on your Windows computer or device. Select the account you intend to delete.
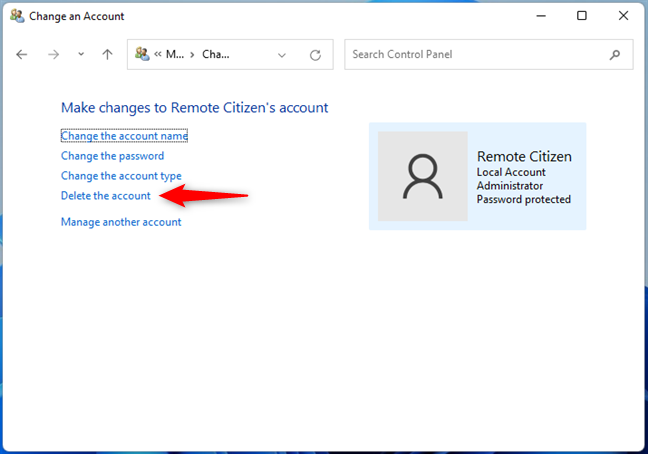
 Click or tap on the user account you want to delete
This lets you make changes to the selected account. Click on “Delete the account” from the actions on the left.
Click or tap on the user account you want to delete
This lets you make changes to the selected account. Click on “Delete the account” from the actions on the left.
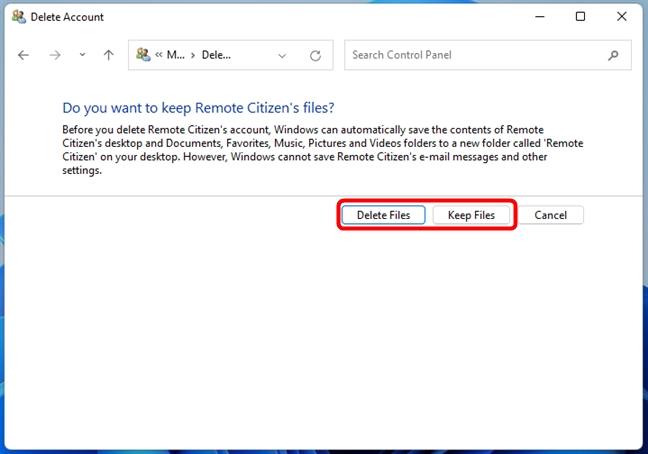
 Click to Delete the account
You are asked whether you want to keep the user’s files. If you choose to Delete Files, the data associated with that user account is removed. You can also click on Keep Files, and that account’s user folders are moved to your desktop in a folder bearing the name of the account.
Click to Delete the account
You are asked whether you want to keep the user’s files. If you choose to Delete Files, the data associated with that user account is removed. You can also click on Keep Files, and that account’s user folders are moved to your desktop in a folder bearing the name of the account.
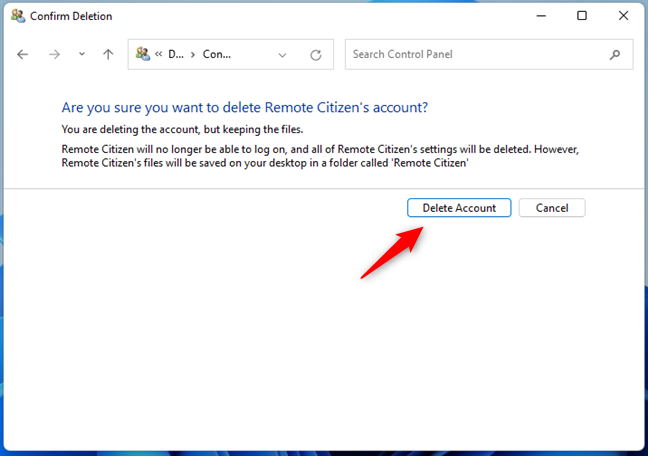
 Choose to Delete or Keep Files
If you decide to Keep Files, you must confirm removing the user account. Press Delete Account, and you are done.
Choose to Delete or Keep Files
If you decide to Keep Files, you must confirm removing the user account. Press Delete Account, and you are done.
 Confirm deleting the account
If you chose to keep the files, you can find them all on your desktop in a folder named after the user.
Confirm deleting the account
If you chose to keep the files, you can find them all on your desktop in a folder named after the user.
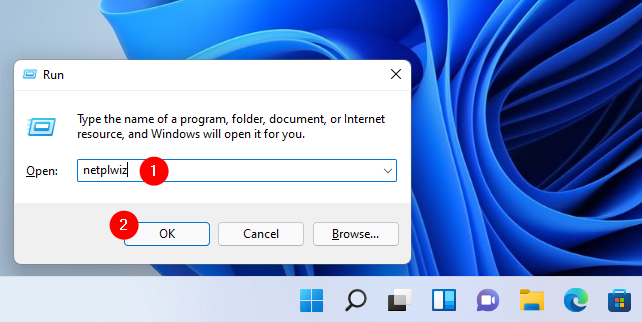
 Type netplwiz in the Run window and press OK
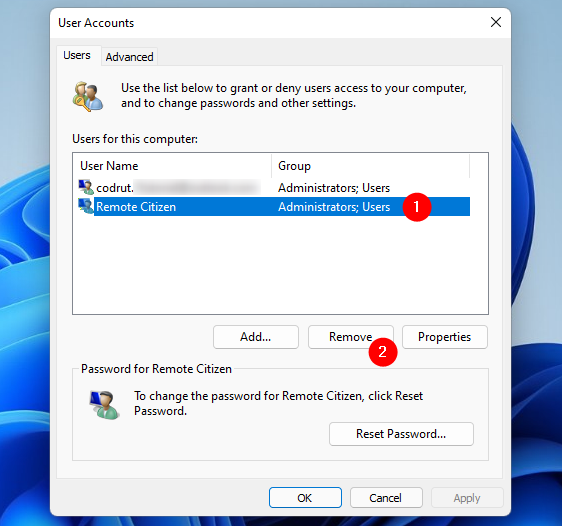
This takes you to the Users tab of the User Accounts window. Select the account you want to remove from the list and then click or tap on Remove.
Type netplwiz in the Run window and press OK
This takes you to the Users tab of the User Accounts window. Select the account you want to remove from the list and then click or tap on Remove.
 Remove an account from Windows 11 with netplwiz
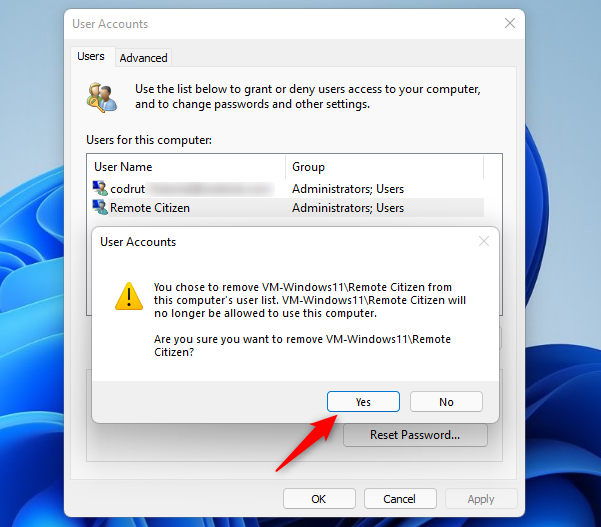
In the subsequent pop-up box, click or tap on Yes to confirm your choice.
Remove an account from Windows 11 with netplwiz
In the subsequent pop-up box, click or tap on Yes to confirm your choice.
 Press Yes to confirm deleting your account
TIP: Did you know that you can also use netplwiz to automatically login to Windows, without having to enter the password of your user account?
Press Yes to confirm deleting your account
TIP: Did you know that you can also use netplwiz to automatically login to Windows, without having to enter the password of your user account?
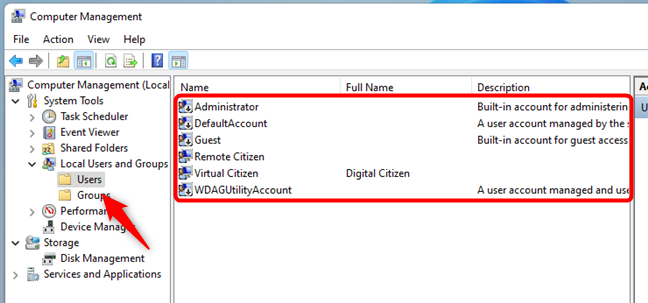
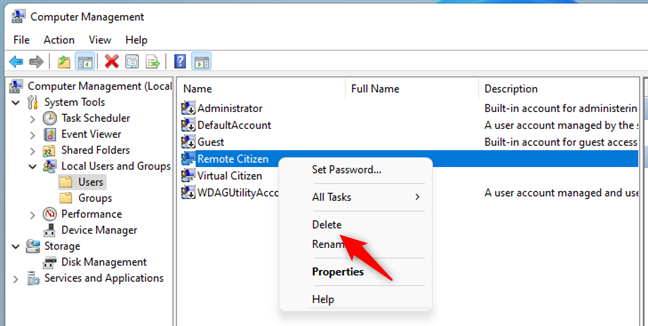
 Access the Users folder under Local Users and Groups
Next, right-click or press-and-hold on the user you want to remove. In the contextual menu that opens, click or tap Delete.
Access the Users folder under Local Users and Groups
Next, right-click or press-and-hold on the user you want to remove. In the contextual menu that opens, click or tap Delete.
 Click Delete in the contextual menu
To confirm your choice, click or tap on Yes in the pop-up.
Click Delete in the contextual menu
To confirm your choice, click or tap on Yes in the pop-up.

 Press Yes to confirm the account's deletion
Replace username with the actual name of the user account you intend to remove. Then, press Enter on your keyboard. For instance, we wanted to delete a user account called Remote Citizen, so we had to run the command net user “Remote Citizen” /delete.
Press Yes to confirm the account's deletion
Replace username with the actual name of the user account you intend to remove. Then, press Enter on your keyboard. For instance, we wanted to delete a user account called Remote Citizen, so we had to run the command net user “Remote Citizen” /delete.
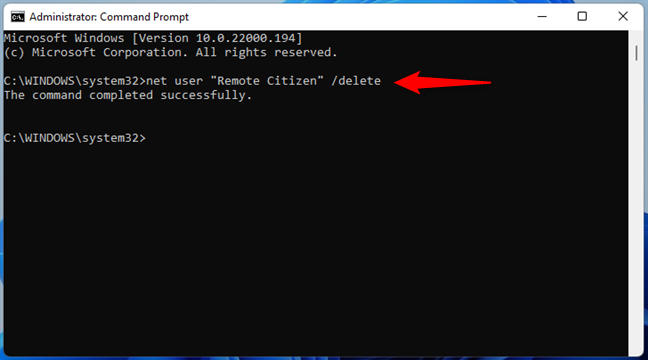
 Use CMD to remove an account from Windows 11
The account is immediately removed from Windows.
Replace username with the name of the account you are removing. Then, press the Enter key.
Use CMD to remove an account from Windows 11
The account is immediately removed from Windows.
Replace username with the name of the account you are removing. Then, press the Enter key.
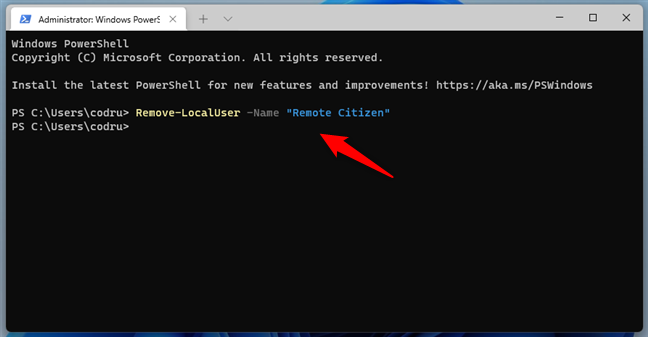
 Remove an account in Windows 11 from PowerShell, in Windows Terminal
While PowerShell does not give you confirmation for this operation, the account is deleted.
Remove an account in Windows 11 from PowerShell, in Windows Terminal
While PowerShell does not give you confirmation for this operation, the account is deleted.
1. How to delete a user account from Windows 11 using the Settings app
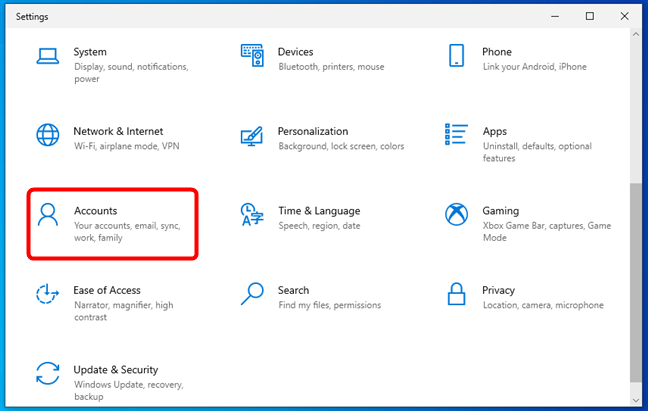
The Settings app offers, in our opinion, the most straightforward way to delete a user account from Windows 11. Start by opening Settings (press Windows + I on your keyboard). Then, select Accounts on the left sidebar.2. How to delete a user account from Windows 10 using the Settings app
You can use the same method to remove a user account from Windows 10. Open Settings (Windows + I) and click or tap on Accounts in the Settings dashboard.3. How to remove an account from Windows using the Control Panel
Deleting an account from the Control Panel gives you the option to keep the user’s files. In either Windows 11 or Windows 10, launch the Control Panel and click or tap on User Accounts.4. How to delete a user account with netplwiz
The netplwiz app offers another way to remove an account from Windows 11 or Windows 10. First, open the Run window using the keyboard shortcut Win + R and type netplwiz. Then, click or tap OK, or press Enter on your keyboard.5. How to remove an account from Windows with Computer Management
If you have a Pro or Enterprise edition of Windows installed on your computer or device, you can also use the Computer Management tool to remove an account. Access Computer Management and under System Tools, click or tap on the arrow shown next to “Local Users and Groups” to reveal its contents. Then, select the Users folder to open it in the middle pane.6. How to delete a user account from Windows with Command Prompt (CMD)
To begin, open Command Prompt as administrator. In the CMD window, type:net user “username” /delete 7. How to remove a user account from Windows with PowerShell
If you prefer PowerShell, you can use it to remove an account from Windows as well. Start Windows Terminal or PowerShell as administrator. Then, type the following:Remove-LocalUser -Name “username” 
Discussion (1)
I just tried to delete an account user who has his email as his password. When I hit the delete button, I was told that his email account would be deleted along with his files! Is this true? How can that be? How can everything, other than the files on my desktop, be deleted? I did not go through with it. HELP!