The quest to find good screensavers seems to be quite daunting these days because either you cannot find something you like or the things you find are full of malware. So, let us show you a different direction, in which we help you create a great screensaver with your own photos. In Windows, it is possible to create an SCR file from images (personalized screensaver) with the help of a free image viewer application named IrfanView. The added bonus of this app is the fact that you can save the slideshow as a standalone screensaver that works even on other computers. Keep on reading to learn how to create your own screensaver.
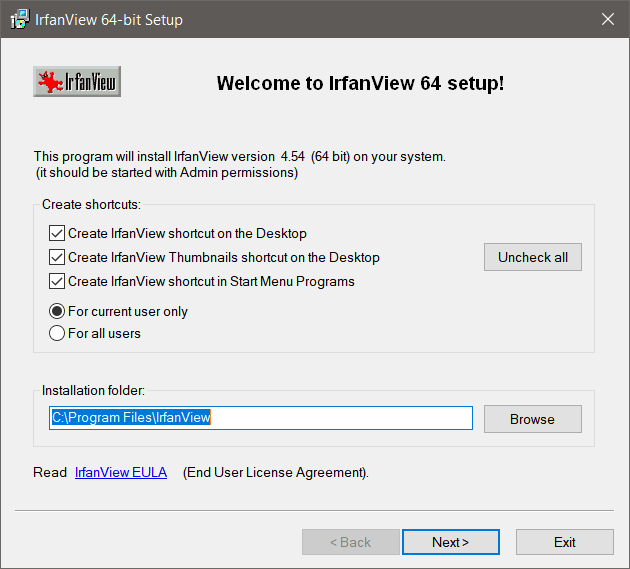
If you don't have IrfanView installed on your computer, you can download it from the IrfanView Official Homepage. Run the executable file that you get: it features simple installation, and it doesn't bundle any other software.
Installing IrfanView
Step 2. Use IrfanView to create a slideshow from images
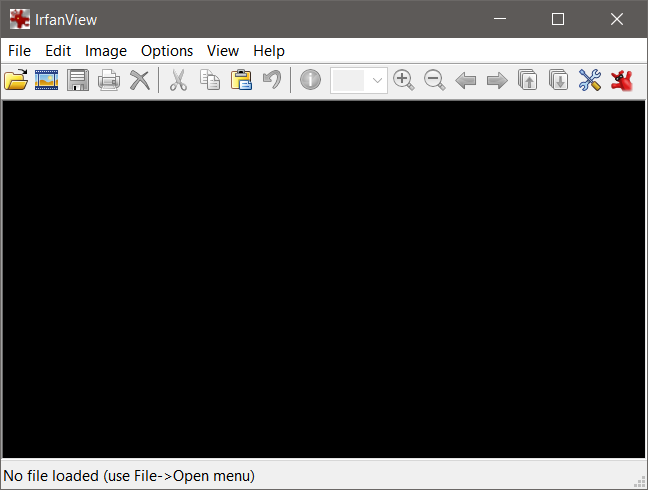
To make a screensaver with IrfanView, you first have to create a slideshow. Of course, you have to open the IrfanView image viewer app before anything else. This is what it looks like:
The main window of IrfanView
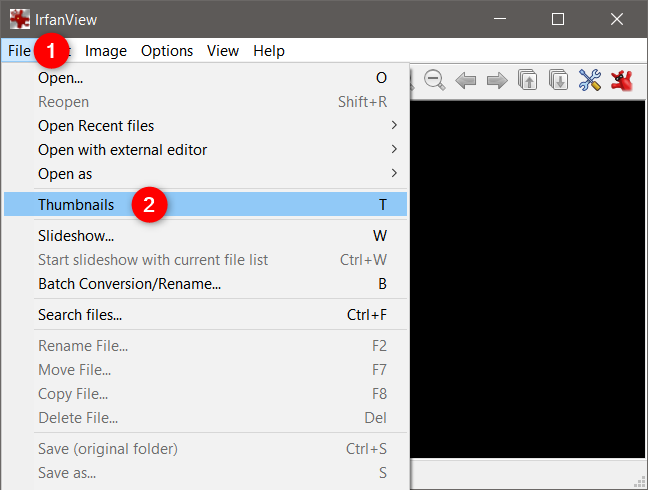
In order to create a slideshow, choose the images that you want it to have. In IrfanView, open the File menu and select Thumbnails. Alternatively, press the letter T on your keyboard.
The Thumbnails entry from IrfanView's File menu
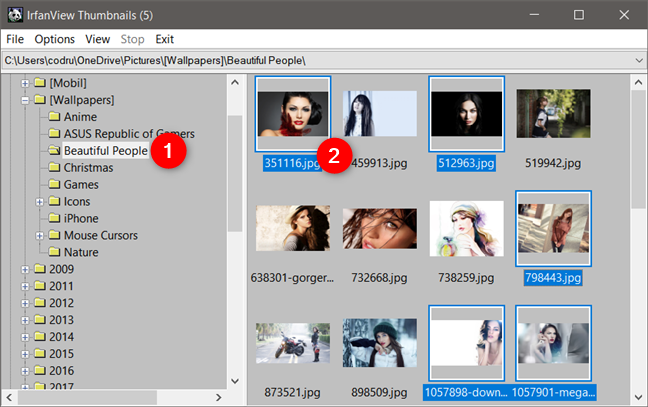
A dialog box opens, and, in the left pane, you should see a directory tree. Use it to navigate to the folder that contains the photos you want to include in your IrfanView screensaver. When you select a folder, the right-hand pane fills with thumbnails of the images found in that folder.
When you've decided which images you want to include in the slideshow, press Ctrl on your keyboard and then click or tap on each image that you want to select. If you're going to select all the pictures in the folder, use the Ctrl + A keyboard shortcut.
The IrfanView Thumbnails window
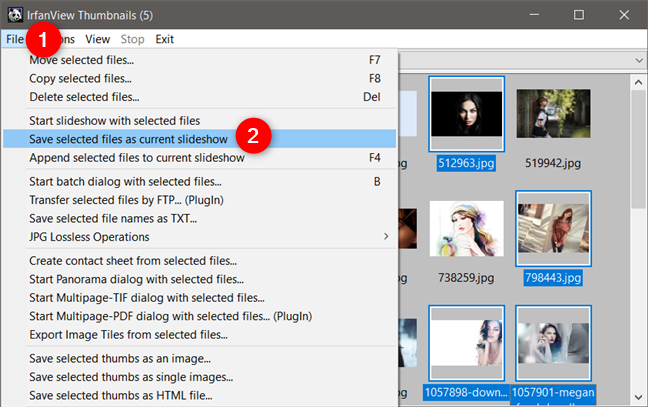
After you're done selecting the pictures, in the thumbnail browser, go to File and click or tap on "Save selected files as current slideshow."
Creating a slideshow using the selected images
This is all you need to do in order to create the slideshow necessary for your personalized screensaver. If you want to make sure that the slideshow meets your requirements, you can preview it by going to the File tab in the same thumbnail browser and then selecting "Start slideshow with selected files."
Watching the slideshow created with IrfanView
Step 3. Fine-tune the IrfanView slideshow
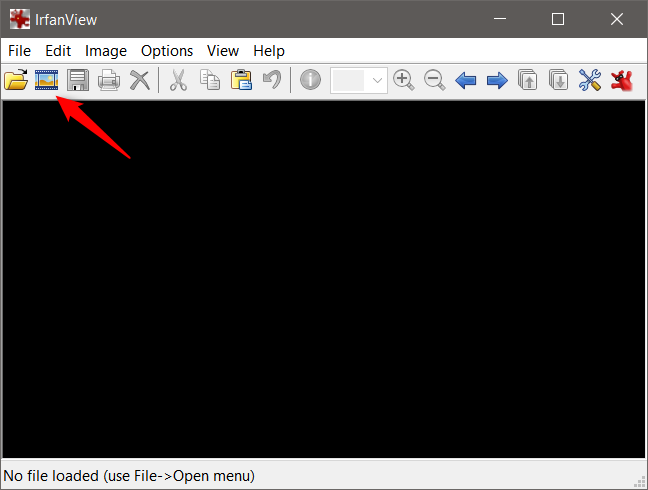
Before creating your own screensaver, you can do some fine-tuning for the configuration parameters of the newly saved slideshow. To access the configuration area of the slideshow, go back to the main IrfanView window and click or tap on the Slideshow button (the second button on the top-left corner).
The Slideshow button from IrfanView's main window
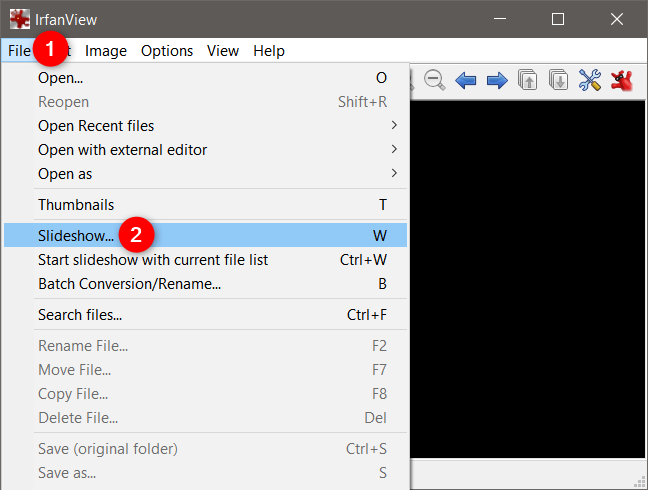
You can also access the Slideshow configuration menu by using this path File - > Slideshow in the main IrfanView window, or by pressing the letter W on your keyboard.
The Slideshow entry from IrfanView's File menu
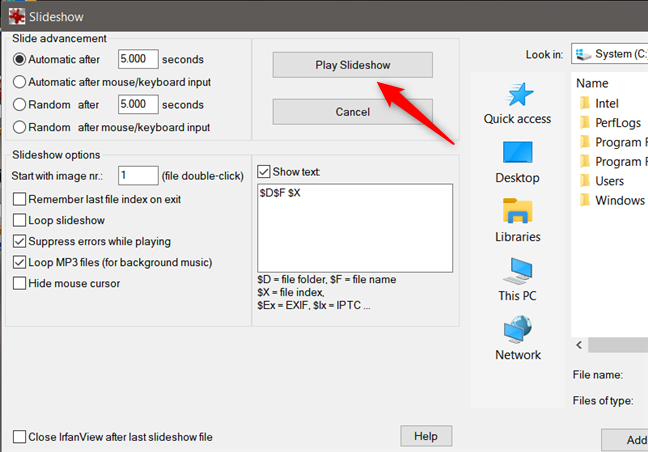
The newly opened window contains a lot of options that allow you to fine-tune all the characteristics of the slideshow. Before you start configuring, know that you can track all the changes you make with the help of the Play Slideshow button. This button gives you a preview of what the slideshow looks like at any given time.
Play Slideshow
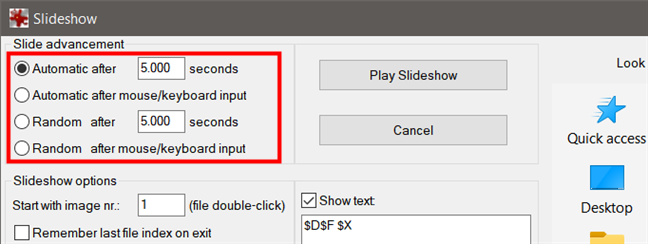
Coming back to the slideshow options window, on the top-left pane, you can choose how quickly the images change and the order in which they appear within the slideshow (automatically or randomized).
Slide advancement options
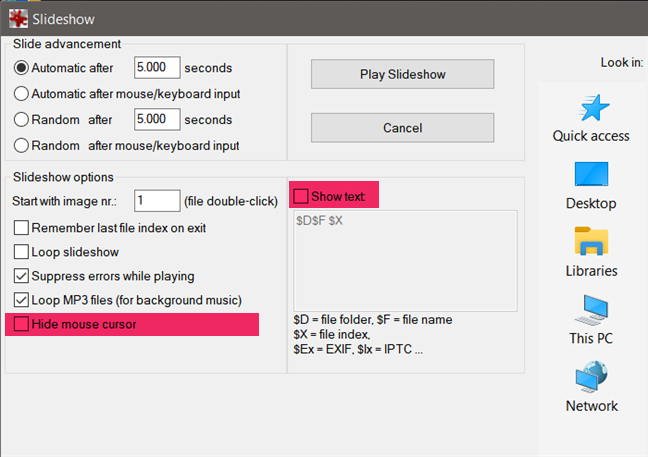
The next area, Slideshow options, offers a series of checkboxes that help you customize the inner workings of the slideshow itself. An important change for your future screensaver is to leave the cursor visible, so you should untick the "Hide mouse cursor" checkbox. You should also uncheck the Show text box. This lets you hide any information that comes with the images: name, EXIF data, location, and so on.
Hide mouse cursor and Show text settings
A really interesting feature is that you can add mp3 audio files to your slideshow and create background music for your screensaver, which is automatically added to the SCR file. Even though this function is a great extra, be careful when choosing the music to be played. Loud and annoying songs placed in an eternal loop might get on your nerves at some point.
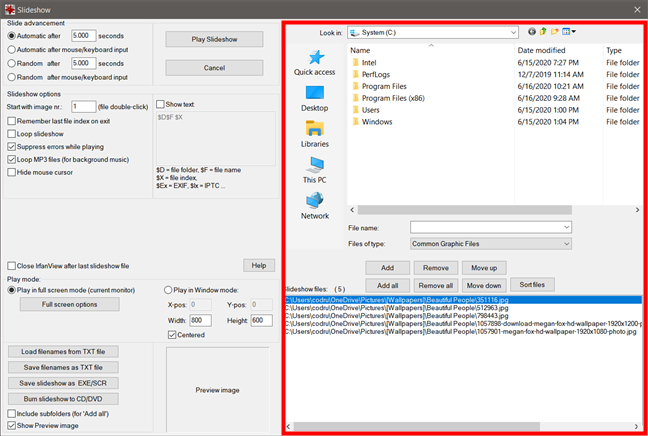
The right side of the Slideshow window offers browsing options that help you add or remove pictures and mp3s from your customized slideshow. In the lower part of this area, you can see the list of images that you're currently using.
Images and music files details in IrfanView's Slideshow window
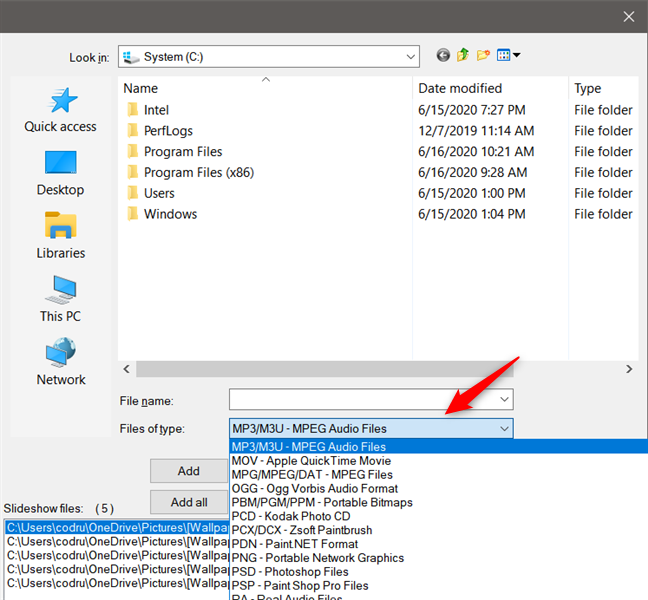
Also, in the browsing area, you can search for mp3 files and add them to the screensaver. To do this, you have to change the selection of Common Graphic Files to All files (*.*) in the "Files of type" drop-down menu. The mp3 files don't appear in the Slideshow files list but be sure that they are added to the slideshow.
Adding mp3s to the screensaver
Carefully customize and fine-tune the slideshow to feature all the characteristics you want for your screensaver. Play around with all the available settings until you like what you see, and check if everything works with the help of the Play Slideshow button. Once you are done, be careful not to close the Slideshow window.
Step 4. Create your own screensaver (or how to create an SCR file)
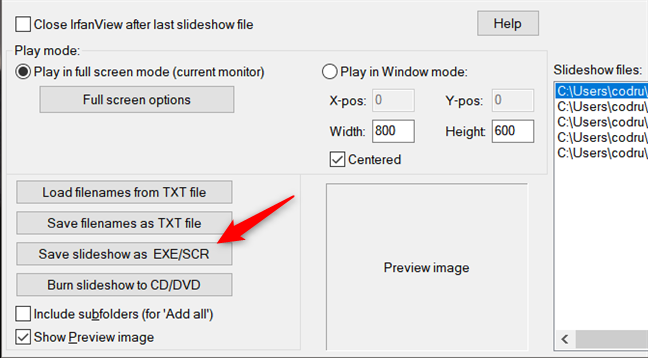
After tweaking the slideshow to your liking, go to the lower-left corner of the Slideshow window and press the "Save Slideshow as EXE/SCR" button.
Saving the slideshow as an SCR file (screensaver)
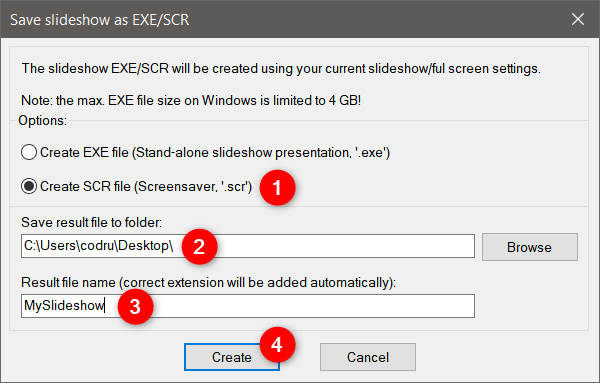
In the newly opened window, you can choose the file type: executable (.EXE) or screensaver (.SCR). Since you want to create your own screensaver, select the "Create SCR file (Screensaver, '.scr')." Then, select the folder where you want to save the screensaver and, of course, name the file. Finally, press the Create button and allow IrfanView to build your new screensaver.
Choosing to create SCR file
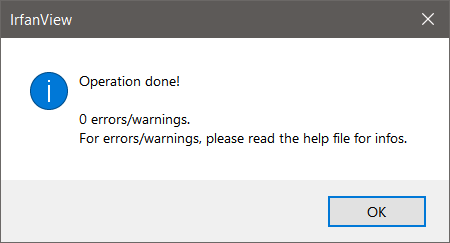
The time needed to create the SCR file from the images you've selected depends on the number of files you've placed inside it and their size. When the process is completed, and the SCR file is saved, you get a confirmation message. Just press the OK button, and your IrfanView screensaver is ready.
IrfanView created the SCR file (custom screensaver)
Step 5. Install the screensaver that you've created
To use the newly created screensaver, go to the folder where you've saved it in. Here, you can retest it or install it: right-click or press and hold on the SCR file. Then, in the contextual menu, select Test if you want to see how your screensaver looks, or select Install if you want it to become the default screensaver for your current theme.
The SCR file: Test, Configure or Install your own screensaver
You can find more information about using and configuring screensavers in this tutorial: How to set and customize screensavers in Windows.
NOTE: Be careful if you switch to another desktop theme, as the screensaver you have just installed will no longer be in use. This is a situation that is connected to the fact that each Windows theme has its own backgrounds, sound schemes, and, of course, screensavers. If you plan to change a theme and still want to use the newly created screensaver, you have to select it again and set it as default.
Do you create your own screensavers?
IrfanView is a great image viewer application that is easy to install and use. As we have seen above, it also offers a neat way of creating your own screensavers. Moreover, IrfanView's ability to save slideshows as screensaver files (.SCR), that can be copied to other computers, allows you to share your creations with family and friends. So, if you want to create your own customized screensaver for free and use all those beautiful pictures that just occupy your hard drive's space, IrfanView is perfect for you. Give it a try and come back to let us know if everything worked well.
Well, 3 years since the previously most recent comment, maybe 7 years since you put together those instructions. WHAT AN EXCELLENT job you did. SO very clear and precise. I was concerned that using a 16-year-old version of IRFANVIEW would create problems – I think Windows 7 was in use around then – but I guess this is something Microsoft got just about perfect 20+ years ago. (Well, they didn’t do a great job on the CREATION side, but you plugged that gap!!) Thanks again!
Naveen ·
Hi,
Thanks for the software i tried and test on my windows 10 and it is running fine. But when i shared the file with others at that time no preview is coming. I made the mp4 to .scr format. Please suggest
BizPlus ·
hy i have selected a video and covert to scr and installed its working fine as screen saver but runs only on time and screen saver stops at the end view of video. Even i have selected loop option but no able to run looping video screen saver.
is there any solution?
Thanks
Ahmed Zubair ·
Wow! You made my day! I have been trying to create a SCR file from PowerPoint for so many days now and who knew IrfanView would helpful in this.
Sagar More ·
Thank you so much
shaun ·
I followed your instructions but the created .scr file does not run when used from the screensaver drop down list or set using group policy.
Shame as this was going to be a great idea
Dude ·
This saved my butt creating an scr slideshow.
Fantastic article and thanks for all the help!
Wayne Wickizer ·
Thank you!!! Even this 80-year-old could follow and successfully complete your excellent instructions.
Ciprian Adrian Rusen ·
Happy to hear that. Don’t hesitate to subscribe to our newsletter, for more good quality content.
John ·
I selected create scr file and, when I click on Create I get “Error copying file !: C:MySlideshow.exe” no matter what directory and name I select for saving.
John ·
Squash that. Uninstalled Irfanview and Plug-Ins and then re-installed both. Works great now. Thanks for the great tips !!


Discussion (12)
Well, 3 years since the previously most recent comment, maybe 7 years since you put together those instructions. WHAT AN EXCELLENT job you did. SO very clear and precise. I was concerned that using a 16-year-old version of IRFANVIEW would create problems – I think Windows 7 was in use around then – but I guess this is something Microsoft got just about perfect 20+ years ago. (Well, they didn’t do a great job on the CREATION side, but you plugged that gap!!) Thanks again!
Hi,
Thanks for the software i tried and test on my windows 10 and it is running fine. But when i shared the file with others at that time no preview is coming. I made the mp4 to .scr format. Please suggest
hy i have selected a video and covert to scr and installed its working fine as screen saver but runs only on time and screen saver stops at the end view of video. Even i have selected loop option but no able to run looping video screen saver.
is there any solution?
Thanks
Wow! You made my day! I have been trying to create a SCR file from PowerPoint for so many days now and who knew IrfanView would helpful in this.
Thank you so much
I followed your instructions but the created .scr file does not run when used from the screensaver drop down list or set using group policy.
Shame as this was going to be a great idea
This saved my butt creating an scr slideshow.
Fantastic article and thanks for all the help!
Thank you!!! Even this 80-year-old could follow and successfully complete your excellent instructions.
Happy to hear that. Don’t hesitate to subscribe to our newsletter, for more good quality content.
I selected create scr file and, when I click on Create I get “Error copying file !: C:MySlideshow.exe” no matter what directory and name I select for saving.
Squash that. Uninstalled Irfanview and Plug-Ins and then re-installed both. Works great now. Thanks for the great tips !!
Very helpful! Thank you so much