If you have a Windows 8.1 laptop, tablet or hybrid that you can connect to wireless networks, you may need or want to use the WPS standard to make quicker connections to some networks. If that is the case for you, here's how to connect any Windows 8.1 device to a wireless network by using the WPS feature on any router.
NOTE: If you need a refresher on what WPS (Wi-Fi Protected Setup) is, we recommend that you read this article: What is WPS (Wi-Fi Protected Setup)?.
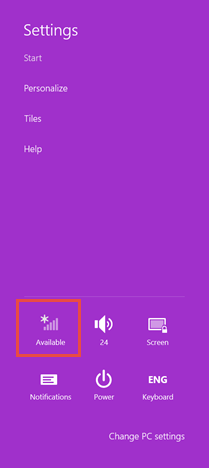
Step 1. Open the Charms & View the Networks List
First, open the charms and select Settings. If you don't know how, here's a brief reminder for you: press Windows + C on your keyboard or flick to the left on the right side of the screen, when using a device with touch.
WPS, Wi-Fi Protected Setup, wireless, connection, Windows 8.1
Look at the bottom half of the Settings charm. There you will find the wireless network icon. Click or tap on it.
WPS, Wi-Fi Protected Setup, wireless, connection, Windows 8.1
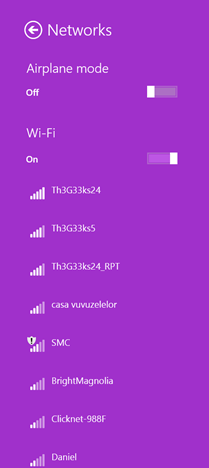
Step 2. Connect to the Wireless Network via WPS
In the networks list, click or tap the wireless network you want to connect to.
WPS, Wi-Fi Protected Setup, wireless, connection, Windows 8.1
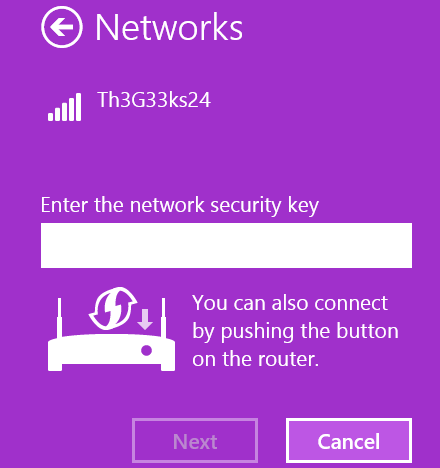
Check the box that says "Connect automatically" if you want Windows 8 to connect automatically to this network each time it is in range. Then, press Connect.
WPS, Wi-Fi Protected Setup, wireless, connection, Windows 8.1
You are asked to enter the password for the selected wireless network.
WPS, Wi-Fi Protected Setup, wireless, connection, Windows 8.1
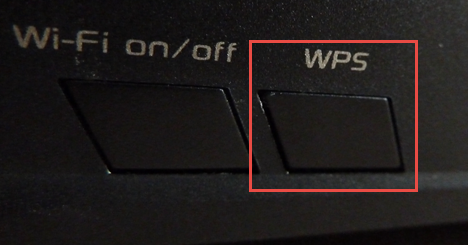
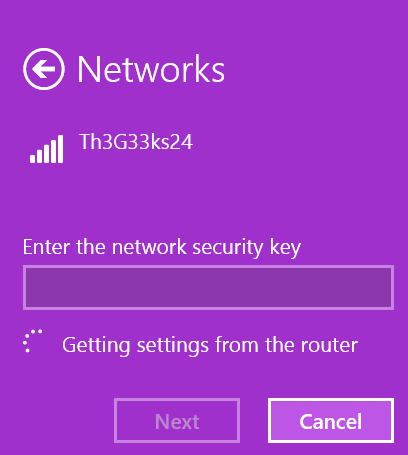
At this step, go to the router and press and hold the WPS button for a couple of seconds. You will find this button on the back of the router or on one side.
WPS, Wi-Fi Protected Setup, wireless, connection, Windows 8.1
You will notice that Windows 8.1 automatically receives the wireless settings from the router and connects to the wireless network, without you entering the password.
WPS, Wi-Fi Protected Setup, wireless, connection, Windows 8.1
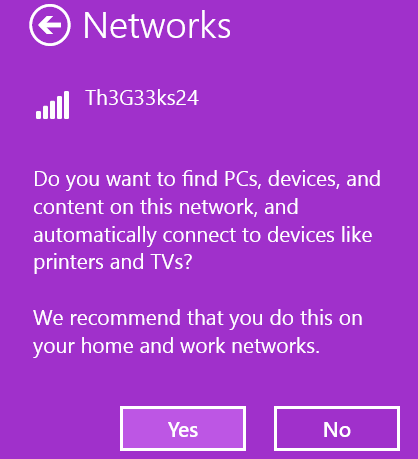
Now you are asked whether you want to find PCs, devices and content on this network. If this is a trusted network, select Yes. Otherwise, select No. Depending on what you choose at this step, the location assigned to your network connection will be changed. To learn more about network locations and their role in network sharing, read this guide: What are Network Locations in Windows 7 & Windows 8?.
WPS, Wi-Fi Protected Setup, wireless, connection, Windows 8.1
Now you are connected to the wireless network via WPS. The next time you connect to this network from the same computer or device, you won't need to use the WPS button because the router has transferred all the required settings to Windows 8.1, including the security password. Windows stores these details and will use them automatically, when making future connections to the same network.
Conclusion
As you can see, connecting to a wireless network via WPS is quick and easy. If you have any questions about this procedure, don't hesitate to ask using the comments form below.
After connecting laptop through wps if I don’t want to connect same pc in future then what is the procedure. (Means Other pc connection via wps)
steve ·
Can’t get, don’t know wps pin for my Windows phone . How do I obtain it?
Microsoft Hater ·
What about when you press the button and Windows 8.1 says it’s getting the connection details from the router, but then fails? Due to the unbelievably horrible error reporting MS has adopted with this completely useless pile of garbage they call an OS, there is no indication of the actual problem, just a worthless “Windows can’t get settings automatically” message. Typing in the WiFi password manually, while reading it directly from the router settings dialog on another PC, also fails. Unsurprisingly, the 6 other devices in my home NOT running Windows 8 connect immediately, every time. When running what apparently passes for a network diagnostics tool for idiots, I get a equally stupid message stating none of the wifi networks I’ve connected to in the past are within range, which is funny because earlier tonight when I first unboxed this nice new $600 paperweight, it connected to the router that is 18 inches away, but now apparently is out of range. So I’m thinking that’s just another one of MicroShit’s lazy “error messages” that convey zero information and don’t actually have anything to do with an actual problem. So even though when initially powering on the laptop it connected to my network just fine, after a single reboot I am left with a completely useless machine that is entirely incapable of connecting to the internet. Any suggestions?
P.S. the “captcha” you’re using to bilk a few pennies out of commenters is incredibly annoying and yet novel at the same time. Congratulations.
david ·
Does not work on windows 8.1 did you actually test it? No mention about wps when connecting.


Discussion (4)
After connecting laptop through wps if I don’t want to connect same pc in future then what is the procedure. (Means Other pc connection via wps)
Can’t get, don’t know wps pin for my Windows phone . How do I obtain it?
What about when you press the button and Windows 8.1 says it’s getting the connection details from the router, but then fails? Due to the unbelievably horrible error reporting MS has adopted with this completely useless pile of garbage they call an OS, there is no indication of the actual problem, just a worthless “Windows can’t get settings automatically” message. Typing in the WiFi password manually, while reading it directly from the router settings dialog on another PC, also fails. Unsurprisingly, the 6 other devices in my home NOT running Windows 8 connect immediately, every time. When running what apparently passes for a network diagnostics tool for idiots, I get a equally stupid message stating none of the wifi networks I’ve connected to in the past are within range, which is funny because earlier tonight when I first unboxed this nice new $600 paperweight, it connected to the router that is 18 inches away, but now apparently is out of range. So I’m thinking that’s just another one of MicroShit’s lazy “error messages” that convey zero information and don’t actually have anything to do with an actual problem. So even though when initially powering on the laptop it connected to my network just fine, after a single reboot I am left with a completely useless machine that is entirely incapable of connecting to the internet. Any suggestions?
P.S. the “captcha” you’re using to bilk a few pennies out of commenters is incredibly annoying and yet novel at the same time. Congratulations.
Does not work on windows 8.1 did you actually test it? No mention about wps when connecting.