The Windows 10 libraries are virtual collections of folders on your system. Microsoft did not enable the libraries in Windows 10 by default, although many users consider them a must-have when it comes to finding and organizing files. This tutorial illustrates three ways to enable the Windows 10 libraries and show them in File Explorer, as well as the Save As and Open dialogues:
1. Enable the libraries in Windows 10 from the Navigation pane
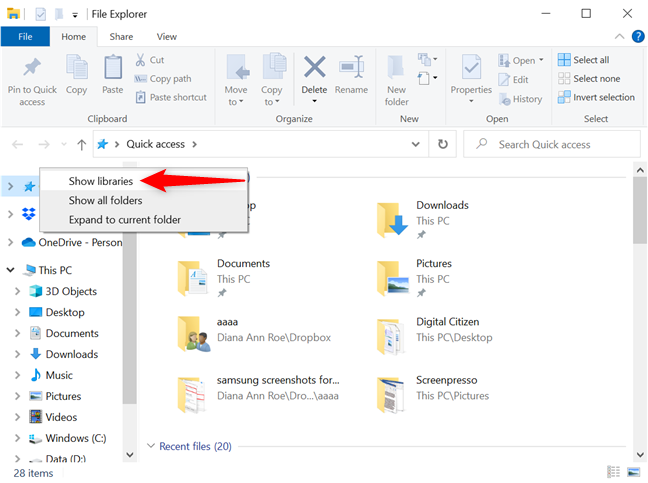
To enable the Windows 10 libraries, opening File Explorer is the first step. The fastest way is by pressing Windows + E on your keyboard. Then, right-click or press-and-hold on an empty area inside the Navigation pane on the left - this works best either on top or under the list of locations displayed in it. From the ensuing contextual menu, click or tap Show libraries.
Press Show libraries from the contextual menu
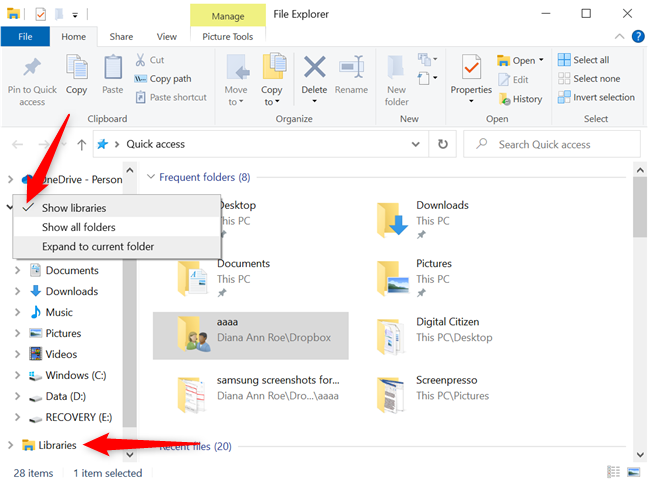
The option is now checked in the contextual menu, and you can instantly see the Libraries entry displayed in the Navigation pane. You can always click or tap on the option again to uncheck it and hide the libraries.
The libraries in Windows 10 are successfully enabled
TIP: Checking the "Show all folders" entry listed next in the contextual menu also enables the libraries, together with other locations, like the Control Panel or the Recycle Bin in Windows 10.
2. Enable the Windows 10 libraries from File Explorer's View tab
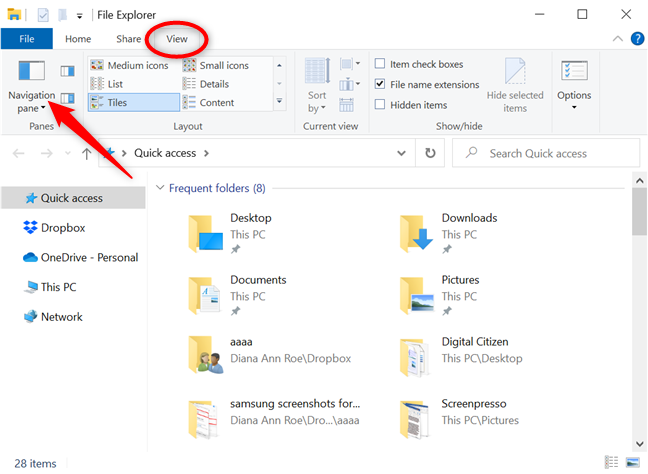
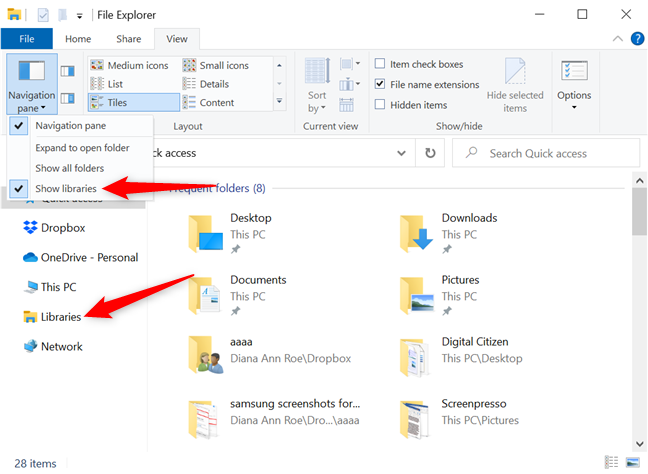
You can also show the libraries in Windows 10 from File Explorer'sView tab. To begin, open File Explorer - you can use the keyboard shortcut Windows + E. Access the View tab, and then find the Navigation pane button from the top-left corner, in the Panes section. Click or tap on it.
Press on Navigation pane on the top-left corner of the View tab
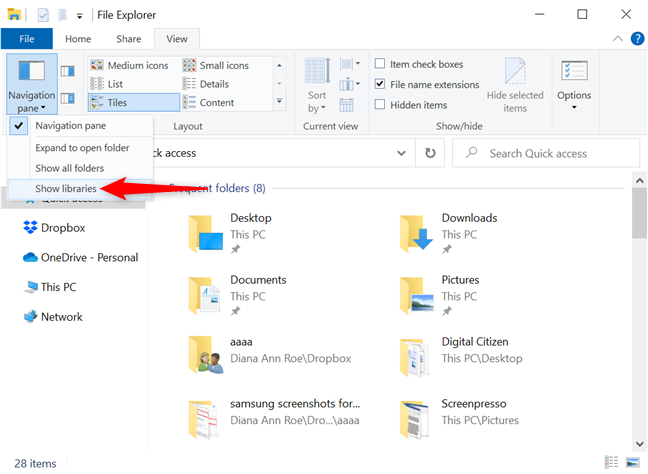
This opens a dropdown menu. Click or tap on the last entry, Show libraries, to check it.
Press Show libraries to show them
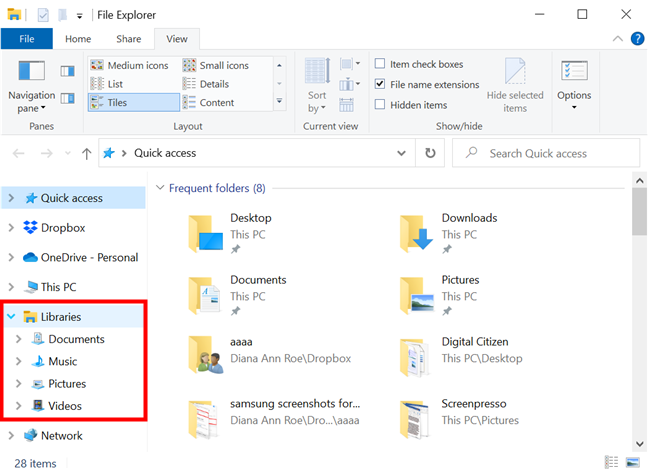
Your libraries are no longer hidden, and you can see them in the Navigation pane. The Show libraries option is checked, and you can click or tap on it again to disable the libraries.
The Windows 10 libraries are enabled, as indicated
TIP: The "Show all folders" option, located directly above in the dropdown menu, also enables the libraries, as well as other useful locations.
3. Enable the libraries in Windows 10 from File Explorer Options
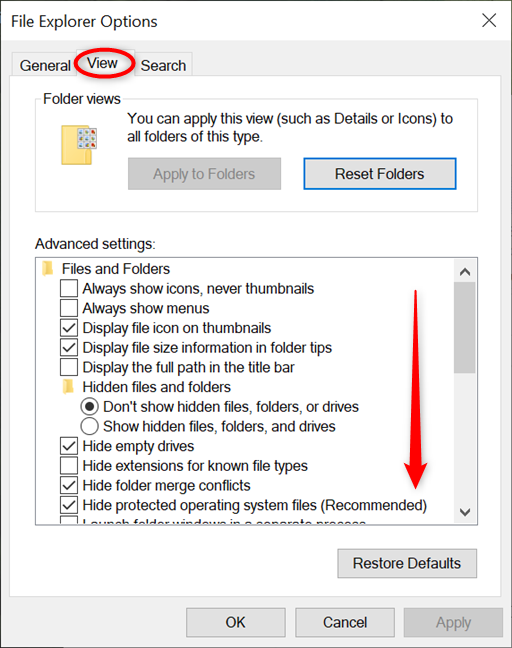
There's another method for enabling the Windows 10 libraries. First, open Folder options - an easy way to do that is to insert "folder options" in the Search bar and access "File Explorer Options." In the new window, go to the View tab and scroll the Advanced settings list to the bottom.
Scroll all the way down in Advanced settings
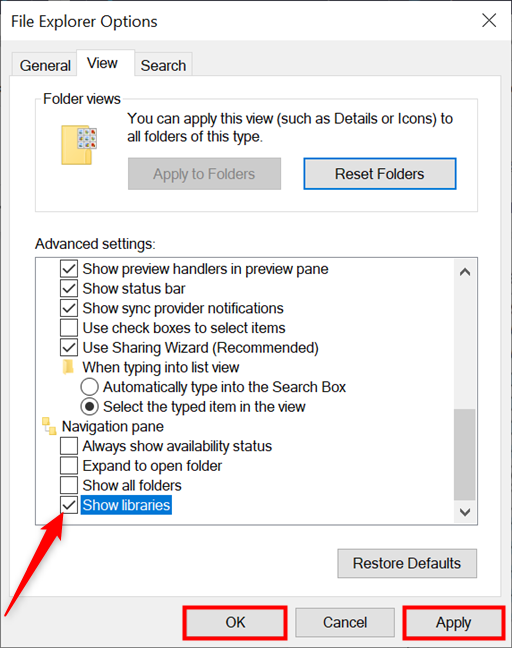
In the last section, Navigation pane settings, check the box next to Show libraries and press OK or Apply. You can uncheck the box at any time to hide libraries again.
TIP: You can also click or tap the "Show all folders" option above to enable all the hidden locations, including libraries.
Click or tap on the entry to check or uncheck it
Your setting is applied, and you can access the Libraries from File Explorer's Navigation pane.
Bonus: Open the Windows 10 libraries from the Run window
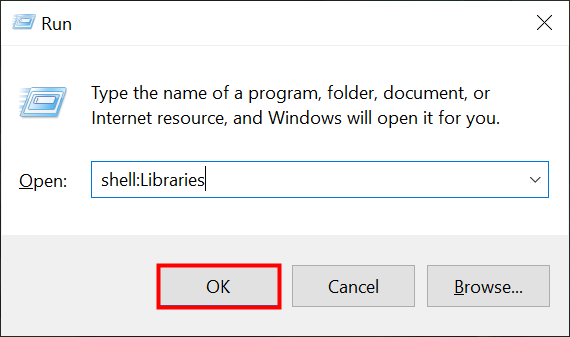
Maybe you don't feel like having your libraries in the Navigation pane, but you'd like the option to access them easily when you need them. If that's the case, open the Run command window by pressing Windows + R on your keyboard. Insert the following command: shell:Libraries. Then, press the Enter key or click or tap OK.
Opening libraries in Windows 10 from the Run window
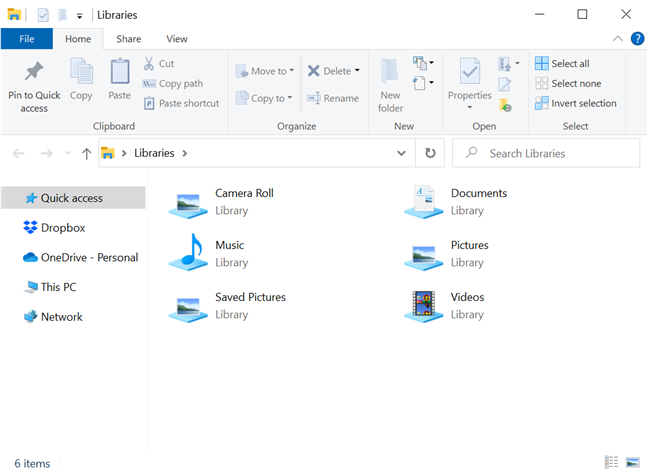
This opens the Libraries location on your Windows 10 computer or device, even if the option is still hidden from the Navigation pane, as seen below.
Libraries have been around since Windows 7, so many people rely on them to access what they need with just a few clicks or taps. We use them to manage and organize our files and folders efficiently. Before closing this tutorial, let us know how you are using the libraries in Windows 10. Do you also feel they help your productivity? Let us know in the comments section.
I use the Downloads library, Dropbox intercepts it and hooks it into cloud storage.
I don’t really use the other libraries much, since most everything is organized in my Dropbox so I have content on all my devices without vendor lockin.
SoCalBryan ·
So instead of teaching people how a file system works microsoft decided that they needed to create libraries. This is where you should put your files.
I’ve been using Microsoft OS’s since windows 3.0 and can honestly say that it chaps my ass that Microsoft keeps trying to make their OS’s easier for morons a yet neglect those that have been using their software for years.
So all the advances in their new OS Windows 10 does not make the OS easier 2 use for experts. In fact if you completely change the OS then everyone has to learn it anew. This is PINA for advanced users.
Microsoft keeps thinking they should make the OS easier to attract Android and Iphone users. Apparently they didnt get the memo that they already lost those users.
fukushimadeath ·
thank you. finally broke down and got PC with Win10, and the first thing i noticed was no libraries…thanks again…have put a shortcut to your site on my desktop…now i have to try and remember how I created a new library in Win7 to create the search I need, and figure out how to get the results in the oder I need….sigh..
michael ·
no I have lost so many video’s with these libraries, you make a copy then move the main video to somewhere else and it deletes the copy. All you have to do is create a folder and put anything you want in it then you don’t lose anything. Michael
wa du ·
love them
Bob_WA ·
I don’t get it. In my Windows 10 / Folder Options / View / Navigation Pane
the checkbox “Show libraries” is definitely un-checked (and “Applied”).
But File Explorer still displays Libraries (eg under Pictures there is Camera Roll).
Any comments?
Anonymous ·
It might happen because you’ve checked the “Show all folders” option?
Ken ·
No. Libraries are a confusing feature of old Windows – I have always found them very irritating.
SoCalBryan ·
Agreed.
Libraries are one of the worst ideas Microsoft has ever implimented.
If you want to eventually lose all your cherished files, music, videos, and photos use libraries. Stupid, stupid, STUPID!
Leah Horner ·
This lesson is all new and very confusing to me–especially when I have to read the instructions on my desktop, then minimize it and open my File Explorer to try to do what the instructions say. By then, I’ve forgotten almost everything I’ve read and have to go back and forth. It’s also confusing when you have to explain the procedure for Windows 10, 8 and 7; too much!
first time reader ·
About libraries, after making them show (the way you explained), I found a way to make this a lot more transparent for use, which was, to rename the libraries. The library formerly called Documents, I renamed DocsLib. The library formerly called Music, I renamed MusLib. Etc. Then I no longer had this confusing DocumentsDocuments buggy-looking display. (I wonder why that was not the default option anyway.)
Luc van Vugt ·
Great, but now the questions is how to get it back in the windows file dialog …. arggggg
Ciprian Adrian Rusen ·
What do you mean by “The Windows File Dialog”?
Luc van Vugt ·
The dialog you get when you want to open or save files from an application like WORD or so.
I have found a work around: by adding the library to the favorites.
Drew Tomlinson ·
According to the article, you have to select “Show All Folders” to get libraries to show in Save As dialogues.








Discussion (15)
I use the Downloads library, Dropbox intercepts it and hooks it into cloud storage.
I don’t really use the other libraries much, since most everything is organized in my Dropbox so I have content on all my devices without vendor lockin.
So instead of teaching people how a file system works microsoft decided that they needed to create libraries. This is where you should put your files.
I’ve been using Microsoft OS’s since windows 3.0 and can honestly say that it chaps my ass that Microsoft keeps trying to make their OS’s easier for morons a yet neglect those that have been using their software for years.
So all the advances in their new OS Windows 10 does not make the OS easier 2 use for experts. In fact if you completely change the OS then everyone has to learn it anew. This is PINA for advanced users.
Microsoft keeps thinking they should make the OS easier to attract Android and Iphone users. Apparently they didnt get the memo that they already lost those users.
thank you. finally broke down and got PC with Win10, and the first thing i noticed was no libraries…thanks again…have put a shortcut to your site on my desktop…now i have to try and remember how I created a new library in Win7 to create the search I need, and figure out how to get the results in the oder I need….sigh..
no I have lost so many video’s with these libraries, you make a copy then move the main video to somewhere else and it deletes the copy. All you have to do is create a folder and put anything you want in it then you don’t lose anything. Michael
love them
I don’t get it. In my Windows 10 / Folder Options / View / Navigation Pane
the checkbox “Show libraries” is definitely un-checked (and “Applied”).
But File Explorer still displays Libraries (eg under Pictures there is Camera Roll).
Any comments?
It might happen because you’ve checked the “Show all folders” option?
No. Libraries are a confusing feature of old Windows – I have always found them very irritating.
Agreed.
Libraries are one of the worst ideas Microsoft has ever implimented.
If you want to eventually lose all your cherished files, music, videos, and photos use libraries. Stupid, stupid, STUPID!
This lesson is all new and very confusing to me–especially when I have to read the instructions on my desktop, then minimize it and open my File Explorer to try to do what the instructions say. By then, I’ve forgotten almost everything I’ve read and have to go back and forth. It’s also confusing when you have to explain the procedure for Windows 10, 8 and 7; too much!
About libraries, after making them show (the way you explained), I found a way to make this a lot more transparent for use, which was, to rename the libraries. The library formerly called Documents, I renamed DocsLib. The library formerly called Music, I renamed MusLib. Etc. Then I no longer had this confusing DocumentsDocuments buggy-looking display. (I wonder why that was not the default option anyway.)
Great, but now the questions is how to get it back in the windows file dialog …. arggggg
What do you mean by “The Windows File Dialog”?
The dialog you get when you want to open or save files from an application like WORD or so.
I have found a work around: by adding the library to the favorites.
According to the article, you have to select “Show All Folders” to get libraries to show in Save As dialogues.