

Are you wondering how to turn your touchpad off? If you’re using a Windows 10 laptop with a touchpad, you may sometimes want to disable it to prevent accidental clicks or movements. Or maybe you just want to turn off your touchpad when typing on your Windows 10 laptop? Without further ado, here’s how to disable the touchpad in Windows 10 using five different methods:
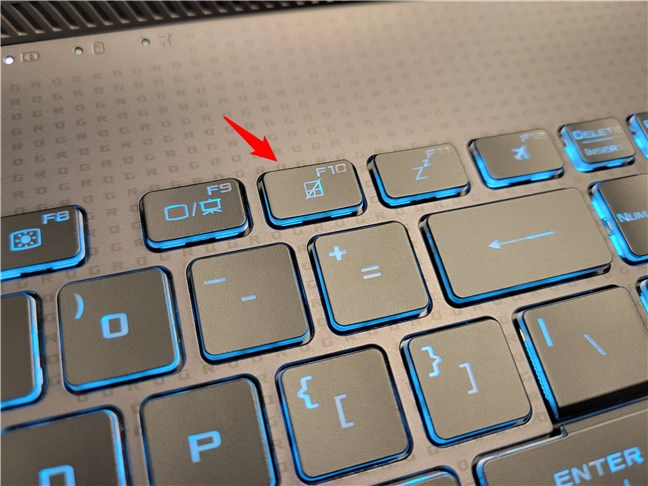
 Find the key that looks like a touchpad
For example, on my ASUS laptop, the shortcut is Fn + F10. To toggle the touchpad on or off, all I have to do is press these keys.
Find the key that looks like a touchpad
For example, on my ASUS laptop, the shortcut is Fn + F10. To toggle the touchpad on or off, all I have to do is press these keys.
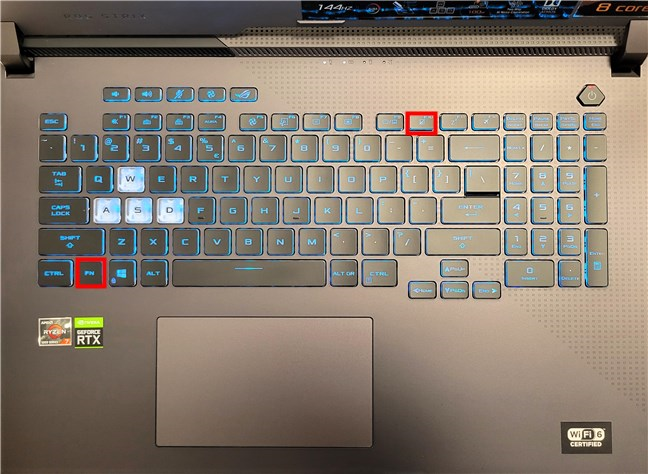
 Disable the touchpad using the keyboard combination
TIP: Do you want to learn more about what you can do with the touchpad on your laptop? Here’s how to configure your touchpad in Windows 10.
Disable the touchpad using the keyboard combination
TIP: Do you want to learn more about what you can do with the touchpad on your laptop? Here’s how to configure your touchpad in Windows 10.
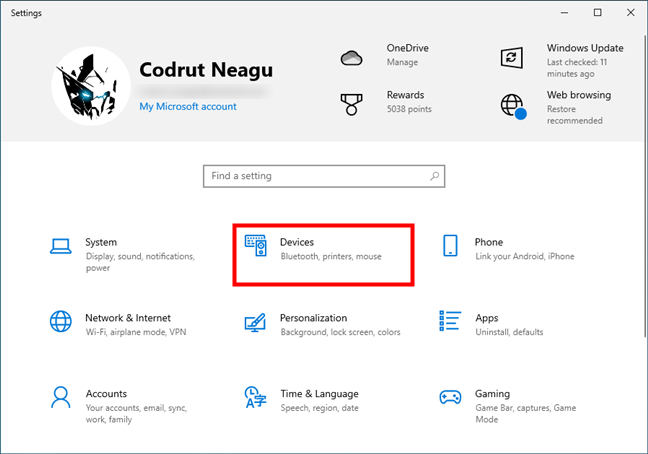
 Open Settings and go to Devices
Then, select Touchpad in the left sidebar, and click or tap to disable the Touchpad switch on the right side of the window.
Open Settings and go to Devices
Then, select Touchpad in the left sidebar, and click or tap to disable the Touchpad switch on the right side of the window.
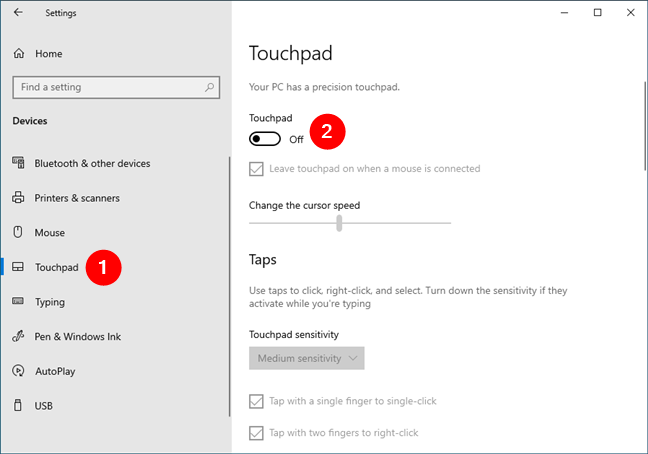 Select Touchpad and disable the Touchpad switch
NOTE: Your touchpad will turn off as soon as you disable its switch. If you don’t have a mouse connected to your laptop or a touch screen, you’ll have to use your keyboard to re-enable it. In this case, you can either follow the steps presented in the first method of this tutorial, or you can press the Tab key repeatedly until the Touchpad switch gets selected and then tap the Spacebar key to re-enable it.
Select Touchpad and disable the Touchpad switch
NOTE: Your touchpad will turn off as soon as you disable its switch. If you don’t have a mouse connected to your laptop or a touch screen, you’ll have to use your keyboard to re-enable it. In this case, you can either follow the steps presented in the first method of this tutorial, or you can press the Tab key repeatedly until the Touchpad switch gets selected and then tap the Spacebar key to re-enable it.
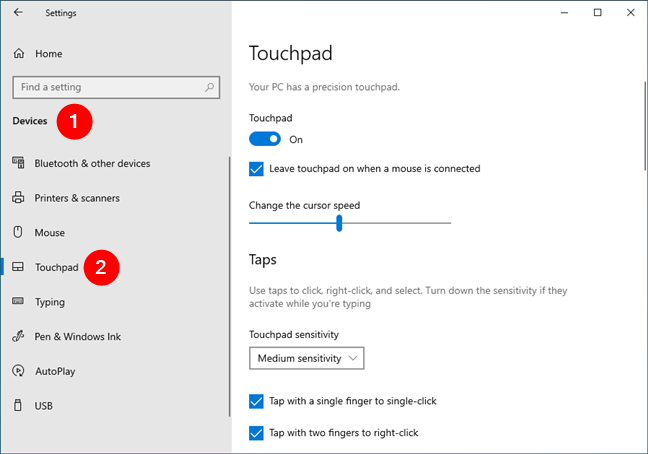 Open Settings, go to Devices and select Touchpad
Then, instead of switching off the touchpad completely, leave it On and uncheck the “Leave touchpad on when a mouse is connected” option under it.
Open Settings, go to Devices and select Touchpad
Then, instead of switching off the touchpad completely, leave it On and uncheck the “Leave touchpad on when a mouse is connected” option under it.
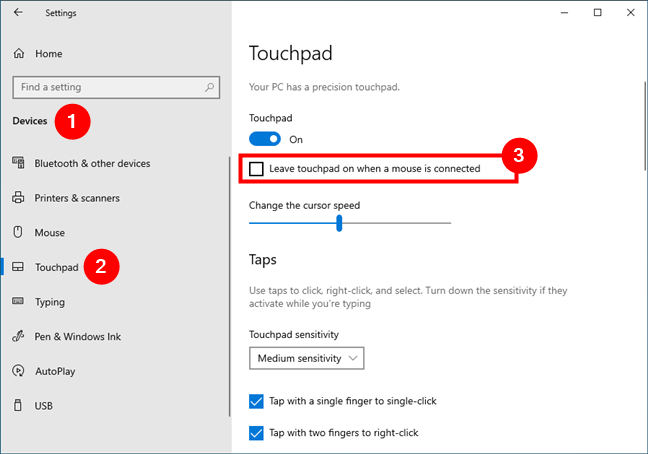 Leave touchpad on when a mouse is connected
This will make Windows 10 automatically disable the touchpad when a mouse is connected, and turn it back on when you unplug the mouse from your laptop.
Leave touchpad on when a mouse is connected
This will make Windows 10 automatically disable the touchpad when a mouse is connected, and turn it back on when you unplug the mouse from your laptop.
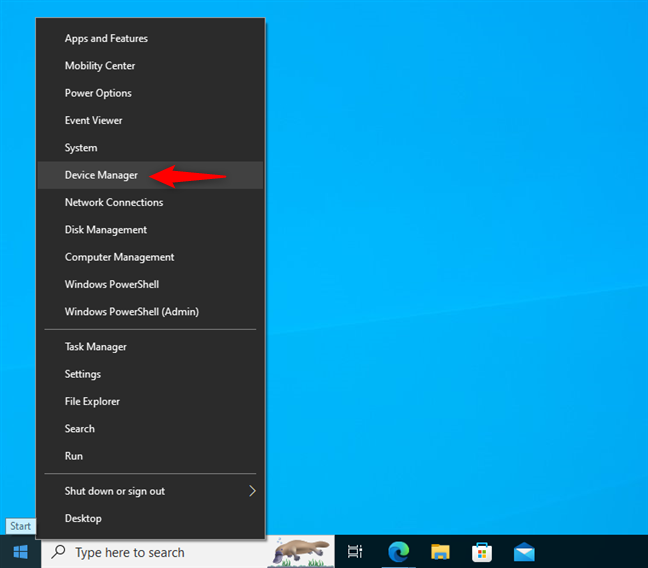
 Open Device Manager
Then, you’ll have to find your touchpad in the list of devices installed on your Windows 10 laptop. It should be listed in one of these categories: Human Interface Devices or Mice and other pointing devices.
Open Device Manager
Then, you’ll have to find your touchpad in the list of devices installed on your Windows 10 laptop. It should be listed in one of these categories: Human Interface Devices or Mice and other pointing devices.
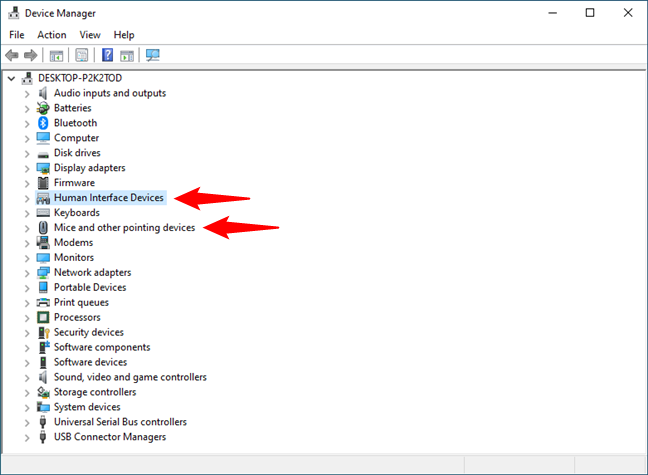
 Expand Human Interface Devices or Mice and other pointing devices
Click to expand these categories and look for your touchpad. Its name should be something easy to identify, like Synaptics TouchPad, ELAN Touchpad, or ASUS Precision Touchpad, in my case.
Expand Human Interface Devices or Mice and other pointing devices
Click to expand these categories and look for your touchpad. Its name should be something easy to identify, like Synaptics TouchPad, ELAN Touchpad, or ASUS Precision Touchpad, in my case.
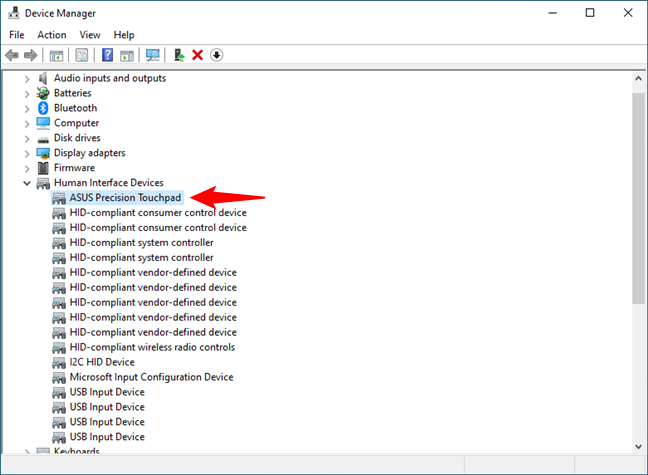 Locate your touchpad device
Once you find your touchpad in Device Manager, right-click (or press and hold) on its name and select Disable device in the context menu.
Locate your touchpad device
Once you find your touchpad in Device Manager, right-click (or press and hold) on its name and select Disable device in the context menu.
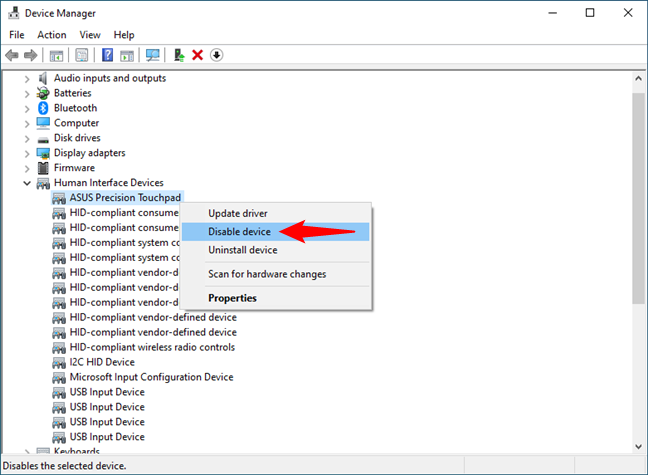 Right-click your touchpad and choose Disable device
Windows 10 will warn you that “Disabling this device will cause it to stop functioning.” If you’re sure this is what you want, confirm your choice by clicking or tapping the Yes button.
Right-click your touchpad and choose Disable device
Windows 10 will warn you that “Disabling this device will cause it to stop functioning.” If you’re sure this is what you want, confirm your choice by clicking or tapping the Yes button.
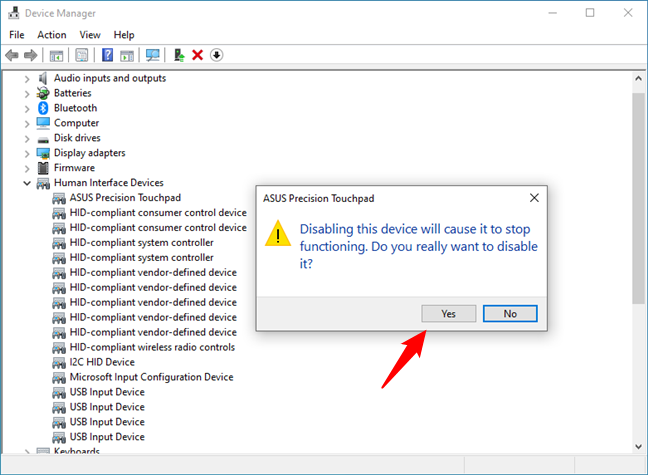 Confirm that you want to disable the touchpad
To enable your touchpad again, you’ll have to follow the same steps but select Enable device instead of Disable device.
NOTE: While this method has the potential to be useful in some situations, I don’t recommend it, as turning the touchpad back on can be quite challenging if you don’t have a mouse connected to your laptop or a touch screen. Using the previous methods in this guide won’t work in order to turn your touchpad back on. If you find yourself in such an unfortunate situation, you’ll have to rely on your keyboard to re-open Device Manager (press the Win button and search for Device Manager) and then get to your touchpad (press Tab and the arrow keys repeatedly inside Device Manager). For more information on what you can do with Device Manager, read this guide.
Confirm that you want to disable the touchpad
To enable your touchpad again, you’ll have to follow the same steps but select Enable device instead of Disable device.
NOTE: While this method has the potential to be useful in some situations, I don’t recommend it, as turning the touchpad back on can be quite challenging if you don’t have a mouse connected to your laptop or a touch screen. Using the previous methods in this guide won’t work in order to turn your touchpad back on. If you find yourself in such an unfortunate situation, you’ll have to rely on your keyboard to re-open Device Manager (press the Win button and search for Device Manager) and then get to your touchpad (press Tab and the arrow keys repeatedly inside Device Manager). For more information on what you can do with Device Manager, read this guide.
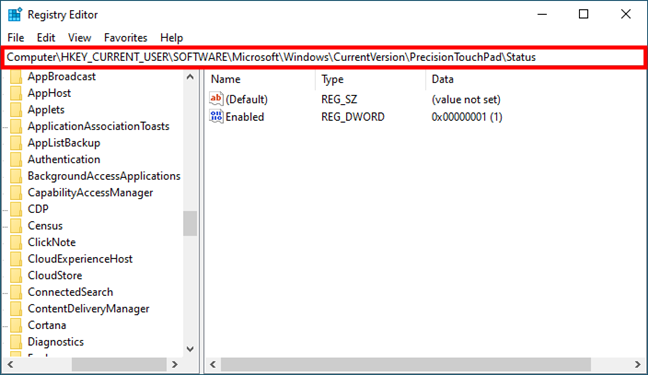
 The registry location for the touchpad
Right-click on the Enabled key and select Modify in the context menu.
The registry location for the touchpad
Right-click on the Enabled key and select Modify in the context menu.
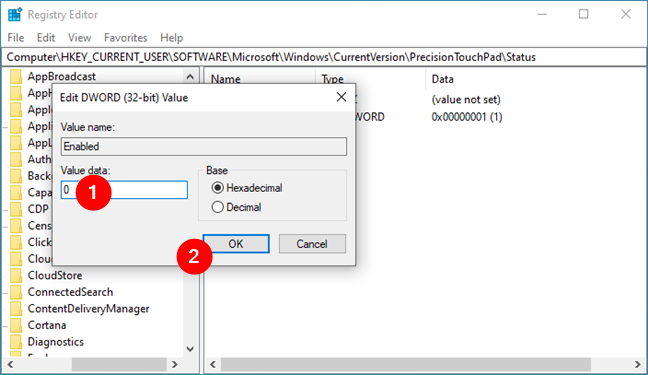
 Right-click on Enabled and choose Modify
In the Value data field, enter 0 (zero) and click/tap on OK or press Enter on your keyboard.
Right-click on Enabled and choose Modify
In the Value data field, enter 0 (zero) and click/tap on OK or press Enter on your keyboard.
 Set the value to zero to disable the touchpad
Reboot your Windows 10 laptop, and it will start with its touchpad disabled.
NOTE: If you want to re-enable your touchpad, you can retrace your steps in the Registry Editor and change the aforementioned value to 1 (one). Moreover, you can also use any of the previous methods in this tutorial except for the Device Manager one.
Set the value to zero to disable the touchpad
Reboot your Windows 10 laptop, and it will start with its touchpad disabled.
NOTE: If you want to re-enable your touchpad, you can retrace your steps in the Registry Editor and change the aforementioned value to 1 (one). Moreover, you can also use any of the previous methods in this tutorial except for the Device Manager one.
1. How to disable the touchpad in Windows 10 using a keyboard shortcut
Probably the easiest method to disable the touchpad is to use your laptop’s dedicated keyboard shortcut. That’s because most notebooks can instantly turn off the touchpad using a special combination of the Fn key and one of the F keys (F1 - F12). Take a look at your laptop’s keyboard to see if you can find a key with a symbol that resembles a touchpad.2. How to disable the touchpad in Windows 10 from Settings
A way to disable the touchpad in Windows 10 that should work regardless of your laptop’s make and model is available in the Settings app. These are the steps you need to follow: Open Settings (Win + I) and click or tap on Devices.3. How to automatically disable the touchpad in Windows 10 when connecting a mouse
To prevent the touchpad from interfering with your mouse, you can also configure Windows 10 to disable it automatically when a mouse is plugged in. To do this, you need to access the Touchpad page in Settings just like in the previous method: open Settings (Win + I), access Devices, and select Touchpad in the left sidebar.4. How to disable the touchpad in Windows 10 from the Device Manager
A more complex method of disabling the touchpad in Windows 10 is available in the Device Manager. Launch Device Manager: a quick way is to right-click (press and hold) on the Start Menu and select Device Manager from the menu displayed.5. How to disable the touchpad in Windows 10’s Registry
Last but not least, if you want to disable the touchpad in Windows 10 but nothing else seems to work, the “nuclear” solution is to edit the Registry. However, be very careful not to change anything other than what I’ll show you next, as modifying the Windows Registry is risky. A change in a value or a deleted registry key can cause system instability or data loss if done incorrectly. Therefore, proceed with caution and perform these steps with the utmost attention: Open the Registry Editor and navigate to the following location:Computer\HKEY_CURRENT_USER\SOFTWARE\Microsoft\Windows\CurrentVersion\PrecisionTouchPad\Status


Discussion (0)
Be the first to comment.