


Most internet service providers don’t use static IP addresses for their customers. Therefore, you can’t log in remotely to your router and your network services using the same IP address every day. To bypass this issue, you can use DDNS (Dynamic Domain Name System) to bind your TP-Link Wi-Fi 6 router, which has a floating IP address, to a static domain name. Here’s how to do this for free:
 Log in to your TP-Link Wi-Fi 6 router
TIP: If the TP-link firmware is not in the language you want, here is how to change the language on your TP-Link Wi-Fi 6 router.
At first, you see the network map and some basic settings. The Dynamic DNS settings can be found by clicking or tapping on Advanced. In the left column, choose Network, followed by Dynamic DNS. Next, you should see the DDNS settings on the right, like in the screenshot below.
Log in to your TP-Link Wi-Fi 6 router
TIP: If the TP-link firmware is not in the language you want, here is how to change the language on your TP-Link Wi-Fi 6 router.
At first, you see the network map and some basic settings. The Dynamic DNS settings can be found by clicking or tapping on Advanced. In the left column, choose Network, followed by Dynamic DNS. Next, you should see the DDNS settings on the right, like in the screenshot below.
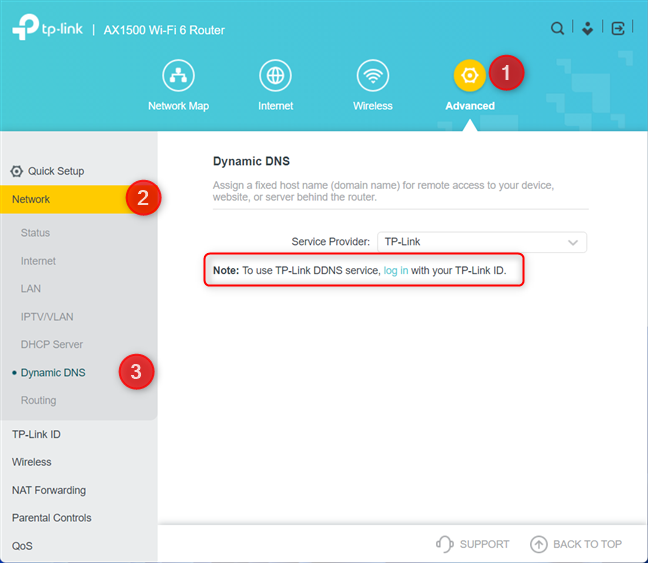
 Go to Advanced > Network > Dynamic DNS
IMPORTANT: If you plan to use TP-Link’s free DDNS service, you see a warning that you first need to log in with your TP-Link ID. Follow the instructions in this guide before moving forward: How to create and add a TP-Link ID to your TP-Link Wi-Fi 6 router.
Go to Advanced > Network > Dynamic DNS
IMPORTANT: If you plan to use TP-Link’s free DDNS service, you see a warning that you first need to log in with your TP-Link ID. Follow the instructions in this guide before moving forward: How to create and add a TP-Link ID to your TP-Link Wi-Fi 6 router.
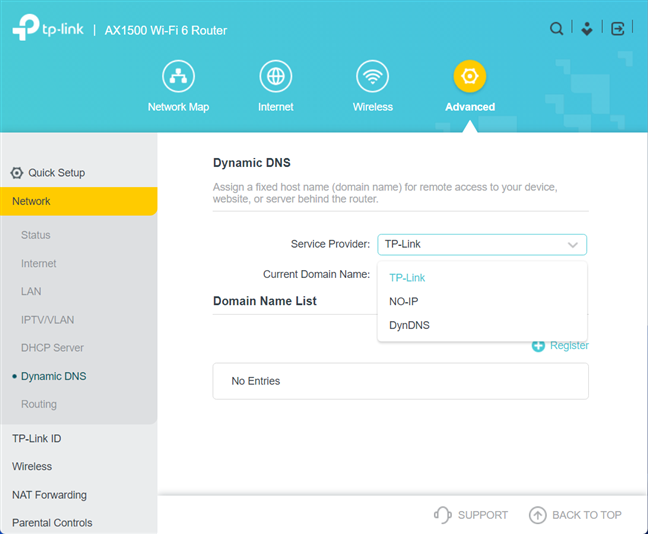
 Choose the Service Provider for DDNS
For this guide, we assume that you want to use TP-Link’s free DDNS service. To do that, select TP-Link in the Service Provider drop-down list, and then click or tap Register.
Choose the Service Provider for DDNS
For this guide, we assume that you want to use TP-Link’s free DDNS service. To do that, select TP-Link in the Service Provider drop-down list, and then click or tap Register.
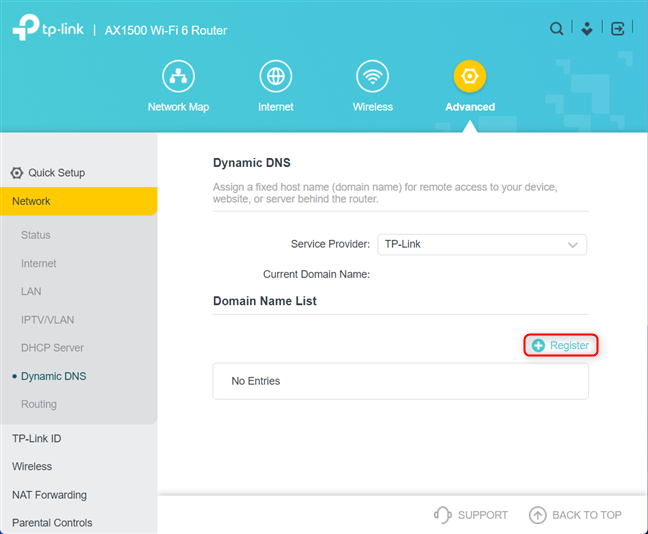 Click or tap Register
Enter a domain name that you want to use and press Save. If it’s not available, you receive a failure message informing you that the domain name is already registered. Then, you need to enter another one.
Click or tap Register
Enter a domain name that you want to use and press Save. If it’s not available, you receive a failure message informing you that the domain name is already registered. Then, you need to enter another one.

 Type the domain name for DDNS
If everything went well, you see the domain name, the date when it was registered, and the domain’s status.
Type the domain name for DDNS
If everything went well, you see the domain name, the date when it was registered, and the domain’s status.
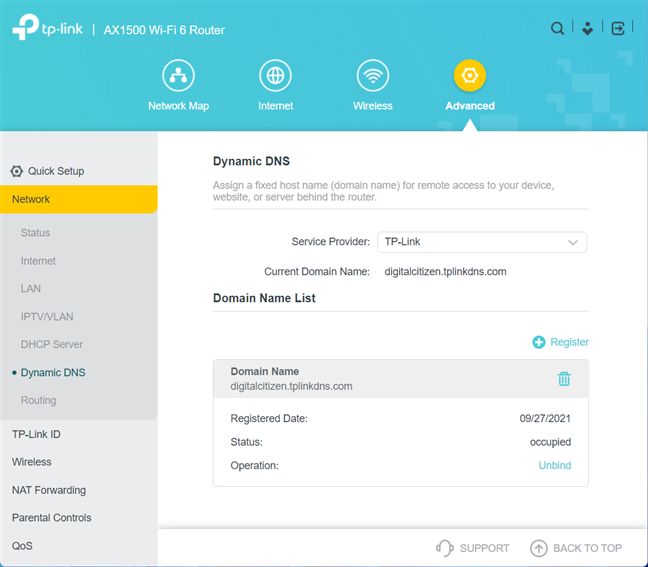
 See the details of your DDNS
You are done with the DDNS configuration of your TP-Link Wi-Fi 6 router. You can now use this domain for all kinds of tasks, including setting up and using the VPN server functionality on your router.
TIP: You can register multiple domains with TP-Link’s DDNS service, but only one can be used at a time.
See the details of your DDNS
You are done with the DDNS configuration of your TP-Link Wi-Fi 6 router. You can now use this domain for all kinds of tasks, including setting up and using the VPN server functionality on your router.
TIP: You can register multiple domains with TP-Link’s DDNS service, but only one can be used at a time.
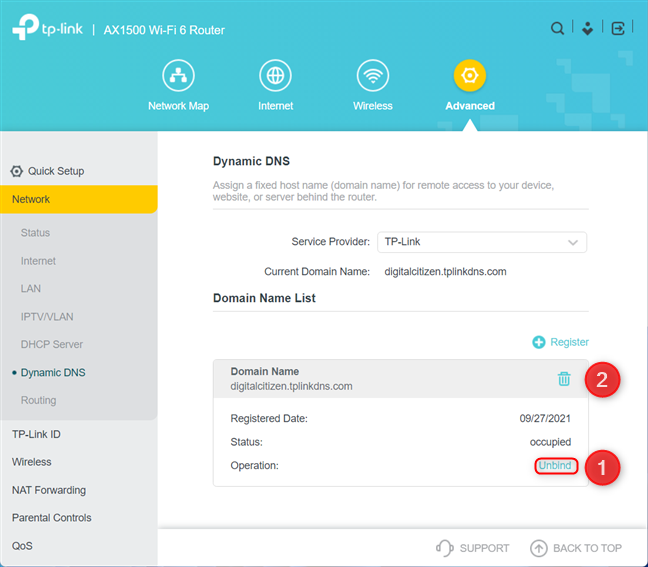 Unbind and then delete you DDNS domain
After each click, you see a brief message from your TP-Link Wi-Fi 6 router, confirming that the operation was successful.
Unbind and then delete you DDNS domain
After each click, you see a brief message from your TP-Link Wi-Fi 6 router, confirming that the operation was successful.
How to access the Dynamic DNS settings on your TP-Link Wi-Fi 6 router
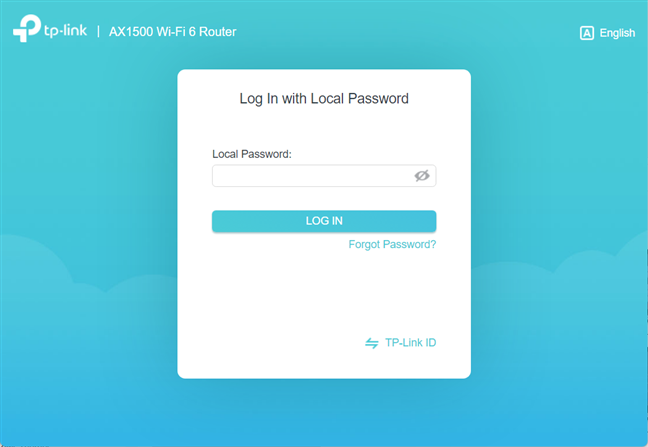
Activating Dynamic DNS on your TP-Link router can be done only from the router’s firmware and not from the Tether app. Therefore, open a web browser on your computer, and navigate to tplinkwifi.net or 192.168.0.1. Next, enter the admin password of your TP-Link Wi-Fi 6 router, and press LOG IN.How to activate Dynamic DNS on your TP-Link Wi-Fi 6 router
Click or tap the Service Provider drop-down on the right. You can use the NO-IP and DynDNS services, alongside TP-Link, by choosing the service provider from the list and then providing the necessary connection details.How to deactivate DDNS on your TP-Link router
If you no longer want to use DDNS, log in to your router’s firmware, and go to “Advanced -> Network -> Dynamic DNS.” On the right, look for the Domain Name List, and click or tap Unbind and then the Delete button for the DDNS service you don’t want to use.

Discussion (0)
Be the first to comment.