10.04.2025
Windows Terminal is a favorite tool for software developers and power users alike, thanks to its modern design, flexibility, and impressive customization options. Unlike the classic Command Prompt, Windows Terminal combines multiple environments, such as PowerShell, Command Prompt, and even Linux distributions like Ubuntu, in one easy-to-use interface. But why stick with the default look and settings when you can personalize it exactly the way you like? In this tutorial, I’ll guide you through all the essential settings and show you how to make Windows Terminal yours. Let’s begin:
IMPORTANT: While Windows Terminal is the default terminal app on Windows 11, you can also install it on Windows 10. The instructions here apply to both Windows versions.
What is Windows Terminal?
Before the modern graphical interfaces of today, computers relied on text-based command-line interfaces (CLI), where users executed tasks by manually typing commands. Today, although graphical interfaces dominate, command-line tools like Windows Terminal remain powerful, especially for developers and system administrators.
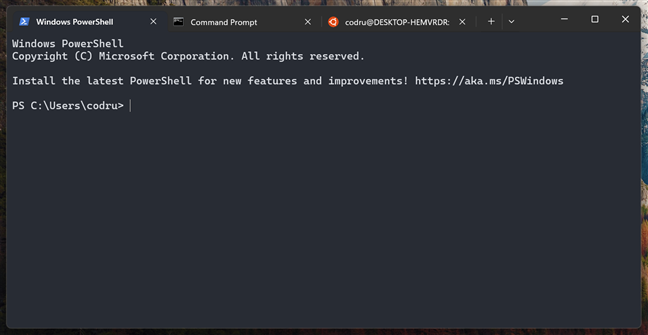
The Windows Terminal with PowerShell, Command Prompt, and Ubuntu tabs
Launched in 2020, Windows Terminal is Microsoft’s modern console application designed to unify multiple shells and command-line environments within a single, user-friendly interface. Its key advantage lies in its ability to run PowerShell, Command Prompt, Azure Cloud Shell, and even Linux shells in separate tabs or panes, which makes multitasking easier. Check out this article to learn more about what the Windows Terminal is and does: What is the Windows Terminal?
How to access Windows Terminal’s Settings
To start customizing Windows Terminal, launch the app by typing terminal in the search bar and selecting Terminal from the results.
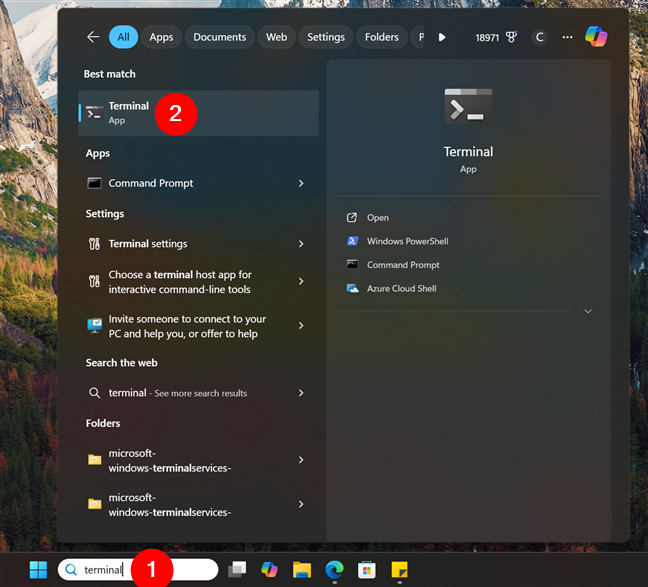
Search and open Terminal in Windows
Once it opens, click the down arrow next to the plus (+) button at the top and choose Settings. You can also quickly access them by pressing the shortcut:

Open the Settings of Windows Terminal
The Settings tab opens, and you immediately notice that it’s neatly organized into sections, each offering specific customization options.
Windows Terminal's Settings tab
Let’s go through them all:
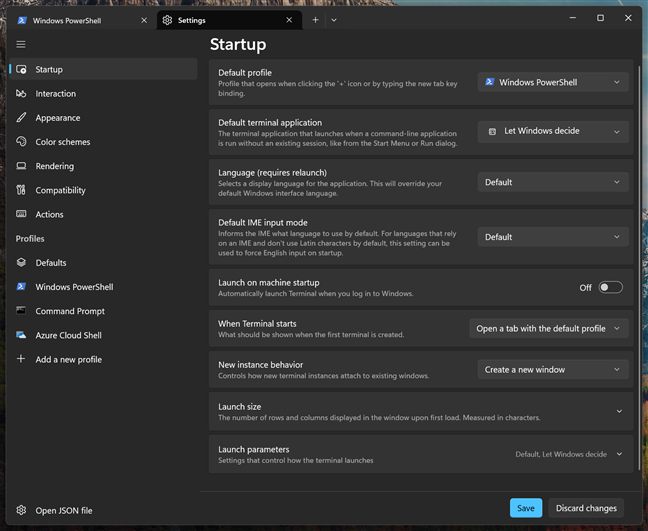
How to change the Startup settings of Windows Terminal
Within the Startup section, you can tailor how Windows Terminal behaves when it launches.
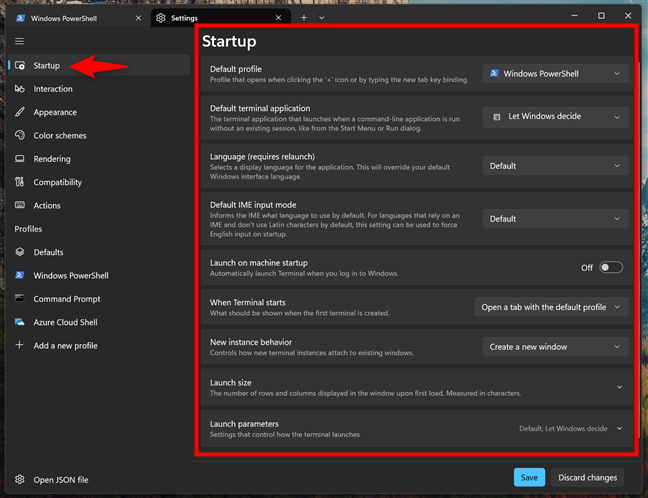
The Startup settings in Windows Terminal
Here’s a detailed breakdown of each option:
- Default profile: Choose which environment, such as PowerShell or Command Prompt, appears by default when you open a new tab. This setting ensures your preferred shell is readily accessible every time you start the terminal.
- Default terminal application: Decide if Windows Terminal should manage how command-line applications open or if the system’s default settings should take precedence. This choice influences whether your terminal or another designated program handles command-line tasks.
- Language: Specify a language for Windows Terminal, allowing you to override the system’s default language setting. This is especially useful if you prefer a language different from the rest of your system for the terminal interface. Say you’re using a computer in Spanish, but you prefer using Windows Terminal in English.
- Default IME input mode: Set the default input method for languages that require an Input Method Editor (IME). This ensures that the correct language input settings are activated automatically when you start the terminal.
- Launch on machine startup: Enable Windows Terminal to launch automatically when you log into your machine. This setting ensures that the Terminal is ready for use immediately after booting up.
- When Terminal starts: Configure what appears on the screen as soon as Windows Terminal opens. You can choose to get a new tab with the default profile loaded or open the windows from the previous session.
- New instance behavior: Determine if launching a new terminal session should open in a separate window or if it should attach to an already open instance.
- Launch size and Launch parameters: Define the initial window dimensions and location on the screen. These options give you control over the terminal’s appearance and behavior from the moment it starts.
After finishing your adjustments, click Save to confirm or choose Discard changes (or simply close the window) to revert to your previous settings.
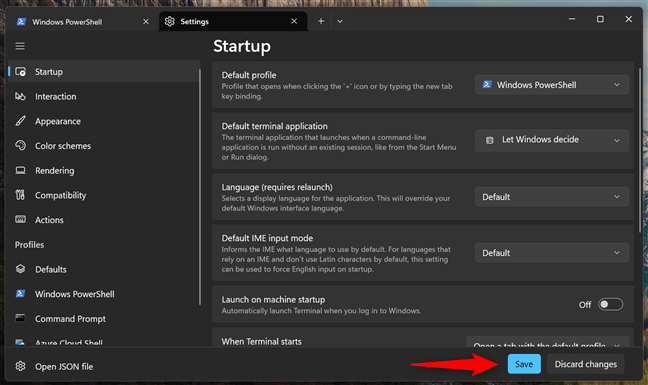
Press Save to apply the changes
How to modify the Interaction settings of Windows Terminal
The Interaction section in Windows Terminal lets you adjust how you work with text and other content.

The Interaction settings in Windows Terminal
These are the options you get:
- Automatically copy selection to clipboard: Decide if you want the Terminal to automatically copy text as soon as you select it.
- Text formats to copy to the clipboard: You can also choose how the text is formatted when it’s copied (options include plain text, HTML, RTF, and HTML plus RTF), making sure it looks the way you need it when pasted elsewhere.
- Remove trailing white-space in rectangular selection and Remove trailing white-space when pasting: Enable the options to automatically remove extra spaces from your text. This means when you select or paste text, unnecessary blank spaces will be removed, keeping your content neat and tidy.
- Word delimiters: Define which characters the Terminal should treat as separators between words. This setting helps improve text selection by making sure that punctuation marks or other symbols are considered boundaries when you double-click to select a word.
- Snap window resizing to character grid: Toggle the feature that aligns the Terminal window with the grid of text characters. When enabled, your Terminal window will “snap” into place based on the text layout, helping maintain a clear and organized view.
- Tab switcher interface style: Choose the method you prefer for switching between different tabs in the Terminal. You can opt for a system that cycles through tabs in their original order or one that prioritizes the most recently used tabs, making it easier to get back to your work.
- Automatically focus pane on mouse hover: Decide if the Terminal should automatically gain focus when you move your mouse pointer over it. This means that simply hovering over the Terminal window can prepare it for typing without the need to click.
- Automatically detect URLs and make them clickable: Enabling this feature has the Terminal continuously scan for web addresses, turning them into clickable links. This makes it convenient to open URLs directly from the Terminal, saving you some time and effort.
- Warn when closing more than one tab: Activate warnings that pop up before you close several tabs at once. This prevents accidentally closing important tabs, giving you a chance to confirm your decision before losing any open work.
Don’t forget, once you’ve finished your adjustments, click Save to confirm. Otherwise, choose Discard changes or simply close the window to go back to your previous settings.
How to customize the Appearance settings of Windows Terminal
The Appearance section in Windows Terminal lets you change how the application looks and behaves, helping you create a workspace that feels more comfortable.
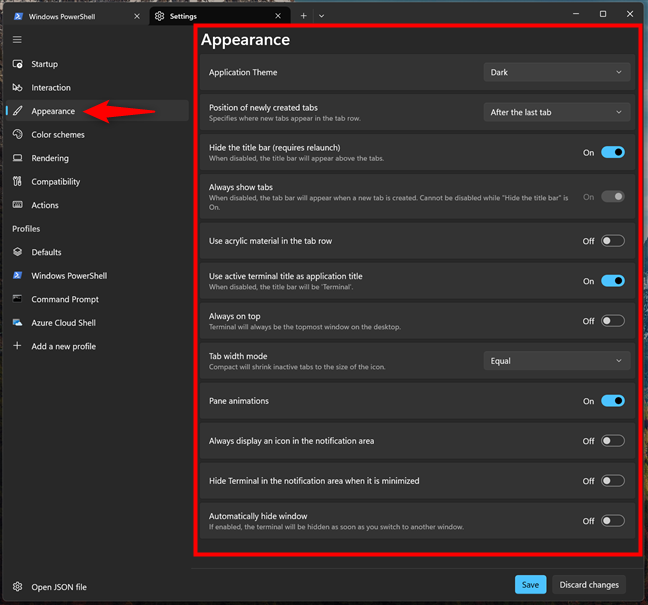
The Appearance settings in Windows Terminal
Here’s a detailed breakdown of the available options:
- Application Theme: Choose whether you prefer a dark interface, a light one, or to have the Terminal automatically match the overall system theme. This lets you set the mood and appearance that suits your working environment.
- Position of newly created tabs: Decide where new tabs appear when you open them. You can set them to open next to your current tab or at the far end of the tab row, depending on what feels more natural for you.
- Hide the title bar and Always show tabs: Control whether the title bar at the top of the window is visible or hidden. You can also adjust its behavior, which can help you maximize screen space or keep important information easily accessible.
- Use acrylic material in the tab row: Enable a translucent look for the tab row of the interface. This effect gives the Terminal a modern feel by letting you see a bit of what’s behind it, which can make the overall design feel lighter and more integrated with your desktop.
- Use active terminal title as application title: Makes Windows display the name of the active shell within the Terminal as the title. For example, if you’re working in Windows PowerShell, the Terminal’s title is Windows PowerShell. If you disable this option, the Terminal app’s title will always be Terminal, no matter the shell you’re working with inside.
- Always on Top: Activate this setting to keep the Terminal window visible above all other open windows. This is especially useful if you need to monitor or interact with the Terminal while working with other applications.
- Tab width mode and Pane animations: Adjust the animation effects when you split or switch between panes, and set the sizes of your tabs. These settings help create a smoother visual experience and ensure that tabs are sized to your liking.
- Always display an icon in the notification area and Hide Terminal in the notification area when it’s minimized: Toggle the visibility of the Terminal in the notification area and decide whether you want to receive notifications. This helps you control how much attention the Terminal demands and keeps your workspace organized.
- Automatically hide window: Minimizes the Terminal window as soon as you focus (click) on another application.
Once you’ve finished your adjustments, remember to click Save to lock in your changes; otherwise, choose Discard changes or simply close the window to forget any changes you’ve made.
TIP: Speaking of customization, here’s also how to turn on or turn off Dark Mode for Windows apps (File Explorer, Outlook, Paint, etc.).
How to adjust the Color schemes of Windows Terminal
In the Color schemes section, you can completely transform the look and feel of your Terminal to enhance readability or simply make it more beautiful.
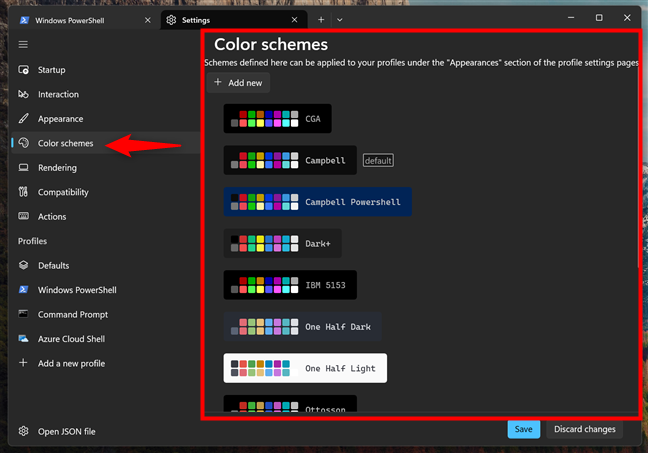
The Color schemes settings in Windows Terminal
You have the option to choose from a variety of ready-made themes, such as Solarized Dark, Tango Light, or One Half Dark, each offering a distinct mix of colors for text, backgrounds, and other elements to create a unique look. If none of these predefined themes suit your style, you can create your own custom color palette by clicking the + Add new button at the top.
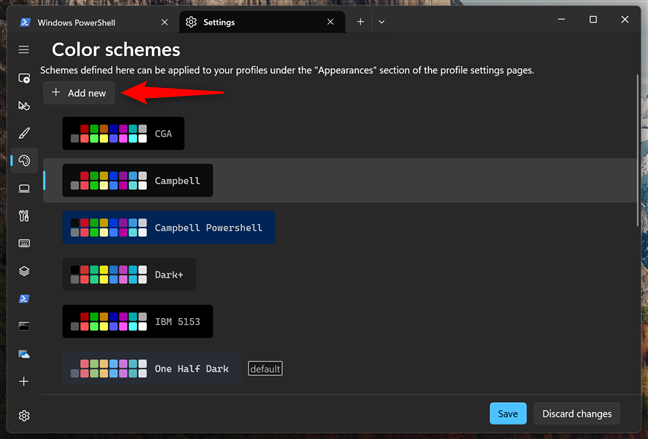
Click + Add new to create a new color scheme
This allows you to select the exact colors for different parts of the Terminal, tailoring every detail to your personal preferences.
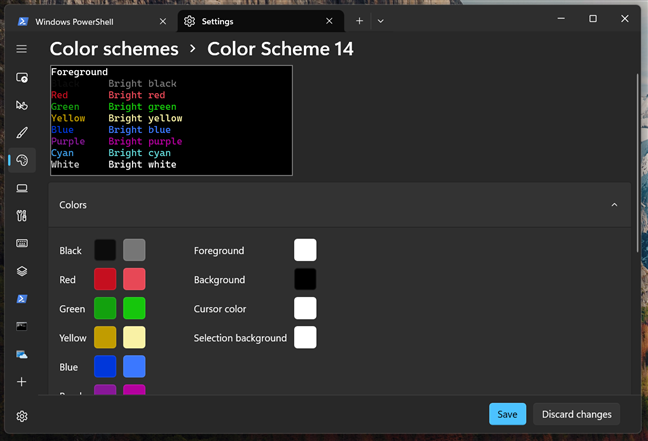
Choose colors used
The Rename color scheme option at the bottom lets you give your color scheme a name.
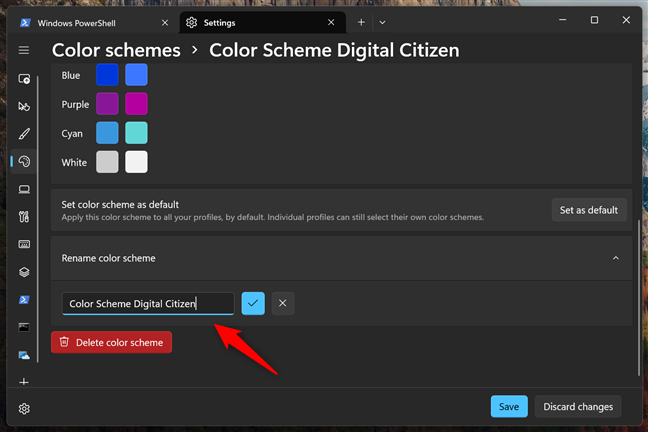
Give a name to the color scheme
If you want all your Terminal profiles to use this color scheme (unless they specify otherwise), check the Set as default button next to Set color scheme as default. This ensures that any new or existing profiles without a custom scheme will use this one.
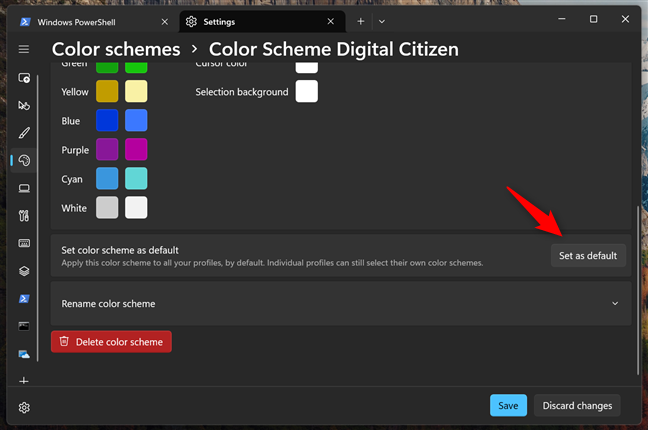
Set color scheme as default
If you decide you no longer need a particular scheme, select Delete color scheme. Be cautious, as this action removes the scheme permanently, so you’ll have to recreate it from scratch if you want to use it again.

Delete color scheme
After making all your adjustments, click or tap the Save button at the bottom to confirm your changes. If you’re having second thoughts, use Discard changes (or close the window without saving) to revert to your previous settings.
How to optimize the Rendering settings of Windows Terminal
The Rendering section lets you adjust settings that affect how the Terminal displays graphics, which can help improve performance or stability.
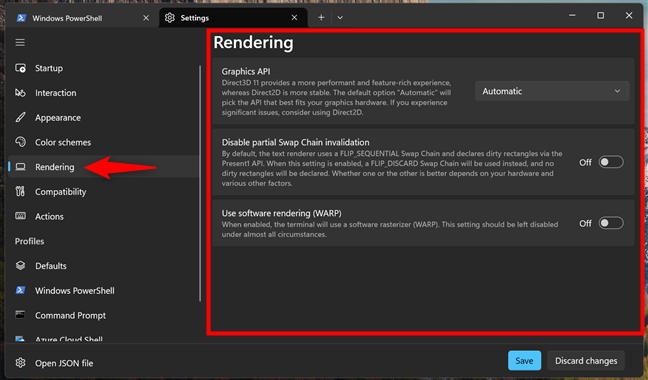
The Rendering settings in Windows Terminal
Here’s a closer look at the available options:
- Graphics API: Choose the graphics technology that the Terminal uses. You can select Direct3D 11 for better performance or Direct2D if you need more stability.
- Disable partial Swap Chain invalidation: Adjust advanced settings that help optimize the way graphics are updated. This option fine-tunes the rendering process, which can make the Terminal run more efficiently.
- Use software rendering (WARP): Enable a backup option for drawing graphics if your hardware isn’t fully compatible. This allows the Terminal to use your computer’s software to render images when needed.
When you’re done, press Save to apply the new settings. If you changed your mind, click or tap Discard changes to keep the old settings instead.
How to set the Compatibility settings in Windows Terminal
The Compatibility settings help ensure that Windows Terminal works well with different applications.
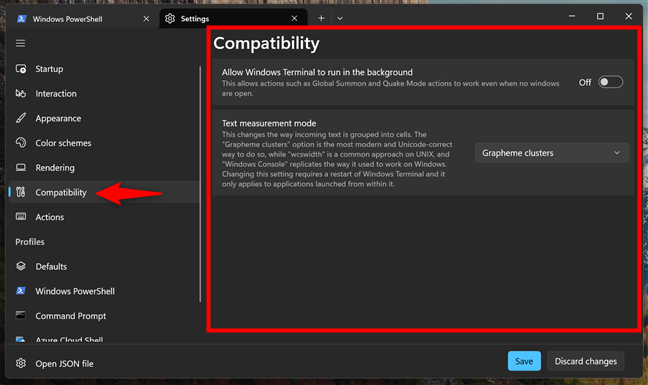
The Compatibility settings in Windows Terminal
These are the options you have here:
- Allow Windows Terminal to run in the background: This setting allows certain Terminal features to continue working even when the Terminal window is minimized or closed. It ensures that tasks or processes can run in the background, so you don’t lose important functionality.
- Text measurement mode: This option adjusts how Unicode characters are measured and rendered. It affects how text appears in the Terminal and ensures better compatibility with various applications that display text. By choosing the right mode, you can improve the readability and alignment of text across different software.
If you’ve made changes you want to keep, press Save when you’re done. Otherwise, click or tap Discard changes.
How to manage the Actions (keyboard shortcuts) in Windows Terminal
The Actions tab offers detailed customization of the keyboard shortcuts available in Windows Terminal. Here, you can review existing shortcuts and add new ones.
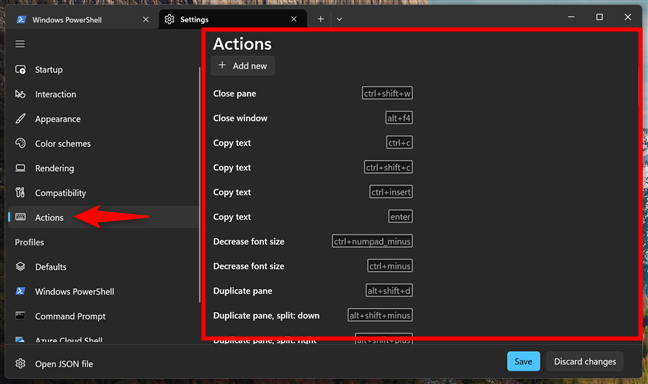
Actions, aka keyboard shortcuts, in Windows Terminal
If you want to add a new keyboard shortcut, click the + Add new button, choose the desired action from the dropdown, and then assign your preferred key combination.
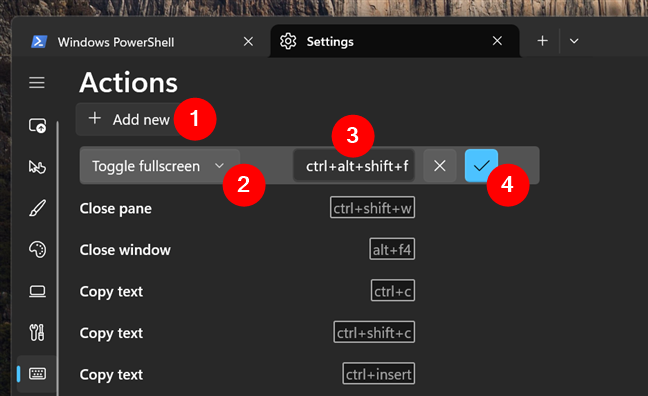
Adding a new keyboard shortcut for Windows Terminal
If you want to modify an existing shortcut, click the small pen icon next to its current key binding and press the new combination you’d like to use.
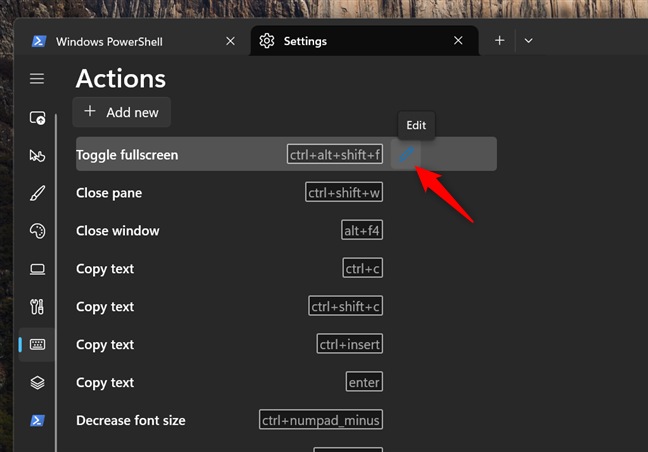
Edit a keyboard shortcut from Windows Terminal
Similarly, if you want to delete a certain keyboard shortcut, start editing it and press the trash bin button next to it.
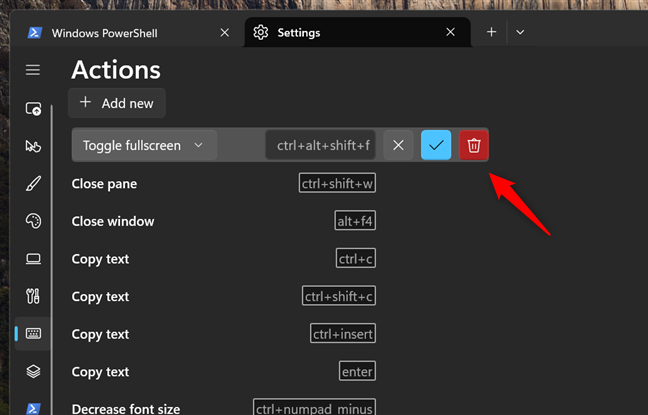
Delete a keyboard shortcut from Windows Terminal
Once you’ve made your changes, click Save to apply them; if you prefer to cancel, choose Discard changes or close the window without saving.
How to configure Profiles in the Terminal
The Profiles section in Windows Terminal lets you manage and customize various command-line environments, like PowerShell or Command Prompt. You can set default options for all the profiles, add or remove profiles, and adjust settings such as appearance, fonts, colors, cursor style, and startup behavior.
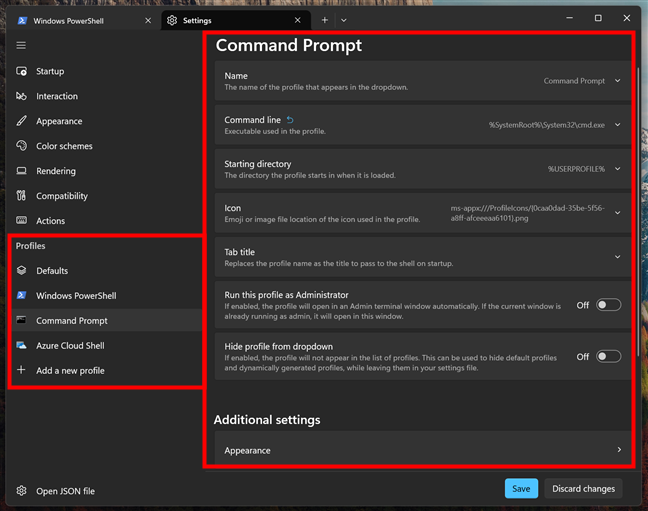
The Profiles settings in Windows Terminal
However, these options deserve their own detailed tutorial, which is found here: How to customize Windows Terminal Profiles.
What’s your favorite customization in the Terminal?
With so many options, Windows Terminal becomes more approachable and enjoyable. Whether you’re a technical person, a seasoned admin, or just a beginner learning the basics of Windows and command-line environments, customizing your Terminal is well worth the effort. So, after going through this guide, which feature did you try first? Let me know what you’ve changed and what your favorite customization is in the comments below.