It's been a while since Microsoft declared its love for Linux, and, at first, it felt strange to see Windows 10 embrace the Tux penguin. However, the fact that Windows 10 can run native Linux applications directly, without having to resort to using virtual machines, is proof of Microsoft's new strategy of embracing other ecosystems. Strange times we're living in, right? Were you expecting to see Ubuntu, openSUSE, Fedora, and the likes, running natively in Windows 10? Here's how to get Windows Subsystem for Linux (WSL) and how to install various Linux distributions in Windows 10:
NOTE: All the features presented are available in Windows 10 Version 1903 (May 2019 Update) or newer. If you're using an older version of Windows 10, you might not have access to all the features. Check your Windows 10 build and, if necessary, get the latest Windows 10 update available for you.
How to install the Windows Subsystem for Linux, using Windows Features
Prior to being able to install any Linux distribution on your Windows 10 PC, you have to install the Windows Subsystem for Linux (WSL). If you prefer clicks to run commands, the easiest way to do it is from the Windows Features.
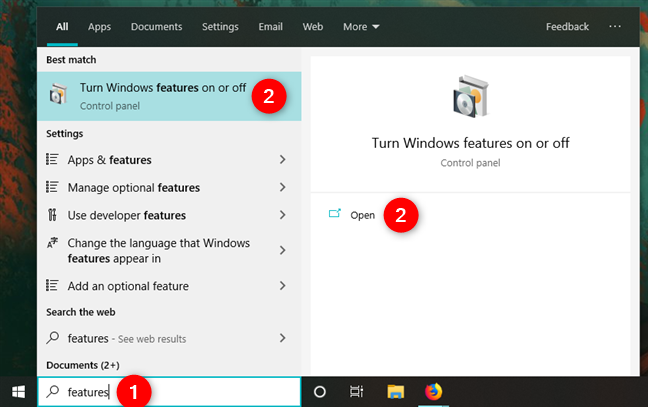
On the search field from your taskbar, type "features" and click or tap on "Turn Windows features on or off." Alternatively, if you prefer the old Control Panel, you can also follow the steps explained here: How to add or remove (un)wanted Windows features, programs or apps.
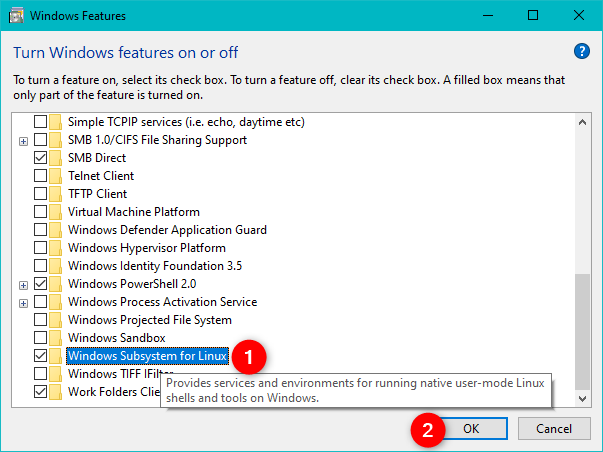
In the Windows Features window, scroll down the list of options, and check the feature called "Windows Subsystem for Linux." Then click or tap OK.
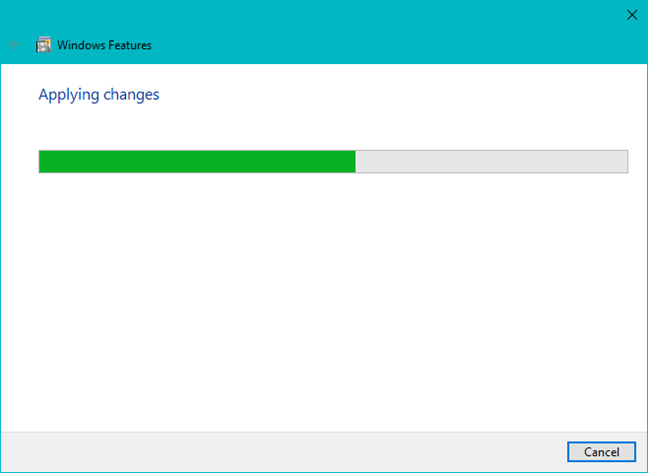
Wait a few moments for Windows 10 to apply the necessary changes.
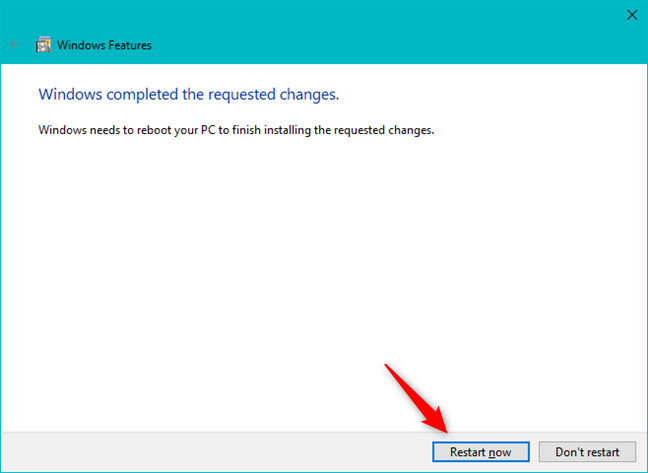
When the changes are done, Windows 10 lets you know that you have to reboot your computer or device to finish installing.
Restart now or choose to restart later if you still have work to do on your Windows 10 computer or device.
How to install the Windows Subsystem for Linux, using Powershell
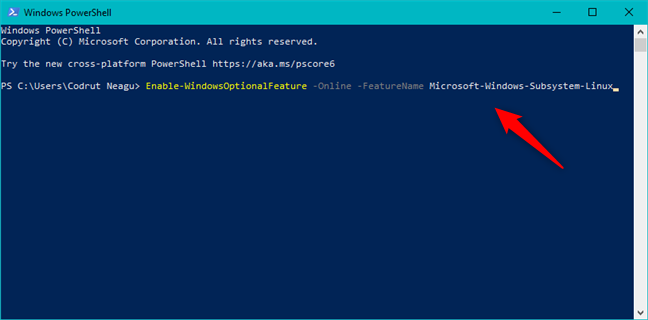
PowerShell offers an even faster way of installing the Windows Subsystem for Linux (WSL). Open Powershell as administrator and enter this command: Enable-WindowsOptionalFeature -Online -FeatureName Microsoft-Windows-Subsystem-Linux. Press Enter on your keyboard to run the command.
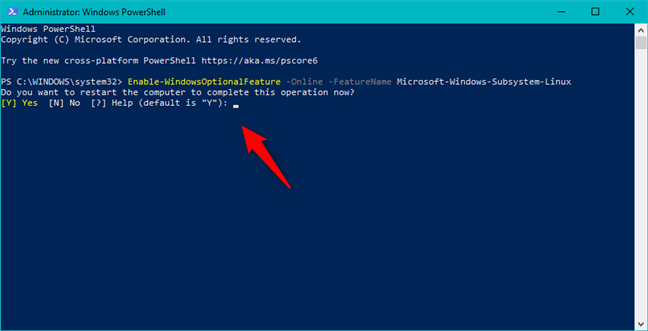
After a short while, Windows 10 finishes installing the WSL (Windows Subsystem for Linux). When it's done, it should ask you to restart your computer. Type Y if you want to do it now, or N if you want to reboot later.
After you restart, Windows 10 finishes installing the Windows Subsystem for Linux (WSL). Next, you can download and install any of the available Linux distributions.
How to download and install Linux distributions on Windows 10, from Microsoft Store
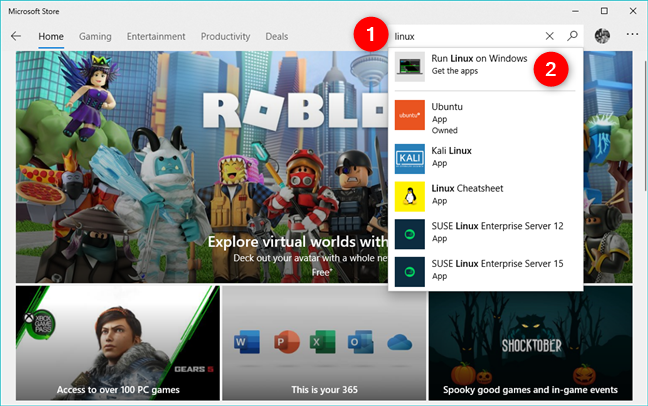
Regardless of how you chose to install the Windows Subsystem for Linux (WSL), you can now go ahead and install one of the available Linux distributions. For those who prefer clicks and taps, the easiest way to install a Linux distro is to do it from the Microsoft Store. Open it and search for "linux," or click/tap on this direct link to see what Linux distributions you can get.
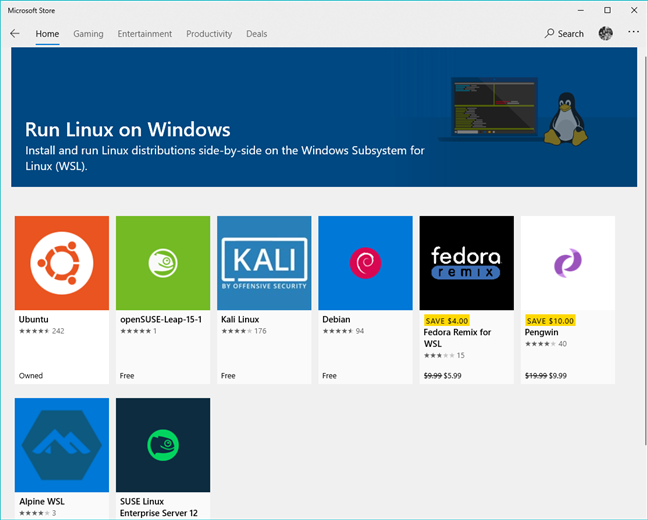
When we published this tutorial, this was the list of Linux distros available on Windows 10: Ubuntu, openSUSE, Kali Linux, Debian, Fedora, Pengwin, Alpine, and SUSE Linux Enterprise Server.
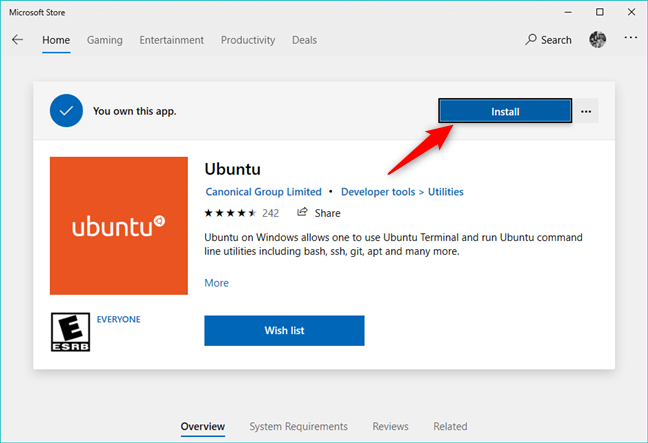
Choose the Linux distro that you want, click or tap on it, and then press the Install button.
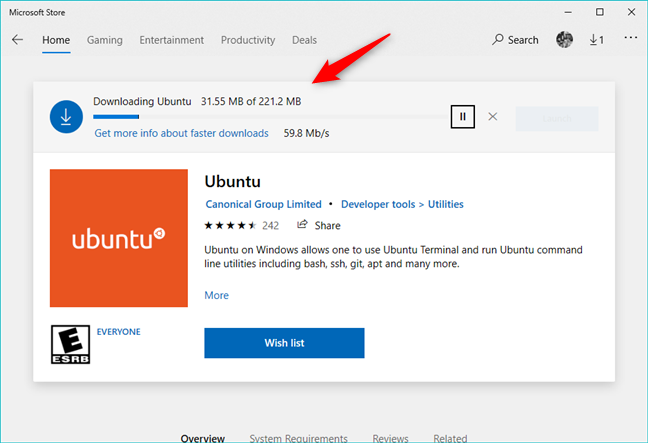
Depending on how large the Linux distro is, and on how fast your internet connection is, it can take a while to finish downloading it. When the download is over, Windows 10 installs the Linux distribution automatically.
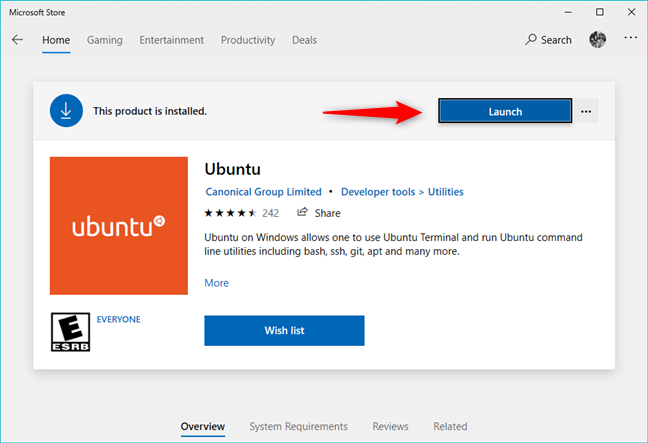
When the installation is done, you can start your new Linux distribution by clicking on the Launch button from its page on the Microsoft Store.
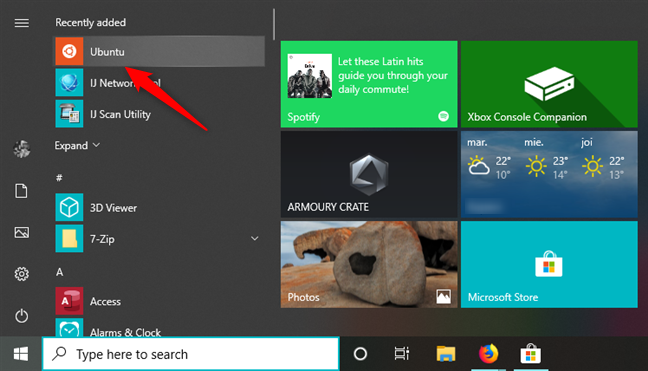
Alternatively, Windows 10 also creates a convenient shortcut for the Linux distribution in your Start Menu, which you can use to start it whenever you want.
How to download and install Linux distributions on Windows 10, from PowerShell
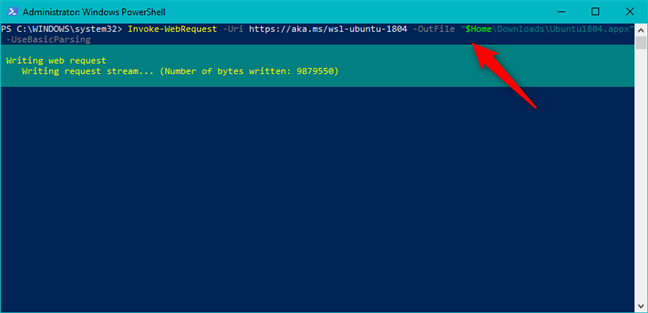
If you're a command-line aficionado, you can also download and install Linux distros directly from PowerShell. Open Powershell as administrator and run one of the following commands, depending on what Linux distro you want:
- Ubuntu 18.04: Invoke-WebRequest -Uri https://aka.ms/wsl-ubuntu-1804 -OutFile "$HomeDownloadsUbuntu1804.appx" -UseBasicParsing
- Ubuntu 18.04 ARM: Invoke-WebRequest -Uri https://aka.ms/wsl-ubuntu-1804-arm -OutFile "$HomeDownloadsUbuntu1804ARM.appx" -UseBasicParsing
- Ubuntu 16.04: Invoke-WebRequest -Uri https://aka.ms/wsl-ubuntu-1604 -OutFile "$HomeDownloadsUbuntu1604.appx" -UseBasicParsing
- Debian GNU/Linux: Invoke-WebRequest -Uri https://aka.ms/wsl-debian-gnulinux -OutFile "$HomeDownloadsDebian.appx" -UseBasicParsing
- Kali Linux: Invoke-WebRequest -Uri https://aka.ms/wsl-kali-linux-new -OutFile "$HomeDownloadsKali.appx" -UseBasicParsing
- OpenSUSE Leap 42: Invoke-WebRequest -Uri https://aka.ms/wsl-opensuse-42 -OutFile "$HomeDownloadsOpenSUSE.appx" -UseBasicParsing
- SUSE Linux Enterprise Server 12: Invoke-WebRequest -Uri https://aka.ms/wsl-sles-12 -OutFile "$HomeDownloadsSUSELinuxEnterprise.appx" -UseBasicParsing
- Fedora Remix for WSL: Invoke-WebRequest -Uri https://github.com/WhitewaterFoundry/Fedora-Remix-for-WSL/releases/download/1.30.1/DistroLauncher-Appx_1.30.1.0_x64.appx -OutFile "$HomeDownloadsFedoraRemix.appx" -UseBasicParsing
Press Enter on your keyboard and wait for the Linux distribution package to download. The chosen distribution is going to be saved in your Downloads folder. However, if you prefer another location, replace the $HomeDownloads string from the command that you're running, with the folder you prefer.
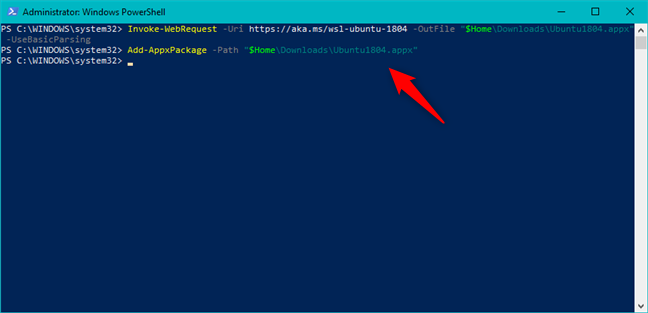
Wait until your Linux distribution is downloaded. When it's done, run one of the following commands, depending on which Linux distro you chose to install on your Windows 10 PC:
- Ubuntu 18.04: Add-AppxPackage -Path "$HomeDownloadsUbuntu1804.appx"
- Ubuntu 18.04 ARM: IAdd-AppxPackage -Path "$HomeDownloadsUbuntu1804ARM.appx"
- Ubuntu 16.04: Add-AppxPackage -Path "$HomeDownloadsUbuntu1604.appx"
- Debian GNU/Linux: Add-AppxPackage -Path "$HomeDownloadsDebian.appx"
- Kali Linux: Add-AppxPackage -Path "$HomeDownloadsKali.appx"
- OpenSUSE Leap 42: Add-AppxPackage -Path "$HomeDownloadsOpenSUSE.appx"
- SUSE Linux Enterprise Server 12: Add-AppxPackage -Path "$HomeDownloadsSUSELinuxEnterprise.appx"
- Fedora Remix for WSL: Add-AppxPackage -Path "$HomeDownloadsFedoraRemix.appx"
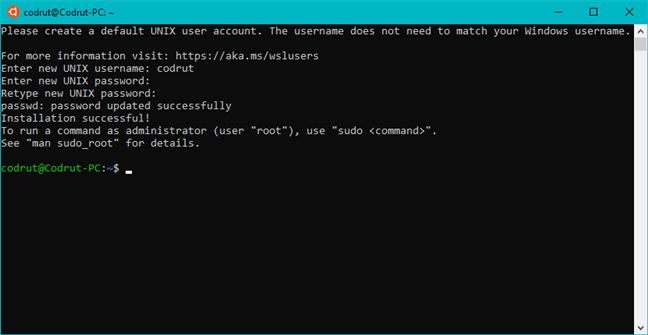
Once the installation is done, you can find convenient shortcuts to your Linux distribution, in the Start Menu. Run it and enjoy it!
That was all! Now you can start playing with Linux on your Windows 10 PC! 🙂
Conclusion
Enabling the Windows Subsystem for Linux (WSL) on Windows 10 is not hard. However, working with Linux from Windows 10 might be something that's not quite for everybody. If you are a developer, if you love running commands in a text environment, or if you have some experience in working with Linux, then you'll probably be very excited with the love Windows 10 is now showing to Linux users.


 23.10.2019