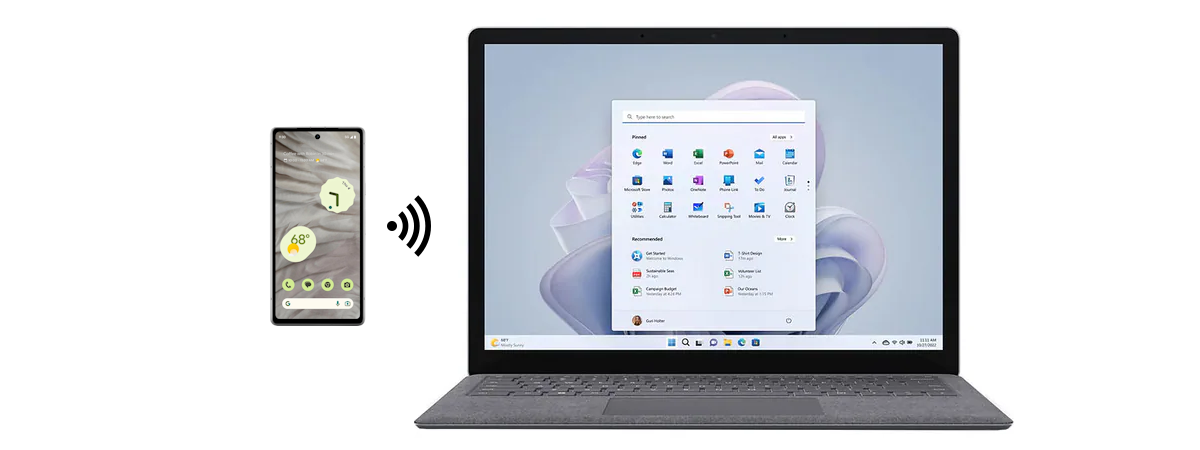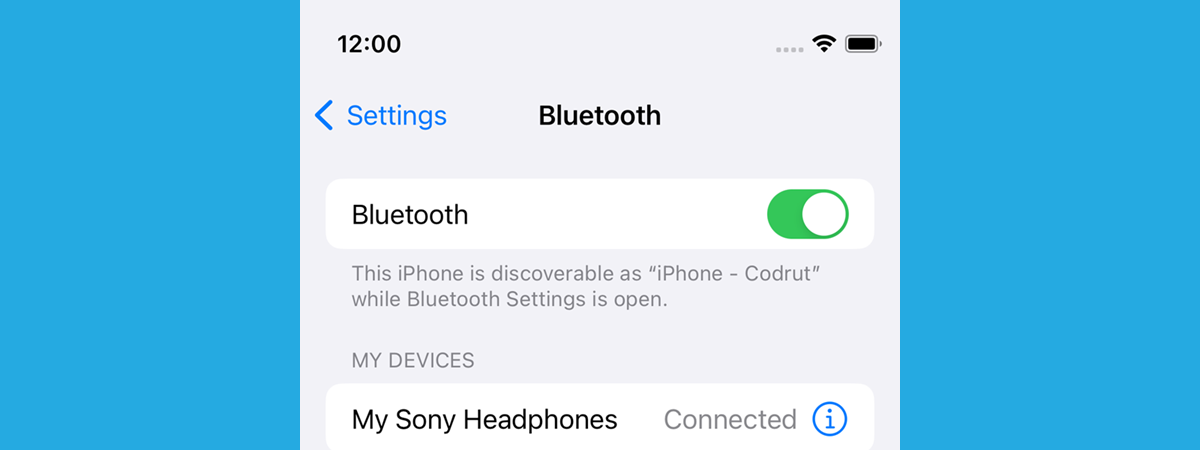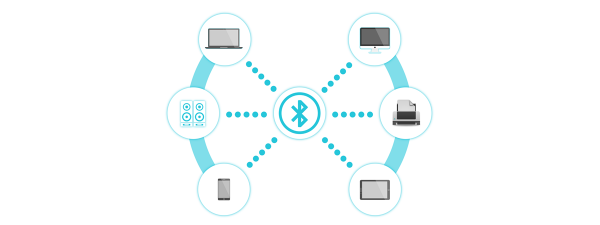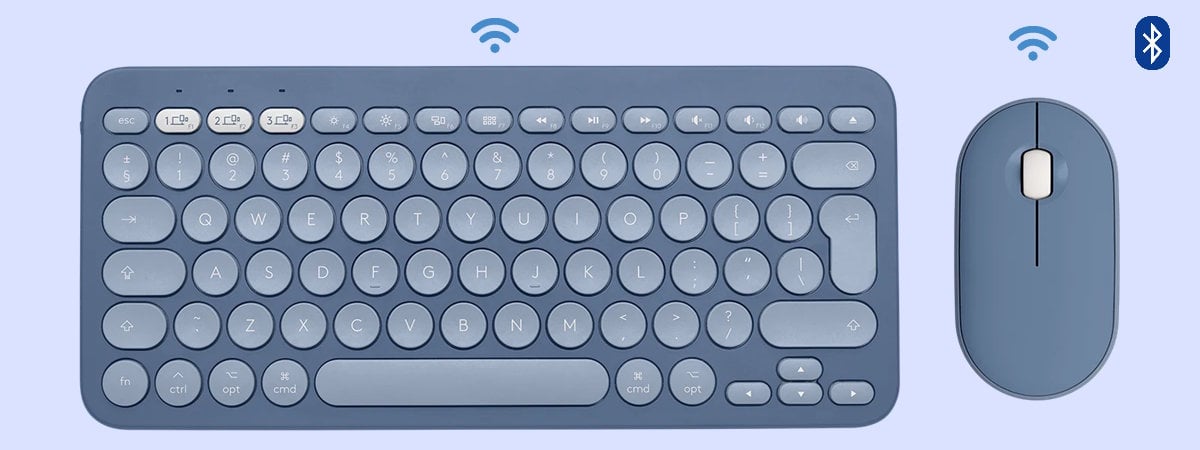
Do you have a laptop, a tablet, or a 2-in-1 device with Windows 10 or Windows 11? Do you need to connect Bluetooth devices and accessories, like a mouse, a keyboard, an external speaker, or a headset? If you do, this tutorial details all the steps you need to go through to make successful Bluetooth connections in both Windows 10 and Windows 11:
How to connect a Bluetooth mouse or keyboard to a Windows laptop or PC
Connecting a Bluetooth mouse to a Windows 10/Windows 11 laptop is just as easy as connecting a Bluetooth keyboard to a desktop computer. And the procedure is mostly the same for any other type of device too. Here’s how it all goes:
Step 1. Turn on your Bluetooth mouse or keyboard and enter pairing mode
The first step is ensuring your Bluetooth mouse or keyboard has its batteries plugged in and working. Then, turn on the mouse or keyboard, and enable its Bluetooth pairing function. This process is different from device to device.
For example, on a Microsoft Wedge Mobile keyboard, you have two buttons for turning on the keyboard and a separate one to turn on Bluetooth discovery. Your keyboard may have similar buttons.
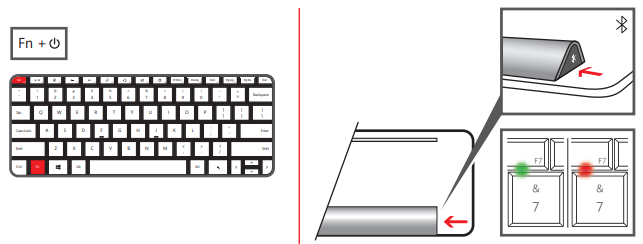
How to enter Bluetooth pairing mode on a Microsoft keyboard
On other keyboards, like the Logitech Bluetooth Illuminated Keyboard K810, you may need to press a button on the back to turn on Bluetooth discovery.
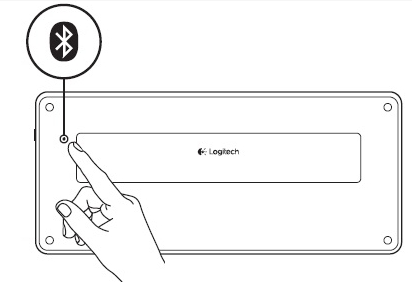
How to enter Bluetooth pairing mode on a Logitech keyboard
The same applies to mice: for example, on a Microsoft Sculpt Comfort mouse, you have a button on its bottom to turn on the mouse and another one for enabling Bluetooth discovery. Your mouse may have similar buttons. Use the button to turn on Bluetooth pairing/connect.
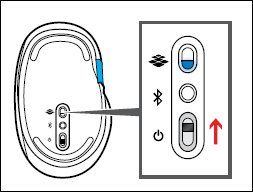
How to enter Bluetooth pairing mode on a Microsoft mouse
On a Microsoft Arc Touch Bluetooth mouse, there is only one Power/Connect button on the bottom. Press and hold the button for three to five seconds, and Bluetooth discovery is turned on. The light on the bottom of the mouse blinks slowly on and off until your mouse is connected through Bluetooth. Your mouse may have a similar system.
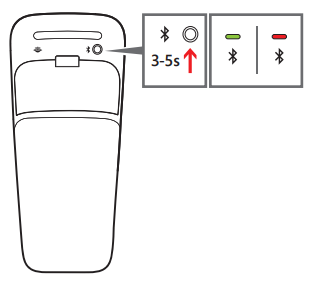
How to enter Bluetooth pairing mode on a Microsoft Arc Touch mouse
On my Razer Basilisk X Hyperspeed mouse, a switch on its bottom turns it on and enables Bluetooth. If your mouse has a similar switch, use it to make it enter the Bluetooth discovery state.
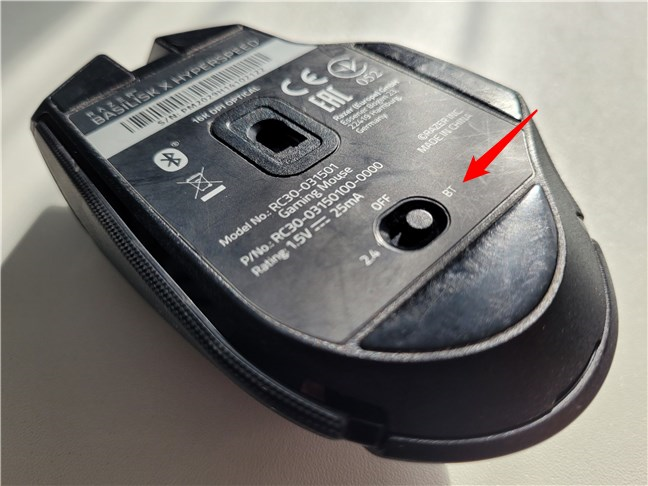
How to turn on Bluetooth on a Razer mouse
TIP: The best way to learn how to turn Bluetooth on for a computer peripheral such as a mouse or keyboard is to read its user manual.
Once you’ve enabled Bluetooth on your mouse or keyboard, it’s time to activate Bluetooth on your Windows 10 or Windows 11 computer. If you don’t know how to do it, we covered all the steps in these guides: How to turn on Bluetooth on Windows 10 (5 ways) and How to turn on Bluetooth on Windows 11 (5 ways). Next, let’s connect your Windows 10 or Windows 11 PC with the accessory you want through Bluetooth.
Step 2. How to connect a Bluetooth mouse or keyboard to a Windows laptop or computer
If you’re using Windows 10, open the Settings app, go to Devices, and then to “Bluetooth & other devices.” The Bluetooth switch should be On, as in the screenshot below. If it’s not, turn it On by clicking or tapping on it.
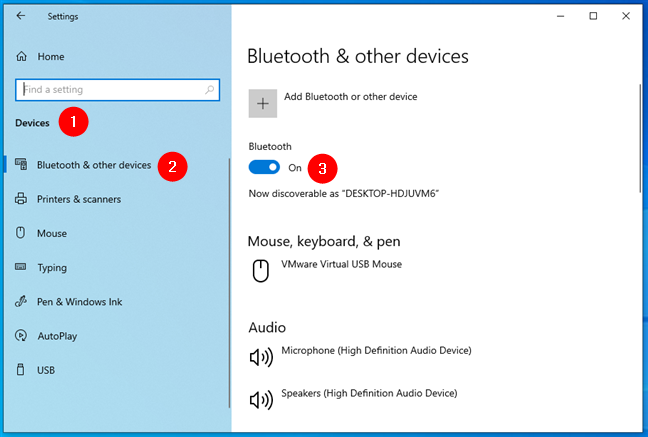
Turning on Bluetooth on a Windows 10 PC
If you’re using Windows 11, open the Settings app and select Bluetooth & devices on the left sidebar. Then, ensure that the Bluetooth switch on the right is turned On.
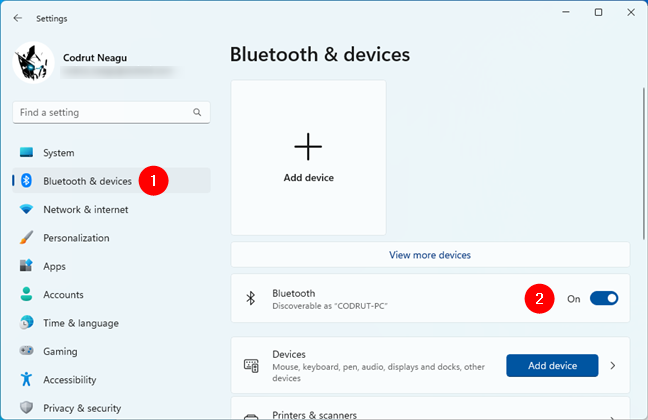
Turning on Bluetooth on a Windows 11 PC
Next, click or tap “Add Bluetooth or other devices” if you’re using Windows 10 or “+ Add device” if you’re using Windows 11.
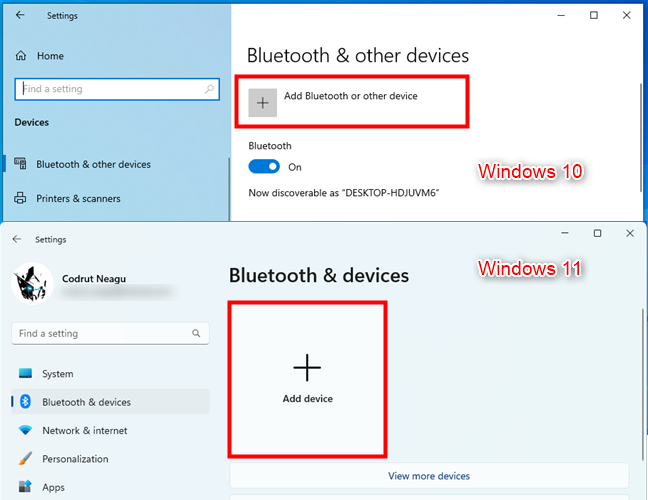
Add a Bluetooth device in Windows
Regardless of your operating system, the next steps are identical. Windows will open a Bluetooth setup wizard called “Add a device.” Here, choose Bluetooth.
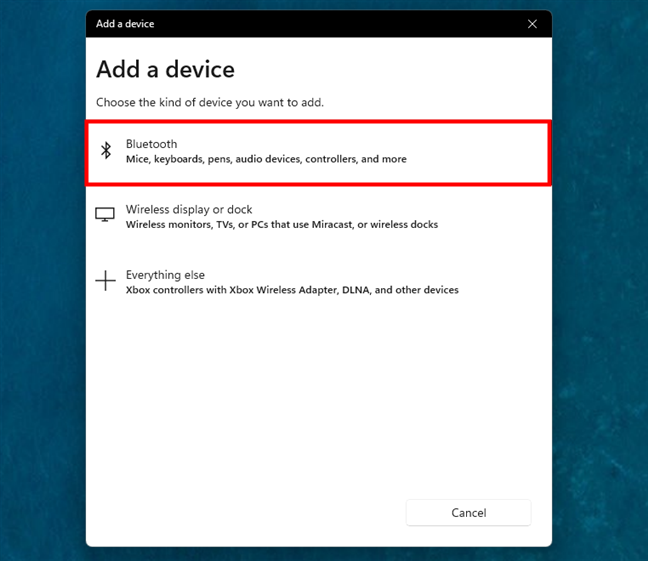
Choose Bluetooth in the Add device wizard
You’re shown a list of Bluetooth devices that are available near you. Click or tap on the name of the Bluetooth device that you want to connect. I chose “Basilisk X.” The name of your Bluetooth mouse or keyboard will be different.
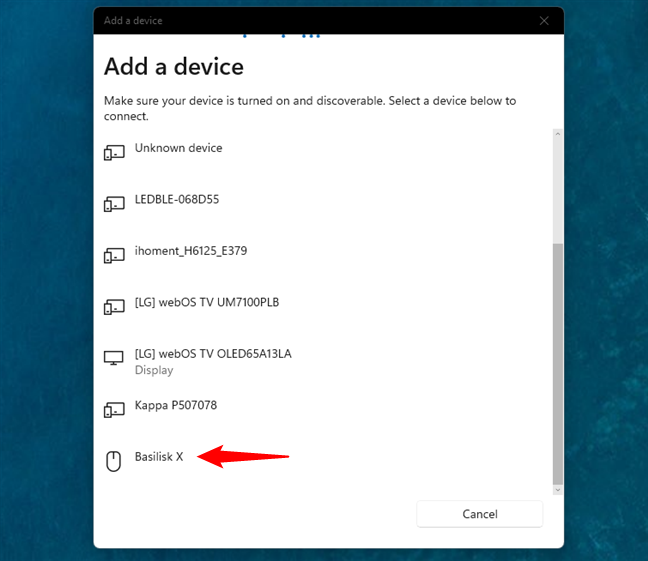
Select the Bluetooth mouse or keyboard to add
Windows then takes a couple of seconds to connect the selected Bluetooth mouse or keyboard and set it up. Note that in the case of keyboards, Windows might display a PIN code asking you to type it on the Bluetooth keyboard to go ahead with the pairing. Type the code on the keyboard, and press the Enter key when you are done. Windows will then let you know that the Bluetooth mouse or keyboard you paired is ready to go. Press Done.
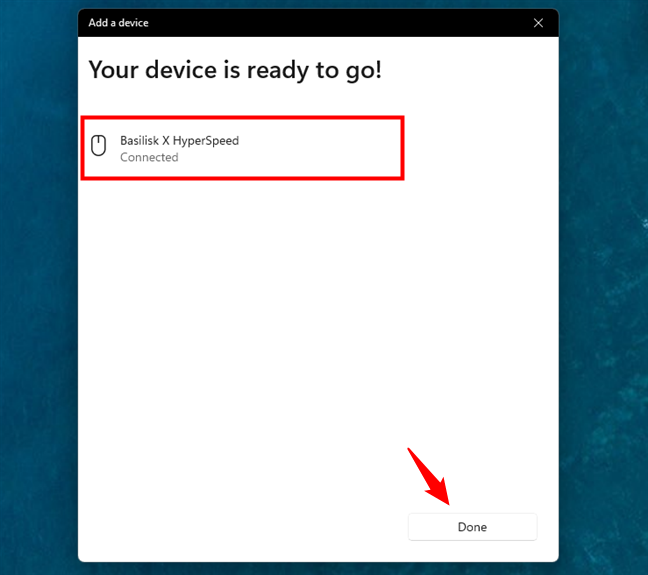
The Bluetooth mouse or keyboard is connected
Now you can start using the Bluetooth mouse or keyboard on your Windows computer.
How to connect Bluetooth headphones, speakers, or other devices to Windows
Connecting other types of Bluetooth devices to your Windows PC is the same as the one for connecting a mouse or keyboard. Turn on the Bluetooth device you want to connect, ensure Bluetooth pairing is started, and then use the instructions we shared earlier. The only difference is that you choose your device, instead of a mouse, in the “Add a device” wizard. Here’s, for example, what I get when I connect a pair of Edifier speakers to my Windows 11 computer via Bluetooth.
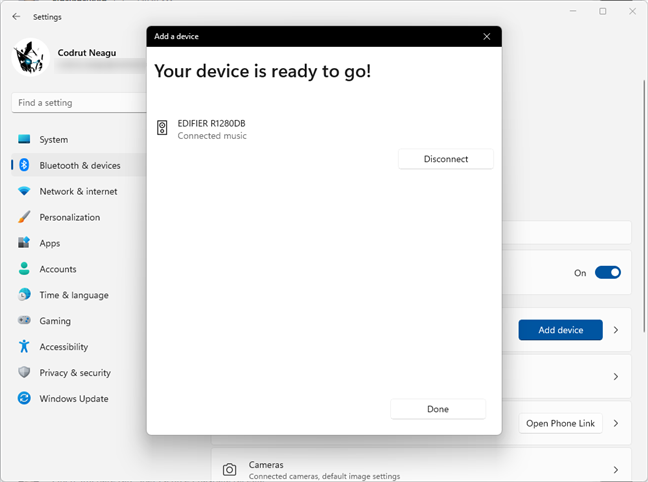
How to connect to Bluetooth speakers
How to disconnect or remove Bluetooth devices from Windows
When you are done using a specific Bluetooth device, you can disconnect it. One way to quickly disconnect it is to turn off Bluetooth in Windows. However, when you do this, all Bluetooth devices get disconnected. If you want to disconnect or remove only one Bluetooth device and leave the others as they are, open the Settings app (Windows + I) and go back to the Bluetooth section.
If you’re using Windows 11, on the Bluetooth & devices page, some of your Bluetooth devices might be shown at the top of the right side of the window. Click or tap the device’s “…” (three dots) button and either select Disconnect or Remove device in the menu, based on what you want.
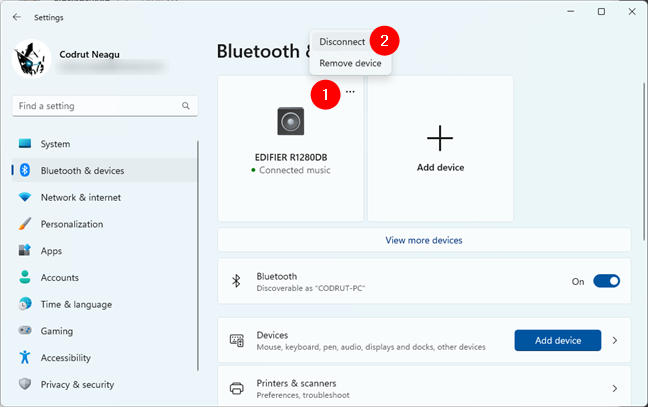
How to disconnect or remove a Bluetooth device from Windows 11
NOTE: The option to disconnect a Bluetooth device appears mostly for headsets and speakers. You don’t see it for Bluetooth mice and keyboards.
Alternatively, on the Bluetooth & devices page from Settings, click or tap Devices, and Windows 11 will show you the full list of devices, Bluetooth or not, connected to your PC. Find the one you want to disconnect or remove, click or tap the “...” (three dots) button next to it, and select Disconnect or Remove device from the menu, depending on your preference.
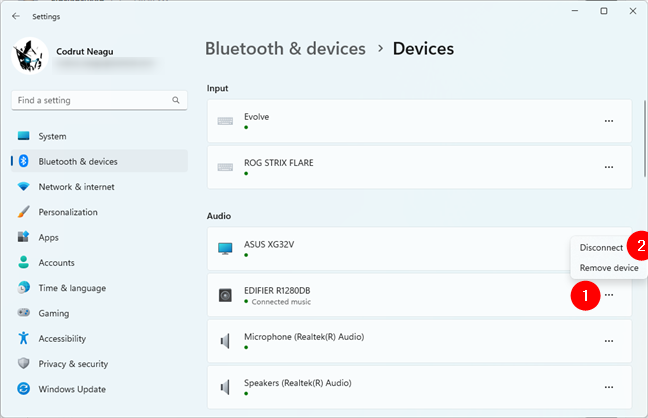
Another way to disconnect or remove a Bluetooth device from Windows 11
If you’re using Windows 10, on the “Bluetooth & other devices” page from Settings, all the Bluetooth devices are shown on the right side of the window. Choose the one you want to disconnect by clicking or tapping its name. Then you see one or two buttons. Press Disconnect or Remove device, depending on what you want.
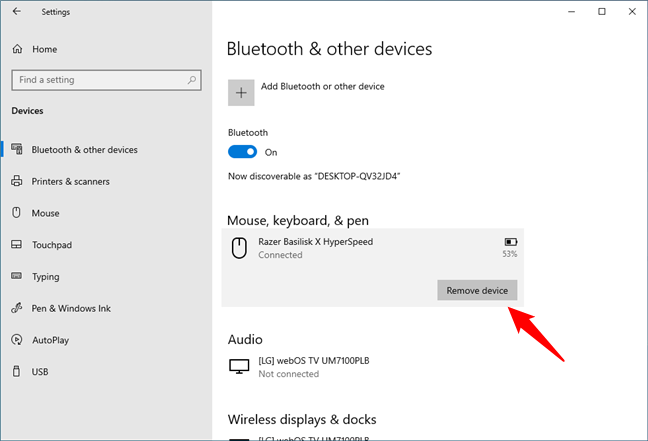
How to disconnect or remove a Bluetooth device from Windows 10
If you need to use a disconnected device again, you can follow the same steps, but press Connect instead of Disconnect. On the other hand, if you removed a Bluetooth device from Windows, you must follow all the steps from this guide’s previous chapters to reconnect it.
Windows 11 has an additional and faster way to connect and manage Bluetooth devices
In Windows 11, there’s another, slightly faster way of connecting Bluetooth devices to your computer: in the notification area on the taskbar, click or tap on the Wi-Fi icon.
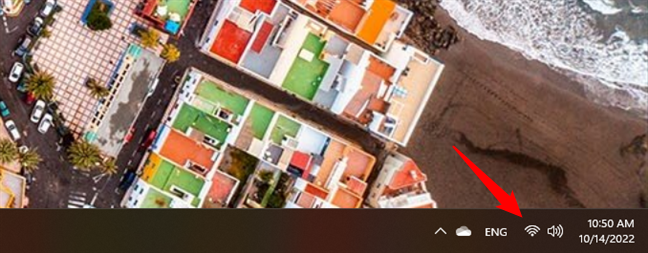
The Wi-Fi taskbar icon in Windows 11
Ensure Bluetooth is on, and click or tap the small caret button next to it.
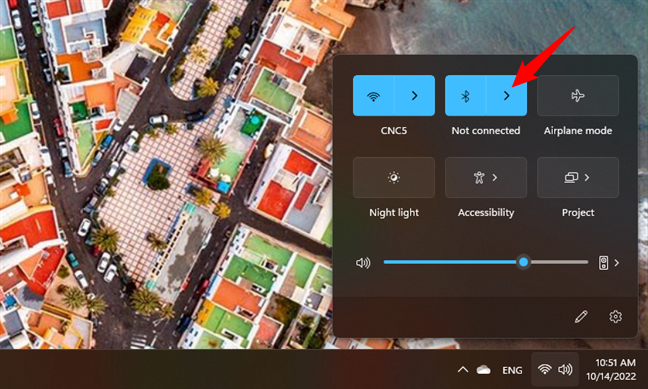
Click or tap the caret button next to Bluetooth
That will make Windows 11 show you the list of Bluetooth devices that are either connected or available. In that list, find the Bluetooth mouse or keyboard you want to connect and click or tap on it.
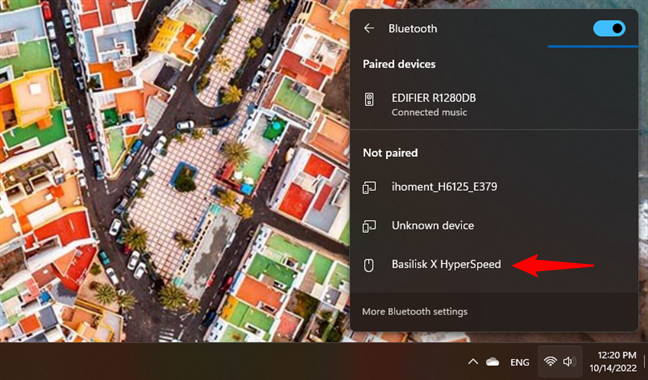
Select the device from the Bluetooth list
Wait for a few seconds, and Windows 11 will establish a Bluetooth connection to the selected device.
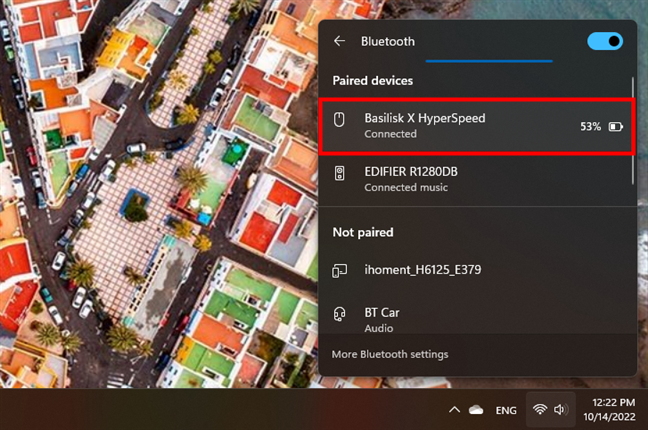
The device is connected to the Windows 11 PC via Bluetooth
If, later on, you want to disconnect a Bluetooth device from your Windows 11 PC, find it again in the fly-out box, click or tap on it and then on Disconnect.
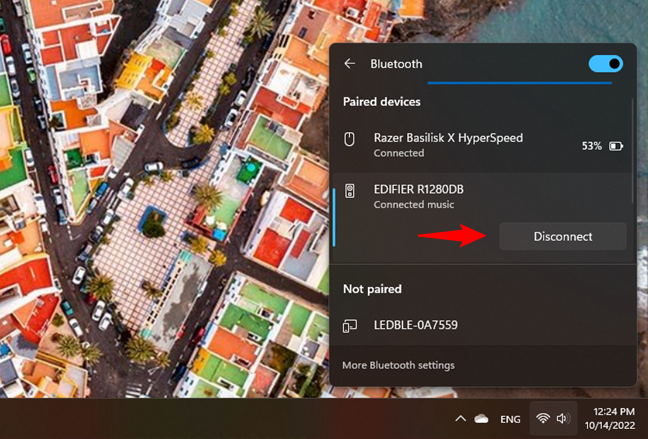
How to disconnect a Bluetooth device from Windows 11
Note, however, that you can’t remove a paired Bluetooth device from Windows 11’s fly-out box: you can only connect or disconnect it.
Conclusion
As you can see, it is not difficult to pair and connect Bluetooth mice, keyboards, headsets, and other devices, to Windows PCs and devices. The procedure is relatively quick and painless unless you have some driver issues or the batteries do not work well on your Bluetooth devices. If you have any questions or problems with the procedures detailed in this guide, leave a comment below, and we will try to help.


 14.10.2022