

The Windows 11 and Windows 10 startup programs are apps that launch automatically when you turn on your computer or device. When you’re installing a new app, Windows may add it to the list of startup programs without your knowledge, running it each time you launch your operating system. While you want some programs to run at startup, having too many apps launch when you open your PC can slow things down considerably. In this tutorial, I’ll show you how to change startup programs in Windows 11 and Windows 10, as well as how to turn off the startup programs you don’t need. Let’s start:
 How to get to the list of startup programs in Windows 11
Then, on the right side of the window, you get to see all the startup programs on your Windows 11 computer.
How to get to the list of startup programs in Windows 11
Then, on the right side of the window, you get to see all the startup programs on your Windows 11 computer.
 How to see startup programs in Windows 11
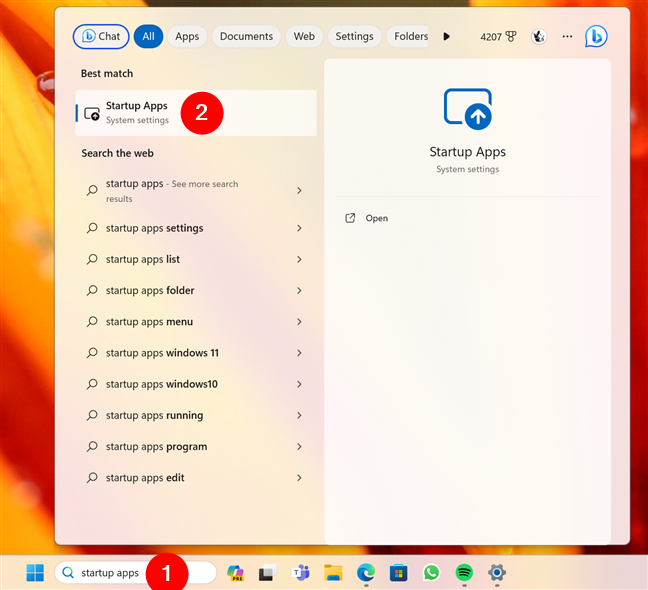
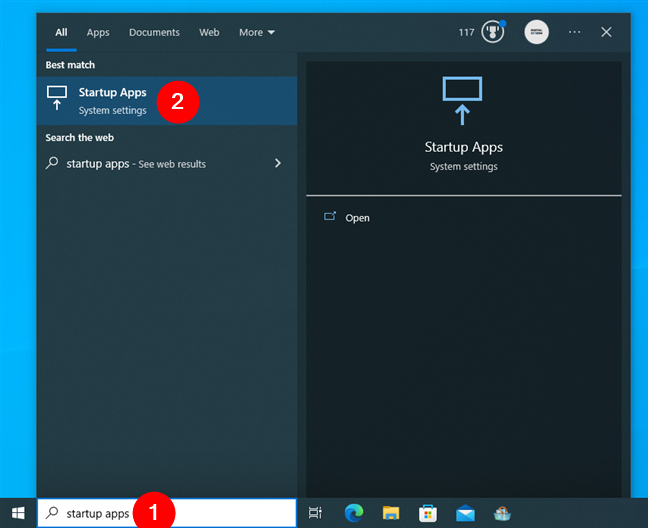
Alternatively, you can use Windows 11’s search box on the taskbar to look for “startup apps.” Once the results are in, click or tap on Startup Apps to see the Windows 11 startup programs.
How to see startup programs in Windows 11
Alternatively, you can use Windows 11’s search box on the taskbar to look for “startup apps.” Once the results are in, click or tap on Startup Apps to see the Windows 11 startup programs.
 How to see startup programs in Windows 11 using search
Now, you can skip to the next chapter in this guide to see how to change startup programs in Windows.
How to see startup programs in Windows 11 using search
Now, you can skip to the next chapter in this guide to see how to change startup programs in Windows.

 Access Apps in Windows 10’s Settings
On the left sidebar, click or tap on Startup, and then you’ll see the Startup Apps on the right.
Access Apps in Windows 10’s Settings
On the left sidebar, click or tap on Startup, and then you’ll see the Startup Apps on the right.
 How to see startup programs in Windows 10
Alternatively, you can also type “startup apps” in your taskbar’s search field and then press on the appropriate result to view the Windows 10 startup programs.
How to see startup programs in Windows 10
Alternatively, you can also type “startup apps” in your taskbar’s search field and then press on the appropriate result to view the Windows 10 startup programs.
 How to see startup programs in Windows 10 using search
NOTE: The next steps are the same regardless of whether you’re using Windows 11 or Windows 10. Let’s see how to change what programs run at startup in Windows:
How to see startup programs in Windows 10 using search
NOTE: The next steps are the same regardless of whether you’re using Windows 11 or Windows 10. Let’s see how to change what programs run at startup in Windows:
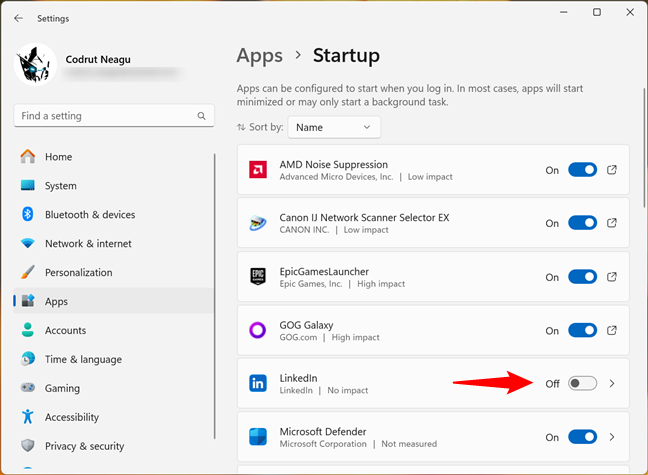 Use the switches to change the Windows startup programs
The change is immediately applied, and the startup programs that you’ve disabled will no longer run when Windows boots.
Use the switches to change the Windows startup programs
The change is immediately applied, and the startup programs that you’ve disabled will no longer run when Windows boots.
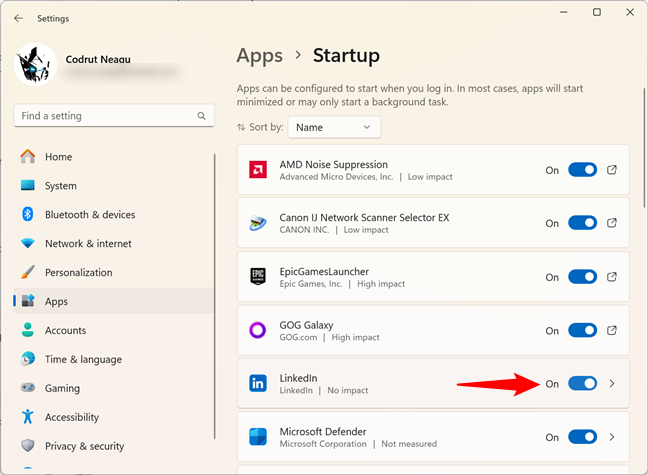 How to set which programs open on startup in Windows
TIP: By the way, some of our readers asked a really funny question: “How do I get Windows to start all programs?”. 🙂 The answer is pretty simple, though: enable the switches of all the apps listed on the Startup page from the Settings app.
How to set which programs open on startup in Windows
TIP: By the way, some of our readers asked a really funny question: “How do I get Windows to start all programs?”. 🙂 The answer is pretty simple, though: enable the switches of all the apps listed on the Startup page from the Settings app.
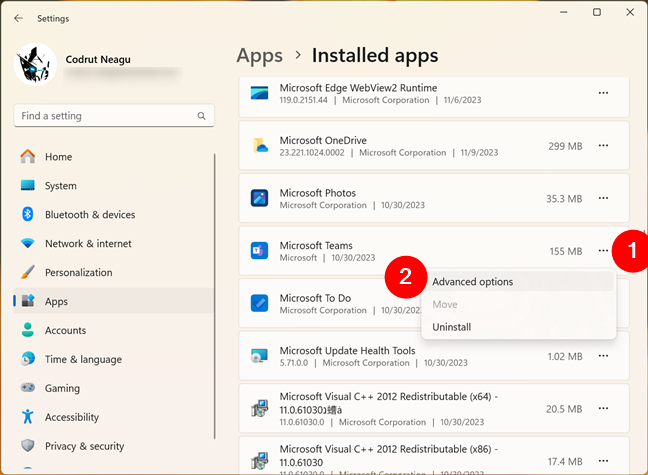
 Go to Apps and locate the app
Click or tap the … (three dots) button next to the app, and select Advanced options from the menu.
Go to Apps and locate the app
Click or tap the … (three dots) button next to the app, and select Advanced options from the menu.
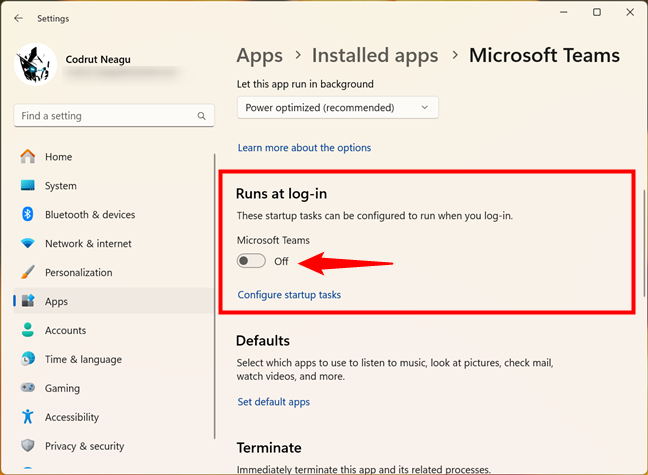
 Access the Advanced options of the app
This loads a new page with settings and options related to that app. On it, find the “Runs at log-in” section, and turn its only switch to either On or Off depending on whether you want to open or stop the app from running on Windows 11’s startup.
Access the Advanced options of the app
This loads a new page with settings and options related to that app. On it, find the “Runs at log-in” section, and turn its only switch to either On or Off depending on whether you want to open or stop the app from running on Windows 11’s startup.
 Set the app to run at Windows startup
TIP: If the app you’re interested in doesn’t have Advanced options or doesn’t show the “Runs at log-in” section, you can look for it on the Startup Apps page, as shown in the previous chapter of this guide.
Set the app to run at Windows startup
TIP: If the app you’re interested in doesn’t have Advanced options or doesn’t show the “Runs at log-in” section, you can look for it on the Startup Apps page, as shown in the previous chapter of this guide.
 Go to Apps & features and press on the app you want to change
This reveals the Advanced options for that specific app. Click or tap on the link to access them. Keep in mind, however, that not all apps in this list have Advanced options. If that is the case for your program, use the previous method presented in this tutorial instead.
Go to Apps & features and press on the app you want to change
This reveals the Advanced options for that specific app. Click or tap on the link to access them. Keep in mind, however, that not all apps in this list have Advanced options. If that is the case for your program, use the previous method presented in this tutorial instead.
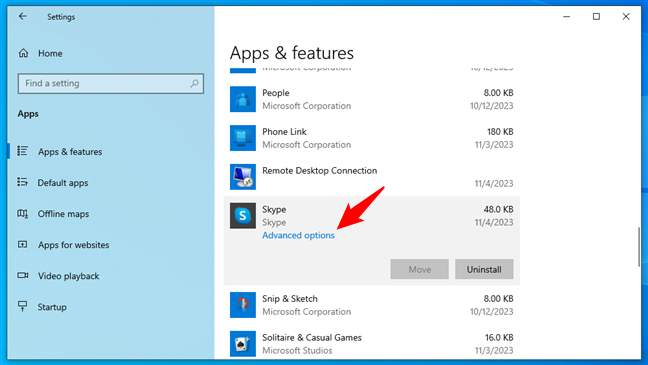
 Click or tap on Advanced options
On the next screen, you can see the specifications and options for the app you selected. Scroll down until you find the “Runs at log-in” section, and turn the corresponding switch On or Off depending on your preferences.
Click or tap on Advanced options
On the next screen, you can see the specifications and options for the app you selected. Scroll down until you find the “Runs at log-in” section, and turn the corresponding switch On or Off depending on your preferences.
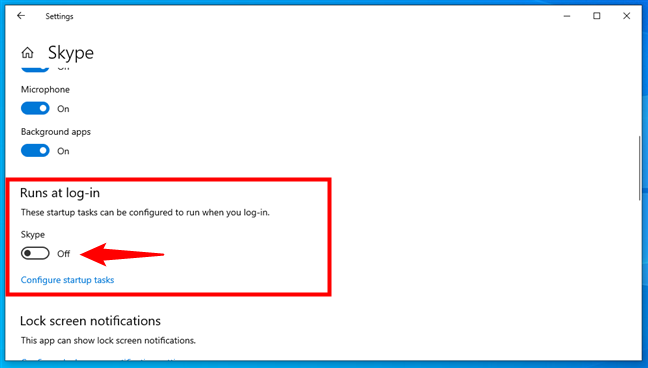
 Turn the switch On or Off to enable or stop the app from running at startup
The next time you start your computer, you can see your changes take effect.
Turn the switch On or Off to enable or stop the app from running at startup
The next time you start your computer, you can see your changes take effect.
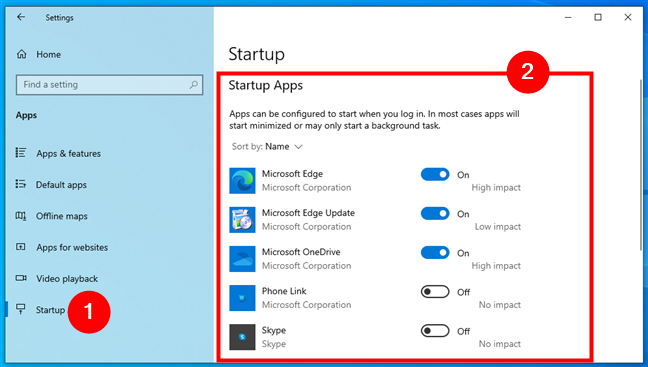
How to access Startup Apps in Windows Settings
In the past, the most straightforward way to disable startup programs was offered by the Task Manager. Nowadays, though, the easiest method to change startup programs in Windows is through the Settings app. Here’s how you can see the startup programs in Windows 11 and Windows 10:How to see startup programs in Windows 11
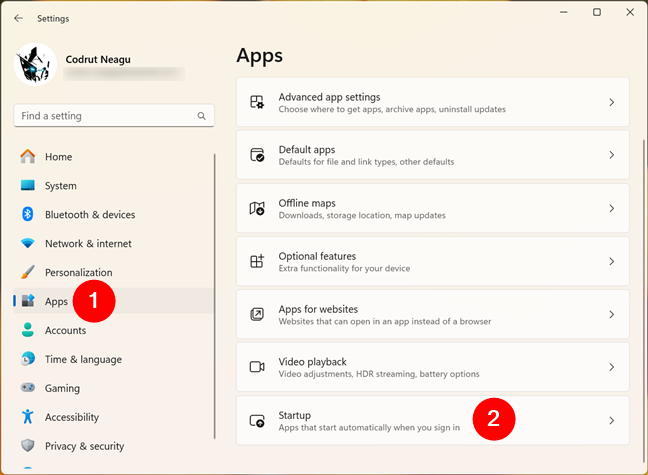
One of the ways to customize your Windows 11 experience is to choose which apps run when you start your device. You can do this from the Settings app, but first, you need to see the list of startup programs in Windows 11. To get to it, open Settings (Windows + I), select Apps on the left sidebar and click or tap Startup on the right.How to see startup programs in Windows 10
As you’ll soon find out, you can change startup apps in Windows 10 easily from the Settings app. But, before that, you need to first get to the list of Windows 10 startup programs. To do that, open Windows 10’s Settings by pressing Windows + I on your keyboard and then click or tap on Apps.How to change what programs run at startup in Windows
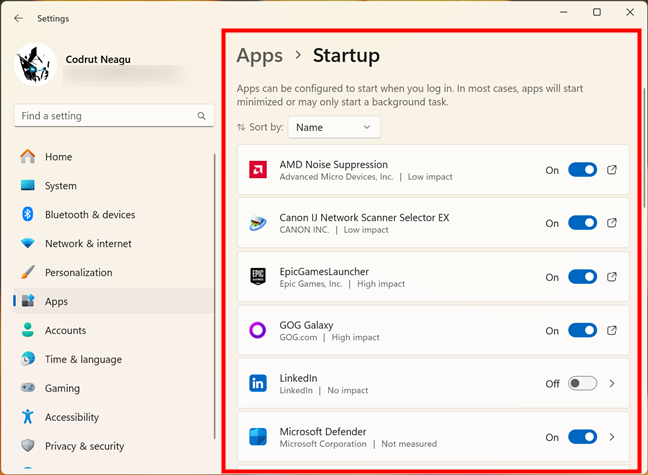
At this point, it might be obvious to experienced users how to turn on or stop apps from opening on startup in Windows. The list of Startup Apps has all the programs that can be set to launch at the same time as your operating system. The publisher’s name is shown underneath, together with its Startup impact - if your computer is taking a long time to start, consider disabling the apps with High impact first to solve the issue.How to stop programs from opening on startup in Windows
To stop apps from opening on startup in Windows, turn Off the switch next to them.How to make Windows open programs on startup
If you change your mind later and decide you want some apps to launch at the same time as your operating system, you can turn the switch On or check out these other methods to enable an app to run at the Windows startup.Bonus: How to individually enable or stop some apps from running on Windows startup
Some apps also let you change whether they open on Windows startup individually from their Advanced options. Unfortunately, these are few and far between. If you know the name of the app you want to enable or disable on startup, here’s what you can do:How to individually set an app to (not) run in Windows 11 during startup
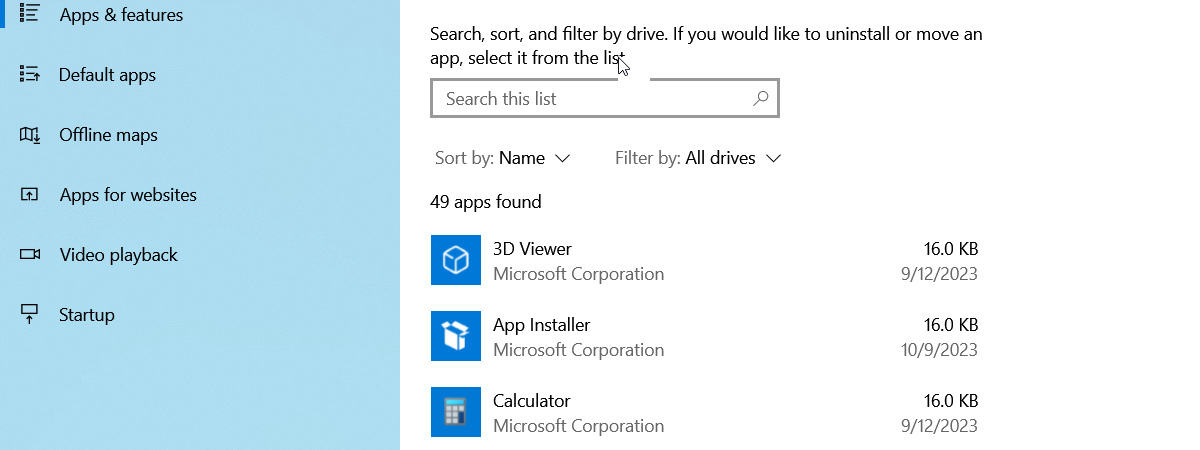
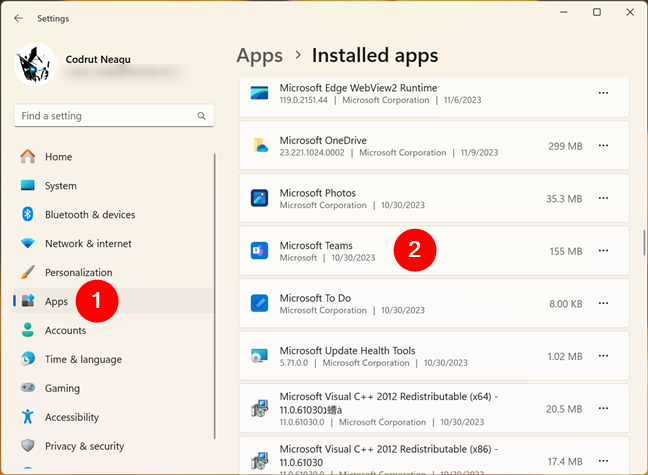
If you’re using Windows 11, open the Settings app, head to Apps > Installed apps, and locate the app you want to turn on or turn off from launching on startup.How to individually set an app to (not) run in Windows 10 at startup
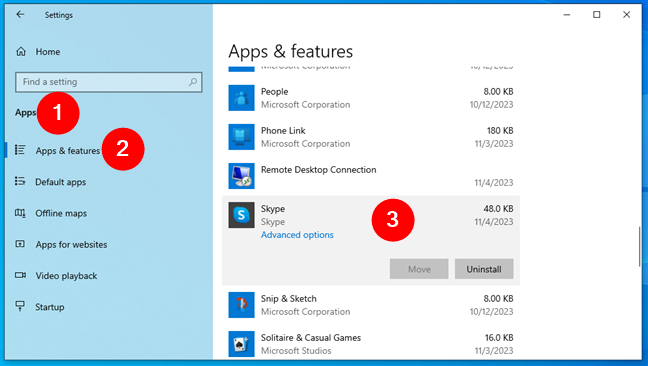
Just like Windows 11, Windows 10 also lets you individually control how some apps start. If you know exactly what app you want to enable or disable from running on Windows 10’s startup, open the Settings app and head to Apps > Apps & features. Then, on the right, scroll through the Apps & features section until you find the program you’re looking for, and click or tap on it.
Discussion (1)
Another good little program/utility (App) is Autoruns. It shows everything that is currently configured to your OS (in this case Windows) it also shows Context Menu settings, Service settings, background run settings, Handlers and where each is located in you Registry Files along with where it is located on a hard drive (if you have several). You have the option to Enable, Disable or Delete all said files and utilities.