


If your Windows is acting up or not booting at all, you may want to try Safe Mode to fix it. Safe Mode is a special way of starting Windows that only loads the essential stuff, so you can troubleshoot and repair the issues. But sometimes, you need more than just the basics, like internet access. That’s where Safe Mode with Networking comes in handy. It’s a variation of Safe Mode that also lets you connect to the web and other networks. In this guide, I’ll show you how to start Windows 10 in Safe Mode with Networking using various methods, including from the command line and the graphical user interface of this operating system:
NOTE: This guide covers the ways in which you can boot Windows 10 into Safe Mode with Networking. If you’d like to know more about Safe Mode, what it is, and why it’s useful, you should read this article first: What is Safe Mode? Also, if you’re interested in starting your computer into standard Safe Mode without networking or internet access, read this tutorial instead: How to boot Windows 10 in Safe Mode.
 Safe Mode with Networking
 can be tremendously helpful when you need to download repair tools from the internet or when your computer is infected with malware and you must download and run antivirus tools that are up to date. Now let’s see how to boot into Safe Mode with Networking in Windows 10. I’ll first cover the ways to start Safe Mode with Networking when you can’t log in to Windows 10 and then the ones to use when you can sign in with your user account.
Safe Mode with Networking
Safe Mode with Networking can be tremendously helpful when you need to download repair tools from the internet or when your computer is infected with malware and you must download and run antivirus tools that are up to date. Now let’s see how to boot into Safe Mode with Networking in Windows 10. I’ll first cover the ways to start Safe Mode with Networking when you can’t log in to Windows 10 and then the ones to use when you can sign in with your user account.

 How to start Windows 10 in Safe Mode with Networking from the Sign In screen
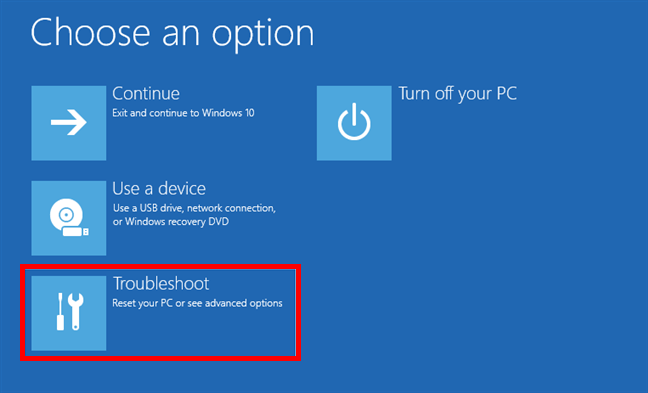
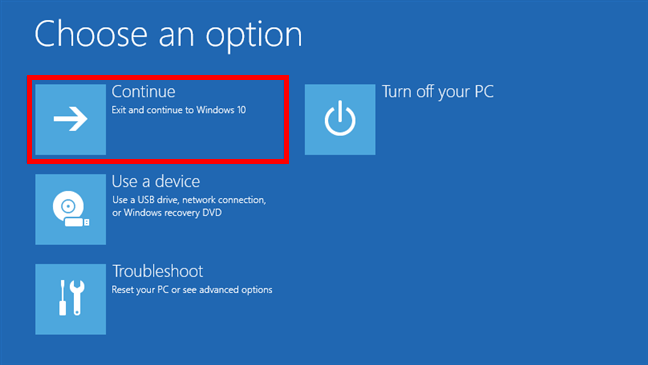
After a short while, you should see a blue screen with four options: “Continue (Exit and continue to Windows 10),” “Use a device (Use a USB drive, network connection, or Windows recovery DVD),” “Troubleshoot (Reset your PC or see advanced options),” and “Turn off your PC.” Click or tap the third one: Troubleshoot.
How to start Windows 10 in Safe Mode with Networking from the Sign In screen
After a short while, you should see a blue screen with four options: “Continue (Exit and continue to Windows 10),” “Use a device (Use a USB drive, network connection, or Windows recovery DVD),” “Troubleshoot (Reset your PC or see advanced options),” and “Turn off your PC.” Click or tap the third one: Troubleshoot.
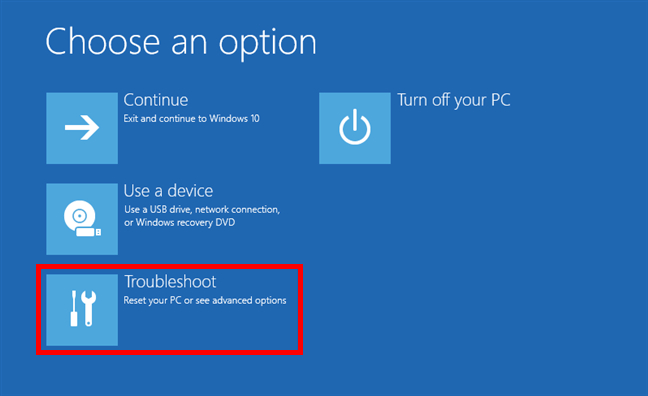
 Click Troubleshoot (Reset your PC or see advanced options)
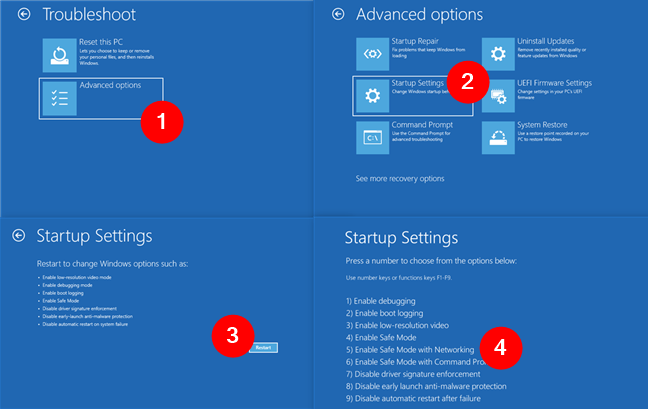
On the Troubleshoot screen, choose Advanced options.
Click Troubleshoot (Reset your PC or see advanced options)
On the Troubleshoot screen, choose Advanced options.

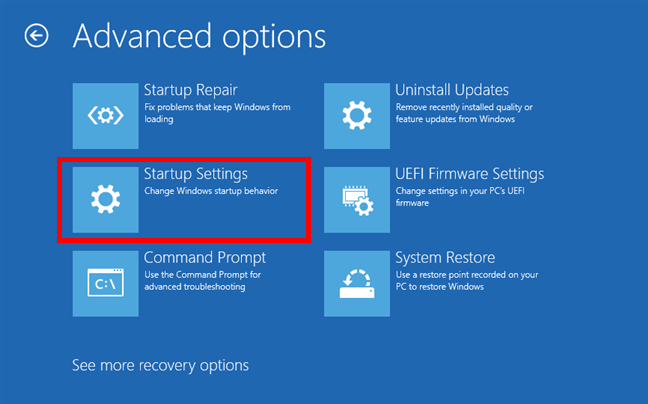
 Select Advanced options
On the Advanced options screen, click or tap on “Startup Settings (Change Windows startup behavior).”
Select Advanced options
On the Advanced options screen, click or tap on “Startup Settings (Change Windows startup behavior).”
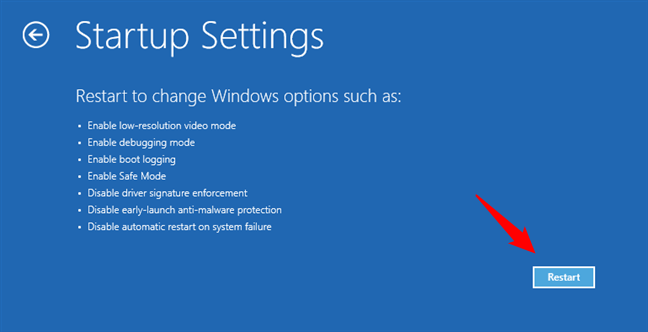
 Enter Startup settings in Windows 10's recovery environment
Next, on the Startup Settings screen, click or tap on the Restart button.
Enter Startup settings in Windows 10's recovery environment
Next, on the Startup Settings screen, click or tap on the Restart button.
 Choose to restart Windows 10
After a short while, Windows 10 restarts and gives you some options for how it will boot up. To make it go into Safe Mode with Networking, choose option number five: “5) Enable Safe Mode with Networking”. To select it, either press the number 5 key or the F5 function key on your keyboard.
Choose to restart Windows 10
After a short while, Windows 10 restarts and gives you some options for how it will boot up. To make it go into Safe Mode with Networking, choose option number five: “5) Enable Safe Mode with Networking”. To select it, either press the number 5 key or the F5 function key on your keyboard.
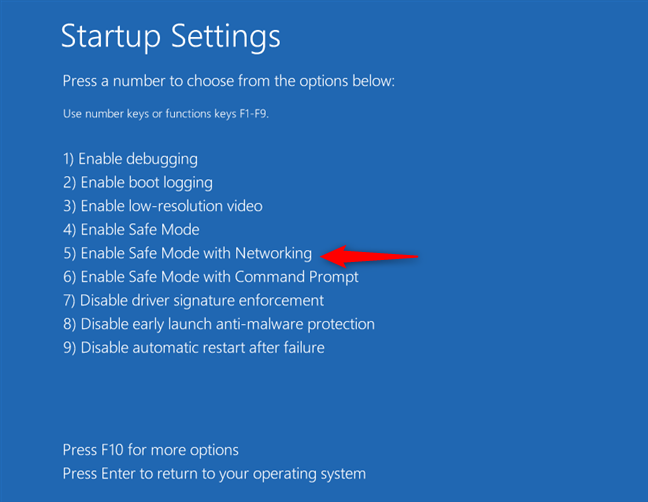
 Press 5 or F5 to restart Windows 10 in Safe Mode with Networking
Your Windows 10 computer will now restart and boot into Safe Mode with Networking.
Press 5 or F5 to restart Windows 10 in Safe Mode with Networking
Your Windows 10 computer will now restart and boot into Safe Mode with Networking.
 How to boot into Safe Mode from a black screen
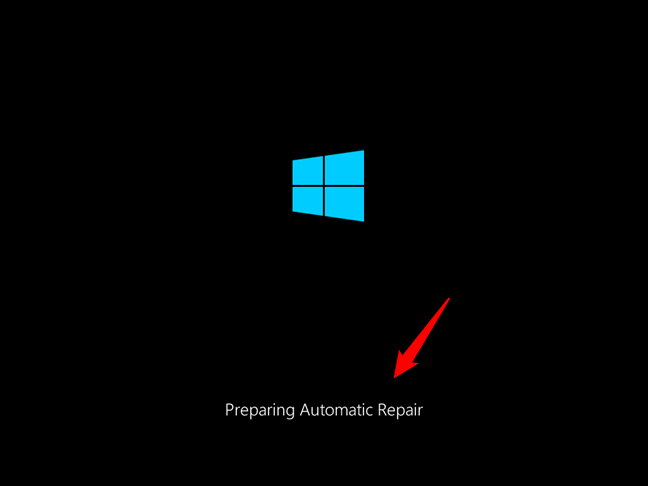
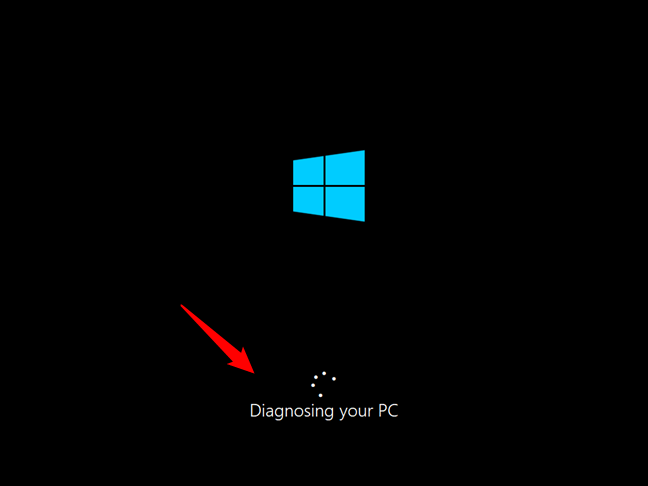
After a short while, the Automatic Repair tries to diagnose the problems that keep your Windows 10 PC from booting successfully.
How to boot into Safe Mode from a black screen
After a short while, the Automatic Repair tries to diagnose the problems that keep your Windows 10 PC from booting successfully.
 Windows 10 is diagnosing your PC
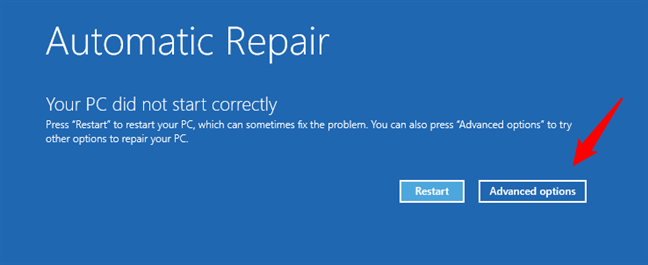
When the Automatic Repair screen is loaded, click or tap on the Advanced options button.
Windows 10 is diagnosing your PC
When the Automatic Repair screen is loaded, click or tap on the Advanced options button.
 Advanced options on the Automatic repair screen
Then, the “Choose an option” screen loads. Click or tap on Troubleshoot and take the same steps shown in this guide’s first method. In short, follow this path: Troubleshoot > Advanced options > Startup Settings > Restart > Enable Safe Mode with Networking (press the 5 or the F5 key).
Advanced options on the Automatic repair screen
Then, the “Choose an option” screen loads. Click or tap on Troubleshoot and take the same steps shown in this guide’s first method. In short, follow this path: Troubleshoot > Advanced options > Startup Settings > Restart > Enable Safe Mode with Networking (press the 5 or the F5 key).

 Go to Troubleshoot > Advanced options > Startup Settings > Restart > Enable Safe Mode with Networking

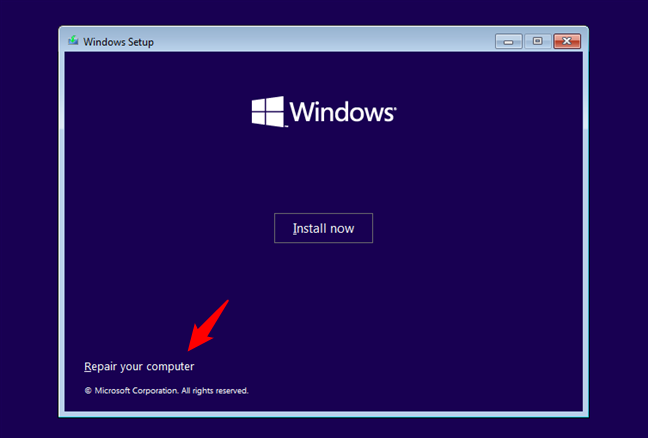
 The Windows 10 Setup first screen
On the next screen, don’t click/tap on Install now. Instead, look at the bottom left part of the wizard and click/tap on “Repair your computer.”
The Windows 10 Setup first screen
On the next screen, don’t click/tap on Install now. Instead, look at the bottom left part of the wizard and click/tap on “Repair your computer.”
 Click on Repair your computer
The screen called “Choose an option” loads. On it, click or tap Troubleshoot.
Click on Repair your computer
The screen called “Choose an option” loads. On it, click or tap Troubleshoot.
 Select Troubleshoot
The Troubleshoot screen loads. On it, click or tap Advanced options.
Select Troubleshoot
The Troubleshoot screen loads. On it, click or tap Advanced options.

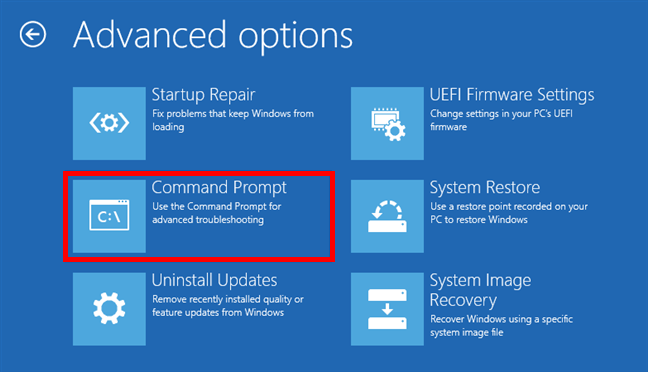
 Select Advanced options
A screen called Advanced options is loaded: click or tap “Command Prompt (Use the Command Prompt for advanced troubleshooting).”
Select Advanced options
A screen called Advanced options is loaded: click or tap “Command Prompt (Use the Command Prompt for advanced troubleshooting).”
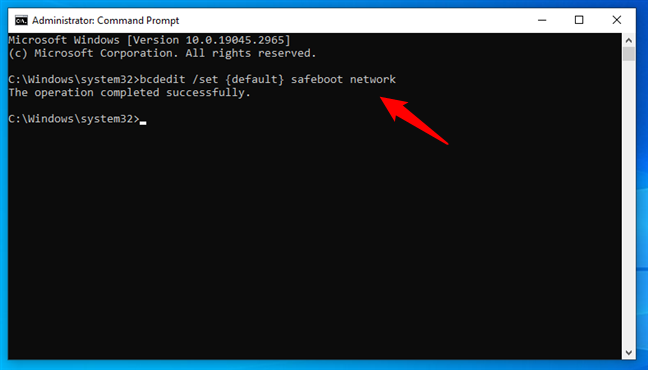
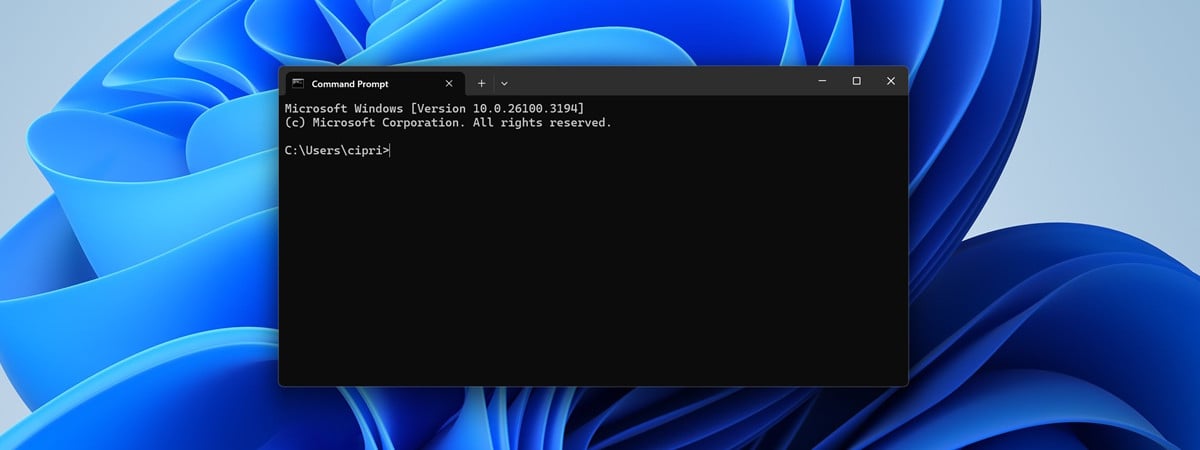
 Open Command Prompt
To restart Windows 10 in Safe Mode with Networking from Command Prompt, run this command:
Open Command Prompt
To restart Windows 10 in Safe Mode with Networking from Command Prompt, run this command:
 How to restart Windows 10 in Safe Mode with Networking from command line
Close the Command Prompt and then click or tap on “Continue (Exit and continue to Windows 10)”.
How to restart Windows 10 in Safe Mode with Networking from command line
Close the Command Prompt and then click or tap on “Continue (Exit and continue to Windows 10)”.
 Choose Continue to start Windows 10 in Safe Mode with Networking
After your PC restarts, Windows 10 will boot into Safe Mode with Networking.
IMPORTANT: To get back to normal boot after you’ve finished repairs, follow the same steps, but run this command instead:
Choose Continue to start Windows 10 in Safe Mode with Networking
After your PC restarts, Windows 10 will boot into Safe Mode with Networking.
IMPORTANT: To get back to normal boot after you’ve finished repairs, follow the same steps, but run this command instead:
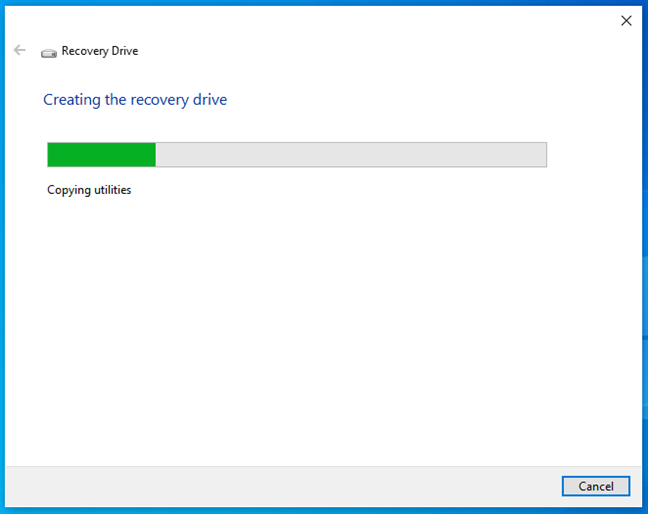
 Creating a recovery drive in Windows 10
Plug the recovery drive into your Windows 10 PC and use it to boot. The first screen you see asks you what keyboard layout you prefer to use. Click or tap on the one you want.
Creating a recovery drive in Windows 10
Plug the recovery drive into your Windows 10 PC and use it to boot. The first screen you see asks you what keyboard layout you prefer to use. Click or tap on the one you want.

 Choose your keyboard layout
Then, on the “Choose an option” screen, click or tap on “Troubleshoot (Reset your PC or see advanced options.” The next steps are the ones shown in the first method from this guide. Essentially, you should follow this path: Troubleshoot > Advanced options > Startup Settings > Restart > Enable Safe Mode with Networking (press the 5 or the F5 key).
Choose your keyboard layout
Then, on the “Choose an option” screen, click or tap on “Troubleshoot (Reset your PC or see advanced options.” The next steps are the ones shown in the first method from this guide. Essentially, you should follow this path: Troubleshoot > Advanced options > Startup Settings > Restart > Enable Safe Mode with Networking (press the 5 or the F5 key).
 Go to Troubleshoot > Advanced options > Startup Settings > Restart > Enable Safe Mode with Networking

 Press Shift and select Restart to get to Windows 10's Safe Mode with Networking
After a short while, you should see a blue screen with four options: “Continue (Exit and continue to Windows 10),” “Use a device (Use a USB drive, network connection, or Windows recovery DVD),”, “Troubleshoot (Reset your PC or see advanced options),” and “Turn off your PC.” Click or tap on the third one - Troubleshoot - and then take the same steps shown in the first method of this guide. In short, go to Troubleshoot > Advanced options > Startup Settings > Restart > Enable Safe Mode with Networking (press the 5 or the F5 key).
Press Shift and select Restart to get to Windows 10's Safe Mode with Networking
After a short while, you should see a blue screen with four options: “Continue (Exit and continue to Windows 10),” “Use a device (Use a USB drive, network connection, or Windows recovery DVD),”, “Troubleshoot (Reset your PC or see advanced options),” and “Turn off your PC.” Click or tap on the third one - Troubleshoot - and then take the same steps shown in the first method of this guide. In short, go to Troubleshoot > Advanced options > Startup Settings > Restart > Enable Safe Mode with Networking (press the 5 or the F5 key).
 Follow the path: Troubleshoot > Advanced options > Startup Settings > Restart > Enable Safe Mode with Networking

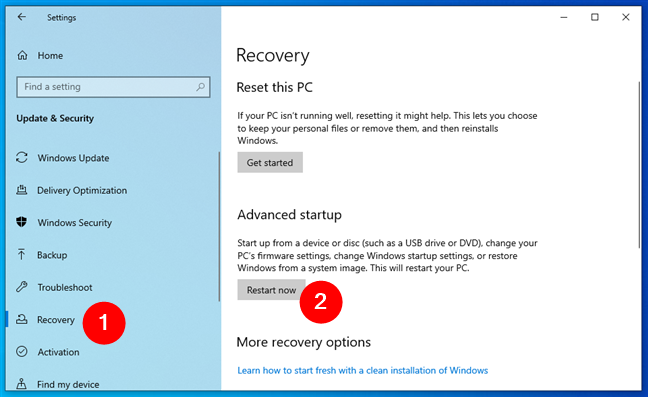
 Update & Security in Windows 10's Settings
In the left sidebar, click/tap to select Recovery. On the right, click or tap the Restart now button from the Advanced startup section.
Update & Security in Windows 10's Settings
In the left sidebar, click/tap to select Recovery. On the right, click or tap the Restart now button from the Advanced startup section.
 Restart now in Advanced startup
Then, Windows 10 loads the same “Choose an option” screen that I’ve shown in this guide’s previous methods. From here on, you should follow the same steps described earlier: Troubleshoot > Advanced options > Startup Settings > Restart > Enable Safe Mode with Networking (press the 5 or the F5 key).
Restart now in Advanced startup
Then, Windows 10 loads the same “Choose an option” screen that I’ve shown in this guide’s previous methods. From here on, you should follow the same steps described earlier: Troubleshoot > Advanced options > Startup Settings > Restart > Enable Safe Mode with Networking (press the 5 or the F5 key).
 Head to Troubleshoot > Advanced options > Startup Settings > Restart > Enable Safe Mode with Networking

 Opening msconfig (System Configuration) in Windows 10
In the System Configuration window, click or tap the Boot tab. Check Safe boot in the Boot options section, and then choose Network.
Opening msconfig (System Configuration) in Windows 10
In the System Configuration window, click or tap the Boot tab. Check Safe boot in the Boot options section, and then choose Network.
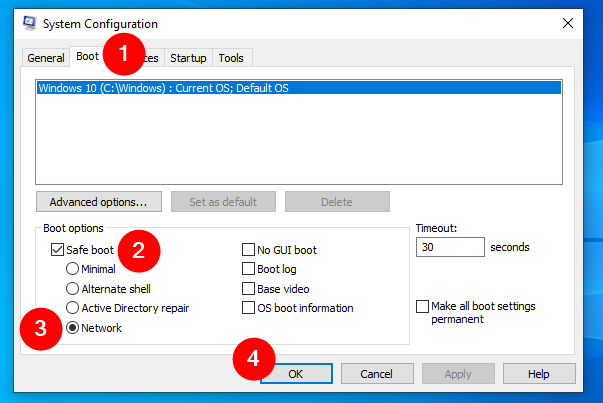
 Enable Safe Boot and select Network in msconfig
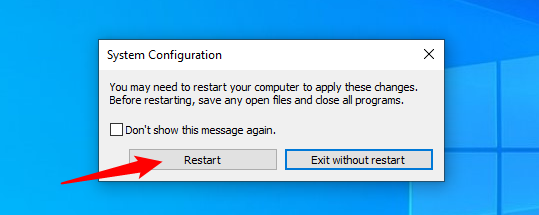
After you click or tap on OK, Windows 10 pops up a notification saying that you must restart your computer to make the changes. If you want to go into Safe Mode with Networking right now, click/tap on Restart. Otherwise, choose to “Exit without restart,” and when you’re ready, restart your Windows 10 PC in Safe Mode with Networking manually.
Enable Safe Boot and select Network in msconfig
After you click or tap on OK, Windows 10 pops up a notification saying that you must restart your computer to make the changes. If you want to go into Safe Mode with Networking right now, click/tap on Restart. Otherwise, choose to “Exit without restart,” and when you’re ready, restart your Windows 10 PC in Safe Mode with Networking manually.
 Restart Windows 10 in Safe Mode with Networking
When you restart, Windows 10 automatically enters Safe Mode with Networking. The first thing I found when that happened on my test computers was that Microsoft Edge launches automatically in this Safe Mode, loading the Windows help & learning website.
Restart Windows 10 in Safe Mode with Networking
When you restart, Windows 10 automatically enters Safe Mode with Networking. The first thing I found when that happened on my test computers was that Microsoft Edge launches automatically in this Safe Mode, loading the Windows help & learning website.
 Edge offers help in Windows 10 Safe Mode with Networking
You can now use Microsoft Edge to navigate the internet and read help guides or download any repair tools you might need. Then, when you’re finished troubleshooting your PC, turn off Safe Mode with Networking by following the same steps in this chapter to disable the Safe boot setting from msconfig (System Configuration).
Edge offers help in Windows 10 Safe Mode with Networking
You can now use Microsoft Edge to navigate the internet and read help guides or download any repair tools you might need. Then, when you’re finished troubleshooting your PC, turn off Safe Mode with Networking by following the same steps in this chapter to disable the Safe boot setting from msconfig (System Configuration).
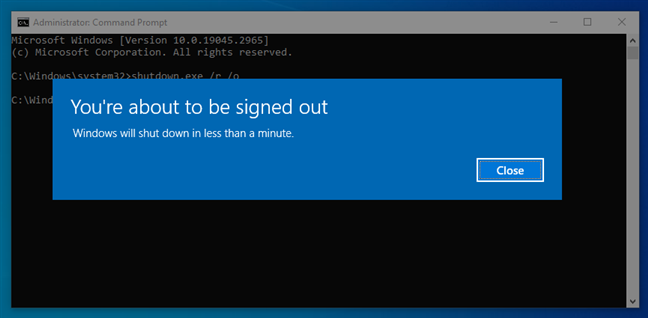
 How to boot a Windows 10 computer in Safe Mode using the shutdown command
This command triggers a reboot of Windows 10 into its recovery environment. Immediately after you execute it, Windows 10 notifies you that it will sign you out.
How to boot a Windows 10 computer in Safe Mode using the shutdown command
This command triggers a reboot of Windows 10 into its recovery environment. Immediately after you execute it, Windows 10 notifies you that it will sign you out.
 You're about to be signed out
You will then see the Choose an option screen, just like in the previous chpaters of this guide. From here on, follow the same path as in the first chapter: go to Troubleshoot > Advanced options -> Startup Settings -> Restart. Then, press 5 or F5 on your keyboard to boot into Safe Mode Safe Mode with Networking.
You're about to be signed out
You will then see the Choose an option screen, just like in the previous chpaters of this guide. From here on, follow the same path as in the first chapter: go to Troubleshoot > Advanced options -> Startup Settings -> Restart. Then, press 5 or F5 on your keyboard to boot into Safe Mode Safe Mode with Networking.
 Head to Troubleshoot > Advanced options > Startup Settings > Restart > Enable Safe Mode with Networking
That’s it!
Head to Troubleshoot > Advanced options > Startup Settings > Restart > Enable Safe Mode with Networking
That’s it!
What is Safe Mode with Networking in Windows 10? What’s the difference between Safe Mode and Safe Mode with Networking?
The default Safe Mode starts Windows using only a few core services and drivers to avoid as many issues as possible. Unfortunately, the downside is that the minimal Safe Mode doesn’t let you connect to the network or the internet, so you’re kind of isolated. That’s where the Safe Mode with Networking environment comes in handy. If you need to use the internet while in Safe Mode to make it easier to troubleshoot your Windows 10 computer, you should try Safe Mode with Networking. This option lets you start Windows with only the essential services and drivers, but it also includes the networking components. However, keep in mind that this only works with wired Ethernet connections. Safe Mode with Networking doesn’t work with Wi-Fi. That’s because wireless cards need more complex drivers that are not loaded by Windows 10 when running in Safe Mode.How to boot in Safe Mode with Networking when you can’t log in to Windows 10
Having trouble starting or logging in to Windows 10? You can still boot your computer into Safe Mode with Networking in order to fix the problem(s). Here’s how:1. How to restart Windows 10 in Safe Mode with Networking using the Shift + Restart keyboard shortcut
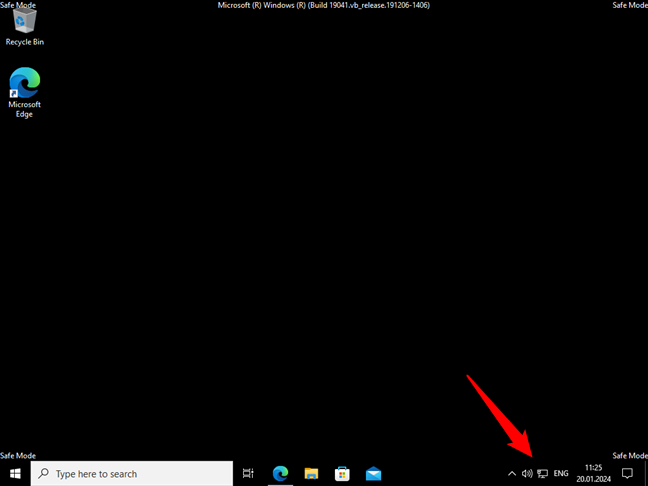
One of the easiest methods to boot Windows 10 into Safe Mode with Networking is to restart it while keeping the Shift key pressed. Furthermore, you can do that from the sign-in or lock screen without having to actually sign in with a user account on your Windows 10 computer: Boot your Windows 10 PC as you would normally do. When you get to the sign-in screen, press and hold the Shift key while clicking the Power button, and then Restart.2. How to open boot into Safe Mode with Networking when Windows 10 shows a black screen
If Windows 10 fails to boot normally three times consecutively, it automatically enters Automatic Repair mode the next time you try to start it. You can access the Safe Mode with Networking from there. Trigger the Automatic Repair mode manually by interrupting the normal boot process three times over: use the reset or the power button on your Windows 10 computer to stop it during boot. If you use the power button, you might have to keep it pressed for at least 4 seconds to force the power off. When your Windows 10 computer enters the Automatic Repair mode, the first thing you see is a screen letting you know that the operating system is “Preparing Automatic Repair.”3. How to restart in Safe Mode with Networking from the command line, with a Windows 10 installation disc or USB stick
If your PC doesn’t boot Windows 10, but you have access to another computer, you can use the working computer to create a Windows 10 installation DVD or USB memory stick. Download Windows 10 and create your own installation media. Then, insert the DVD or the USB memory stick into your non-working Windows 10 computer and boot from it. Wait for the Windows 10 setup wizard to load, and choose the language and keyboard layout you prefer. Then, click or tap Next.bcdedit /set {default} safeboot network
After you press Enter on your keyboard, the Command Prompt should state: “The operation completed successfully.”
bcdedit /deletevalue {default} safeboot
4. How to start Windows 10’s Safe Mode with Networking from a recovery drive
If you already have a recovery disk or you create one on another Windows 10 computer, you can use it to boot your broken Windows 10 PC into Safe Mode with Networking.How to boot in Safe Mode with Networking when you can log in to Windows 10
If you want to boot your Windows 10 PC in Safe Mode with Networking, and you can still log in normally, here’s are your options:5. How to start Windows 10 in Safe Mode with Networking using Shift + Restart
If you’re signed in to Windows 10, open the Start Menu. Press and keep the Shift key down, click the Power button, and select Restart.6. How to reboot into Safe Mode with Networking using Windows 10’s Settings
You can also boot into Safe Mode with Networking if you use the Advanced startup settings from Windows 10. Start by opening the Settings app and then click or tap on the Update & Security section.7. How to boot Windows 10 into Safe Mode with Networking using msconfig (System Configuration)
Another easy way to boot a Windows 10 computer into Safe Mode with Networking is to use the System Configuration tool, otherwise known as msconfig.exe. Launch System Configuration: a fast way to do this is to type system configuration or msconfig in the search box on your taskbar and then click or tap System Configuration.8. How to start Windows 10 in Safe Mode with Networking from Command Prompt with the shutdown command
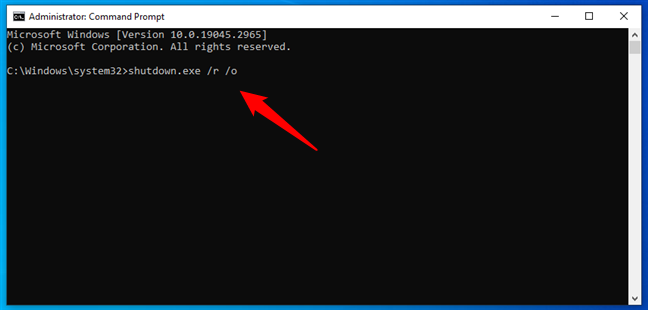
The last method I know for starting Windows 10 in Safe Mode with Networking relies on Command Prompt. Open CMD and execute the following command:shutdown.exe /r /o

Discussion (3)
The procedures are clear. The result is not with wireless. Is there a way to access safe mode with networking using a wireless Windows 10 laptop?
Why such complicated procedures? Install freeware EasyBCD & iReboot from NeoSmart and you are done.
This guide is about showing how it is done from Windows 10 itself, not about third-party tools.