
 14.04.2020
Knowing how to share your screen on Skype is useful in a variety of situations. Whether you need help with your computer, want to show a presentation to your colleagues, or feel like getting a loved one's opinion on your dating profile, you can use Skype screen sharing during calls to broadcast what you see on your device. This tutorial shows you how to screen share on Skype from a Windows 10 PC, a Mac, an Android smartphone, an iPhone or iPad, and with Google Chrome or Microsoft Edge:
First things first: About Skype screen sharing
With the share screen feature, Skype lets you send whatever is on your display to the other participants in your call. It is easy, and it works on Windows 10, macOS, Android 6.0 and above, and iOS 12 or above. For the screen sharing feature to work, you need to use the latest version of the Skype app for your platform. You can get it from the official Skype Download page.
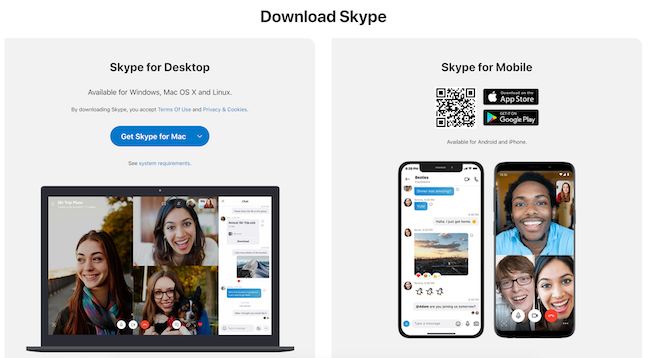
You can also access the feature with Skype for Web, as long as you're using at least Google Chrome version 72 or the new version of Microsoft Edge.
There are a couple of things to keep in mind before sharing your screen. First of all, know your audience and be careful with any personal information or sensitive content. In the Windows 10 desktop app, macOS, and Skype for Web, you can choose between sharing your whole screen or a single window. However, if you're planning to show grandma how to install a new app by sharing your Android's screen, it's probably safer to close your Tinder profile first. Likewise, make sure not to forget those pictures of you partying open, just in case you decide to share your whole screen during a business meeting, instead of just an application window. We recommend decluttering your display as much as possible before you share your screen with Skype, as it may also help with your device's performance.
Also, be patient! Depending on the device and the speed of your internet connection, the image on the screen of your colleagues and friends might lag a few seconds behind what you're doing on your screen. If they can't see anything or they report your screen is freezing, try turning the feature off and on again. If that doesn't do the trick, you can also close and reinitiate the call or even restart your device before trying again.
To be able to share your screen on Skype, first make an audio or video call with the people with whom you want to share the screen. Once you're engaged in a call, Skype lets you broadcast your display in just a few clicks or taps, no matter what platform you're using. While Microsoft tries to make the application consistent across devices, there are certain specific instructions, so head on to the section that applies to your device.
How to share the screen on Skype from Windows 10
As we mentioned in a previous tutorial about using Skype, there are two versions of the app you can have on your Windows 10 PC: the "classic" desktop app Skype, which you can install from the link provided in the previous section, and the UWP app that comes preinstalled with Windows 10. While both work in a similar manner, the default app that comes with Windows 10 lacks one important option when it comes to sharing the screen: it does not let you limit what you share, and you can only broadcast your entire display. The steps and screenshots below apply for the desktop version of the app, which is the one we recommend for improved privacy.
Download, install, and launch the Skype app on your Windows 10 PC. Then, start an audio or video call with the person(s) you want to show your screen to. When they answer, and your call is connected, Skype displays the video from their webcam or a black screen for audio calls. The Share screen button looks like two overlapping squares in the bottom-right area of your call window. Click or tap on it.
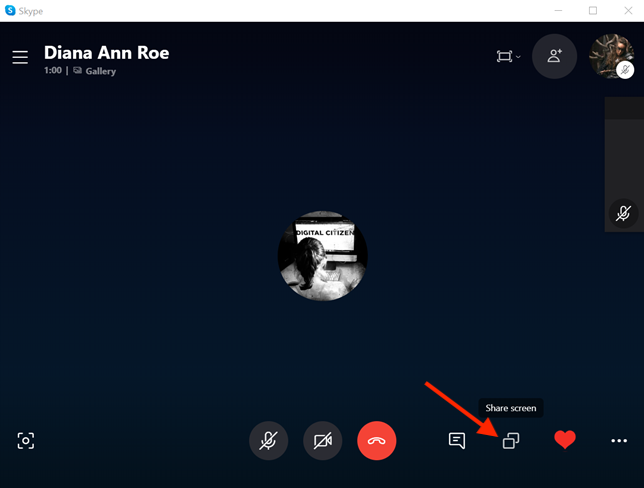
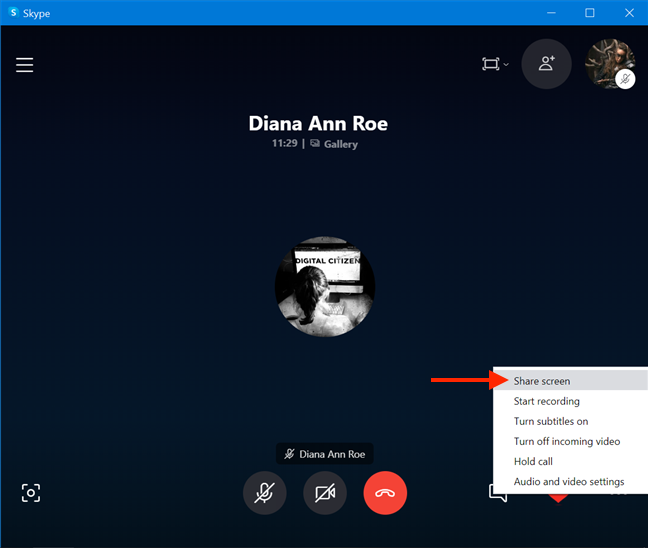
If you can't see the button on your screen, you can try enlarging the window to reveal it, or just press on the More options button in the lower-right corner.

In the menu that pops up, click or tap the Share screen option.
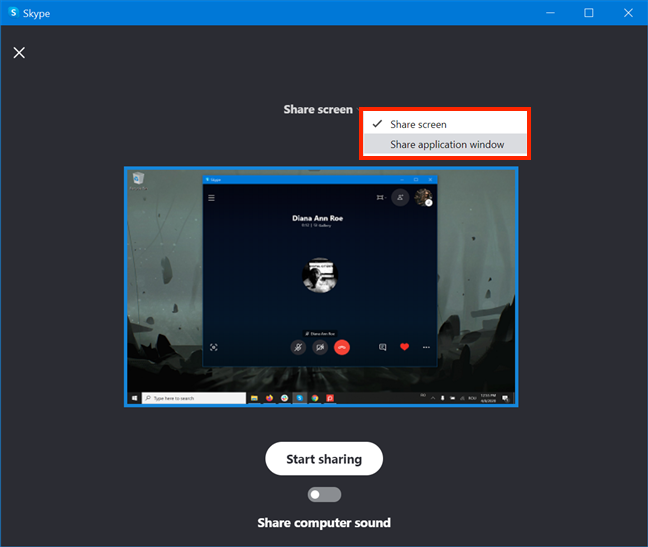
On the next screen, you get several options to set up what you're broadcasting. While easy to overlook, the Share screen option on top can limit what others can see. Click or tap on it.
TIP: If you are using a dual-monitor setup on your Windows 10 device, you can see a preview of each screen, and you can click or tap on the one you want to share.
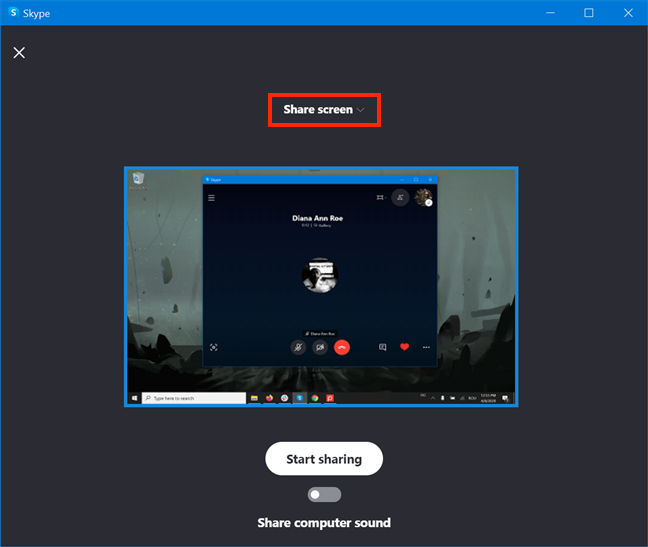
This opens a dropdown menu where the Share screen option is enabled by default. You can choose to "Share application window" instead.
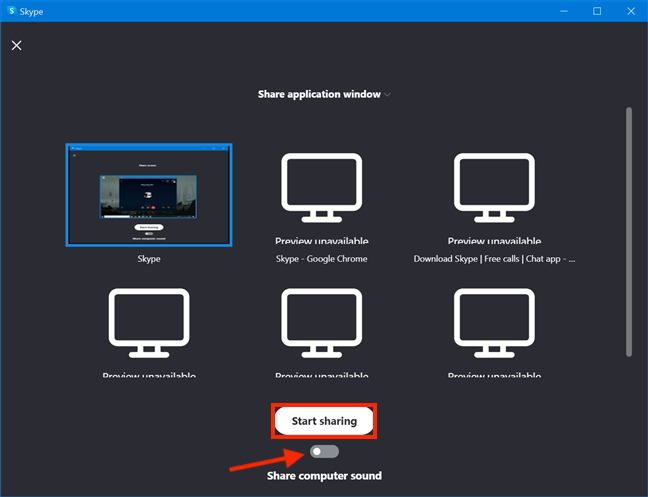
If you only want to share an app window, you can now select which of the open apps on your device you want to show the others in the call. Then, use the "Share computer sound" switch at the bottom to choose if you also want to share the sounds made by your Windows 10 computer.
When you are done, click or tap on Start sharing.
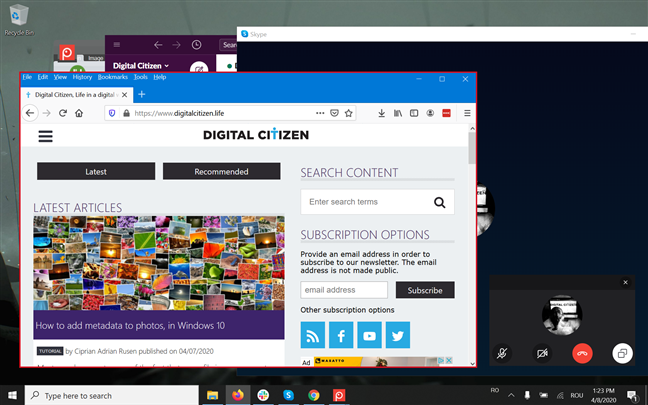
If you're sharing an application window, Skype now highlights it with a thin red border, to make you aware it is being shown to other participants in your call.
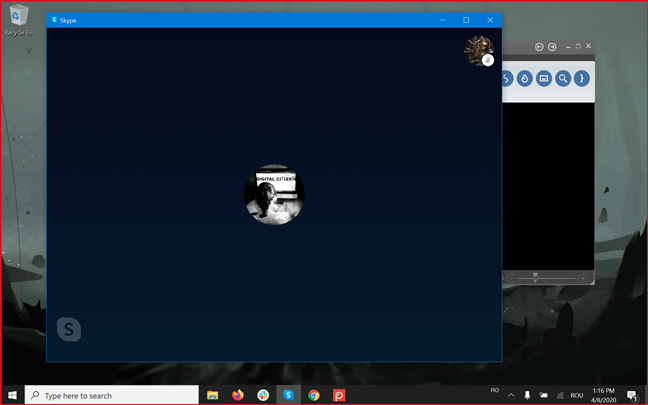
If you're sharing your whole screen, everyone who's part of your Skype audio or video call gets to see your Windows 10 desktop. For as long as you share the screen on Skype, your desktop has a thin red border to make you aware that other people can see what you are doing.
TIP: If you are using the Skype version that comes preinstalled in Windows 10, the border is yellow.
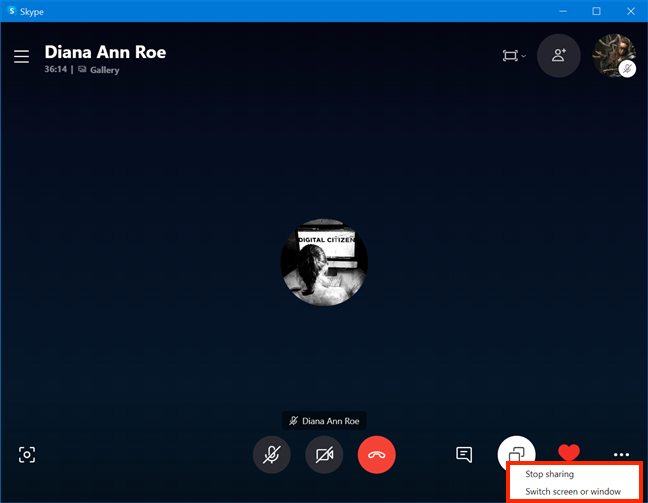
While you're broadcasting your display, the Share screen button is lit up, and pressing it offers other "Screen sharing options." You can Stop sharing, and your screen is no longer shown to other people in the call. You can also access "Switch screen or window" to return to the screen where you decide what you're sharing. If you don't see the Share screen button, the options are included in the More Options menu.
If you end the call on Skype, screen share also stops immediately.
How to share screen with Skype for Web in Google Chrome and Microsoft Edge
Skype for Web is meant to offer a similar experience to the downloadable application in your browser, without the hassle of having to install or update Skype. While Skype for Web can also be used in other browsers, you benefit from the screen sharing feature only if you're using the new Microsoft Edge or with Google Chrome version 72 or newer. If you're unsure about the Google Chrome's version on your device, read Which version of Google Chrome do I have? 7 ways to find out!
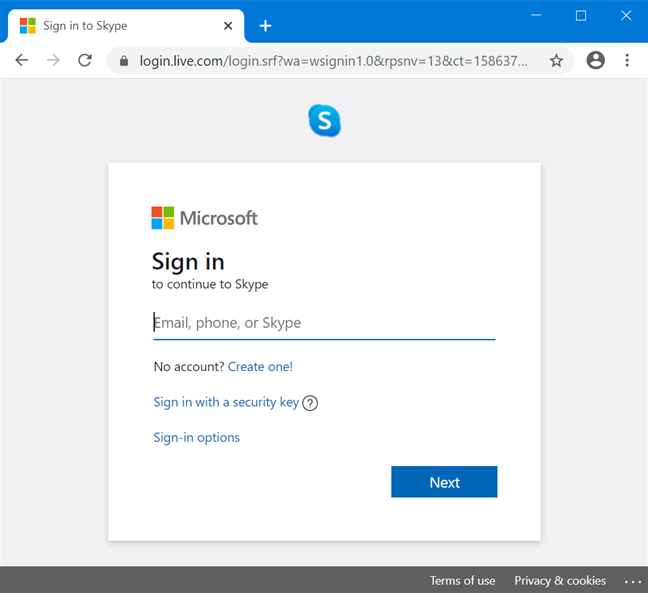
To use Skype screen sharing directly from your browser, access the official Skype for Web page with Google Chrome or Microsoft Edge and sign in with your credentials.
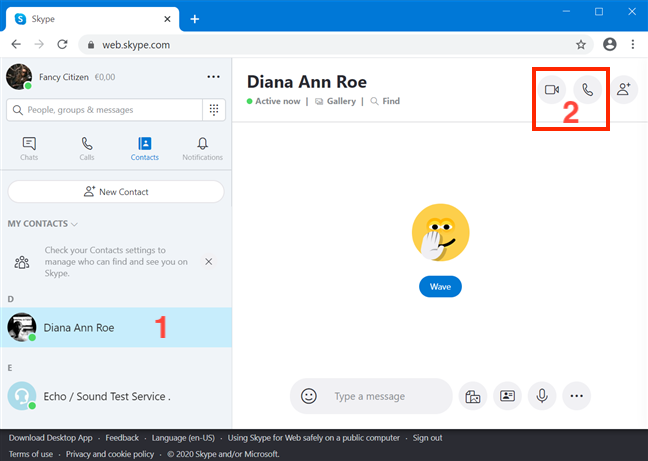
It might take a few moments, but the familiar Skype interface should load in your Google Chrome or Microsoft Edge tab. Select the contact to share the screen with, and use the Video Call and Audio Call buttons to start a call.
When your call is connected, you should see the Share screen icon at the bottom of the browser window. It looks like two overlapping squares. Click or tap on it to start sharing your screen with the others in your call.
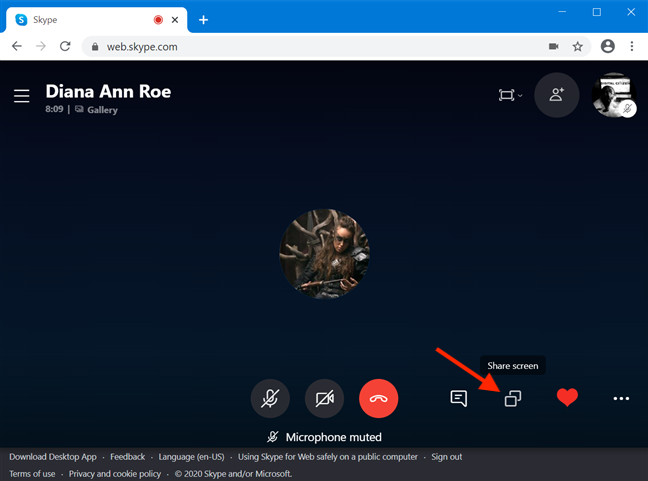
Depending on Chrome's or Edge's size on your screen, the icon might not be displayed. If that is the case, click or tap on More Options, and press Share screen from the menu that appears.
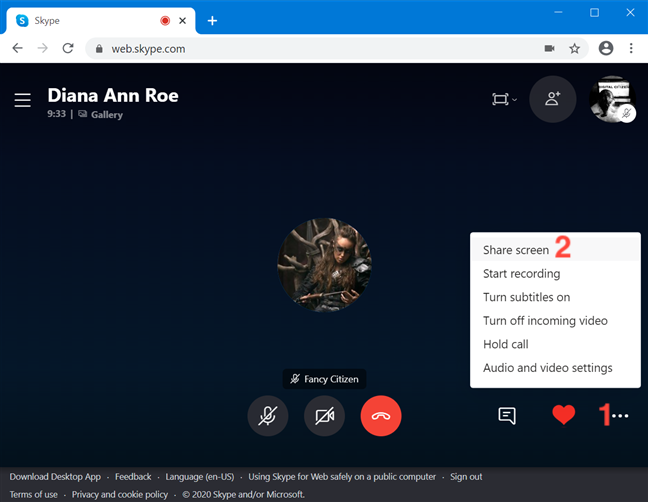
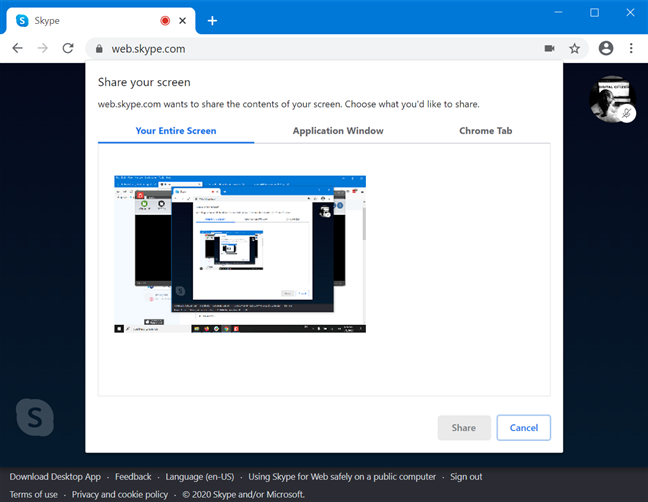
Next, you get to choose what the other people in your Skype call can see from your screen with the help of three tabs. The first tab lets you share "Your Entire Screen."
Access the second tab if you want to limit the participants in your call to only see an Application Window. Click or tap on the open app window you want to broadcast.
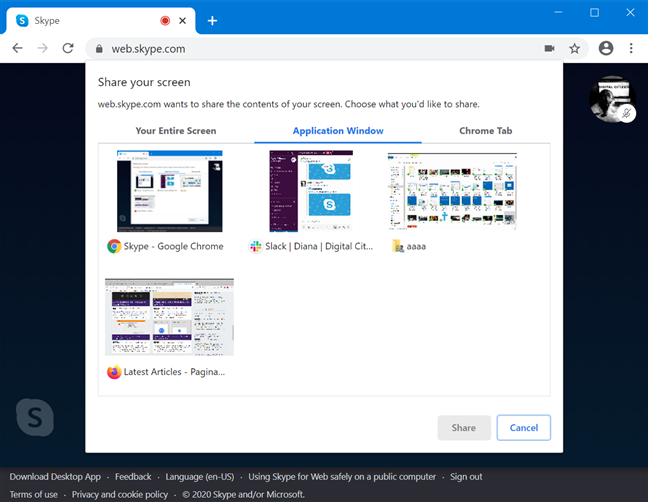
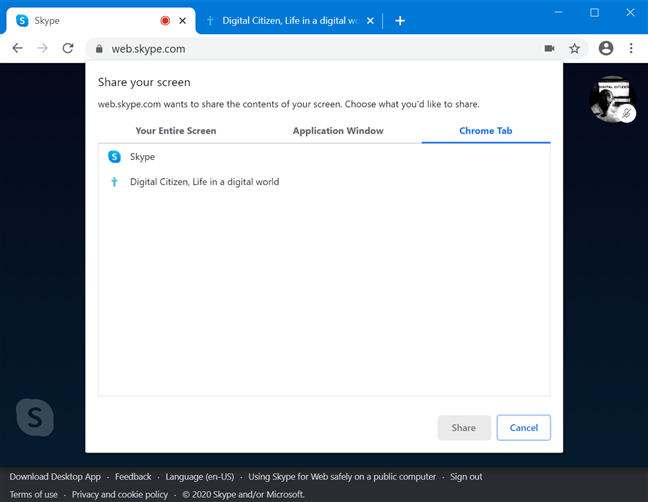
The last category lets you choose the Chrome Tab or Microsoft Edge tab you want to share with the person(s) in your call. Select one of the open tabs in Chrome or Edge to broadcast it. Regardless of what you want to show the other call participants, after making your selection, click or tap on Share at the bottom.
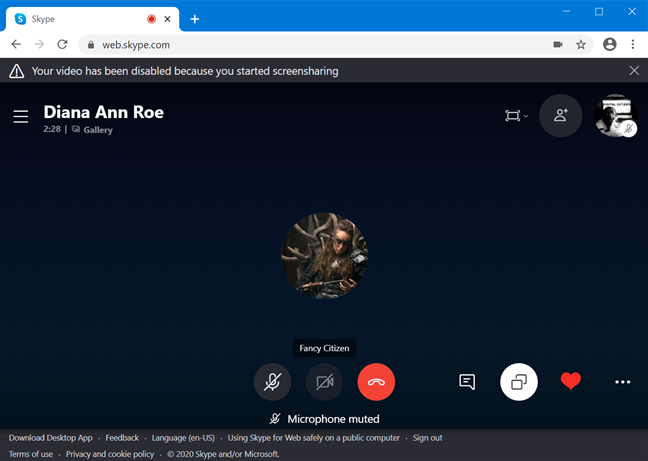
Google Chrome and Microsoft Edge do not allow more than one output at the time, so you can't share your screen and show video at the same time. If you were in a video call, you get a message on top of the Skype for Web tab, letting you know that "Your video has been disabled because you started screensharing."
If you are sharing your entire screen, you get a discreet warning at the bottom of your display to let you know others are seeing your screen.

The Skype for Web reminder reads a bit differently when you are sharing an app window, but it is still present at the bottom, even when accessing different apps than the one you're sharing.

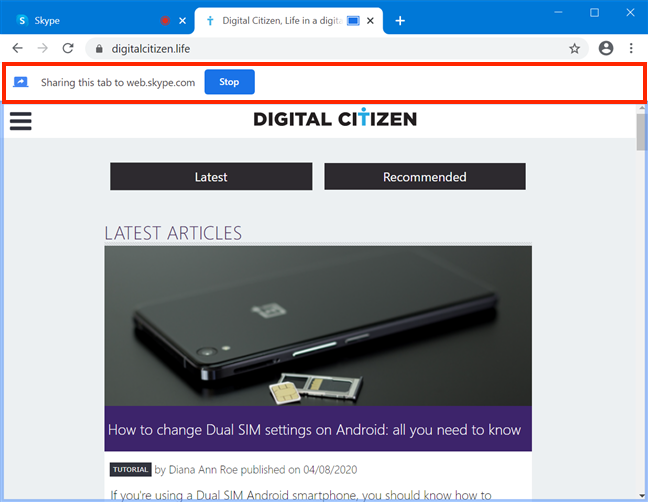
When you are broadcasting a Chrome or Edge tab, the warning doesn't follow you around anymore, and a discreet banner is shown under the address bar. If you are accessing the shared tab, the banner lets you know it is "Sharing this tab to web.skype.com."
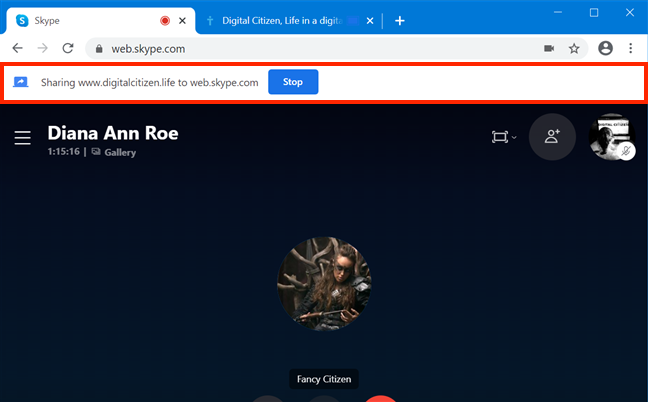
Another slightly different banner is displayed at the top of other Chrome and Edge tabs, making sure you don't forget others can see your actions in them.
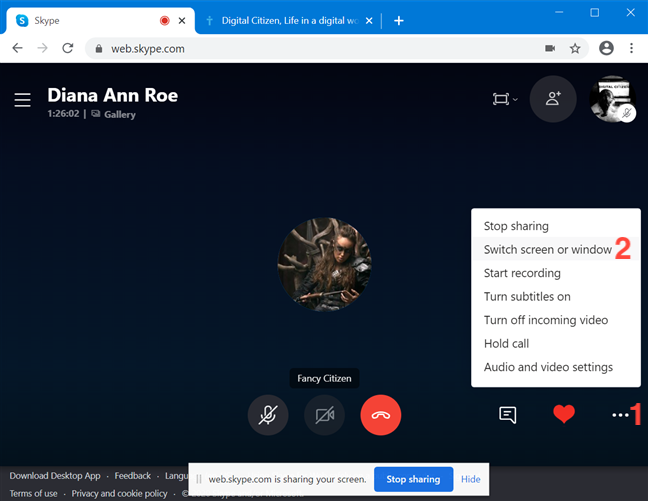
You can change what you're sharing at any time by accessing "Screen sharing options." Click or tap on the overlapping squares icon, and press "Switch screen or window" to get back to the screen where you can select what other participants in your call are seeing.
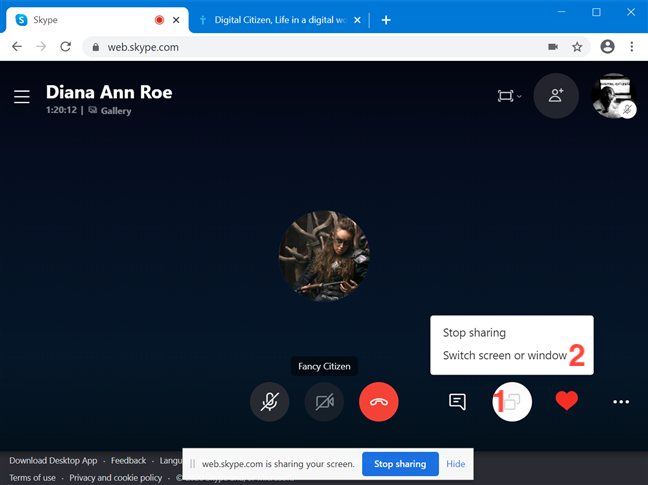
If the button is not visible, open More Options and then press on "Switch screen or window" from that menu.
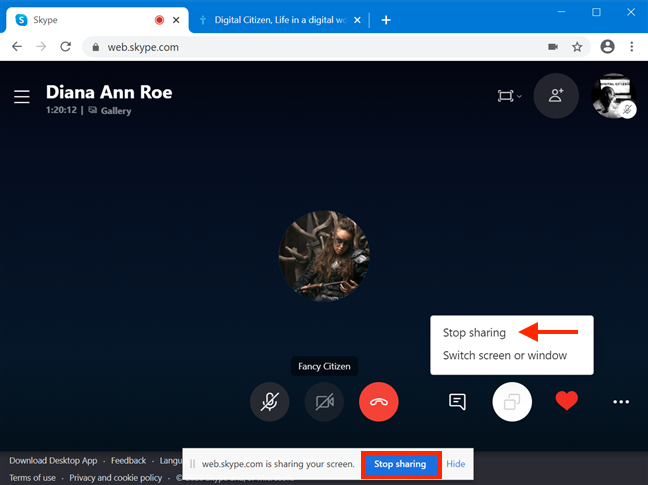
It's hard to miss the buttons you can use to stop sharing your screen, app window, or tab. They are present on every banner and warning you get while screen sharing, and you can also access Stop sharing from Screen sharing options (or More options, if the overlapping squares button is missing).
Hang up the call, and Skype screen sharing is also disconnected.
How to share screen on Skype from an Android smartphone or tablet
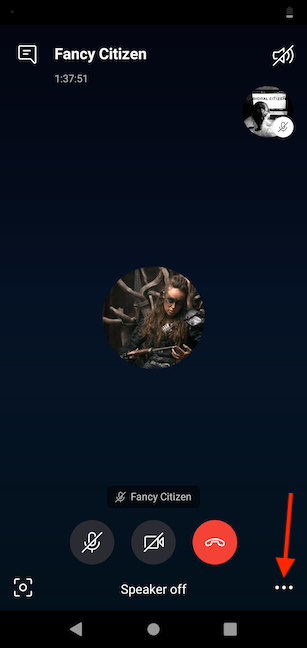
Start the Skype app on your Android smartphone and make an audio or video call. During the call, tap the screen to reveal several options and then press on the … (More Options) button in the lower-right corner of the screen.
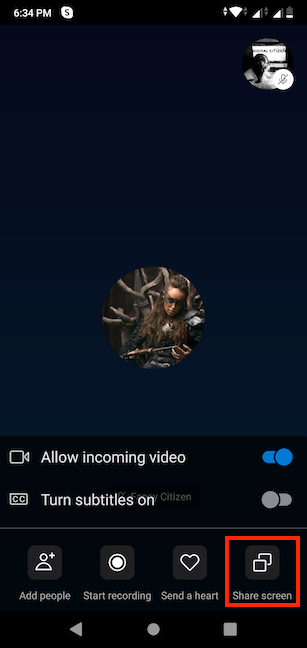
Skype for Android should then display a few more options at the bottom of the screen. Tap on the Share screen button in the lower-right corner.
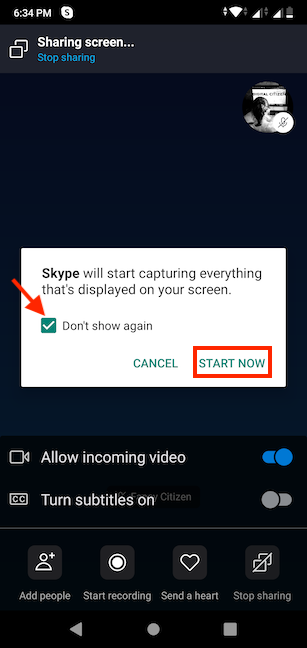
If this is your first time sharing your Android screen on Skype, you should get a message to confirm you want the app to "start capturing everything that's displayed on your screen." Check the "Don't show again" box to avoid Skype asking this every time you share your screen, and then tap Start now.
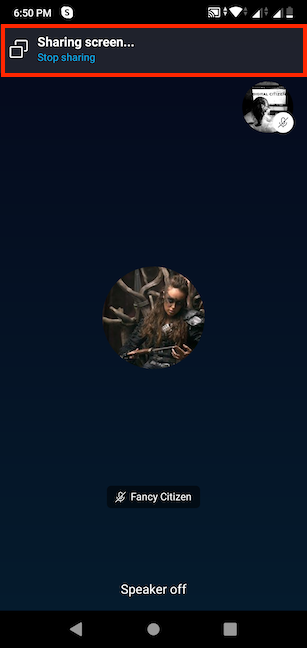
The people with whom you are talking on Skype should also see your Android smartphone's screen in real time. A banner on top of the screen lets you know your screen is being shared.
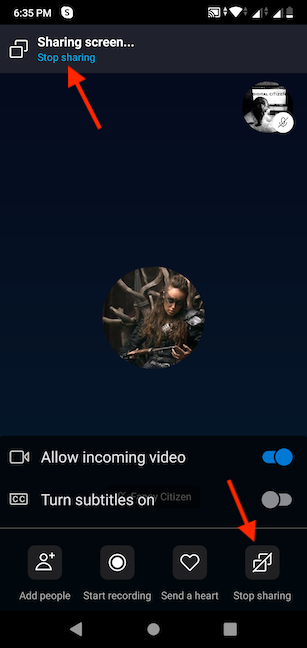
When you no longer want to share your screen on Skype, you can tap on Stop sharing from the banner on top or from the More Options menu at the bottom.
As an alternative, the Skype screen share stops automatically when the call is disconnected.
How to share your screen with Skype from an iPhone or iPad
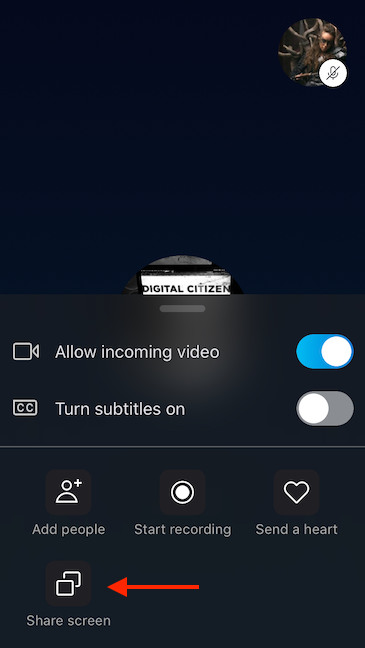
First, make an audio or video call using the Skype app from your iPhone or iPad. Then, during the call, tap the … (More Options) button from the bottom-right corner of the screen.
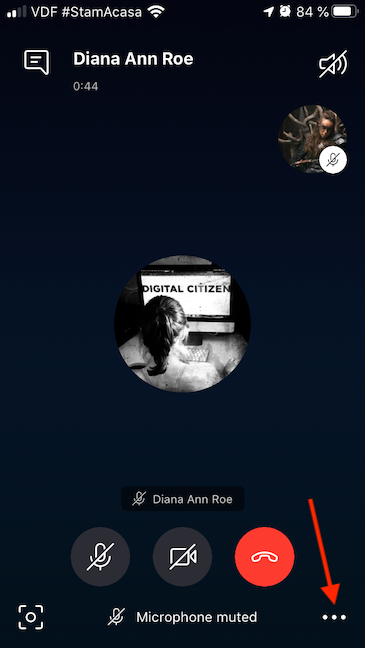
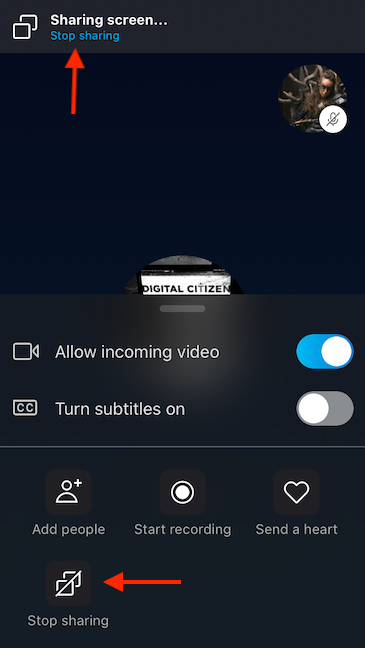
Skype for iOS displays a few buttons on the bottom of the screen. Tap the one called Share screen.
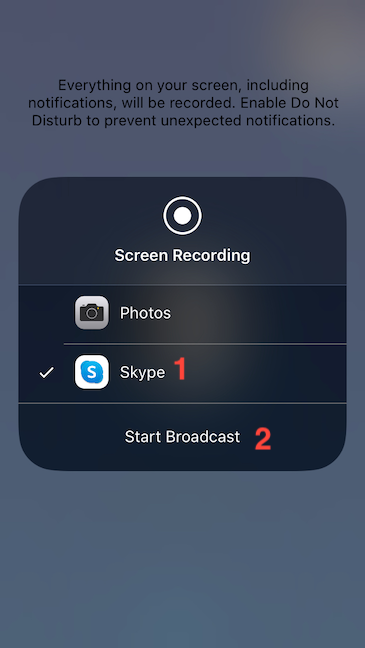
Skype warns you that everything on your screen is recorded and advises you to enable "Do not Disturb" to prevent unexpected notifications you might not want other participants to see. Underneath, there is a list of apps that can receive the Screen Recording feed. Scroll if you need to, and tap to select Skype. Then, press Start Broadcast.
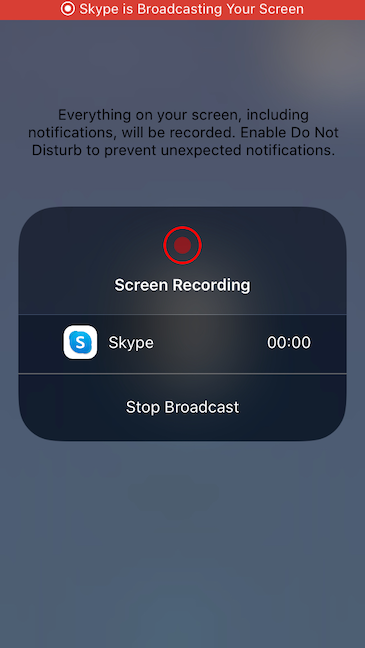
After a three-second countdown, your iPhone or iPad starts broadcasting everything you do on your screen, and the people you're talking to can see it live. Skype briefly displays a message on the red banner on top of your screen. The red border resides there for the duration of your Skype screen sharing, as a reminder that others can follow your actions.
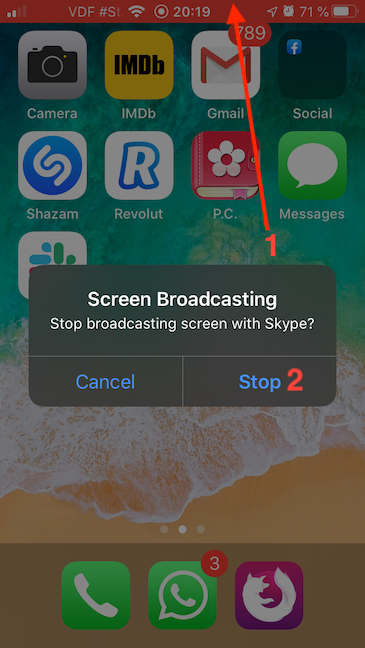
When you no longer want to share your screen on Skype, tap the red stripe from the top side of the screen, and then tap Stop.
You can also stop your screen from being broadcast by returning to your Skype call and tapping on Stop sharing either from the top of the screen or from the More Options menu.
You can also end the call, and the screen sharing is automatically disabled on your iPhone or iPad.
How to share the screen on Skype from a Mac
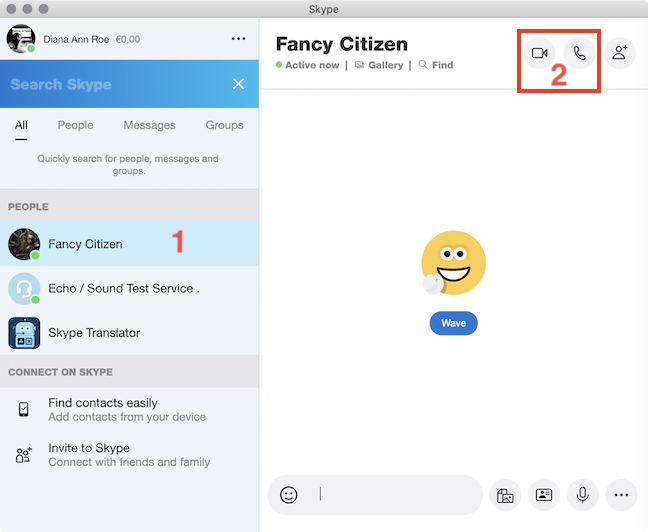
After downloading and installing the app on macOS, launch Skype, sign in with your credentials, and start an audio or video call with the people you want to show your screen to. In short, select the person(s) that you want to call, and press on Video Call or Audio Call to initiate the call.
When the person picks up, and your call is connected, Skype can show video from their camera, or the screen turns black for voice calls. Regardless, you should see the Share screen button in the bottom-right area of your call window. Click on the icon resembling two overlapping squares.
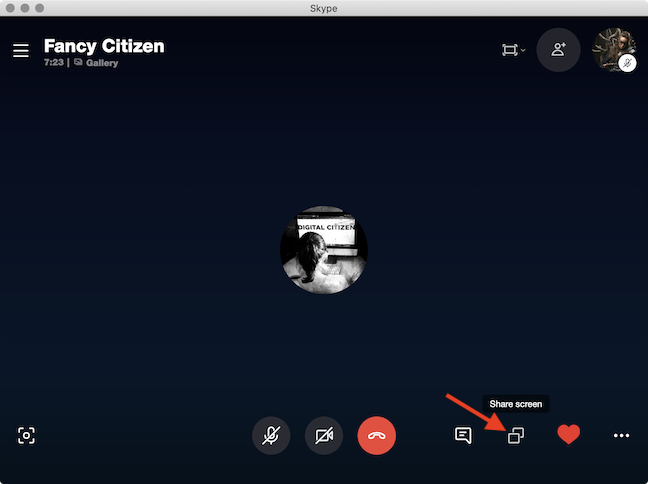
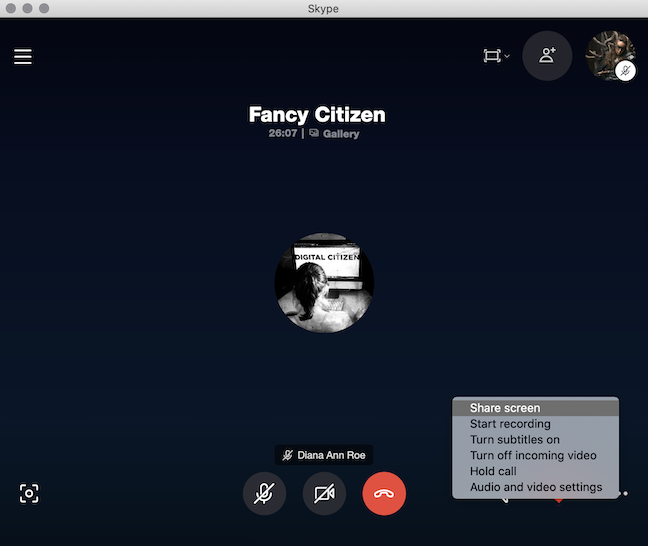
The button might not be displayed if the Skype window is too small on your Mac. Either make it bigger or access the option by pressing on the More Options button in the lower-right corner of the window, that looks like three horizontal dots.

A menu is revealed, and you can click on Share screen to access the option.
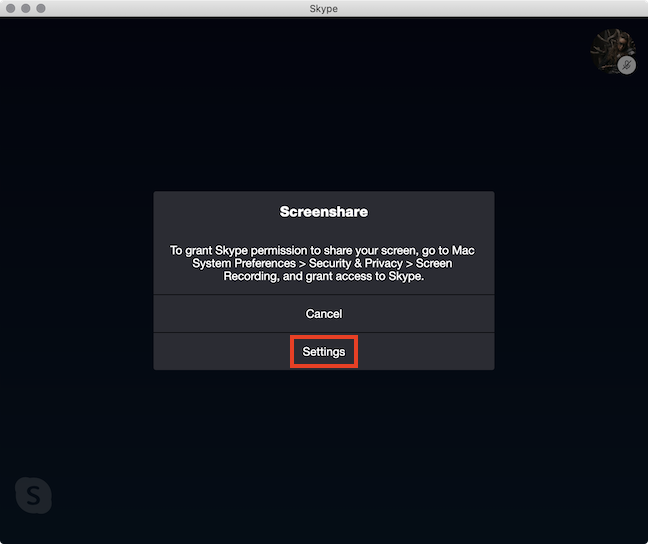
If you're running Skype on macOS Catalina, and this is the first time you're trying to share your screen with the app, a pop-up called Screenshare notifies you that Skype needs additional access. Click on Settings to reach the destination indicated by the path in the message.
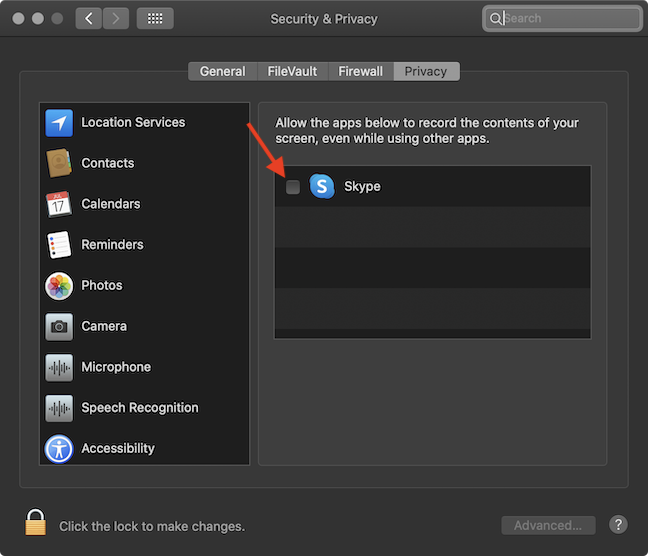
This opens the System Preferences window. Check the box next to Skype to let it record the contents of your screen.
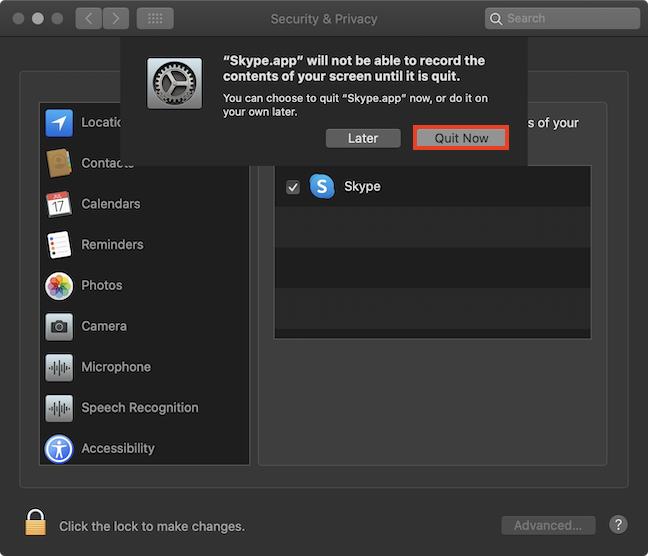
A pop lets you know that your settings can not be applied while the app is still running. Click on Quit Now, and the Skype app closes on your Mac. You can also exit System Preferences.
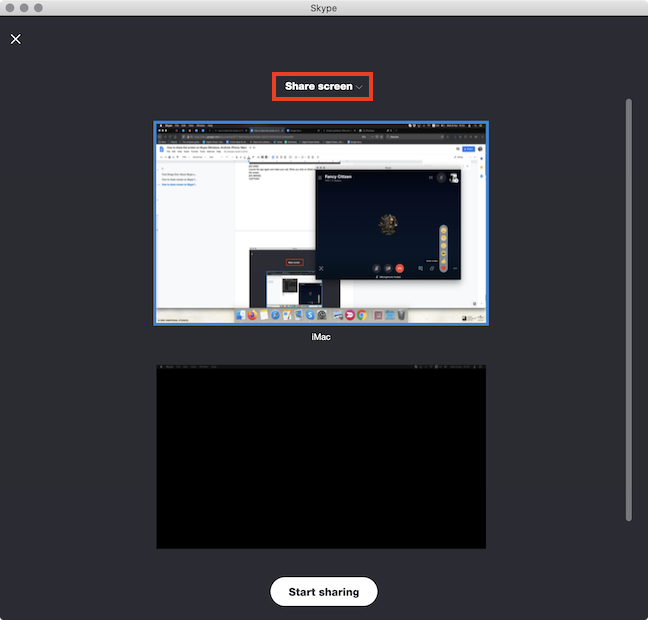
Relaunch the app. Follow the instructions above to make your call and try to share your screen. You should access a new window, where you can decide what you want to share with the other people present in your call. Click on the Share screen option on top.
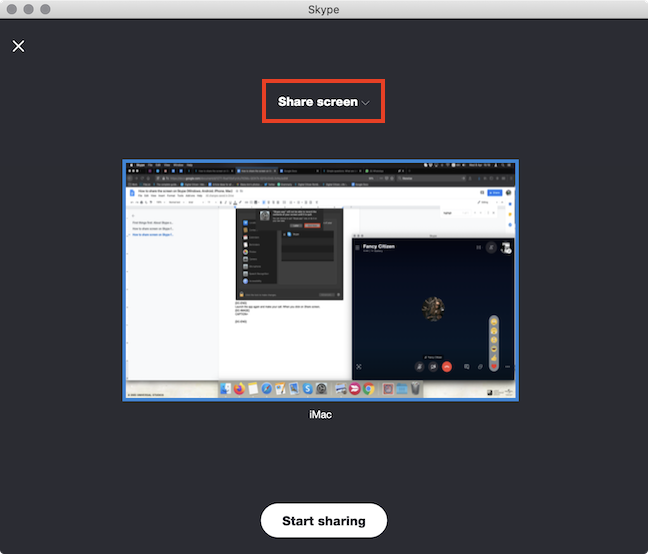
When you are using multiple monitors on your Mac, you also get a preview of each screen, and you can choose which one to share if you decide to broadcast the entire screen. We recommend only sharing relevant content during your calls. Click Share screen on top to limit what others can see on your screen.
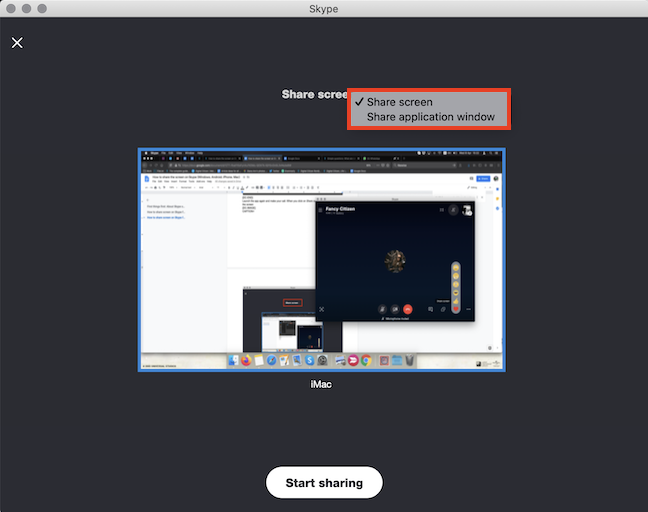
From the dropdown menu that opens, you can choose to "Share application window." This ensures the person(s) you're sharing the screen with can only access the app of your choice, thus eliminating the risk of anyone catching a glimpse of your private information.
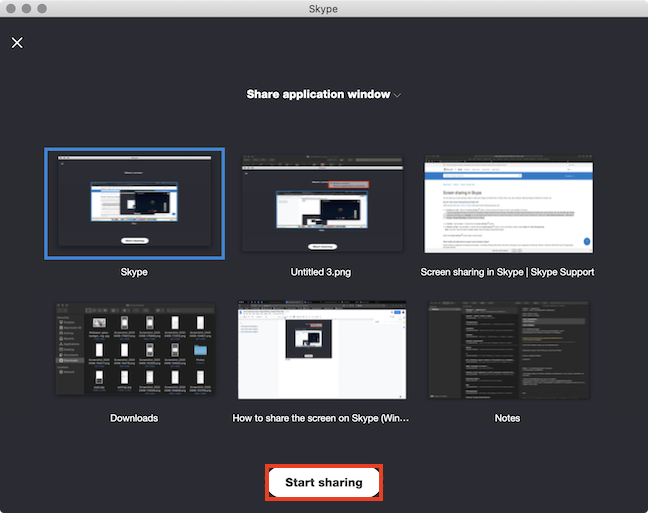
Select which application window you want to share from the available previews. Once you are done choosing what other people in your call can see from your screen, click on Start sharing.
If you're sharing an application window, you can clearly see which one it is, because Skype highlights it with a red border.
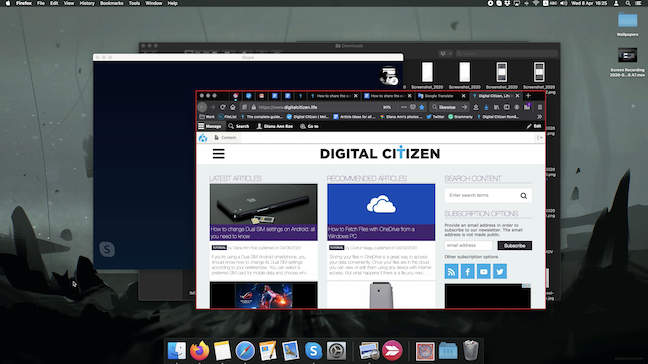
If you're sharing a whole screen, you can see the same red border surrounding your display, making sure you don't forget the people in your call can see whatever is happening on your monitor.
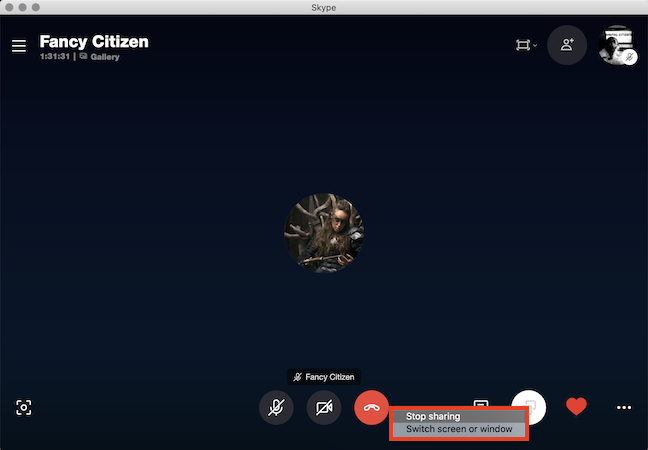
While you're sharing your screen on Skype, pressing the Share screen button in the conversation window offers different options. Click Stop sharing to stop broadcasting your screen to the other participants in your call. Accessing the "Switch screen or window" option returns you to the screen where you decide what to share. If the Share screen button is not visible for you, both choices are included in the More Options menu.
Disconnecting your Skype call immediately stops screen sharing also.
Do you like the screen sharing feature from Skype?
We believe the share screen is one of the best features on Skype. It is a cross-platform experience that works on Windows 10, Mac, Android, iOS, Google Chrome, and Microsoft Edge, so you can use it for a multitude of tasks, from shopping together with friends to providing technical support to your family, like we're often required to do. 🙂 Before closing this tutorial, tell us if you like the screen sharing feature from Skype. What are you using it for? Would you change anything about it? Let us know in the comments section.
