

If you feel that the blacks and the other colors on your monitor don’t look the way they should, you may be right. Just like any imaging device, computer monitors also have to be calibrated to produce the best image they can. Fortunately, both Windows 11 and Windows 10 include a “Display Color Calibration” wizard that can help you calibrate your monitor for the best possible color display. In this article, I’ll show you how to use the color calibration wizard to set everything to your liking:
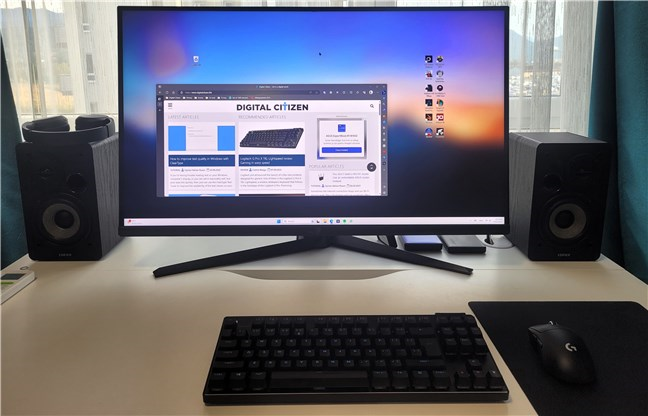
 A properly calibrated computer monitor
To be able to calibrate a monitor properly in Windows and to understand how to use the “Display Color Calibration” wizard I’ll cover later in this guide, there are two essential concepts that you need to know about. Having these two parameters configured correctly leads to more realistic color rendering on your monitor:
A properly calibrated computer monitor
To be able to calibrate a monitor properly in Windows and to understand how to use the “Display Color Calibration” wizard I’ll cover later in this guide, there are two essential concepts that you need to know about. Having these two parameters configured correctly leads to more realistic color rendering on your monitor:
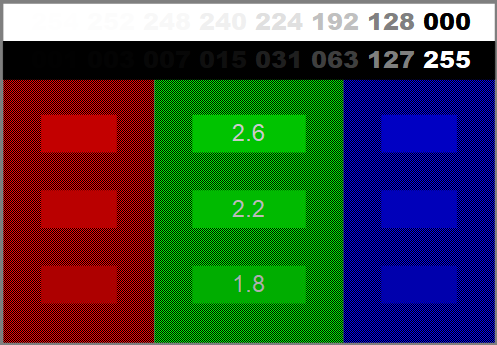
 Gamma correction test image
Image source: Wikipedia
Gamma correction test image
Image source: Wikipedia

 Government Center Miami color balance comparison
Image source: Wikipedia
NOTE: Furthermore, before running the “Display Color Calibration” wizard that I’m going to talk about in the next sections of this tutorial, you should also make sure that you have the right driver and color profile for your monitor. If you need help with that, read this guide first: What is an ICM file? How to install an ICM profile.
Government Center Miami color balance comparison
Image source: Wikipedia
NOTE: Furthermore, before running the “Display Color Calibration” wizard that I’m going to talk about in the next sections of this tutorial, you should also make sure that you have the right driver and color profile for your monitor. If you need help with that, read this guide first: What is an ICM file? How to install an ICM profile.

 Searching for Calibrate display color in Windows 11
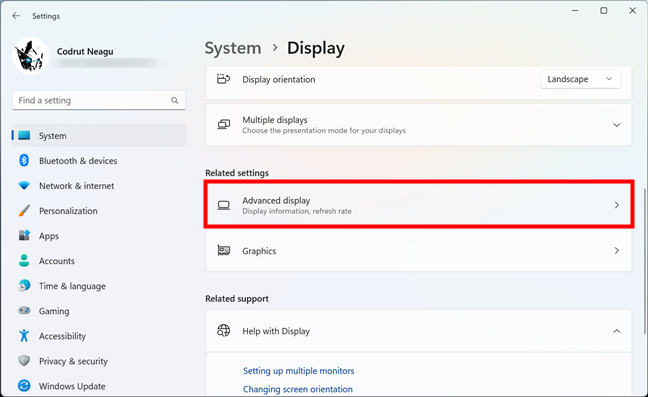
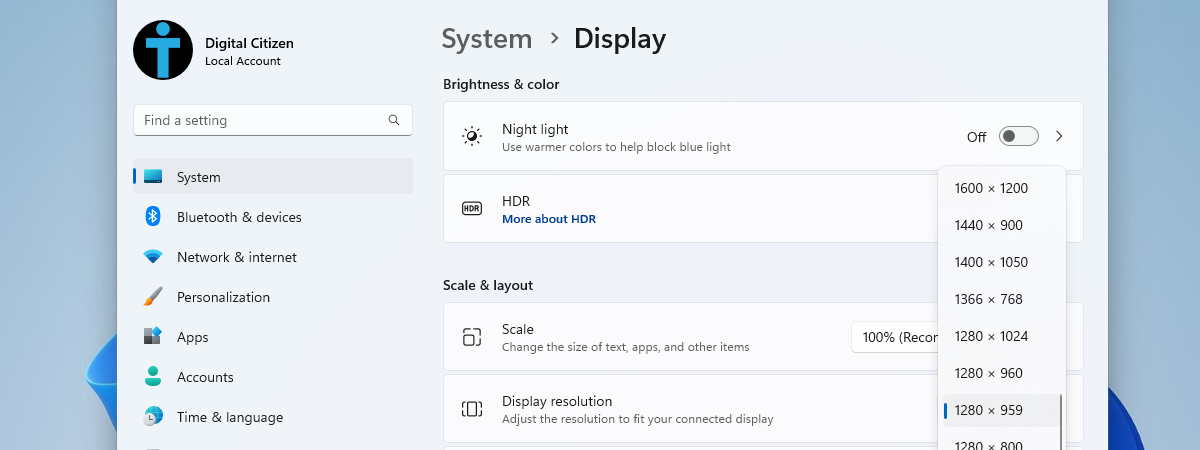
The alternative and much lengthier way is to use the Settings app. Open it (Win + I), select System in the left sidebar, and click or tap on Display in the right pane.
Searching for Calibrate display color in Windows 11
The alternative and much lengthier way is to use the Settings app. Open it (Win + I), select System in the left sidebar, and click or tap on Display in the right pane.
 Head to Windows 11's Display settings
On the Display page, click or tap on “Advanced display settings.”
Head to Windows 11's Display settings
On the Display page, click or tap on “Advanced display settings.”
 The Advanced display entry
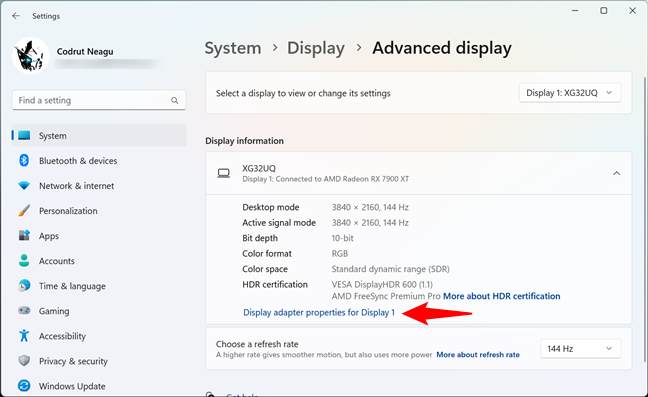
Next, scroll if you need to, and click or tap the “Display adapter properties [...]” link.
The Advanced display entry
Next, scroll if you need to, and click or tap the “Display adapter properties [...]” link.
 The Display adapter properties link
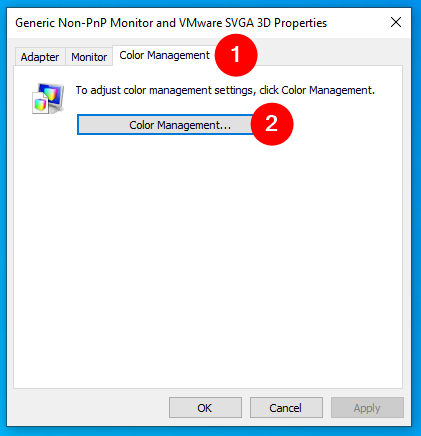
Next, Windows 11 opens the Properties window of your graphics card and monitor. Select the Color Management tab and click or tap on the Color Management button.
The Display adapter properties link
Next, Windows 11 opens the Properties window of your graphics card and monitor. Select the Color Management tab and click or tap on the Color Management button.
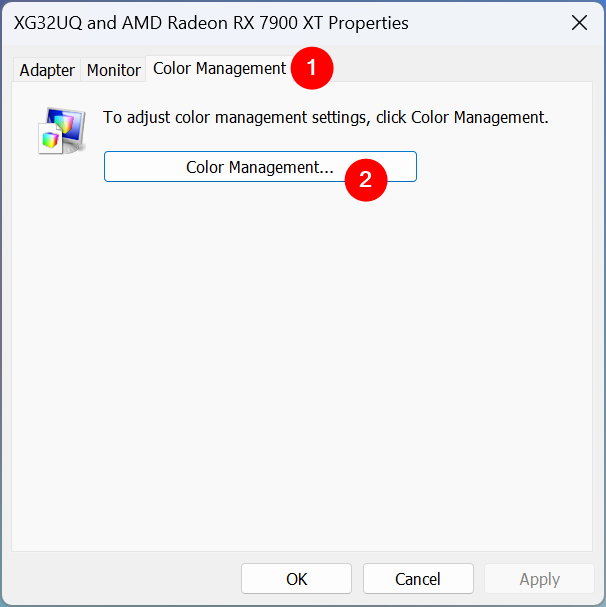
 The Color Management button from the monitor’s Properties window
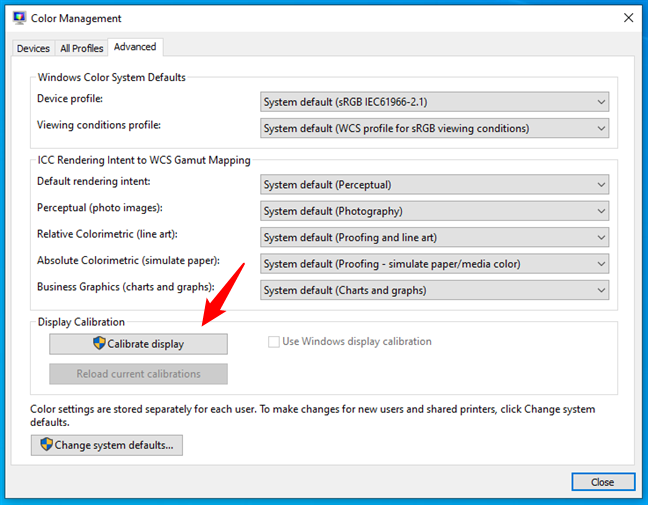
This triggers the opening of another window called Color Management. In it, head to the Advanced tab and click or tap the Calibrate display button.
The Color Management button from the monitor’s Properties window
This triggers the opening of another window called Color Management. In it, head to the Advanced tab and click or tap the Calibrate display button.
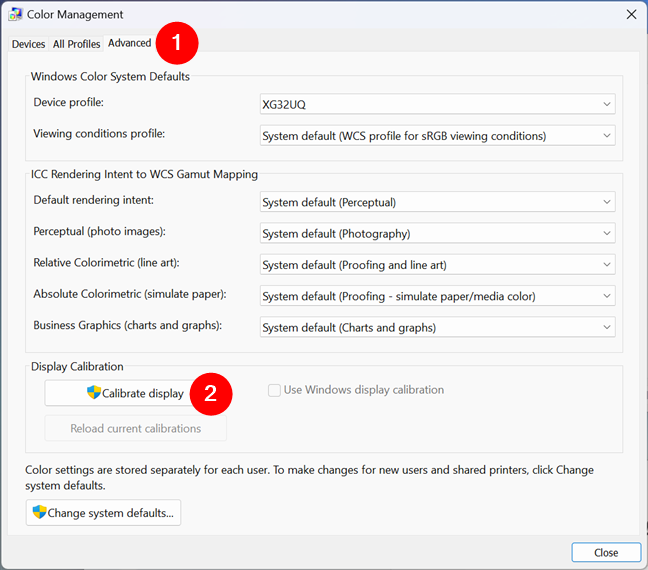
 The Calibrate display button from the Advanced tab
The Display Color Calibration wizard will open now. Skip to the “Step 2. How to calibrate your monitor in Windows” chapter in this guide to see how to go through all its steps.
The Calibrate display button from the Advanced tab
The Display Color Calibration wizard will open now. Skip to the “Step 2. How to calibrate your monitor in Windows” chapter in this guide to see how to go through all its steps.
 Searching for Calibrate display color in Windows 10
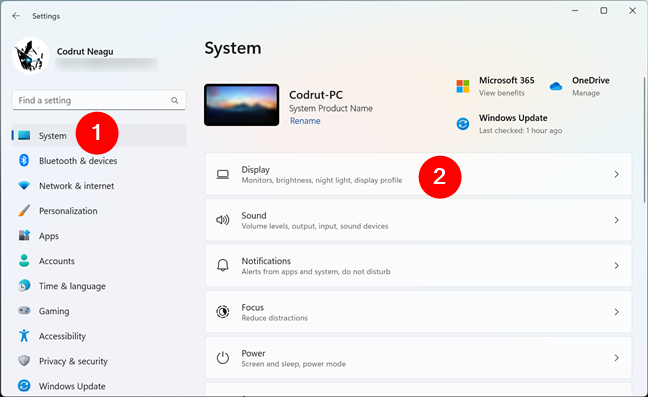
If you prefer, you can also use the Settings app to open the “Display Color Calibration” wizard, although this is a much lengthier way to do it. Start by launching the Settings. Then, open the System category.
Searching for Calibrate display color in Windows 10
If you prefer, you can also use the Settings app to open the “Display Color Calibration” wizard, although this is a much lengthier way to do it. Start by launching the Settings. Then, open the System category.
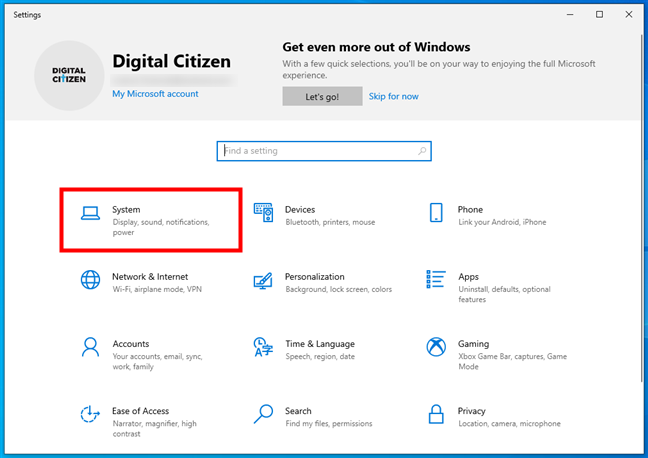
 Access the System settings in Windows 10
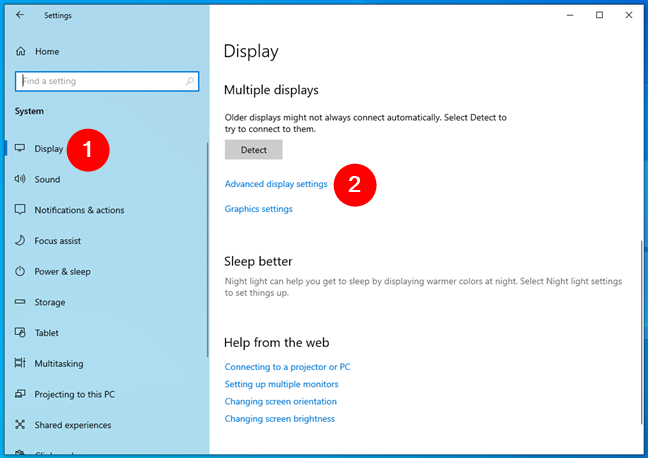
Select Display on the left, and click or tap “Advanced display settings” on the right side of the window.
Access the System settings in Windows 10
Select Display on the left, and click or tap “Advanced display settings” on the right side of the window.
 Click or tap on Advanced display settings
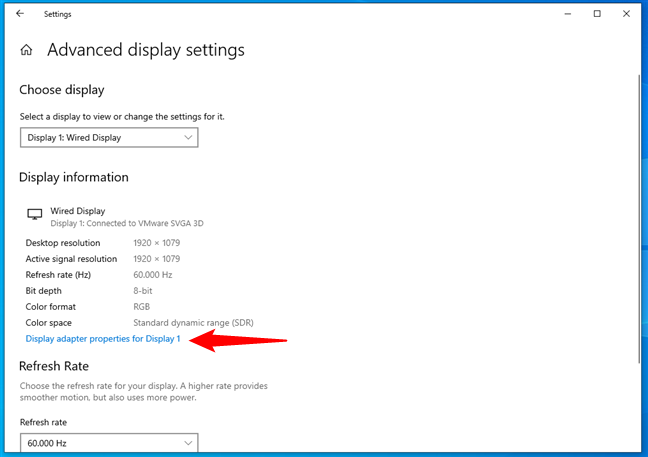
Scroll down until you find the link called “Display adapter properties [...]” and click or tap on it.
Click or tap on Advanced display settings
Scroll down until you find the link called “Display adapter properties [...]” and click or tap on it.
 The Display adapter properties link in Windows 10
This opens up the Properties window of your graphics adapter and monitor. Select the Color Management tab and click or tap on the button bearing the same name.
The Display adapter properties link in Windows 10
This opens up the Properties window of your graphics adapter and monitor. Select the Color Management tab and click or tap on the button bearing the same name.
 The Color Management button in the Properties window
Windows 10 now opens the Color Management window. In it, select the Advanced tab, and then, at the bottom of the window, click or tap on the Calibrate display button.
The Color Management button in the Properties window
Windows 10 now opens the Color Management window. In it, select the Advanced tab, and then, at the bottom of the window, click or tap on the Calibrate display button.
 Press Calibrate display in the Advanced tab of Color Management
This opens the Display Color Calibration wizard. Now let’s see how to use this wizard to calibrate your monitor in Windows 10:
Press Calibrate display in the Advanced tab of Color Management
This opens the Display Color Calibration wizard. Now let’s see how to use this wizard to calibrate your monitor in Windows 10:
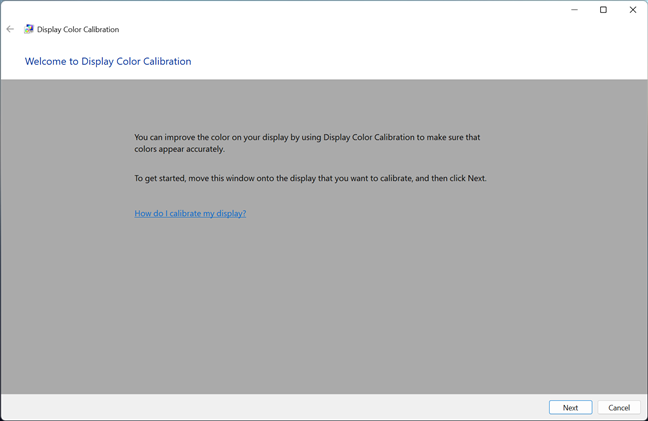
 Welcome to Display Color Calibration
You’re asked to press the Menu button on your monitor. If you can’t find this button, check the user manual. Note that a laptop, a 2-in-1 computer, or a tablet may or may not have an equivalent to a Menu button for its screen. Consult your product guide to make sure. On this screen, there are also recommendations for using the monitor’s own menu to set its properties for best results with the “Calibrate Display Color” wizard. Once you’ve followed those instructions, click or tap Next.
Welcome to Display Color Calibration
You’re asked to press the Menu button on your monitor. If you can’t find this button, check the user manual. Note that a laptop, a 2-in-1 computer, or a tablet may or may not have an equivalent to a Menu button for its screen. Consult your product guide to make sure. On this screen, there are also recommendations for using the monitor’s own menu to set its properties for best results with the “Calibrate Display Color” wizard. Once you’ve followed those instructions, click or tap Next.
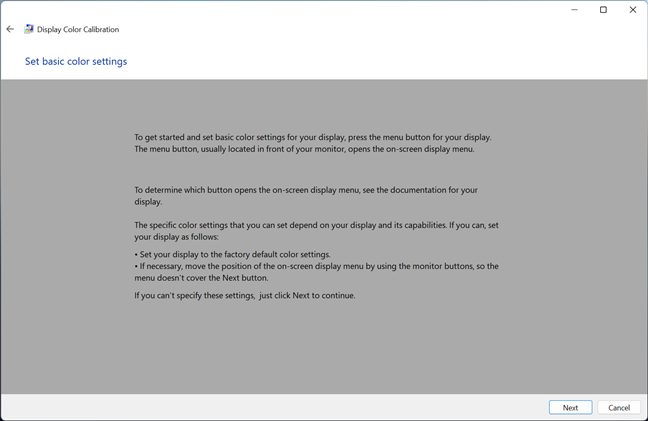 Set basic color settings
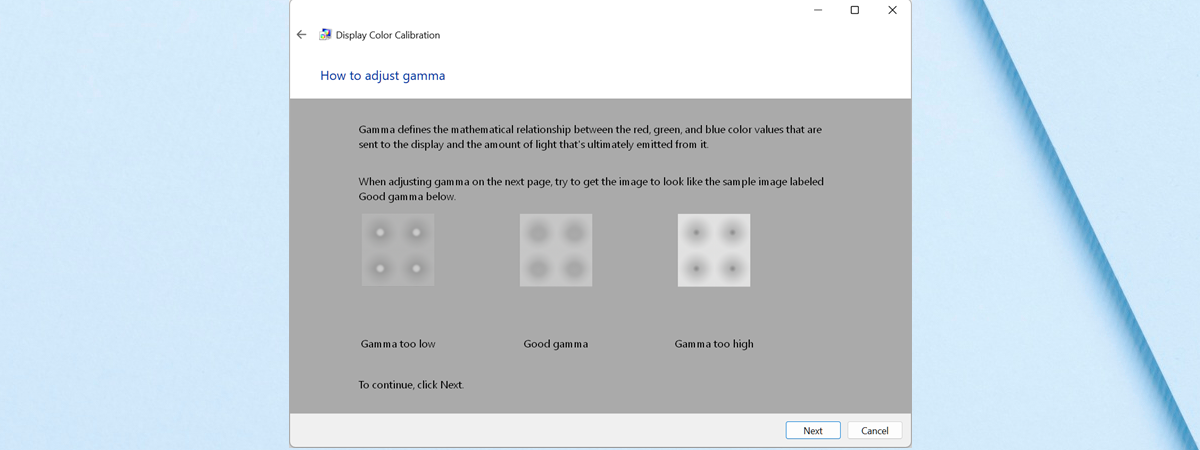
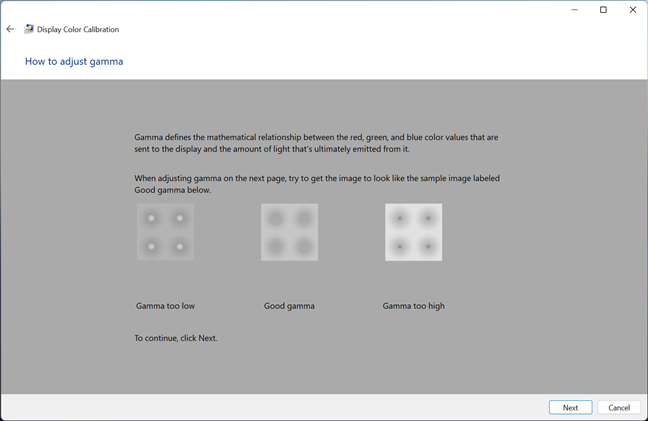
Next, you get a helpful explanation of gamma and why it’s essential to adjust it properly. Read the information on this screen and ensure you understand what you’re looking for. It’s essential that you remember the pattern that indicates good gamma. Press Next to continue.
Set basic color settings
Next, you get a helpful explanation of gamma and why it’s essential to adjust it properly. Read the information on this screen and ensure you understand what you’re looking for. It’s essential that you remember the pattern that indicates good gamma. Press Next to continue.
 How to adjust the gamma
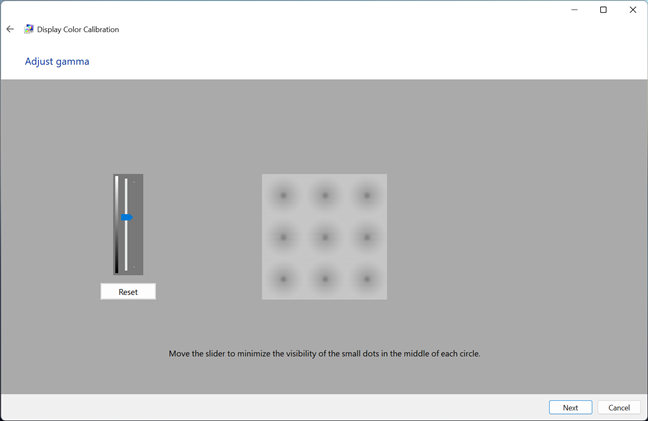
On the left, there’s a vertical slider that allows you to adjust the gamma until the graphics on the screen most closely resemble the example on the previous screen. Take some time to play with this because having the gamma set properly is vital to the settings that come next. Click or tap Next when you’re finished.
How to adjust the gamma
On the left, there’s a vertical slider that allows you to adjust the gamma until the graphics on the screen most closely resemble the example on the previous screen. Take some time to play with this because having the gamma set properly is vital to the settings that come next. Click or tap Next when you’re finished.
 Adjust gamma
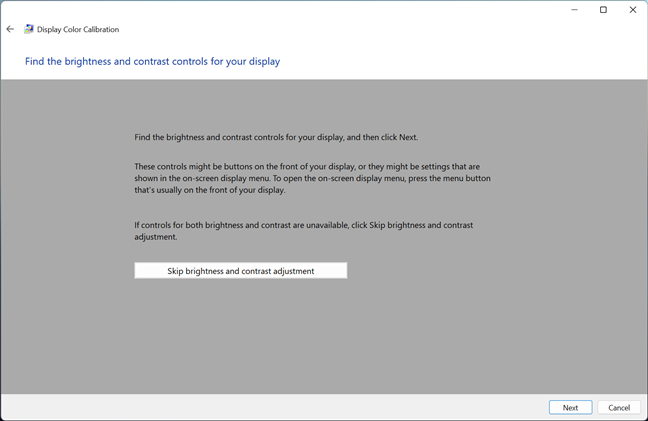
On the next screen, you’re given the option to “Skip brightness and contrast adjustment,” but I don’t recommend it. Having the brightness and contrast set properly can make a big difference in the way your graphics look. Click or tap Next to go on.
Adjust gamma
On the next screen, you’re given the option to “Skip brightness and contrast adjustment,” but I don’t recommend it. Having the brightness and contrast set properly can make a big difference in the way your graphics look. Click or tap Next to go on.
 Find the brightness and contrast controls for your display
The next screen gives you the instructions for the procedure of adjusting the brightness. Read and understand them before clicking/tapping Next to move on.
Find the brightness and contrast controls for your display
The next screen gives you the instructions for the procedure of adjusting the brightness. Read and understand them before clicking/tapping Next to move on.
 How to adjust brightness
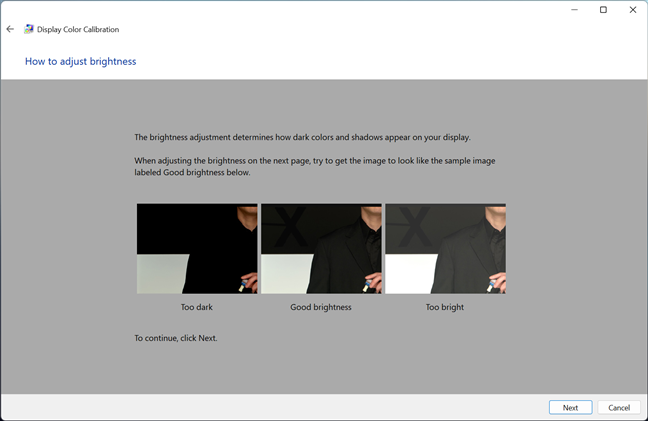
To adjust the brightness and contrast, use the buttons on your monitor. What happens depends on your own hardware, so read the directions for your monitor and proceed accordingly. Since everyone’s display is different, our screenshots just show the instructions and not the results. Also, take note that if you are using a laptop or a similar portable device, you may or may not be able to adjust these attributes.
How to adjust brightness
To adjust the brightness and contrast, use the buttons on your monitor. What happens depends on your own hardware, so read the directions for your monitor and proceed accordingly. Since everyone’s display is different, our screenshots just show the instructions and not the results. Also, take note that if you are using a laptop or a similar portable device, you may or may not be able to adjust these attributes.
 Adjust brightness on your monitor
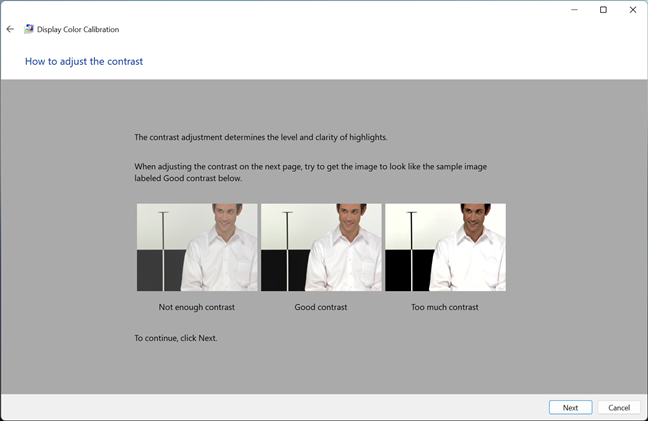
Next comes the adjustment of your monitor’s contrast. As the Display Color Calibration wizard tells you, this is an important step in the process of calibrating your monitor because it controls the level and clarity of the highlights (the brighter areas of the images shown on the screen). Check the three sample images in the wizard and try to take note of the Good contrast picture: this is what you’re aiming for in the next step.
Adjust brightness on your monitor
Next comes the adjustment of your monitor’s contrast. As the Display Color Calibration wizard tells you, this is an important step in the process of calibrating your monitor because it controls the level and clarity of the highlights (the brighter areas of the images shown on the screen). Check the three sample images in the wizard and try to take note of the Good contrast picture: this is what you’re aiming for in the next step.
 How to adjust the contrast
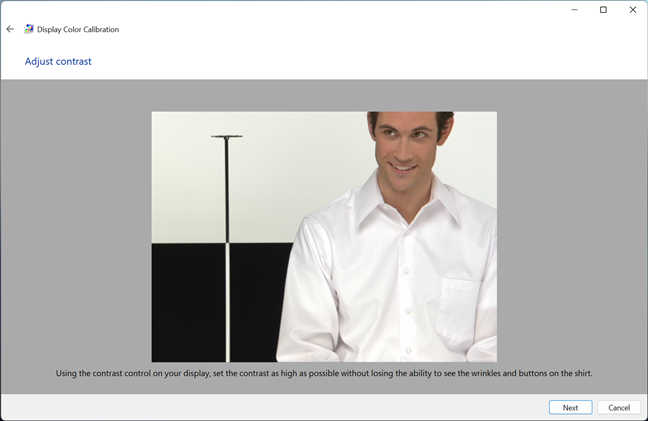
Next, use the buttons and OSD menu of your monitor to adjust the contrast so that the image shown by the Display Color Calibration matches the Good contrast sample you saw earlier.
How to adjust the contrast
Next, use the buttons and OSD menu of your monitor to adjust the contrast so that the image shown by the Display Color Calibration matches the Good contrast sample you saw earlier.
 Adjust contrast on your monitor
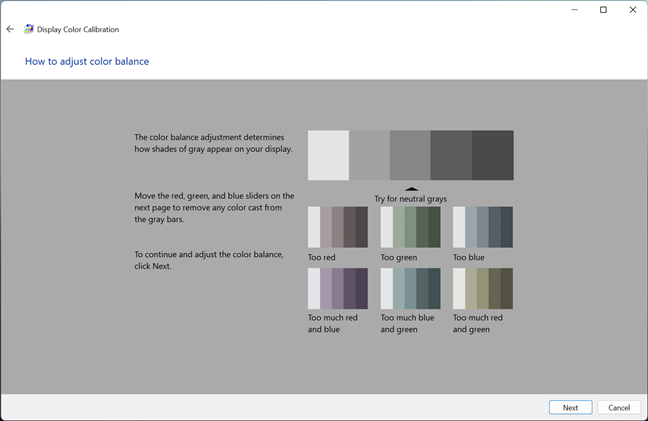
The following step is to adjust the color balance, and this is a software adjustment the wizard can walk you through. Read the instructions before you press Next.
Adjust contrast on your monitor
The following step is to adjust the color balance, and this is a software adjustment the wizard can walk you through. Read the instructions before you press Next.
 How to adjust color balance
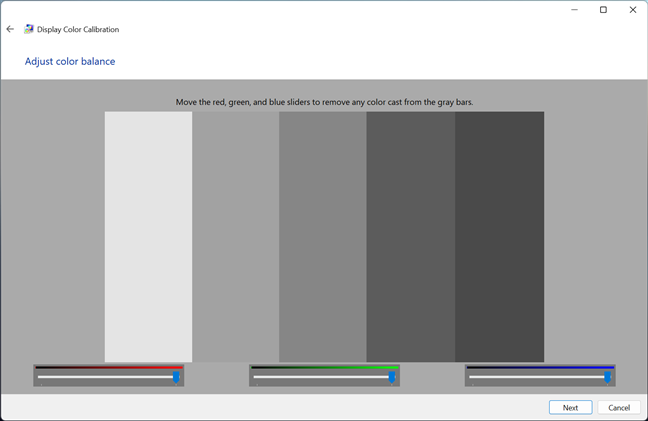
You must use the sliders under the red, green, and blue elements to try to achieve a neutral shade of gray. Take your time with this, and move all the sliders around until you get the best result.
How to adjust color balance
You must use the sliders under the red, green, and blue elements to try to achieve a neutral shade of gray. Take your time with this, and move all the sliders around until you get the best result.
 Adjust color balance
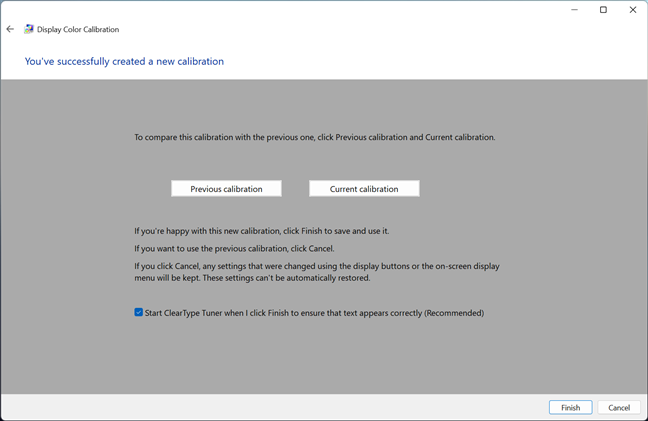
Once you complete the color balance, you’re done with the wizard. If you’d like to see the changes you’ve made, you can toggle back and forth between your previous settings and your new ones.
Adjust color balance
Once you complete the color balance, you’re done with the wizard. If you’d like to see the changes you’ve made, you can toggle back and forth between your previous settings and your new ones.
 You've properly calibrated your monitor in Windows
Now, you can press Finish to apply the color calibration for your monitor. However, before you do that, there’s another thing worth mentioning: the wizard also gives you the option to start the ClearType Tuner on this last screen. I recommend you check this option to also adjust how your monitor displays text. And, if you need help with that, check this other tutorial we published not long ago: How to improve text quality in Windows with ClearType.
You've properly calibrated your monitor in Windows
Now, you can press Finish to apply the color calibration for your monitor. However, before you do that, there’s another thing worth mentioning: the wizard also gives you the option to start the ClearType Tuner on this last screen. I recommend you check this option to also adjust how your monitor displays text. And, if you need help with that, check this other tutorial we published not long ago: How to improve text quality in Windows with ClearType.
Why calibrate your monitor’s gamma & color balance?
Calibrating your monitor is essential if you want it to be able to display images and colors correctly. By correctly, I mean that the colors and images should look as close as possible to what their creators wanted you to see. How do you know if your monitor is calibrated correctly? Well, a properly calibrated monitor allows you to have consistency between different devices. For example, if you’re looking at a picture on your computer’s monitor, it should look the same as it does on your friends’ monitors or your smartphone.Gamma
The concept of gamma can be a bit tricky to understand, but here’s how I’d describe it as simple as possible: Our eyes don’t see things the same way that electronic devices do, so the devices need to translate what they see into something that looks natural to the human eye. This is called “gamma encoding.” Monitors do gamma correction to ensure that what we see on the screen resembles what we see in the non-electronic world. The pixels on a monitor are made of red, green, and blue (often referred to as RGB), and their mix is what gives us the colors we see. Monitors are more sensitive to individual RGB values, and if these values were portrayed as the monitor sees them, the images on the screen would be somewhat distorted, especially at color boundaries. Gamma takes the RGB values and scales them to ensure that the monitor represents all colors appropriately. For a more thorough explanation, see this article: Understanding Gamma Correction.Color balance
Color balance is an adjustment to how the various intensities of colors are displayed on your monitor. Many of us have seen images where the color balance is not correct, resulting in a screen that appears to have too much or too little of a particular color. It’s especially important to have proper color balance when you view neutral colors because you don’t want your white or gray screen to look pink, for example. And if you are using special filters for your images (to give them the look of old sepia photographs, for example), you want to be sure that what you see on the screen is actually what you get with your image. Here is a Wikipedia article on Color balance that may clarify the concept.Step 1. Launch the Display Color Calibration wizard in Windows
In order to calibrate a monitor properly in Windows 11 or Windows 10, you need to use the Display Color Calibration tool. This wizard walks you through all the steps necessary, which, as you’ll see, are quite easy to go through. But, before that, let’s see how to launch it in both Windows 11 and Windows 10:How to launch the Calibrate Display Color wizard in Windows 11
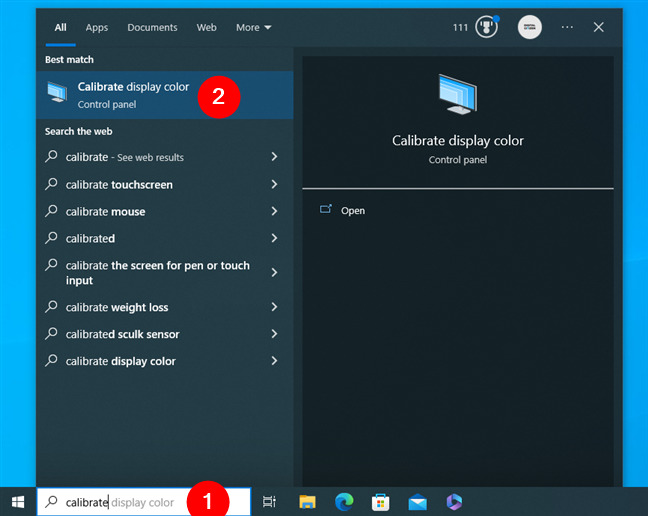
The easiest method to open the monitor calibration wizard in Windows 11 is to use the search. Click or type on the search box from your taskbar, and then type calibrate. Once the search results are in, click or tap on “Calibrate display color.”How to launch the Calibrate Display Color wizard in Windows 10
The fastest way to open the monitor calibration wizard in Windows 10 is to use the search. Start by typing calibrate into the search box on your taskbar. Then, press Enter or click or tap on “Calibrate display color.”Step 2. How to calibrate your monitor in Windows
Regardless of the method you choose to follow to get to the “Calibrate Display Color” window and whether you’re using Windows 11 or Windows 10, you can see what the wizard looks like in the next screenshot. Also, you’re informed that to get started, you should first “[...] move this window onto the display that you want to calibrate [...].” If you have only one monitor, you can ignore this message and simply press Next. However, if you have more than just one monitor connected to your computer, do as instructed: move the wizard’s window to the one you want to calibrate and only then press Next.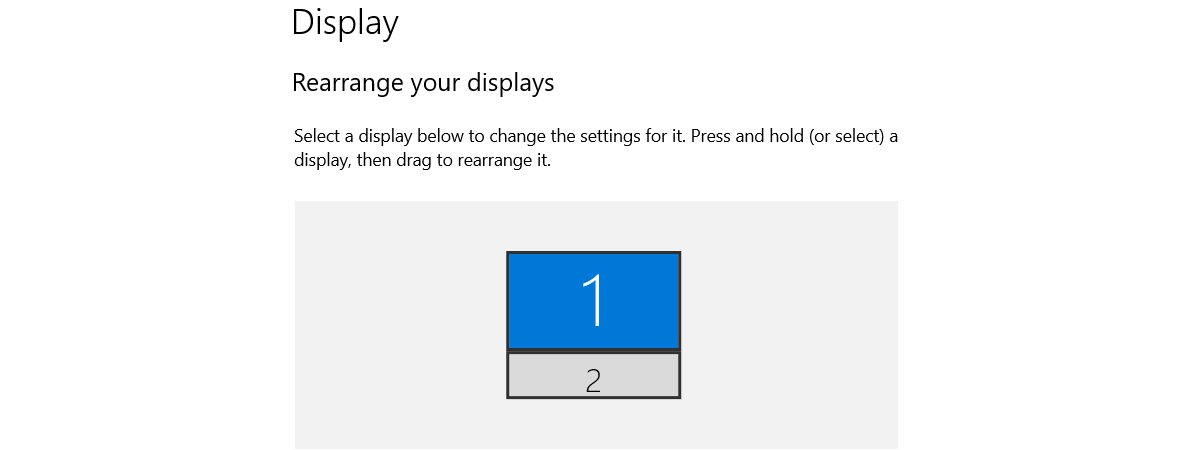
Discussion (0)
Be the first to comment.