In Windows 10, File Explorer has a ribbon interface with lots of tabs and options. The View tab is one of the most useful, as it gives you many different ways in which to browse and look at your files. You can make File Explorer show you different panes with different types of information, change the layout of your files and folders, sort them, hide them and so on. Here are ten ways in which you can browse your files in Windows 10, as an IT Professional:
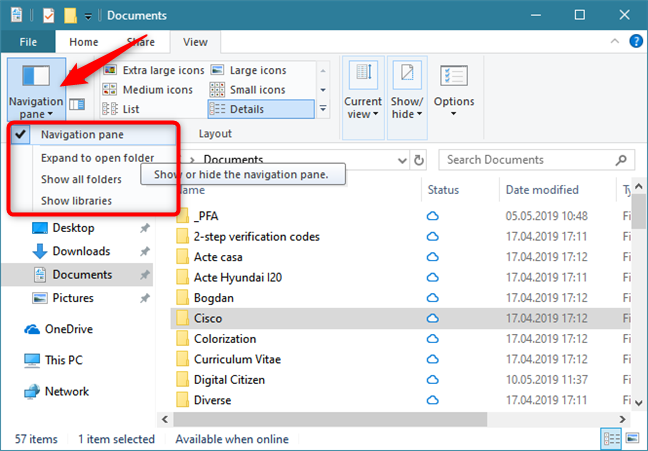
1. Show or hide the Navigation pane in File Explorer
One of the most useful tools in File Explorer is the navigation pane that is shown always on its left side. It offers the easiest and fastest way to browse through your files. However, not all people want to use it, and some old-school users who also saw the old Windows Explorer from Windows XP might want to hide it. To do that, click the View tab on the ribbon, and go to the Panes section of the ribbon toolbar. Click or tap the Navigation pane and then deselect the Navigation pane option to hide the navigation pane from view. To bring the Navigation pane back, perform the same action.
Showing the Navigation pane in File Explorer
Additionally, you can also choose to enable or disable a few other things about how the Navigation pane works:
Expand to open folder - Select this option to have your folders expand as you click/tap through them in the right pane. Deselect it to have the navigation pane folders remain compressed unless you click them individually.
Show all folders - Select this option to display all folders on your computer in a single group on the Navigation pane. Deselect this option to have a more concise folder view sorted into relevant sections like Quick Access, This PC, OneDrive, and Network.
2. See a preview of your selected file(s) in File Explorer
On the View tab, next to the Navigation pane button from the ribbon interface of File Explorer, there is a button called the Preview Pane. Clicking or tapping on it, opens an optional column on the right side of the File Explorer window. It displays a preview of any media files you select, which can be pretty useful at times.
Showing the Preview pane on the right side of File Explorer
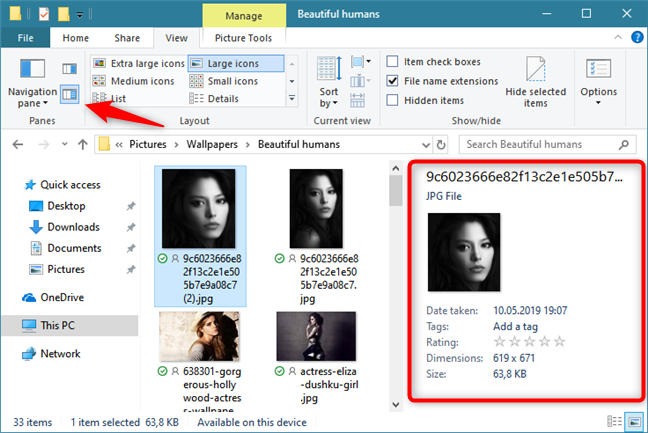
3. View detailed information about your selected file(s) in File Explorer
While the Preview pane looks good, it does not display detailed information about the selected file(s). If that is what you would like to see, click or tap the Details pane button from the View tab. This creates a pane that displays a preview of the file you select along with all of the selected file's metadata. You can even edit the metadata from this pane, by clicking on the available data fields and typing the new values.
Showing the Details pane on the right side of File Explorer
Unfortunately, you cannot have both the Preview and Details panes open at the same time. You can choose one or the other, or opt for neither of them to be displayed.
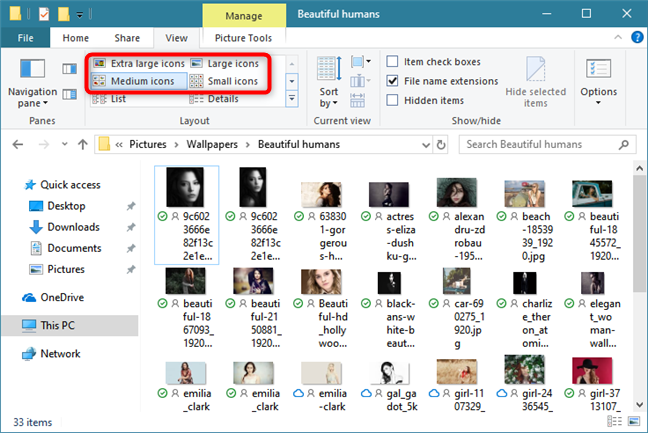
4. Display files as icons of different sizes, like tiles, as a list, or with details about their contents, in File Explorer
Some people like icons, some like tiles, and some prefer to see details about their files. File Explorer lets you look at your files just the way you want. All you have to do is select the way you prefer to look at them, in the Layout section of the View tab. Choose between extra large, large, medium, or small icons to display files and folders as icons of variable size with the file names shown below them. The smallest option only shows generic icons, while any of the larger options provide thumbnails of photos or videos that are found in the folder that you browse with File Explorer.
Choosing to display files as icons of various sizes
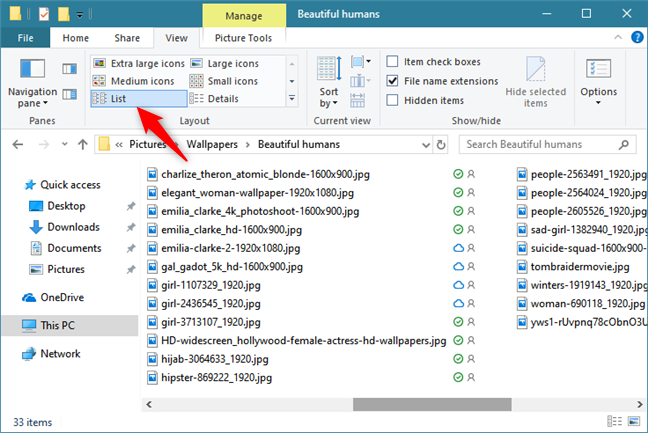
The List option provides a list of files and folders with a generic icon next to it. The list wraps into multiple columns.
Showing files and folders in a simple List
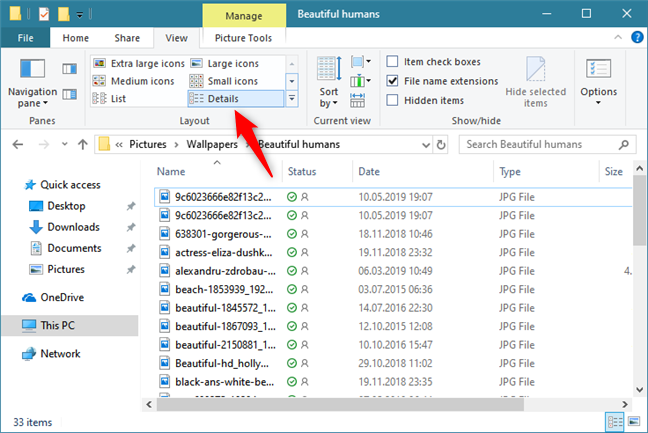
If you prefer Details, your files and folders are shown one after another, in a single column. However, you also get multiple additional columns to display more data about each file such as the date the file was last modified, the file size and the file type.
Viewing Details about files and folders, in File Explorer
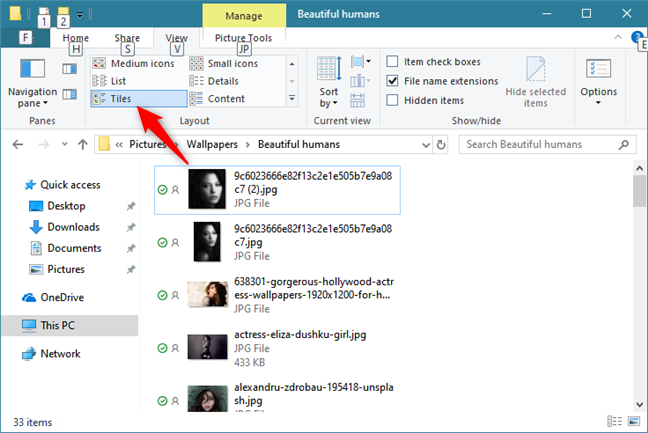
If you have grown accustomed to tiles, select Tile. This makes File Explorer show icons the same as you'd see with the Medium icon option, but it displays the full filename and file type to the right side of each icon.
Showing files as Tiles in File Explorer
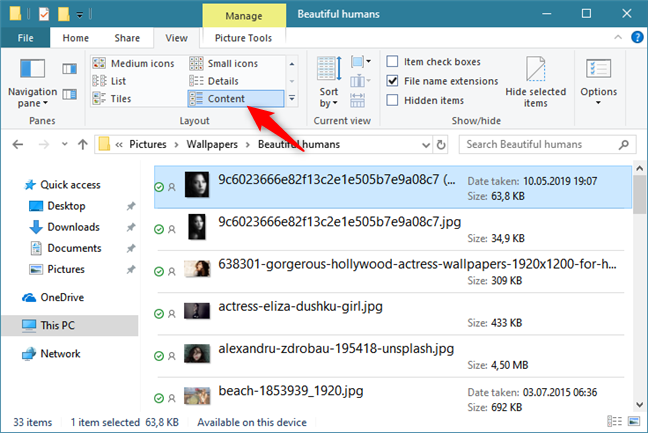
Finally, if you are a fan of details and want those details to automatically change depending on the type of files that you are looking at, choose Content. This option lists your files with medium-sized icons, but also provides a line of information about each file. It is technically all displayed in a single column, but each different type of file displays different information. For example, a video file displays the frame height and width of the file, while a music file displays the album title, genre, and length of the song.
Showing files with additional Content, in File Explorer
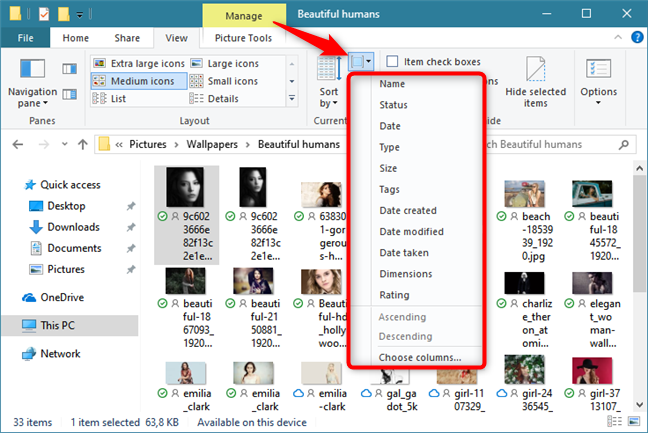
5. Use File Explorer to sort files and folders by different criteria
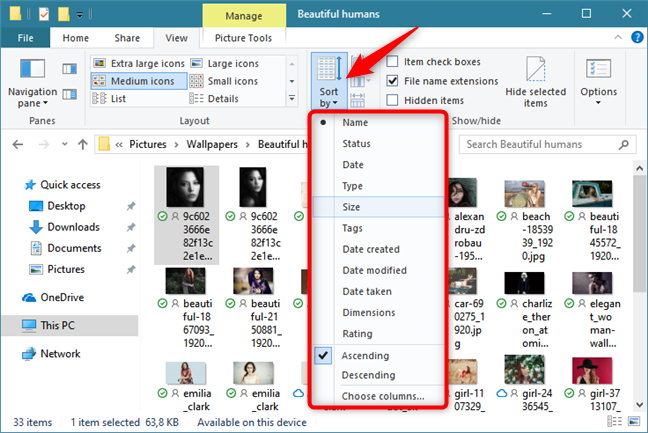
Finding what you are looking for is easier if your files and folders are sorted the right way. That is why File Explorer lets you sort them using different criteria. In the View tab, click or tap on Sort by and select an option such as Name or Type, to reorder files based on your chosen criteria. You can also select Descending or Ascending to reverse the order your files are listed in.
Sorting files in File Explorer
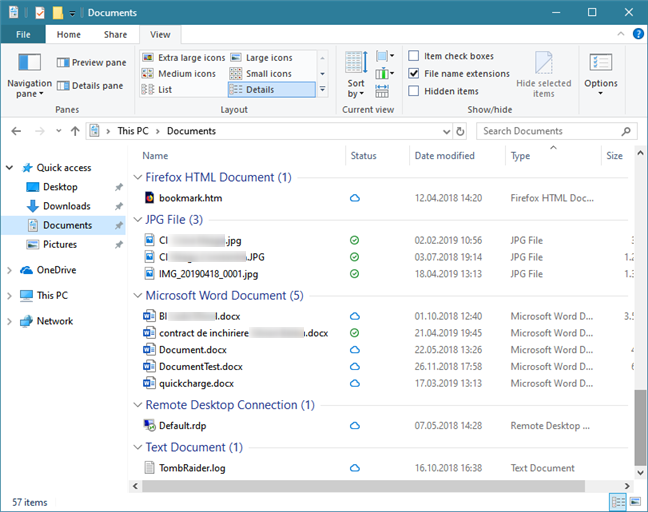
6. Use File Explorer to group files and folders using various criteria
Similarly to sorting, you can also group your files and folders to find the things that you are looking. In the View tab, click or tap on Group by to see the list of options that you can choose to group your files. By default, no grouping option is selected, and your files are all displayed in a single list. Selecting a group option breaks it up into logical sections.
Grouping items in File Explorer
For example, here is a folder grouped by Type. Notice that the list is broken into sections, depending on the types of files and folders that are found in the current folder.
An example of a folder with various types of files grouped by type
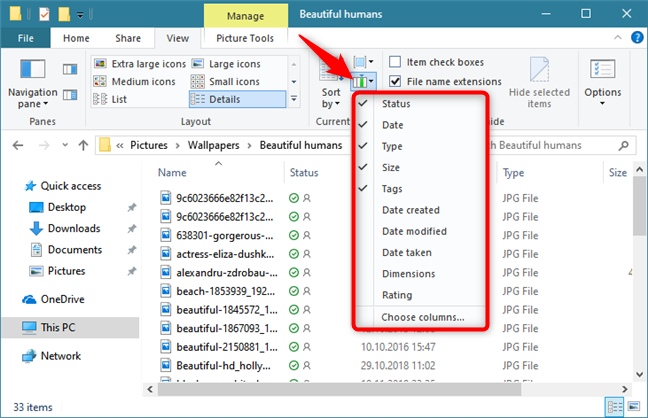
7. View more columns with additional information about your files and folders, in File Explorer
If you like the Details view, but you find that there is some information that you would like to see, but File Explorer does not display it, you might want to use the Add columns button from the View tab.
It is available only if the Details layout is selected, and it displays a list of optional columns you can select to display more information about your files. Click or tap a column name to add or remove it from view.
Adding more columns to the Details view of File Explorer
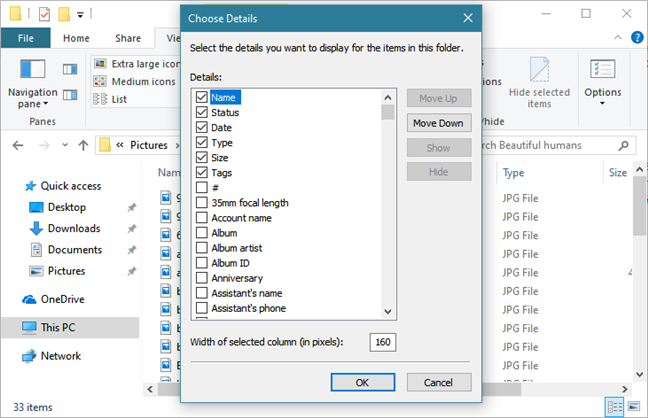
This list displays only the most commonly used columns, but there are tons more to choose from, that can display any metadata tag supported by Windows. Click or tap "Choose columns…" at the bottom of the list to open a dialog that contains all of these options. In this dialog, you can also change the default width at which columns are displayed.
Choosing what new columns to add to the Details view
After you choose what information to display in the columns, you might also want to click/tap on "Size all columns to fit." It resizes the columns active for the current view so that they fit into the File Explorer window, without having to scroll. Evidently, this button is available only if you selected the Details layout in File Explorer.
Automatic resizing of columns in File Explorer
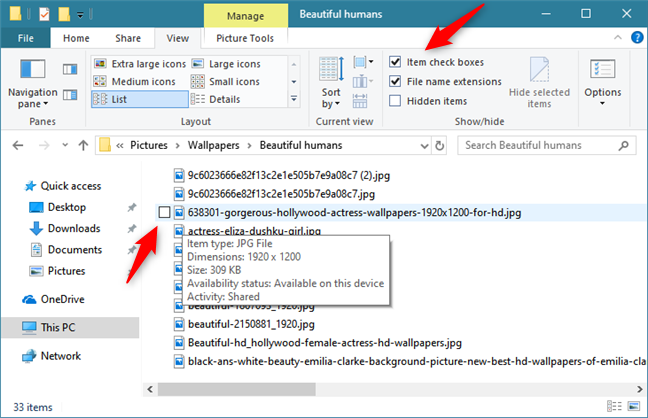
8. Add item checkboxes for selecting files and folders in File Explorer
If you are using a touchscreen, the easiest way to select items such as files or folders in File Explorer is to use item checkboxes. Enabling "Item check boxes" displays a checkbox next to each file or folder. On a laptop or desktop PC, you can see the checkboxes when you hover the mouse cursor over a file or folder, while on a touchscreen the boxes are displayed next to each file. You should also see a box displayed above the file list, that allows you to select all files in the current folder with a single tap or click. This option allows users to select multiple files without having to hold down additional keys or clicking and dragging.
Making File Explorer show item checkboxes
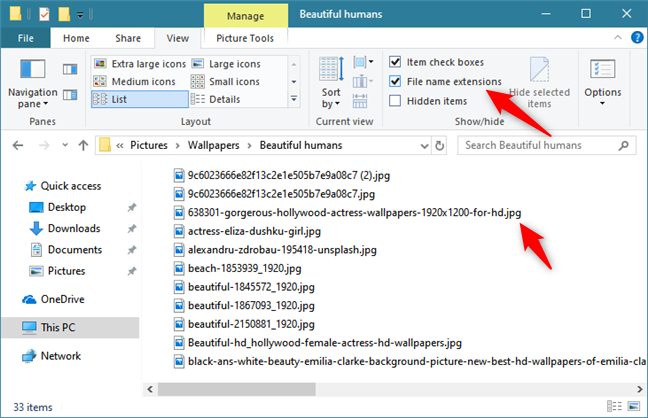
9. View file name extensions (.exe, .dll, .txt, etc.) in File Explorer
If you want to see exactly what format each file is at a glance, enable "File name extensions" in the View tab, to toggle whether or not to display file extensions at the end of file names.
Showing file extensions in File Explorer
This is a very useful option that makes it harder to be fooled by malware posing as legitimate files and documents.
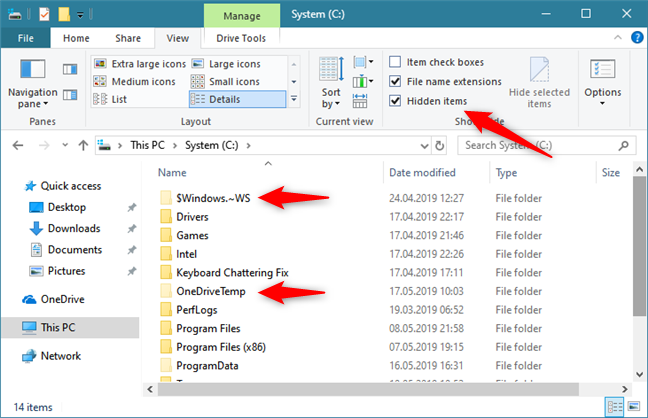
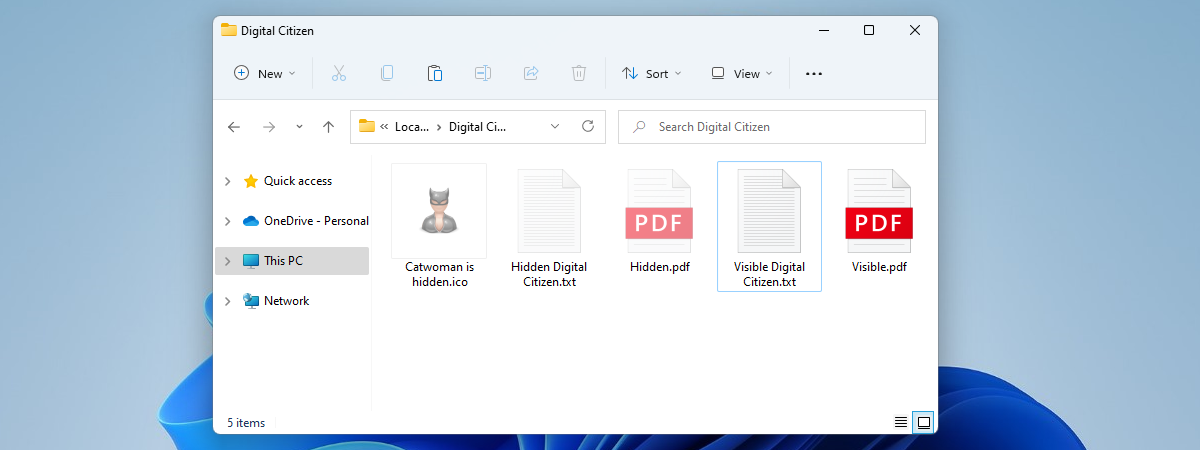
10. View hidden files in File Explorer
Both Windows and apps hide certain files from view because accidentally deleting them would cause issues and might stop things from running as they should. However, if you want to see the hidden files in File Explorer, you can. To show or hide them all, select or deselect the Hidden items option in the View tab. Hidden files and folders are displayed with washed out colors to alert you that they were once hidden from view.
Showing hidden files and folders in File Explorer
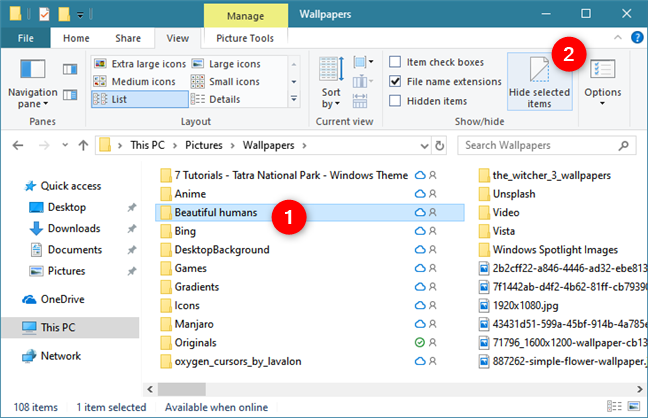
If you want to hide some of your files or folders, select them and then click or tap on Hide selected items to mark files and folders of your choosing as hidden. This is great for folders or files that contain sensitive information that you wouldn't want someone else to find.
Hiding files or folders in File Explorer
Did you change how File Explorer displays folders and files?
These are the main changes that you can perform in File Explorer about the way it shows your files and folders. There is something for everybody: different ways of displaying files, different sorting and grouping options, alternative methods to interact with files and folders, and so on. Hopefully, now you have a File Explorer that shows files and folders just as you like them. For even more ways of improving File Explorer, check this guide, and if you have questions, leave a comment below.


Discussion (1)
I can not see after reading all your settings in my view. Earlier I could see the pdf files and could scroll to read them. Now I cant. what to do.