

If you’re a gamer, it’s extremely likely that you’re using Steam to buy and play games on your computer. But did you hear about SteamCMD? Do you want to know what SteamCMD is, how to get it, and how to use it? In this guide, we’re explaining everything, showing you how to use SteamCMD to download a game server to which you and your friends can connect and play “friendly” multiplayer games. 🙂 Let’s begin:

 Download and save the steamcmd.zip file
Next, use File Explorer or any command-line environment you prefer to create a folder for SteamCMD on your computer. This is the folder where you’ll install SteamCMD. For example, I made a folder called SteamCMD on my E: drive as that’s where I keep all my games.
Download and save the steamcmd.zip file
Next, use File Explorer or any command-line environment you prefer to create a folder for SteamCMD on your computer. This is the folder where you’ll install SteamCMD. For example, I made a folder called SteamCMD on my E: drive as that’s where I keep all my games.
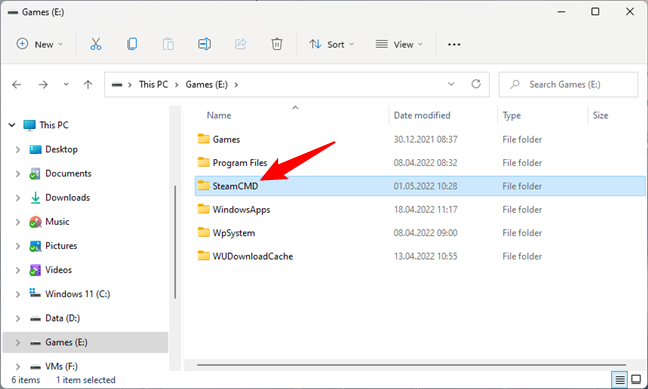
 Create a SteamCMD folder somewhere on your PC
Now, extract the content of the steamcmd.zip file to the SteamCMD folder you created.
Create a SteamCMD folder somewhere on your PC
Now, extract the content of the steamcmd.zip file to the SteamCMD folder you created.
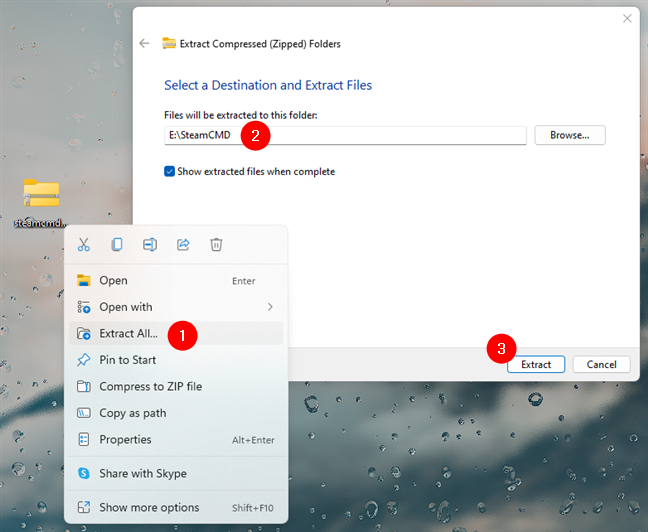
 Extract steamcmd.zip to the SteamCMD folder
That will give you an executable file called steamcmd.exe. Double-click or double-tap on it to run it.
Extract steamcmd.zip to the SteamCMD folder
That will give you an executable file called steamcmd.exe. Double-click or double-tap on it to run it.
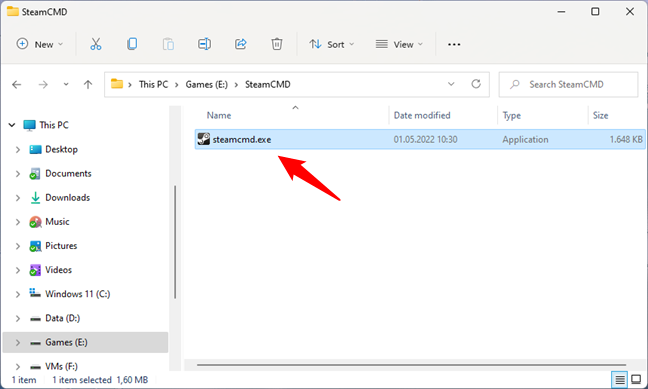 Run the steamcmd.exe file
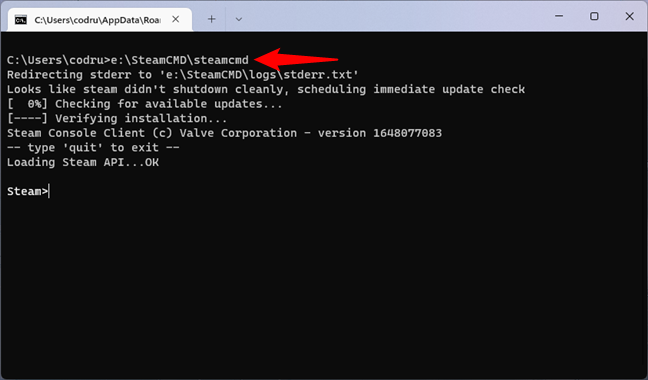
You can also open Command Prompt, navigate to the SteamCMD folder, and run the steamcmd command like this:
Run the steamcmd.exe file
You can also open Command Prompt, navigate to the SteamCMD folder, and run the steamcmd command like this:
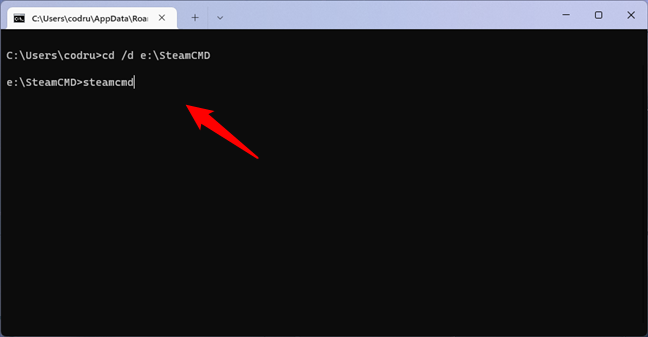
 Run steamcmd from the Command Prompt
Either way, the result will be that your PC executes the steamcmd command in Command Prompt, installing SteamCMD and downloading all its required files from Steam. Wait for a minute or two until it finishes its job queue. Then, you’ll see Steam instead of the current folder in Command Prompt.
Run steamcmd from the Command Prompt
Either way, the result will be that your PC executes the steamcmd command in Command Prompt, installing SteamCMD and downloading all its required files from Steam. Wait for a minute or two until it finishes its job queue. Then, you’ll see Steam instead of the current folder in Command Prompt.
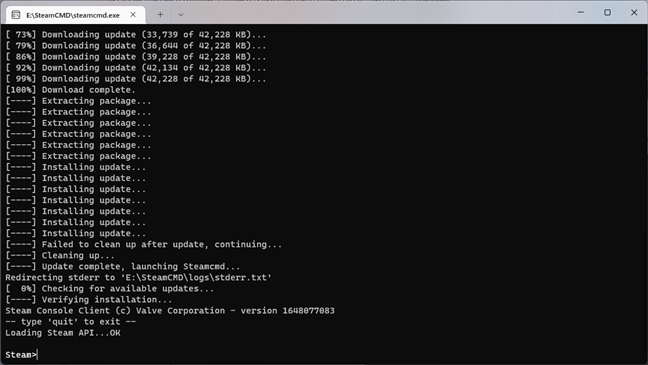
 Wait for SteamCMD to install on your PC
 How to run SteamCMD on Windows
 How to set the install folder for SteamCMD apps
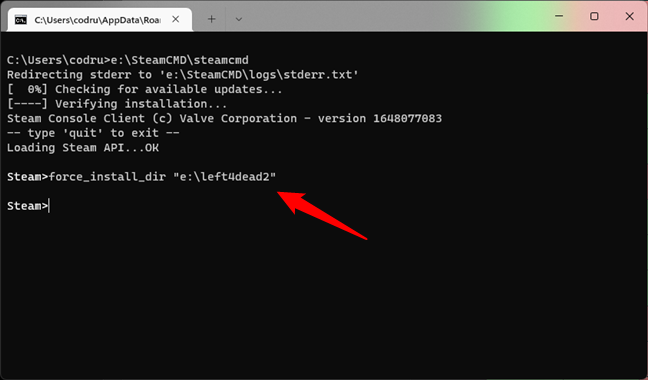
NOTE: The force_install_dir command from SteamCMD takes care of creating the specified folder too. You don’t need to create it beforehand.
Next, you need to log in using your Steam account. It’s only natural, as games are tied to your account, and you’ve paid money on them. 🙂 To sign in to your Steam account in SteamCMD, run the following command replacing [username] with the actual ID of your user account:
How to set the install folder for SteamCMD apps
NOTE: The force_install_dir command from SteamCMD takes care of creating the specified folder too. You don’t need to create it beforehand.
Next, you need to log in using your Steam account. It’s only natural, as games are tied to your account, and you’ve paid money on them. 🙂 To sign in to your Steam account in SteamCMD, run the following command replacing [username] with the actual ID of your user account:
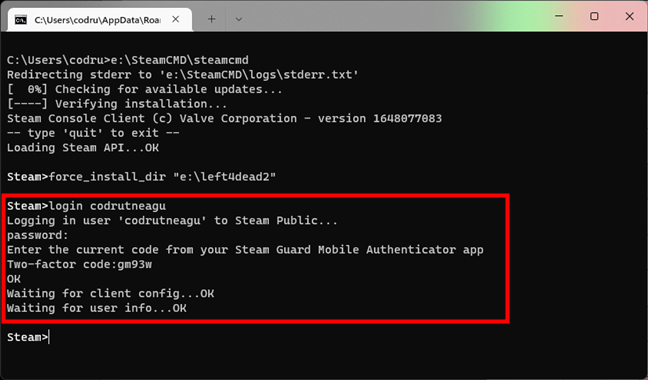 Log in with your Steam account
Now that you’re logged in, you can start installing game servers. However, to do that from SteamCMD, you’ll need to know the game’s Steam Application ID. To find out the ID, use a web browser to go to this webpage: Steam Dedicated Servers List. On it, look for the game you want. When you find it, copy or write down the game’s App ID. For example, Left 4 Dead 2 has the App ID 222860.
Log in with your Steam account
Now that you’re logged in, you can start installing game servers. However, to do that from SteamCMD, you’ll need to know the game’s Steam Application ID. To find out the ID, use a web browser to go to this webpage: Steam Dedicated Servers List. On it, look for the game you want. When you find it, copy or write down the game’s App ID. For example, Left 4 Dead 2 has the App ID 222860.
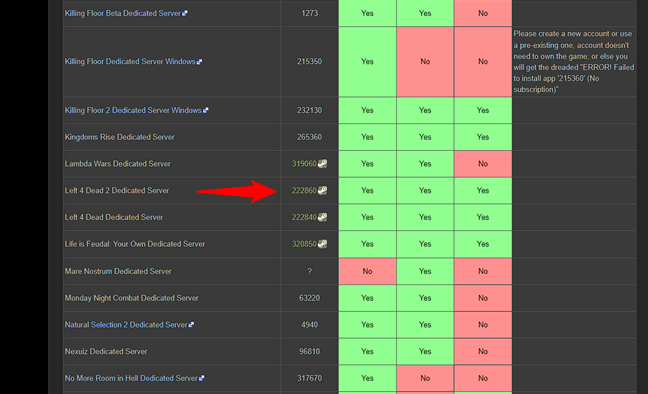
 Find the App ID of the game you want
Now go back to SteamCMD in Command Prompt. In it, run this command:
Find the App ID of the game you want
Now go back to SteamCMD in Command Prompt. In it, run this command:
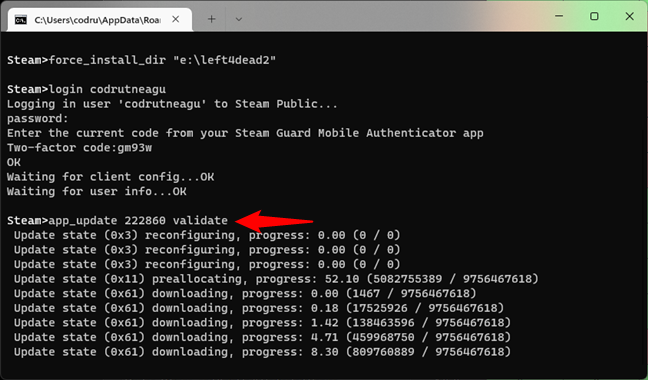 Install the game server files
Depending on how large the game you install is, this step will take a while, so arm yourself with patience. You’ll know the install progress if you monitor or check the download process from time to time in Command Prompt. When done, SteamCMD will send you a “Success!” message.
Install the game server files
Depending on how large the game you install is, this step will take a while, so arm yourself with patience. You’ll know the install progress if you monitor or check the download process from time to time in Command Prompt. When done, SteamCMD will send you a “Success!” message.
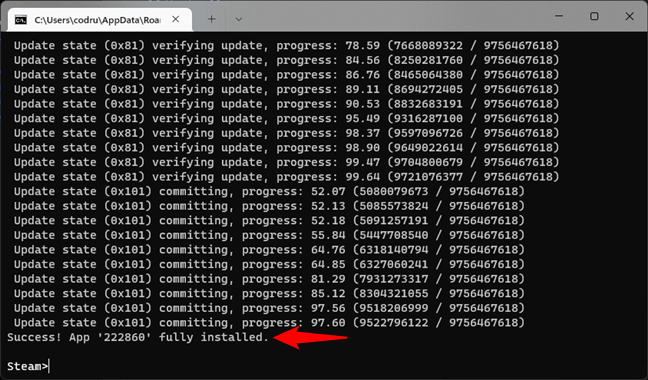 The game server files have been downloaded
TIP: Note that the validate parameter is not mandatory for the install command to run. Its purpose is to check that the game files downloaded are OK and nothing is lost along the way. However, you can leave it out if you don’t want that.
Last but not least, once the game files have all been downloaded and the process was ended, type:
The game server files have been downloaded
TIP: Note that the validate parameter is not mandatory for the install command to run. Its purpose is to check that the game files downloaded are OK and nothing is lost along the way. However, you can leave it out if you don’t want that.
Last but not least, once the game files have all been downloaded and the process was ended, type:
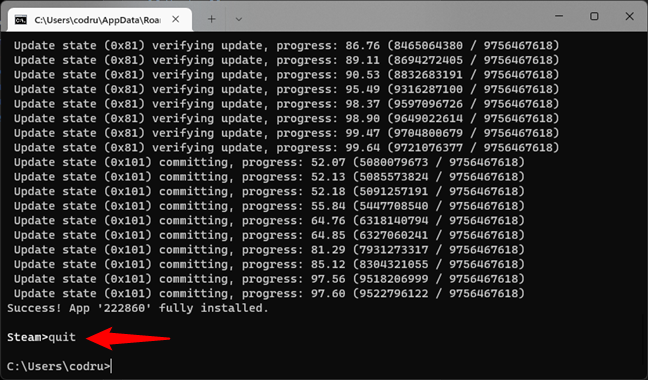 Quit SteamCMD
Next, you can start your game server and configure it as you please, following the directions available on that game’s support page. Unfortunately, we can’t show you how to do that because every game has a different procedure for running servers. However, you usually can do that either by running an executable file from the game server folder or by using the console from the game, after you start that game.
For example, in the case of Left 4 Dead 2, the game I used to showcase the steps in this guide, in the l4d2 folder where I chose to download the files with SteamCMD, there’s an executable called srcds.exe. This file is made by Valve, and you’ll often find it in the Steam game server folders that you installed with SteamCMD. Running it allows you to easily set up a server to which your friends and other people can connect via internet or local network connection.
Quit SteamCMD
Next, you can start your game server and configure it as you please, following the directions available on that game’s support page. Unfortunately, we can’t show you how to do that because every game has a different procedure for running servers. However, you usually can do that either by running an executable file from the game server folder or by using the console from the game, after you start that game.
For example, in the case of Left 4 Dead 2, the game I used to showcase the steps in this guide, in the l4d2 folder where I chose to download the files with SteamCMD, there’s an executable called srcds.exe. This file is made by Valve, and you’ll often find it in the Steam game server folders that you installed with SteamCMD. Running it allows you to easily set up a server to which your friends and other people can connect via internet or local network connection.
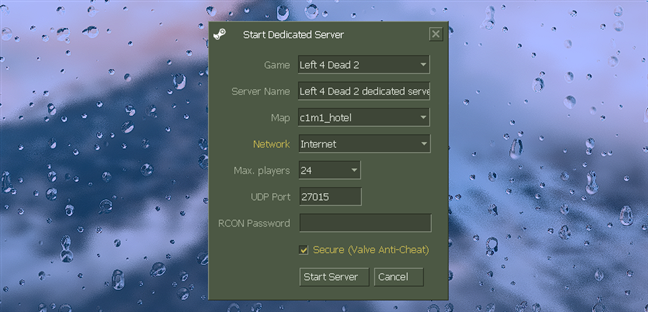
 Start Dedicated Server in Windows
 How to uninstall a game server
 How to uninstall SteamCMD from Windows
SteamCMD is not installed like a regular app or program in Windows. It’s just a folder with binaries (executables and other types of files), and it’s not registered by the operating system in the Apps and features list or in Control Panel’s Programs and Features.
How to uninstall SteamCMD from Windows
SteamCMD is not installed like a regular app or program in Windows. It’s just a folder with binaries (executables and other types of files), and it’s not registered by the operating system in the Apps and features list or in Control Panel’s Programs and Features.
What is SteamCMD?
SteamCMD is a console version of the Steam client app available for Windows and Linux that runs from the command line only. While this is the shortest SteamCMD definition we can give you, the truth is that SteamCMD is a rather complex tool that allows you to download and install game servers from the command line as long as they’re supported by Steam. Here’s how it all works:How to get SteamCMD
SteamCMD is a tool that you must download from Steam and install on your computer in order to be able to use it. Thus, the first step in getting SteamCMD on your Windows computer is to download it. To do that, use your favorite web browser to click or tap on this link: Download SteamCMD. What you’ll get is a ZIP file called steamcmd.zip: save it somewhere on your PC.cd /d e:\SteamCMD
steamcmd
How to run SteamCMD
Before we move on to showing you how to use SteamCMD, let’s see how to start SteamCMD whenever you want. As you might suspect, that’s done from the command line. Open Command Prompt and run the following command, adjusting it to your environment (replace the drive letter and the folder path with the ones where you installed SteamCMD):e:\SteamCMD\steamcmd
How to use SteamCMD to install a game server
As you know now, the main purpose of SteamCMD is to allow you to set up game servers. Let’s see how: Start SteamCMD in Command Prompt like we’ve shown you earlier. Then, you’ll need to set the folder where the game server’s files will be installed. The SteamCMD command to create and set the install folder is this:force_install_dir [path]
For example, I wanted to install Left 4 Dead 2 from SteamCMD. In order to do that, I had to create and set a folder with an appropriate name - left4dead2- on my E: drive. The command I needed to run is:
force_install_dir “e:\left4dead2”
login [username]
SteamCMD will ask you for your password, and if you’ve enabled 2FA, you’ll also have to enter a two-factor code. If everything’s OK, SteamCMD will let you know.
app_update [App ID] validate
Replace [App ID] with the Steam Application ID of the game you want. In my case, to install Left 4 Dead 2, whose ID is 222860, I have to run the command:
app_update 222860 validate
quit
… to exit SteamCMD and disconnect from Steam safely.
How to remove a game server
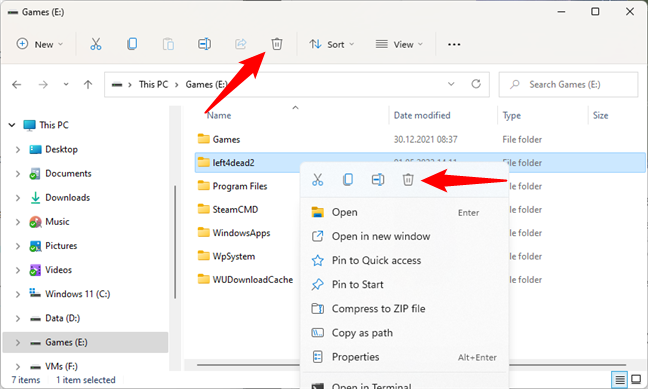
Now the question is “How do you delete a game server?” that you’ve installed using SteamCMD. The answer couldn’t be simpler: just delete its folder. There’s nothing else you have to do, really, except make sure that you’ve closed the server and SteamCMD beforehand. For example, if I wanted to uninstall the Left 4 Dead 2 server, all I need to do is delete the l4d2 folder where I downloaded the game server files earlier with SteamCMD.How to uninstall SteamCMD
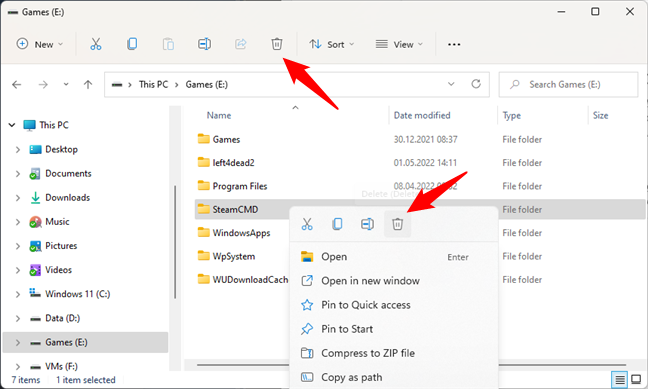
And what if you want to get rid of SteamCMD completely? How do you uninstall SteamCMD from your Windows PC? Just like for game servers, there’s nothing special you need to do to remove SteamCMD from your PC. Just open File Explorer and navigate to SteamCMD’s location and delete it from your computer.
Discussion (0)
Be the first to comment.