


In Windows 11, Microsoft offers an improved Snipping Tool app that promises to be better than previous versions. It’s a simple application that many people are familiar with already, yet some of its new features are worth looking into. That’s why, in this tutorial, I decided to show you how to screenshot on Windows 11, as well as record your screen with the Snipping Tool app:
 How to open the Snipping Tool in Windows 11 using Search
Another, even faster way to start taking a screenshot with Snipping Tool is by using the keyboard shortcut:
How to open the Snipping Tool in Windows 11 using Search
Another, even faster way to start taking a screenshot with Snipping Tool is by using the keyboard shortcut:

 The keyboard shortcut for Snipping Tool in Windows 11
However, this does not show you the Snipping Tool window. Instead, it dims the screen and lets you directly select what you want to screenshot.
The keyboard shortcut for Snipping Tool in Windows 11
However, this does not show you the Snipping Tool window. Instead, it dims the screen and lets you directly select what you want to screenshot.

 The fastest way to start Snipping Tool is to use its keyboard shortcut
Next, let’s see what the Snipping Tool in Windows 11 looks like and how it works:
The fastest way to start Snipping Tool is to use its keyboard shortcut
Next, let’s see what the Snipping Tool in Windows 11 looks like and how it works:
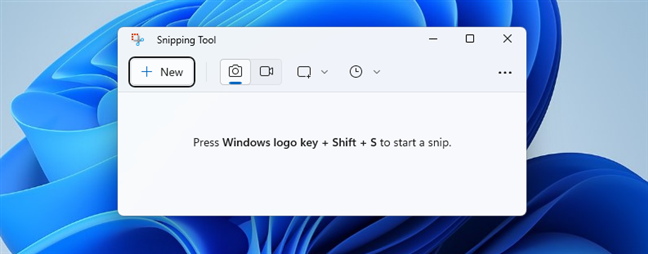
 The Snipping Tool app
As you can see, it’s a relatively small window with only a few buttons and little information. However, this simple interface cleverly hides various screenshotting and video recording options, as well as other complementary features.
First of all, the Snipping Tool’s menu gives you the + New button. Clicking or tapping on it initiates the screenshotting process. You can also start it by using the keyboard shortcut we mentioned earlier: Windows logo key + Shift + S. But, before taking your first Windows 11 screenshot, you should understand what screen capture Modes are available.
The Snipping Tool app
As you can see, it’s a relatively small window with only a few buttons and little information. However, this simple interface cleverly hides various screenshotting and video recording options, as well as other complementary features.
First of all, the Snipping Tool’s menu gives you the + New button. Clicking or tapping on it initiates the screenshotting process. You can also start it by using the keyboard shortcut we mentioned earlier: Windows logo key + Shift + S. But, before taking your first Windows 11 screenshot, you should understand what screen capture Modes are available.
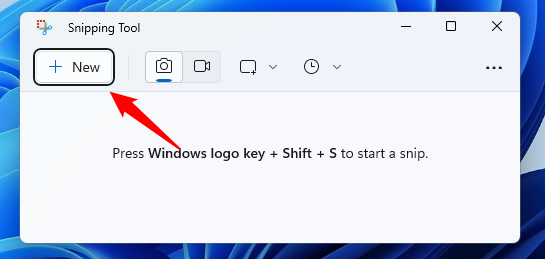
 The New button from Snipping Tool
Next to the + New button, there’s a switch with two modes:
The New button from Snipping Tool
Next to the + New button, there’s a switch with two modes:
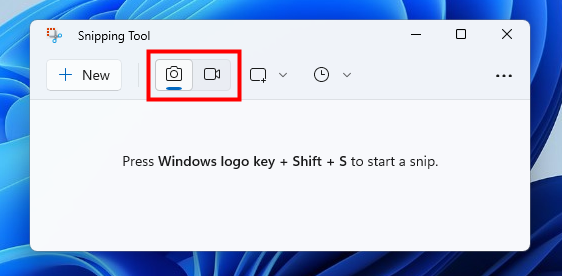
 The switch for Snip and Record
Let’s see how each of them works:
The switch for Snip and Record
Let’s see how each of them works:
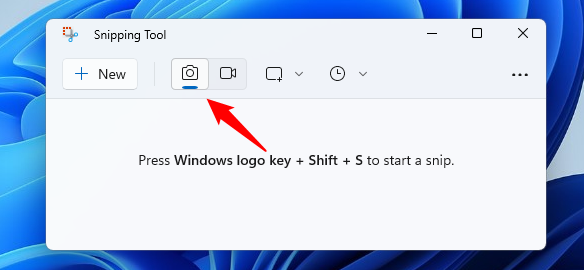
 Choose Snip in Snipping Tool to take screenshots
Then, look to the right of the Snip/Record switch, and you should see the screenshot type currently set in Snipping Tool. By default, it’s the Rectangle mode.
Choose Snip in Snipping Tool to take screenshots
Then, look to the right of the Snip/Record switch, and you should see the screenshot type currently set in Snipping Tool. By default, it’s the Rectangle mode.
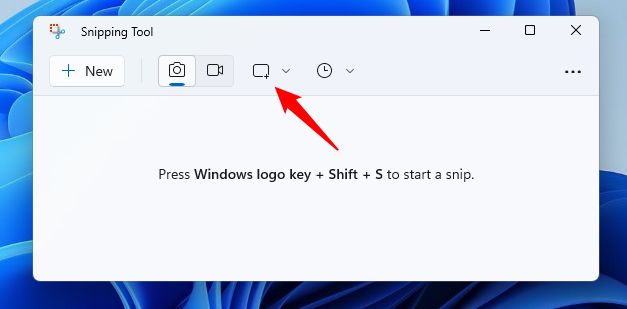
 The Snipping mode button from Windows 11's Snipping Tool
If you click or tap on the Snipping mode button, Windows 11’s Snipping Tool shows you a list of four different screenshot modes:
The Snipping mode button from Windows 11's Snipping Tool
If you click or tap on the Snipping mode button, Windows 11’s Snipping Tool shows you a list of four different screenshot modes:
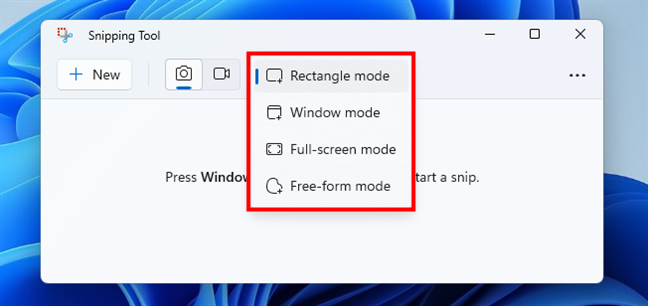
 Screenshot modes in Snipping Tool
When you’re ready to take a screenshot in Windows 11, either press the + New button from the Snipping Tool window or use the Win + Shift + S keyboard shortcut. Then, your entire screen dims, and a small menu shows up at the top-center of the screen. There, you can switch between the four screenshotting options.
Screenshot modes in Snipping Tool
When you’re ready to take a screenshot in Windows 11, either press the + New button from the Snipping Tool window or use the Win + Shift + S keyboard shortcut. Then, your entire screen dims, and a small menu shows up at the top-center of the screen. There, you can switch between the four screenshotting options.
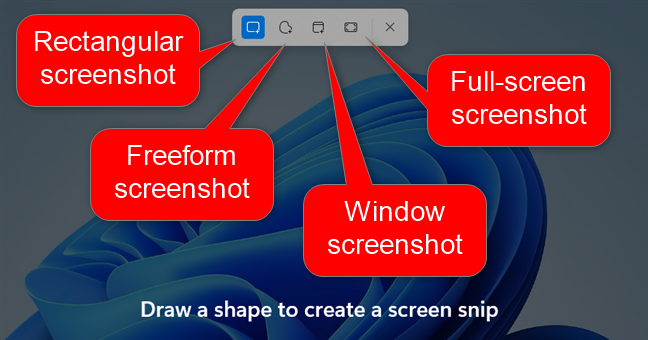
 Snip options for taking a screenshot
After choosing the type of screenshot you want, select the area you want to capture with your mouse or using touch. For example, in the image below, you can see what taking a freeform screenshot in Windows 11 looks like.
Snip options for taking a screenshot
After choosing the type of screenshot you want, select the area you want to capture with your mouse or using touch. For example, in the image below, you can see what taking a freeform screenshot in Windows 11 looks like.
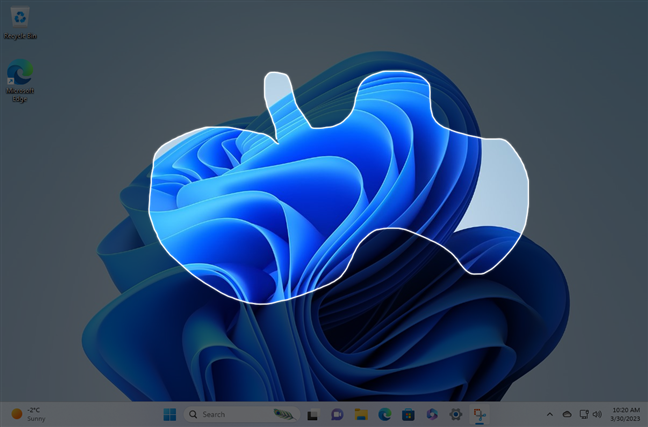 Capturing a free-form screenshot with Snipping Tool
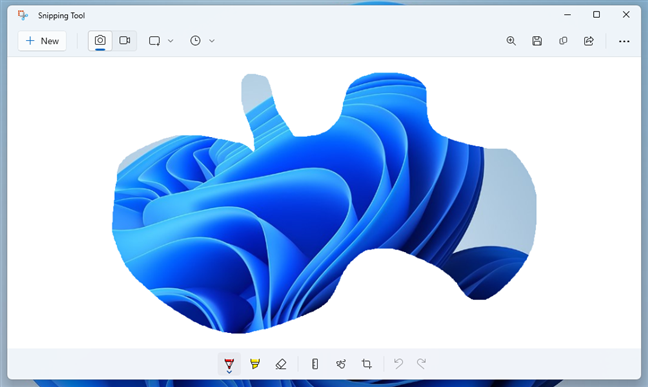
When you finish taking a screenshot, the Snipping Tool loads it in its window and allows you to start editing it.
Capturing a free-form screenshot with Snipping Tool
When you finish taking a screenshot, the Snipping Tool loads it in its window and allows you to start editing it.
 Editing a screenshot taken with the Snipping Tool
The Snipping Tool makes it easy and fast to edit and annotate your screenshot immediately after you take it. As you can see in the following image, you get all the basics you need for editing at the bottom of the window:
Editing a screenshot taken with the Snipping Tool
The Snipping Tool makes it easy and fast to edit and annotate your screenshot immediately after you take it. As you can see in the following image, you get all the basics you need for editing at the bottom of the window:
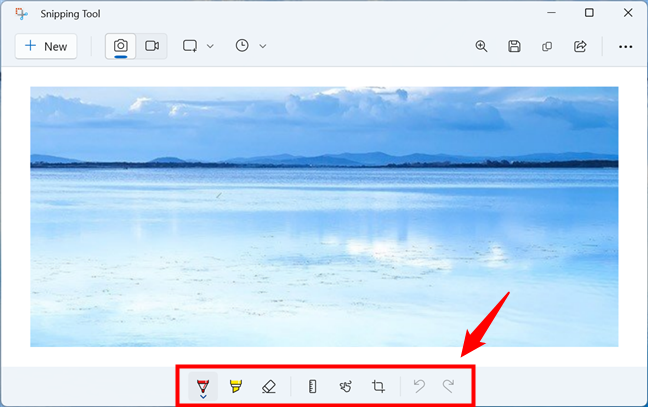
 The editing options are at the bottom of the window
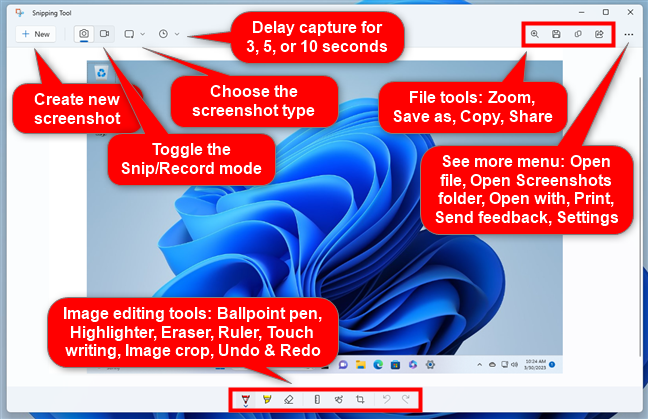
To help you understand the editing interface of Windows 11’s Snipping Tool, here’s an overview of all the options available:
The editing options are at the bottom of the window
To help you understand the editing interface of Windows 11’s Snipping Tool, here’s an overview of all the options available:
 The image editing interface of Snipping Tool
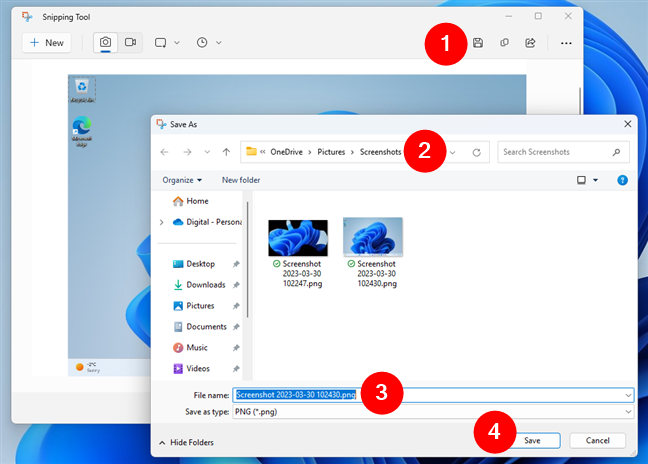
After taking a screenshot and editing it, you probably want to save it somewhere on your Windows 11 PC. To do so, click or tap the Save as button from the Snipping Tool app, select a location to save the screenshot, choose a name for it if you want, and press Save.
The image editing interface of Snipping Tool
After taking a screenshot and editing it, you probably want to save it somewhere on your Windows 11 PC. To do so, click or tap the Save as button from the Snipping Tool app, select a location to save the screenshot, choose a name for it if you want, and press Save.
 Saving a screenshot from the Snipping Tool
TIP: When you take a screenshot with the Snipping Tool, it is also automatically copied into your clipboard, so you can simply and quickly paste it into any app or image editor you want.
Saving a screenshot from the Snipping Tool
TIP: When you take a screenshot with the Snipping Tool, it is also automatically copied into your clipboard, so you can simply and quickly paste it into any app or image editor you want.
 The screen Recording button in Snipping Tool
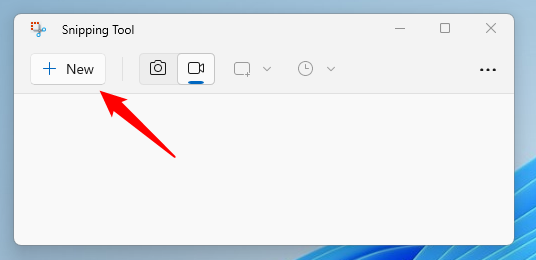
Next, click or tap the + New button in the top-left corner of the Snipping Tool window.
The screen Recording button in Snipping Tool
Next, click or tap the + New button in the top-left corner of the Snipping Tool window.
 Starting a screen recording in Snipping Tool
NOTE: These are mandatory steps you need to follow in order to record your screen with Snipping Tool. You can’t use the Windows + Shift + S keyboard shortcut to start recording the screen.
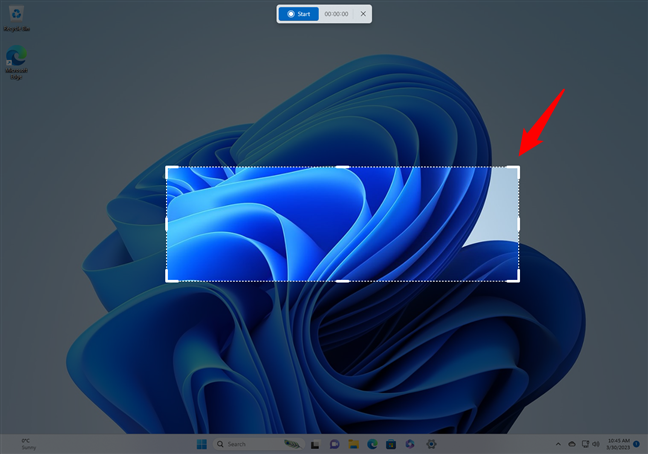
Once you’ve pressed the + New button, the Snipping Tool grays out the entire screen, and you need to use your mouse or touch to draw a rectangular recording area.
Starting a screen recording in Snipping Tool
NOTE: These are mandatory steps you need to follow in order to record your screen with Snipping Tool. You can’t use the Windows + Shift + S keyboard shortcut to start recording the screen.
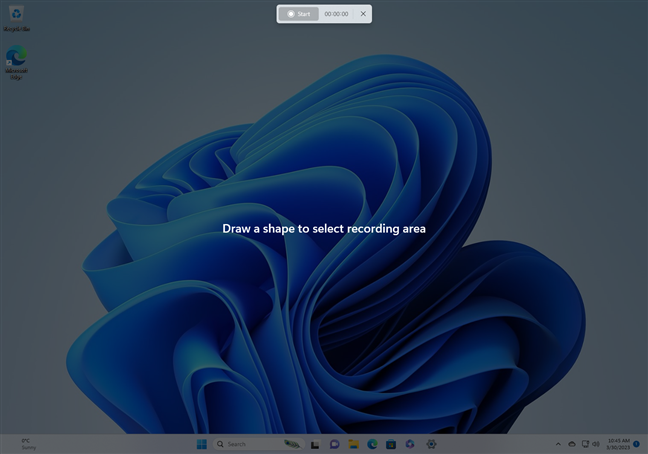
Once you’ve pressed the + New button, the Snipping Tool grays out the entire screen, and you need to use your mouse or touch to draw a rectangular recording area.
 Draw a rectangular recording area on the screen
If you want to adjust the recording area in detail, you can then drag its corners or edges, as well as drag it anywhere on the screen.
Draw a rectangular recording area on the screen
If you want to adjust the recording area in detail, you can then drag its corners or edges, as well as drag it anywhere on the screen.
 Adjust the positioning and size of the screen recording
Once you’re satisfied with the recording area set, click or tap the Start button shown at the top of the screen.
Adjust the positioning and size of the screen recording
Once you’re satisfied with the recording area set, click or tap the Start button shown at the top of the screen.
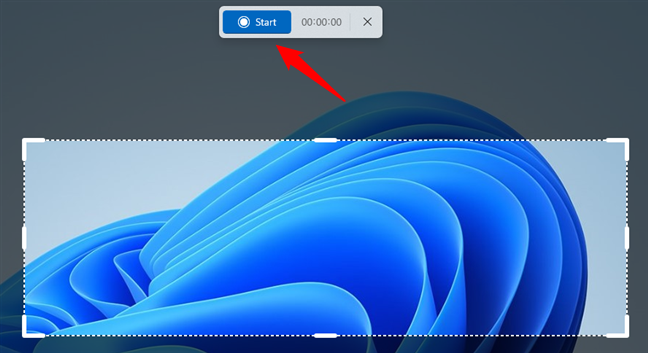
 Start a screen recording with Snipping Tool
After three seconds, the Snipping Tool starts recording the area you’ve selected on your screen. While recording, a red border surrounds that area, and a timer starts counting at the top of the screen. During this time, you should perform the actions you want to record.
Start a screen recording with Snipping Tool
After three seconds, the Snipping Tool starts recording the area you’ve selected on your screen. While recording, a red border surrounds that area, and a timer starts counting at the top of the screen. During this time, you should perform the actions you want to record.
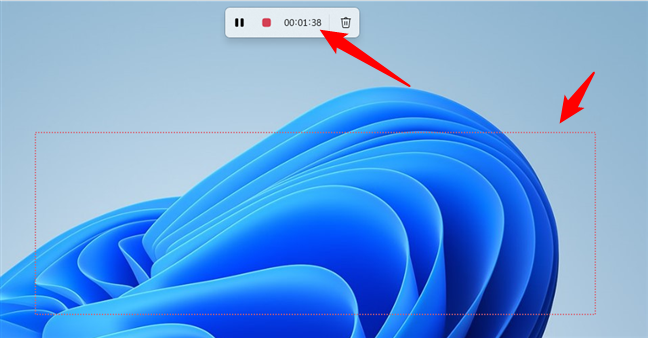
 Snipping Tool recording the screen
Left and right of the timer shown at the top of your screen, you also find a couple of buttons:
Snipping Tool recording the screen
Left and right of the timer shown at the top of your screen, you also find a couple of buttons:
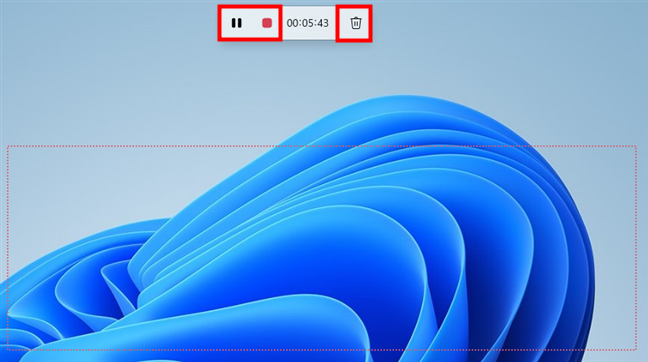
 Options available during a screen recording
When you end a recording by pressing the Stop button, the Snipping Tool opens its main window and automatically loads the video with the screen recording.
Options available during a screen recording
When you end a recording by pressing the Stop button, the Snipping Tool opens its main window and automatically loads the video with the screen recording.

 A screen recording made with Snipping Tool
Snipping Tool doesn’t offer any editing tools for videos (like it does for screenshots), and you can’t zoom them either. All you can do is play the recording to see the final result.
A screen recording made with Snipping Tool
Snipping Tool doesn’t offer any editing tools for videos (like it does for screenshots), and you can’t zoom them either. All you can do is play the recording to see the final result.
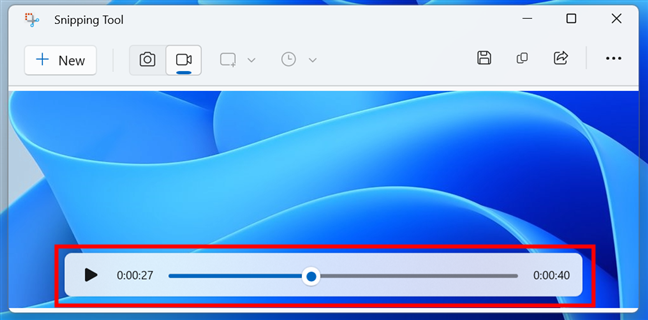
 Snipping Tool only lets you play screen recordings
However, just like for screenshots, you have the options to save, copy, and share the screen recording you just made.
Snipping Tool only lets you play screen recordings
However, just like for screenshots, you have the options to save, copy, and share the screen recording you just made.
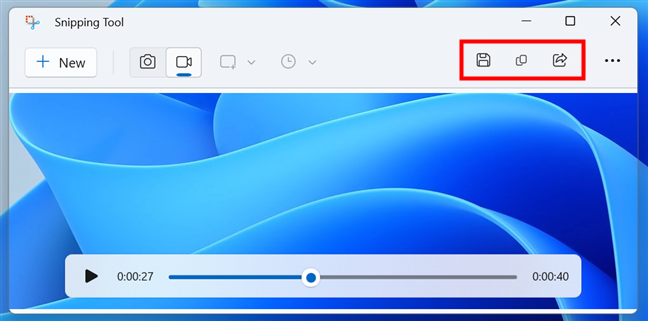
 Options to save, copy, and share a screen recording
It’s worth noting that Snipping Tool saves screen recordings as MP4 files.
Options to save, copy, and share a screen recording
It’s worth noting that Snipping Tool saves screen recordings as MP4 files.
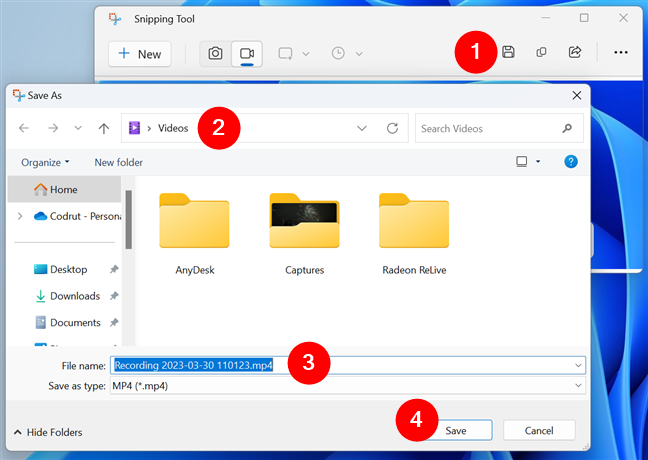
 Screen recordings are saved as MP4 files
And… that’s about all there is to say about the screen recording feature offered by the Snipping Tool in Windows 11. However, we still have to cover the Settings part of this small and useful app:
Screen recordings are saved as MP4 files
And… that’s about all there is to say about the screen recording feature offered by the Snipping Tool in Windows 11. However, we still have to cover the Settings part of this small and useful app:
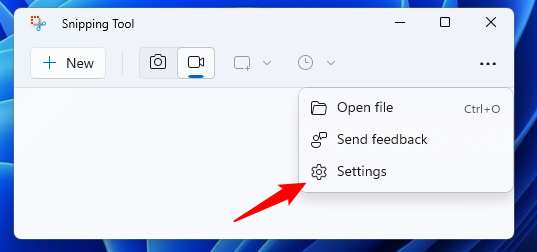
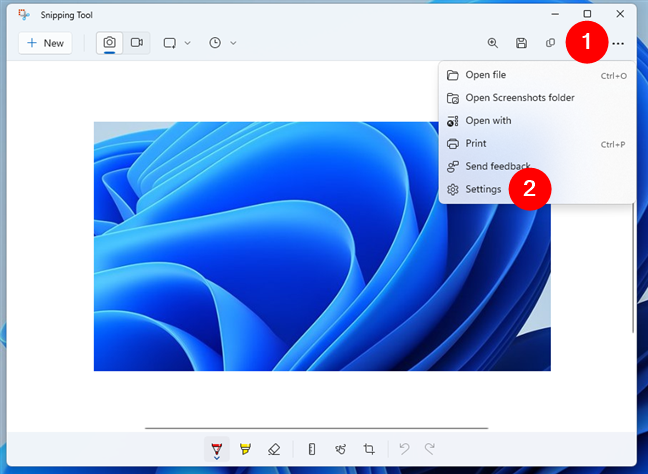
 Opening Snipping Tool's Settings
You can open the same menu and access the Settings even if you already have a screenshot or a screen recording loaded in the Snipping Tool window.
Opening Snipping Tool's Settings
You can open the same menu and access the Settings even if you already have a screenshot or a screen recording loaded in the Snipping Tool window.
 How to open Snipping Tool's Settings when editing a screenshot
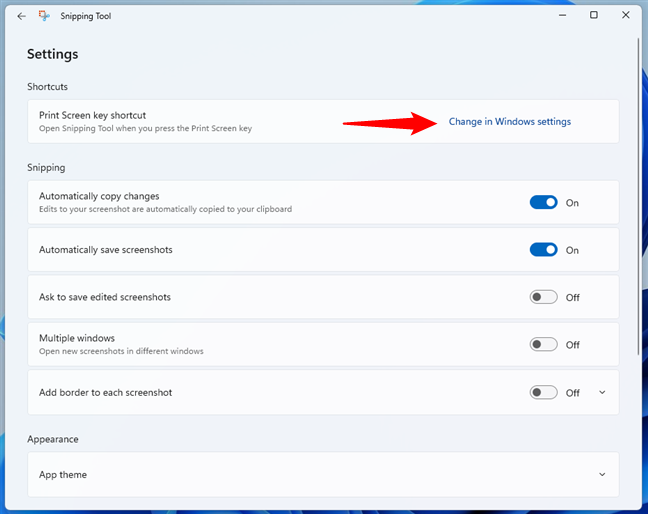
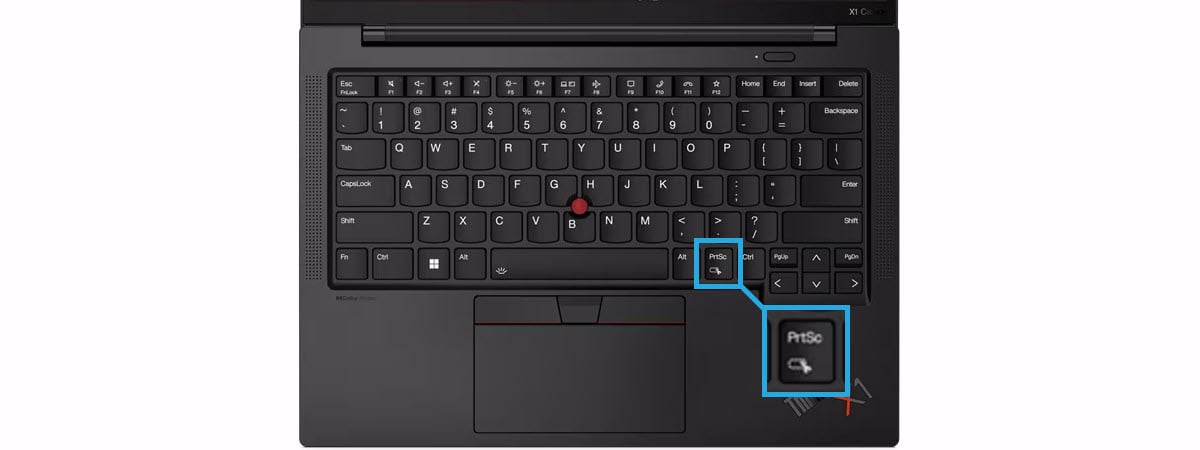
The first thing you find inside Snipping Tool’s Settings is the Shortcuts section. By default, it tells you that you can use the PrtScn (Print Screen) key to open Snipping Tool. While it’s not enabled by default, if you want to use it, click or tap on “Change in Windows settings.”
How to open Snipping Tool's Settings when editing a screenshot
The first thing you find inside Snipping Tool’s Settings is the Shortcuts section. By default, it tells you that you can use the PrtScn (Print Screen) key to open Snipping Tool. While it’s not enabled by default, if you want to use it, click or tap on “Change in Windows settings.”
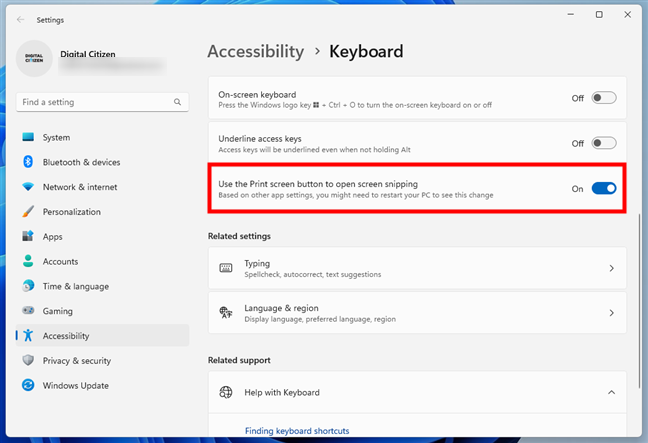
 The Print Screen key is used by default to open Snipping Tool
This opens the Settings app and takes you to the Accessibility > Keyboard section, where you can enable the “Use the Print screen button to open screen snipping” switch.
The Print Screen key is used by default to open Snipping Tool
This opens the Settings app and takes you to the Accessibility > Keyboard section, where you can enable the “Use the Print screen button to open screen snipping” switch.
 Enable or disable PrtScn for Snipping Tool
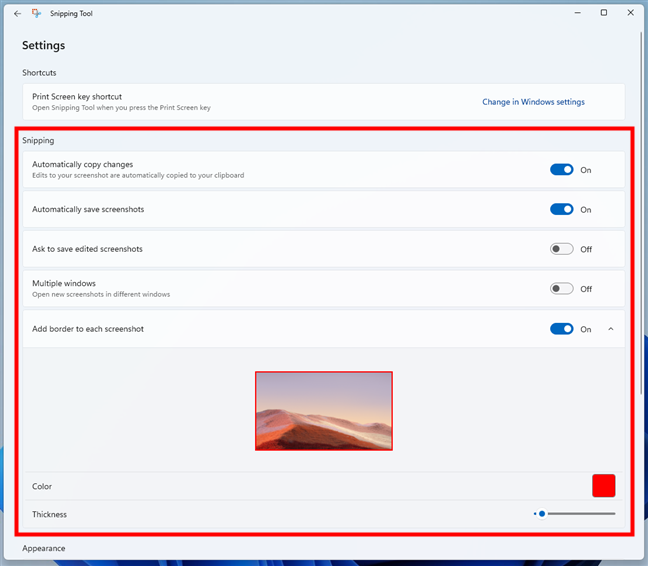
Going back to the Snipping Tool Settings, the next section is all about Snipping options. Depending on how you want the app to work, you can enable or disable the following switches:
Enable or disable PrtScn for Snipping Tool
Going back to the Snipping Tool Settings, the next section is all about Snipping options. Depending on how you want the app to work, you can enable or disable the following switches:
 Snipping settings available in Windows 11's Snipping Tool
The final Snipping Tool setting you can change is its Appearance. The App theme setting allows you to choose whether you want the Snipping Tool to use Windows 11’s Light or Dark mode, or Use system setting to match the operating system’s main style.
Snipping settings available in Windows 11's Snipping Tool
The final Snipping Tool setting you can change is its Appearance. The App theme setting allows you to choose whether you want the Snipping Tool to use Windows 11’s Light or Dark mode, or Use system setting to match the operating system’s main style.
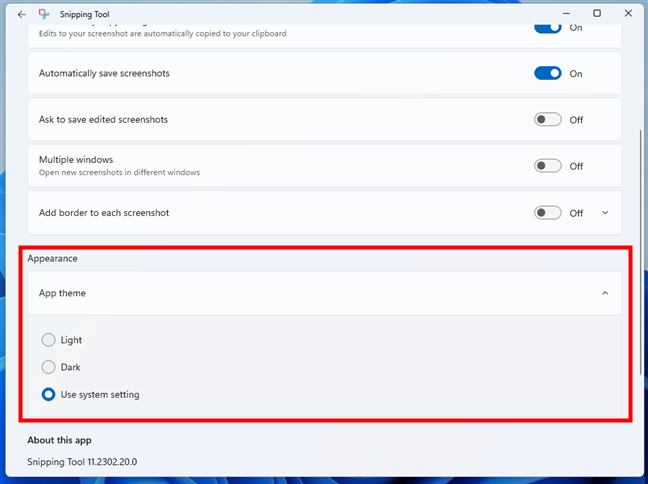
 The appearance settings for Windows 11's Snipping tool
These are all the settings available for the Snipping Tool in Windows 11. Try them out and have fun!
The appearance settings for Windows 11's Snipping tool
These are all the settings available for the Snipping Tool in Windows 11. Try them out and have fun!
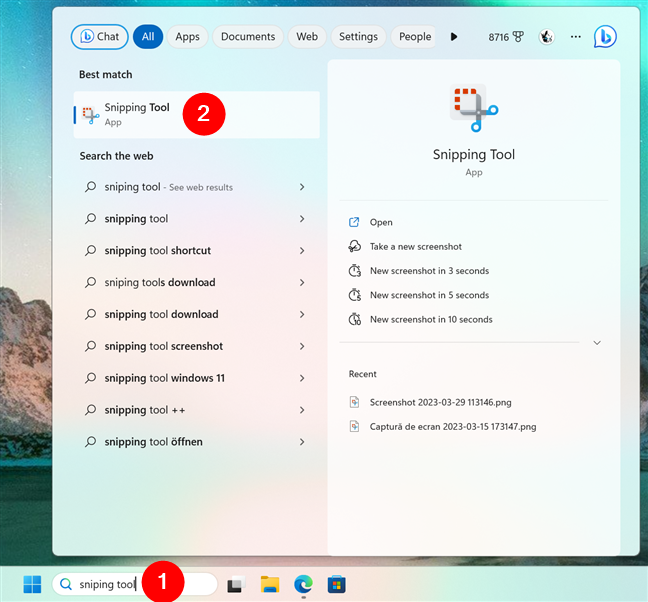
How to open the Snipping Tool in Windows 11
There are many ways to open the Snipping Tool in Windows 11, and if you want to see them all, you should first check out this guide: 9 ways to open Snipping Tool in Windows. It covers everything, including the Snipping Tool shortcuts, how to launch it from the keyboard, and how to add the Snipping Tool to the taskbar. However, if you don’t have the time to look into all the methods to find your favorite, know that a quick way to open the Snipping Tool in Windows 11 is to search for it. Type “snipping tool” in the search box on your taskbar and select the Snipping Tool app in the search results.Windows logo key + Shift + S
How to use Snipping Tool in Windows 11
Windows 11’s Snipping Tool is relatively simple, but it packs everything you need to create all kinds of screenshots. When you open the Snipping Tool, this is what you get:- Snip: allows you to capture screenshots of your Windows 11 computer’s screen
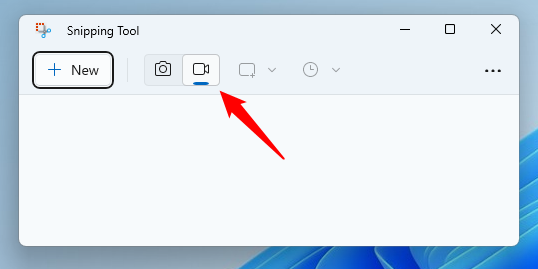
- Record: lets you record an area of the screen
How to screenshot with Snipping Tool in Windows 11
If you want to take a still picture of your screen or an area of it, you should choose the Snip mode. It’s the one selected by default, and it looks like a small camera. If it’s not selected, click or tap on the switch to enable it.- Rectangle mode: lets you take rectangular screenshots, which you define using your mouse or using touch
- Window mode: takes a screenshot of the window you select by clicking or tapping on it
- Full-screen mode: captures your entire screen
- Free-form mode: allows you to use your mouse or finger (for touch screen devices) to draw freely and capture any form on your screen
- Ballpoint pen: imitates a real-life ballpoint pen which you can use to write or even draw things on your screenshot, using your mouse or using touch
- Highlighter: lets you emphasize, or underscore if you prefer, parts of the screenshot you just took
- Eraser: removes edits or changes you already made using other tools
- Ruler: allows you to make measurements on the screenshot
- Touch Writing: if you enable this option, you can use your finger, stylus, or mouse to write things more easily on the screenshot you just took
- Image Crop: lets you crop the screenshot to remove unwanted parts from it
- Undo & Redo: go back or forward through the changes you’ve made to your screenshot
How to record your screen with the Snipping Tool
If you want to record your screen with the Snipping Tool in Windows 11, select the Record mode in the app’s top toolbar. It looks like a small video camera.- Pause/Record: If you want to interrupt the recording for a brief period of time, you can press the Pause button. To continue recording, press the same button.
- When you want to stop recording altogether, press the red Stop button.
- If you want to discard the recording, press the trash bin button found on the right side of the timer.
How to configure Snipping Tool in Windows 11
To get started with personalizing Windows 11’s Snipping Tool, press the See more (...) button from the app’s top-right corner and then select Settings in the menu.- Automatically copy changes: by default, this switch is on, and it makes the Snipping Tool automatically copy the screenshot you take in Windows 11’s clipboard.
- Automatically save screenshots: enabled by default, this switch controls whether the Snipping Tool should save any screenshots you take.
- Ask to save edited screenshots: disabled by default; enabling this switch makes Snipping Tool ask you if you want to save your work whenever you intend to close the application, and you still have a screenshot loaded but not saved.
- Multiple windows: if you turn this switch on, each screenshot you take opens in its own separate Snipping Tool window.
- Add border to each screenshot: allows you to automatically add a border to the screenshots you take with the Snipping Tool. Furthermore, when you enable this switch, you also get a preview of what the outline looks like, and you can choose its Color and Thickness.
Discussion (2)
Everything works with the Snipping Tool except that I cannot get rid of the screens i.e. there is no X at the top right hand corner. In trying to find out why, I clicked on Settings. Now I cannot remove the Settings screen to get back to the actual Snipping Tool. It is very frustrating
Having an issue trying to snip on multiple screen mode – grey snipping area does not cover all monitors – very frustrating – do you have a solution?