

Both Windows 11 and Windows 10 are operating systems that allow you to use them in various languages, depending on what you prefer. It’s easy to add a new language pack and get yourself the Windows display language you like and understand. However, sometimes, you might want the opposite: delete a display language that you no longer need. Theoretically, that’s easy to do, as the Settings app allows you to remove a Windows display language in just a few clicks or taps. However, there are times when the system misbehaves, and you just can’t remove a language from Windows 10 or Windows 11. In this tutorial, we show you both ways: how to delete a Windows display language from Settings and how to completely uninstall a language pack using commands in PowerShell:
 Go to Language & region in Windows 11's Settings
On the Language & region page, check the Language list and find the language pack that you want to uninstall. Then, click or tap on the three dots button on that language’s right side.
Go to Language & region in Windows 11's Settings
On the Language & region page, check the Language list and find the language pack that you want to uninstall. Then, click or tap on the three dots button on that language’s right side.
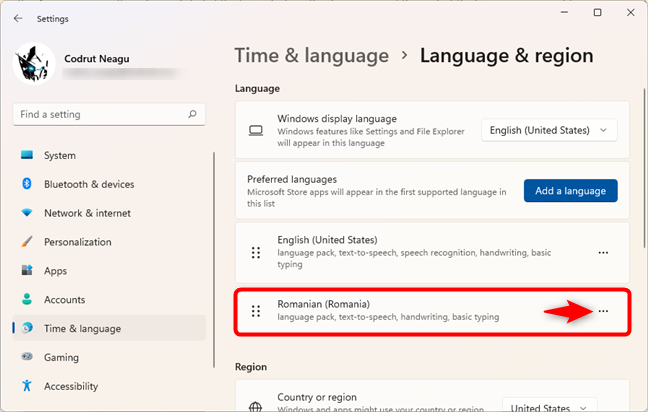 click or tap on the three dots next to the language you want removed
Finally, click or tap on the Remove option from the menu displayed.
click or tap on the three dots next to the language you want removed
Finally, click or tap on the Remove option from the menu displayed.
 Choosing to Remove a Windows 11 display language
Once you’ve removed the language pack, that language is gone and is no longer an option you can use for your Windows display language.
TIP: To get it back, you need to add that language pack again, which you can do by following the steps in this tutorial: How to change the language on Windows 11.
Choosing to Remove a Windows 11 display language
Once you’ve removed the language pack, that language is gone and is no longer an option you can use for your Windows display language.
TIP: To get it back, you need to add that language pack again, which you can do by following the steps in this tutorial: How to change the language on Windows 11.
 Go to Time & Language in Windows 10's Settings
On the Time & language page, select Language on the left sidebar.
Go to Time & Language in Windows 10's Settings
On the Time & language page, select Language on the left sidebar.
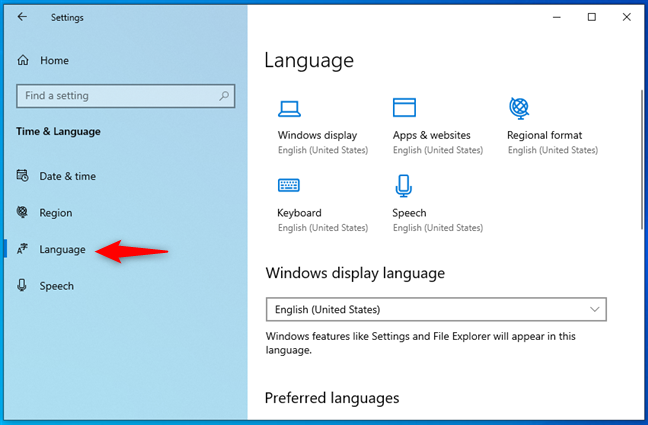
 The Language page from Windows 10's Settings app
On the right pane, scroll down to the Preferred languages section. In it, locate the Windows 10 language pack that you want to uninstall and select it by clicking or tapping on it. Then, press the Remove button on the right of that language.
The Language page from Windows 10's Settings app
On the right pane, scroll down to the Preferred languages section. In it, locate the Windows 10 language pack that you want to uninstall and select it by clicking or tapping on it. Then, press the Remove button on the right of that language.
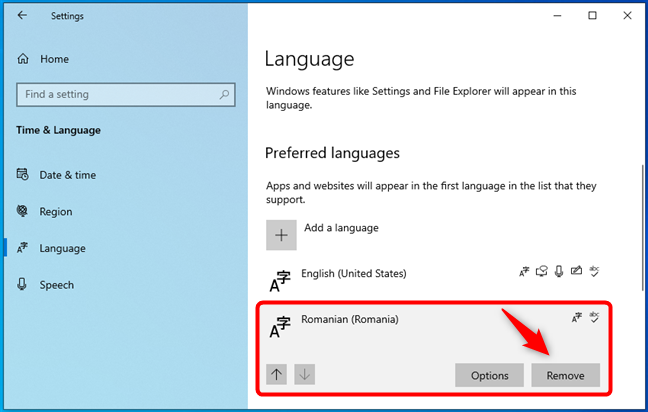 The option to Remove a Windows 10 display language
As soon as you press Remove, the language pack is deleted and can’t be used as your Windows display language anymore.
TIP: To get the removed language pack back or install a new one on your Windows 10 PC, you can follow the steps from this tutorial: How to change the language on Windows 10: All you need to know.
Look through the list of Windows language packs installed on your PC and note the LanguageTag of the display language you want to uninstall. For example, we wanted to remove the Romanian display language, and its LanguageTag is ro-RO, as you can see in the following screenshot.
The option to Remove a Windows 10 display language
As soon as you press Remove, the language pack is deleted and can’t be used as your Windows display language anymore.
TIP: To get the removed language pack back or install a new one on your Windows 10 PC, you can follow the steps from this tutorial: How to change the language on Windows 10: All you need to know.
Look through the list of Windows language packs installed on your PC and note the LanguageTag of the display language you want to uninstall. For example, we wanted to remove the Romanian display language, and its LanguageTag is ro-RO, as you can see in the following screenshot.
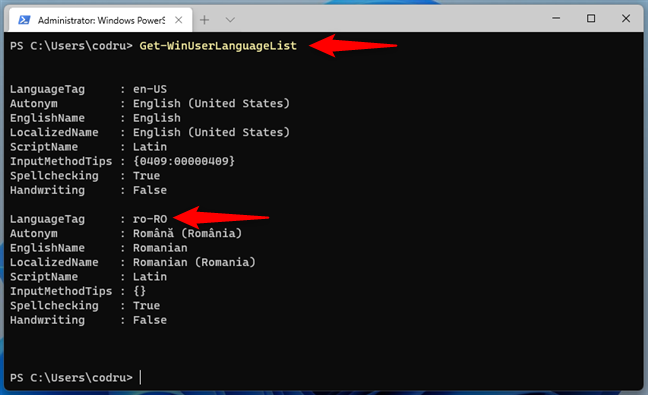
 Using PowerShell to get the list of installed language packs
Once you know the LanguageTag of the Windows display language that you want to get rid of, type (or copy/paste) and execute the following commands, one by one:
Make sure you replace YourLanguageTag with the language tag of the Windows display language you want to uninstall, the one you noted when you ran the first command. In our example, because we wanted to uninstall the Romanian Windows display language, we replaced YourLanguageTag with ro-RO, like this: $LanguageToUninstall = $Languages | where LanguageTag -eq "ro-RO.”
Using PowerShell to get the list of installed language packs
Once you know the LanguageTag of the Windows display language that you want to get rid of, type (or copy/paste) and execute the following commands, one by one:
Make sure you replace YourLanguageTag with the language tag of the Windows display language you want to uninstall, the one you noted when you ran the first command. In our example, because we wanted to uninstall the Romanian Windows display language, we replaced YourLanguageTag with ro-RO, like this: $LanguageToUninstall = $Languages | where LanguageTag -eq "ro-RO.”
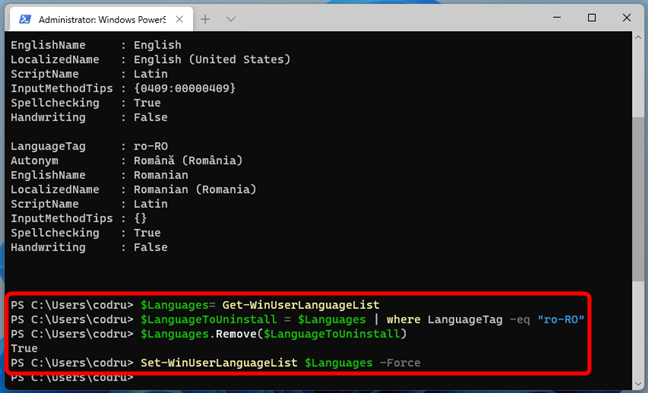
 The commands that uninstall a Windows language pack
Once you’ve run these commands, the operating system immediately deletes the Windows display language you specified.
The commands that uninstall a Windows language pack
Once you’ve run these commands, the operating system immediately deletes the Windows display language you specified.
What you should know about removing display languages from Windows 11 and Windows 10
There are two ways to remove a display language from Windows 11 or Windows 10. The first one is to use the friendly Settings app, and the second is to use some special commands in PowerShell or Windows Terminal. However, while similar, each method does a slightly different thing:- When you remove a language pack using the Settings app, you don’t actually uninstall it. It’s only removed from the list of languages that are installed on your Windows computer or device. If you try to install the same display language again, Windows doesn’t download it from Windows Update. It only quickly enables it back for you to use. If this is what you want, follow the first chapter of this guide to remove a Windows display language from Windows 11 or the second chapter to remove a language pack from Windows 10.
- However, sometimes Windows just doesn’t behave as it should, and languages keep turning back on even if you deleted them from the Settings app. That can make you wonder “Why can’t I remove a language from Windows 10 or Windows 11?”. Unfortunately, we don’t have a clear answer. Sometimes, the issue can be a botched Windows update or just a bug in the operating system. But, there is a solution that should always work if what you want is to completely uninstall a Windows display language and all its files: use the special PowerShell commands presented in the third and last section of this tutorial.
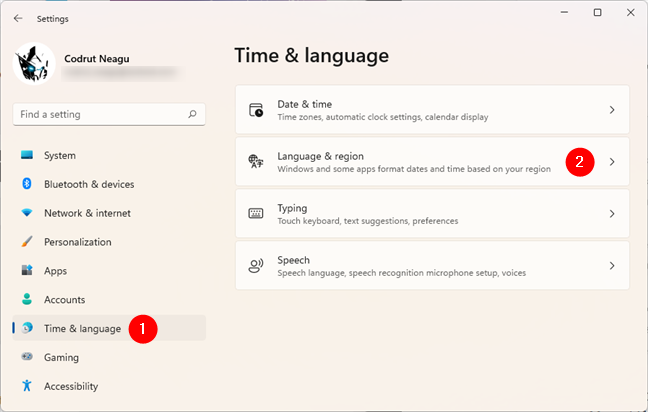
1. How to remove a language pack from Windows 11 using Settings
If you want to uninstall a language pack from your Windows 11 device, you must first open the Settings app, and a quick way to do that is to simultaneously press Windows + I on your keyboard. Next, select Time & language on the left sidebar and click or tap on Language & region on the right pane.2. How to remove a language pack from Windows 10 using Settings
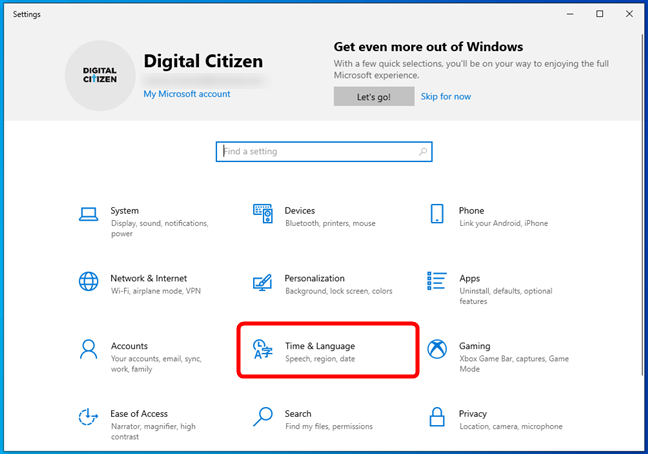
To remove a language pack on a Windows 10 PC, open the Settings app. A fast way to do that is to press the Windows + I keyboard keys, but there are other methods too, which you can read about in this article. Once you’ve launched Settings, click or tap on the Time & language category to enter it.3. How to completely uninstall display languages from Windows 11 or Windows 10 using PowerShell
In Windows 11 and Windows 10, if you can’t get rid of a certain display language, there’s another more radical way of uninstalling it, using PowerShell. Here’s how it works: Start PowerShell or launch Windows Terminal as an administrator and open a PowerShell tab in it. Then, run the following command to get the list of Windows language packs currently installed on your computer: Get-WinUserLanguageList $Languages= Get-WinUserLanguageList
$LanguageToUninstall = $Languages | where LanguageTag -eq "YourLanguageTag"
$Languages.Remove($LanguageToUninstall)
Set-WinUserLanguageList $Languages -Force

Discussion (12)
Doesn’t work for me.
In settings, under “Windows display language” (as well as in the system tray language switcher) I have 2 languages: English (United States) and English (United Kingdom). And under language packs, I only have one pack: English (United States).
Running Get-WinUserLanguageList only gives me en-US. I can’t find any way to remove English (United Kingdom)
This means your Windows was made for the UK market and the language is part of the core OS. You won’t be able to remove the UK language.
In my windows 7 System32 folder I have dozens of folders for languages I do not need, e.g. zh-CN, zh-HK, zh-TW for Chinese.
When I use the lpksetup.exe it only shows me the language which I actually need, no others.
Can I just delete the folders of those Chinese etc. things ?
Thanks man it worked (:
Thank you for this tip, a corrupted language pack kept trying to install and I needed to remove it.
That’s fine, but pressing uninstall only shows English as a display language. Yet there are many dozens of other language files still under system32. How do I get rid of these storage wasters?
Same issue here on my Win7 machine.
LPKSetup.exe only ‘sees’ the English language but my Windows Folder (& the folders within) are peppered with thousands of folders & files (like zh-cn).
LPKSetup.exe seems to be useless unless I want to install languages.
While deleting them my storage gets bigger and then when i reset my pc it lowers the storage gigsbytes. Is that a problem???
I’m not sure I understand your problem. Can you please be more descriptive and clear?
thanks for the information. I have faced a bigger problem. I uninstalled the languages as you explained. while uninstalling,my hard drive C started being occupied more. while you uninstall , normally you have more free space. but now it is completely the opposite. why??????
if the system language isn’t english, and i would like to change it to english and then delete the default system language, what can i do?
SOLUTION FOR VERY IMPORTANT NOTE!
Go to regedit=>HKEY_LOCAL_MACHINESYSTEMCurrentControlSetControlMUIUILanguages
And then delete the language, which you’ve unistalled through windows. The language after deleting will disappear in Vistalizator, and you can now install it again.