




Running older operating systems in a virtual environment helps you test software, use legacy tools, and experiment safely. Knowing how to install Windows 7 on VMware Workstation lets you create a stable Windows 7 virtual machine without affecting your main system. At the time of writing, VMware Workstation remains one of the most reliable ways to virtualize older operating systems using ISO files.
Before you start, make sure you have a Windows 7 ISO file and a computer that meets VMware Workstation’s system requirements. A solid processor, enough RAM, and enough storage space help the virtual machine run smoothly. Once those requirements are met, follow the steps below to install Windows 7 on VMware Workstation.
Download And Install VMware Workstation
You need VMware Workstation installed before creating a virtual machine for Windows 7. After the download, the installer walks you through setup with a standard wizard.
- Open the VMware Workstation installer from your downloads folder.
- Choose your preferred language and accept the license agreement.
- Select the default installation path unless you need a custom location.
- Enable automatic update checks so VMware stays current.
- Finish the installation and restart the system if prompted.
Prepare The Windows 7 ISO File
VMware Workstation uses ISO files as installation media. Make sure your Windows 7 ISO is complete and not corrupted. Choose the edition you want to run before continuing.
- Download a valid Windows 7 ISO from a trusted source.
- Confirm the file is accessible and saved in a location you can find easily.
- Verify that the ISO matches the edition required for your installation key.
Create A New Windows 7 Virtual Machine
Now you can create a new VMware Workstation VM using the guided setup. This step tells VMware which operating system you want to install and how much hardware to allocate.
- Open VMware Workstation and select Create A New Virtual Machine.
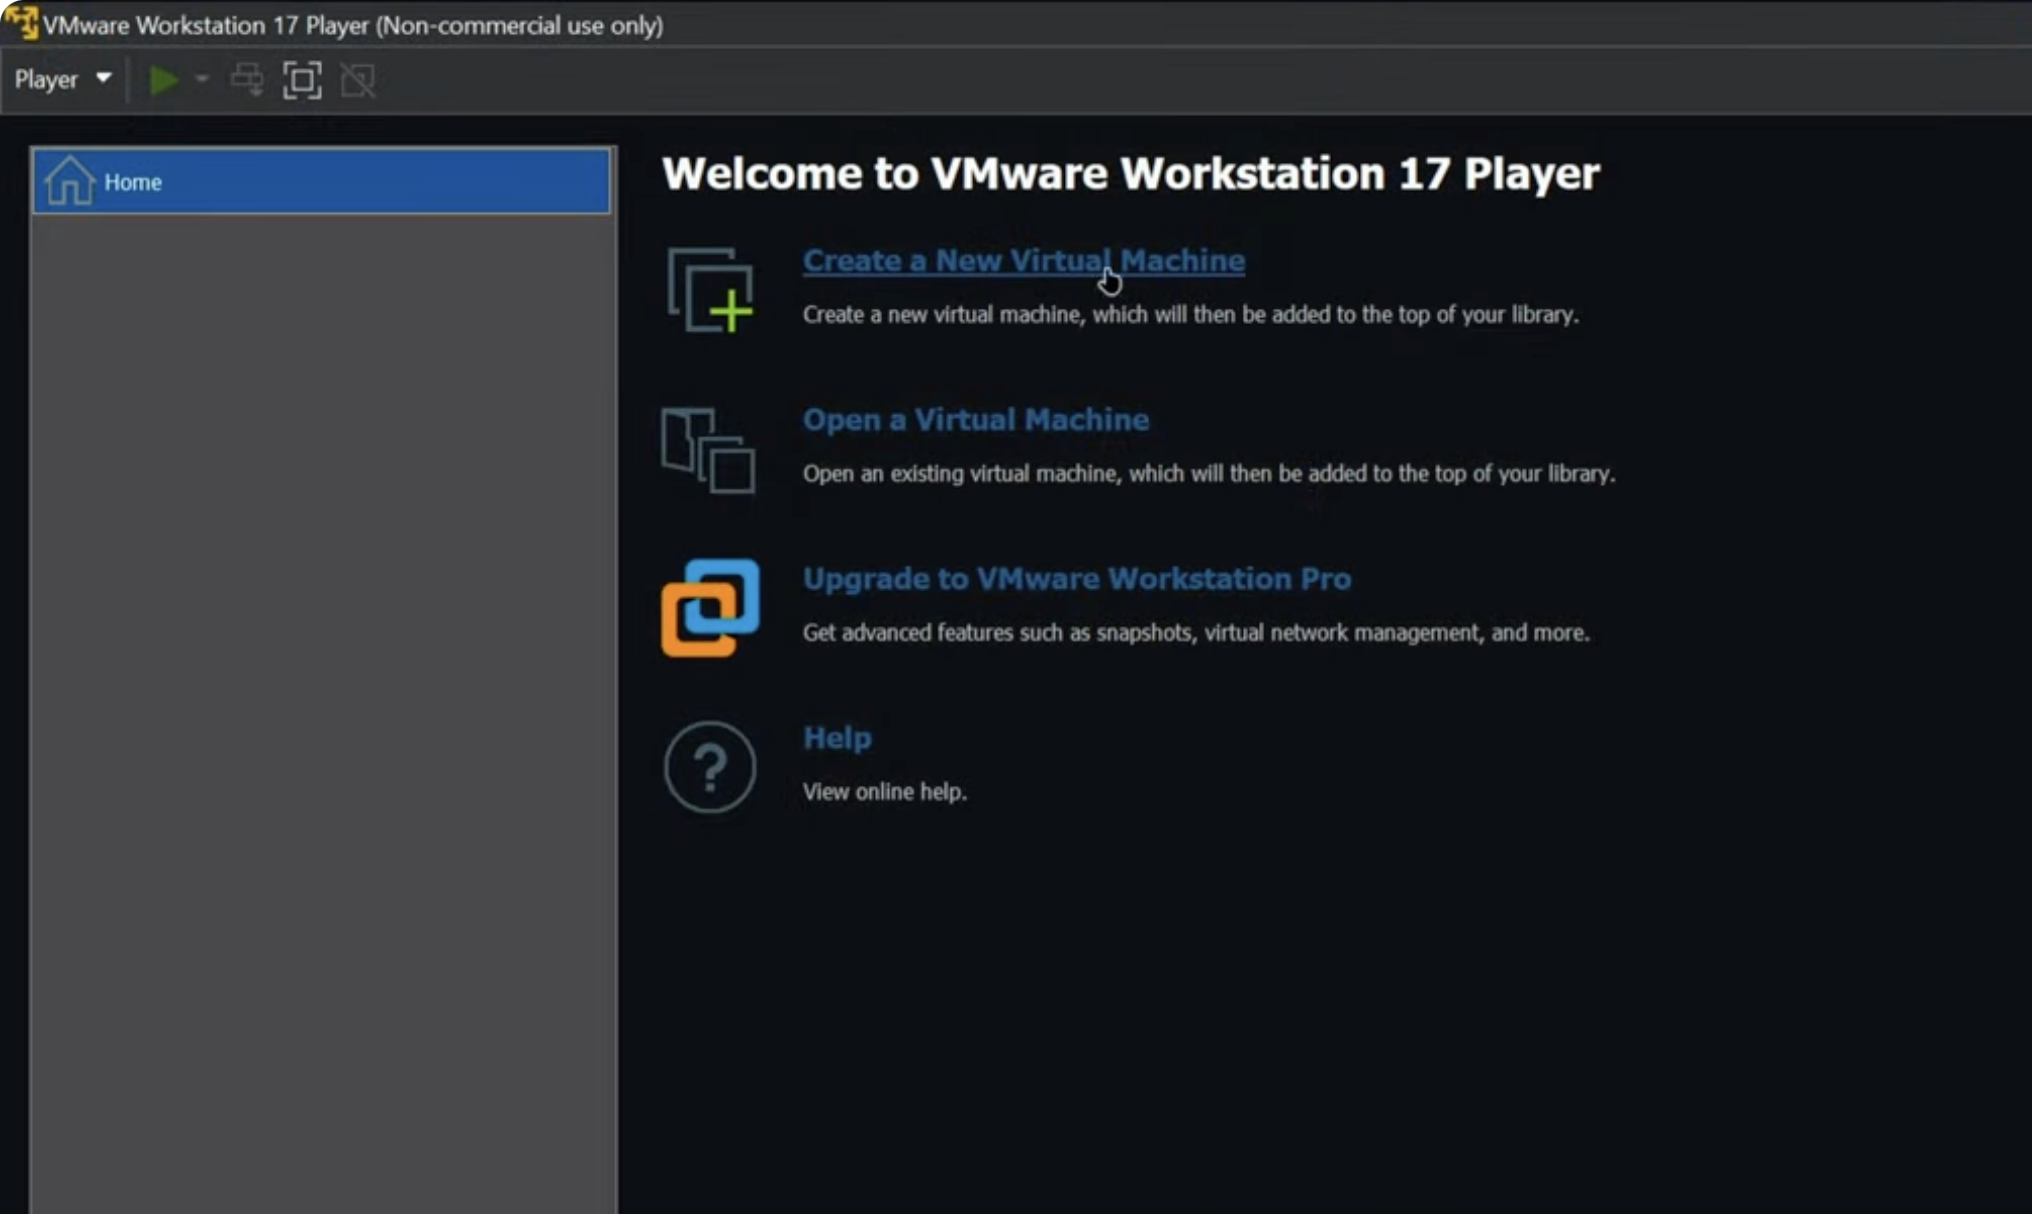
- Choose the Typical configuration option.
- Select Installer Disc Image (ISO) and browse to open your Windows 7 ISO.
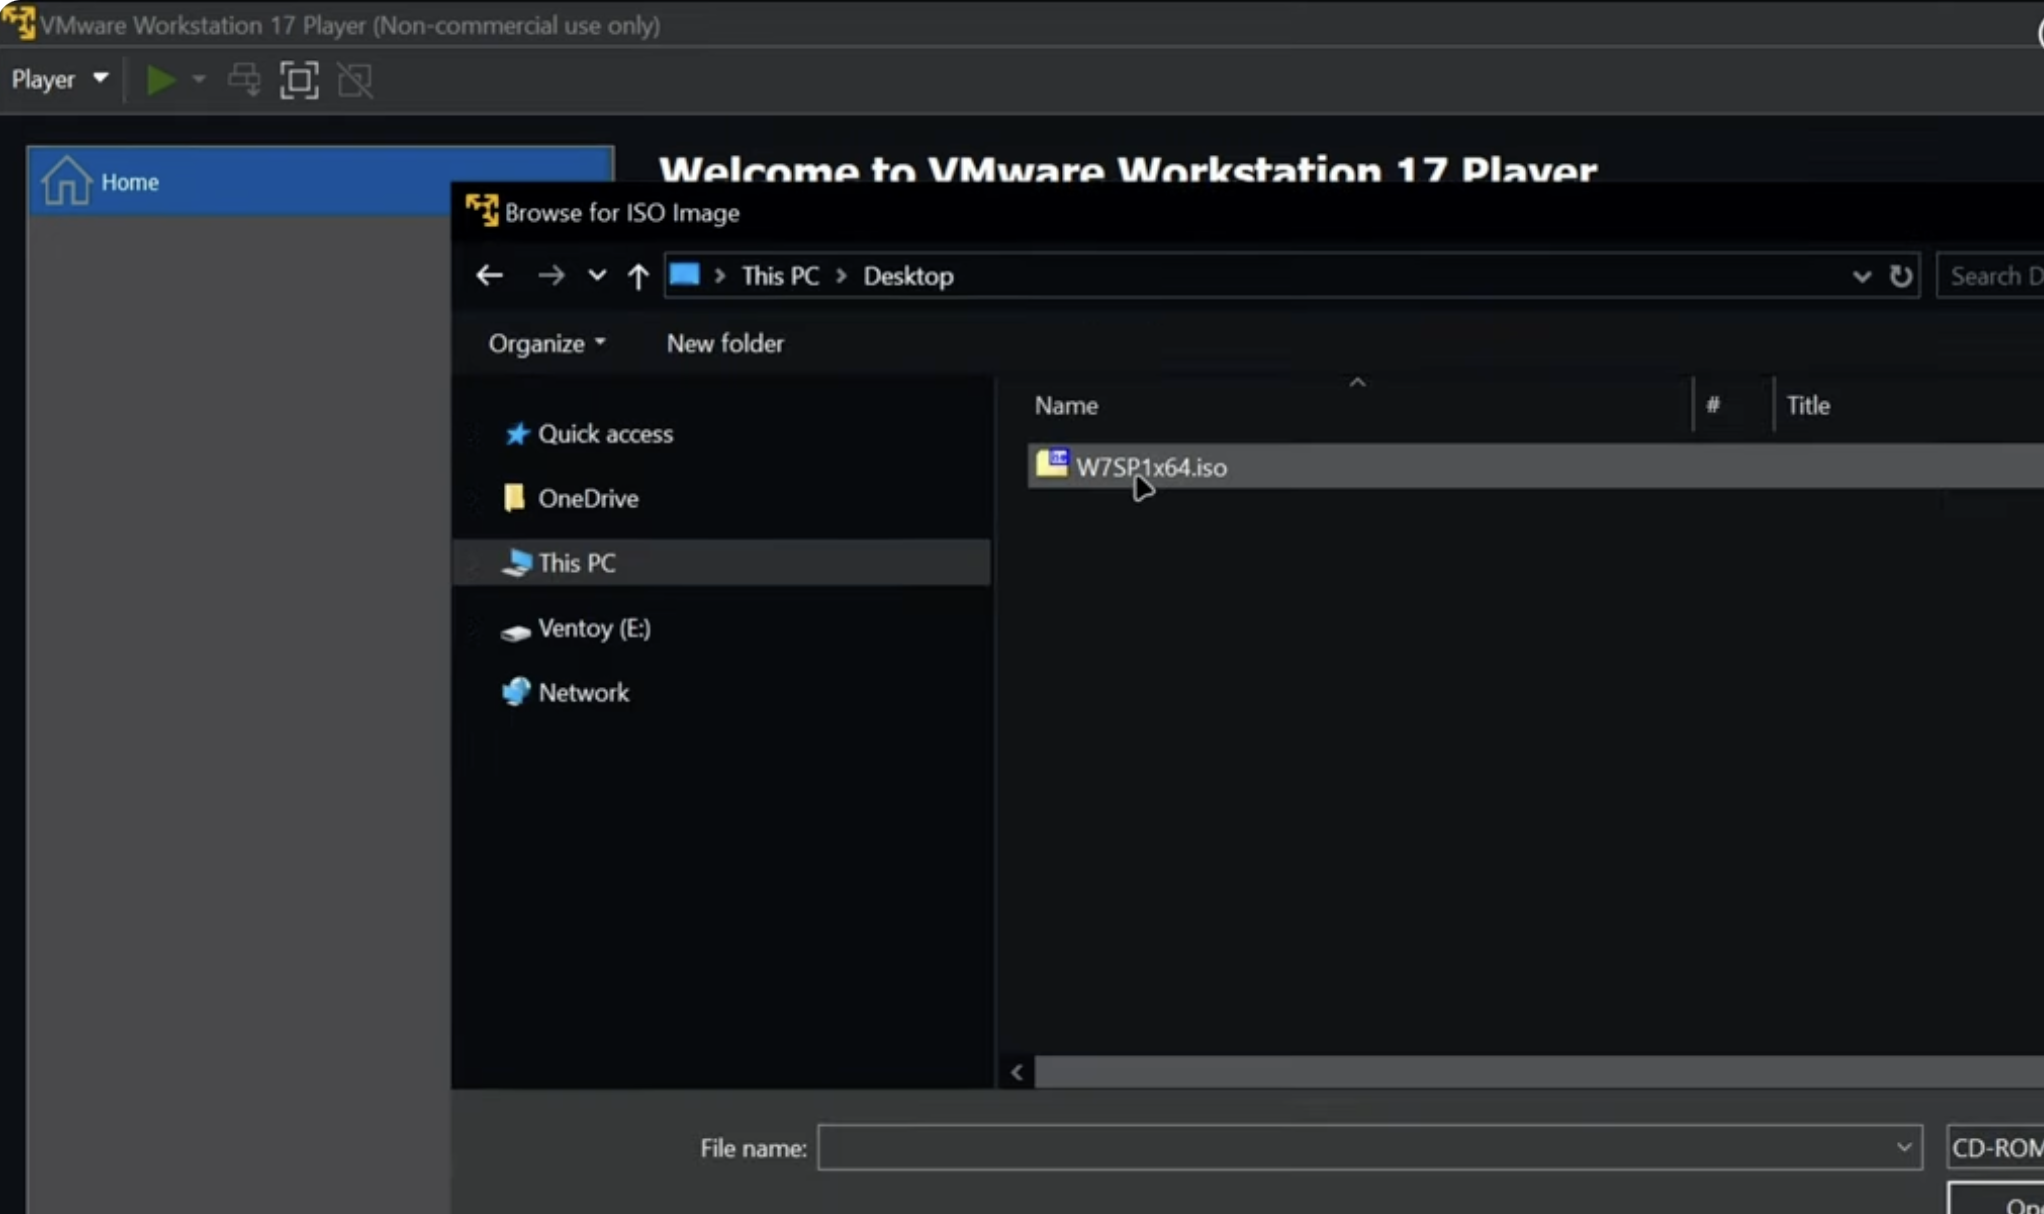
- Enter a name for your virtual machine and choose a storage location.

- Select a virtual disk size that supports Windows 7 and your apps.
- Finish the wizard to create the virtual machine folder and files.
Customize Virtual Machine Settings
Before installing Windows 7, adjust the VM hardware configuration for better performance. VMware Workstation allows you to change CPU allocation, memory settings, and removable device behavior.
- Select your new Windows 7 VM and open Settings.
- Increase RAM if your system supports it for smoother multitasking.
- Allocate additional CPU cores to improve responsiveness.
- Confirm that the CD/DVD drive uses your Windows 7 ISO file.
- Review network adapter settings and choose NAT or Bridged mode.
Install Windows 7 On The Virtual Machine
Now that the VM is configured, start the installation process. The steps mirror a standard Windows 7 installation, but everything occurs inside the virtual environment.
- Power on the virtual machine to boot from the Windows 7 ISO.
- Choose your language, time format, and keyboard layout.
- Select Install Now and accept the license terms.
- Choose Custom installation to manage the virtual drive.
- Select the VMware virtual disk and start the installation.
- Wait for Windows 7 to copy files, restart, and complete setup.
- Create a username and set initial preferences when prompted.
Complete Setup And Install VMware Tools
Once Windows 7 has loaded inside the VM, you should install VMware Tools to improve performance, enable better graphics, and support features like drag-and-drop file transfer.
- With the VM running, open the VM menu and select Install VMware Tools.
- Run the setup in Windows 7 when the installer appears.
- Choose the Typical installation option.
- Restart the virtual machine to apply changes.
- Adjust display size or enable full-screen mode for better usability.
Troubleshooting Common Problems
- If the ISO does not boot, reopen VM settings and confirm the CD/DVD drive points to the Windows 7 ISO file.
- If the VM runs slowly, increase RAM or CPU allocation.
- If Windows 7 freezes during installation, try lowering the number of virtual CPU cores.
- If the display resolution is stuck, reinstall VMware Tools.
- If networking fails, switch from NAT to Bridged or vice versa.
Tips
- Snapshot your VM after installing Windows 7 so you can restore it later.
- Allocate more disk space than the minimum if you plan to install extra software.
- Disable unused hardware in VM settings to improve performance.
- Keep a backup of your Windows 7 ISO in case the VM becomes corrupted.
FAQ
Do I Need A Product Key To Install Windows 7?
You can install Windows 7 without a key initially, but activation is required for long-term use.
Can VMware Workstation Run Windows 7 Smoothly?
Yes, as long as your system meets memory and CPU requirements. Installing VMware Tools improves performance.
Can I Use This Virtual Machine For Legacy Software?
Yes. Many users install Windows 7 in VMware Workstation specifically to run older apps that modern systems no longer support.
Does Windows 7 Still Receive Updates?
No. Windows 7 reached end of support, so use caution when connecting the VM to the internet.
Summary
- Install VMware Workstation and prepare a Windows 7 ISO file.
- Create a new Windows 7 virtual machine and customize its hardware settings.
- Boot from the ISO and complete the Windows 7 installation process.
- Install VMware Tools to improve performance and usability.
- Update settings and troubleshoot issues as needed.
Conclusion
Installing Windows 7 on VMware Workstation gives you a flexible, isolated environment for testing software or running legacy programs. Once you configure the VM, set up the ISO, and install VMware Tools, you have a fully functional Windows 7 virtual machine ready for daily use or testing. With snapshots, performance tweaks, and proper VM settings, VMware Workstation makes running older operating systems simple and reliable.


Discussion (0)
Be the first to comment.