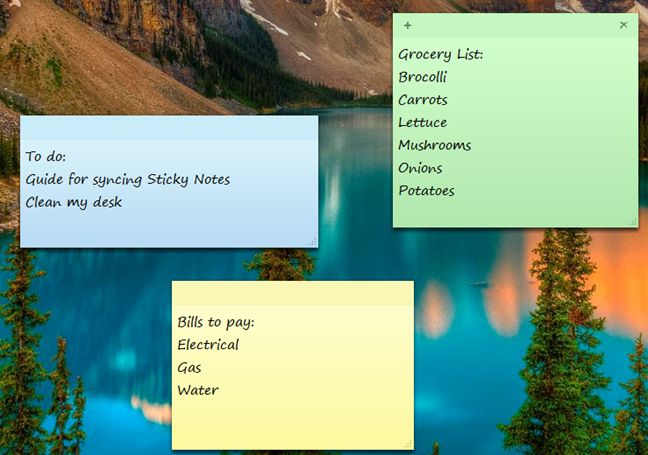
One of our readers wanted to use Sticky Notes across multiple user accounts and Windows computers and have them in sync. Unfortunately, Sticky Notes is not able to pull this off by default. It only saves your notes on a per user account basis. However, with a little bit of hacking, you can have your notes synced between multiple users and computers. This guide will show you how to do that.
NOTE: This guide applies to all modern versions of Windows: Windows 7, Windows 8.1 and Windows 10.
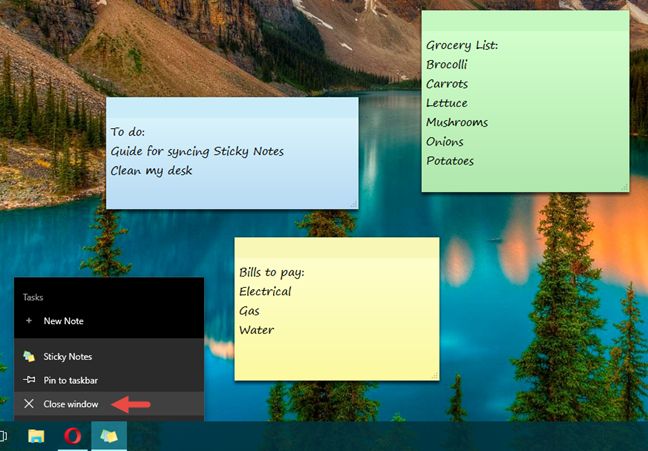
Step 1. Close Sticky Notes
If you keep Sticky Notes open, the whole procedure will fail. Make sure it is closed on all the user accounts for which you want to perform this procedure.
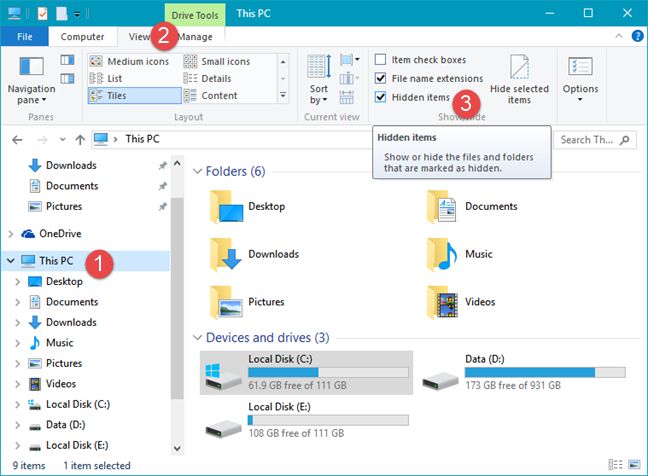
Step 2. Set Windows/File Explorer to show hidden files and folders
Sticky Notes saves its data in a hidden folder that's not displayed by Windows Explorer in Windows 7 or File Explorer in Windows 8.1 and Windows 10 . In order to find it, you need to enable "Show hidden files, folders and drives" in Windows/File Explorer. A tutorial showing how to enable this option and others, can be found here: How to improve Windows & File Explorer using Folder Options.
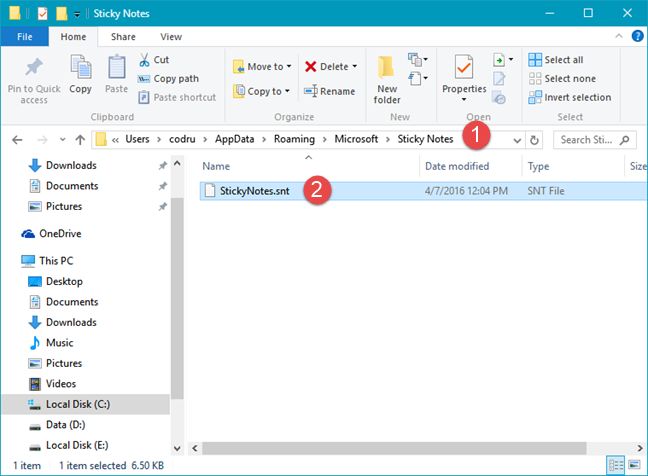
The following procedure is prone to errors and problems if you're not very careful. That's why it is best to first create a backup of your existing Sticky Notes. Open Windows/File Explorer and go to "C:\Users\ Your Username \AppData\Roaming\Microsoft\Sticky Notes". Make sure to replace "Your Username" with your user accounts' name.
Then, copy the file named StickyNotes.snt to a USB drive or to another folder from your Windows device. All your notes are saved in that one file.
Step 4. Download and run Steam Mover
Steam Mover is an application that was created by Paul Traynier to help you move your Steam games from the "C:" drive to another partition and folder. However, it can also be used successfully for our purpose of syncing Sticky Notes.
The application uses NTFS junction points - a more complex Windows feature that is used by Windows Vista, Windows 7, Windows 8.1, and Windows 10, which allows the creation of symbolic links between folders found at different locations. Creating such symbolic links involves using the Command Prompt and understanding lots of complicated terminology and commands.
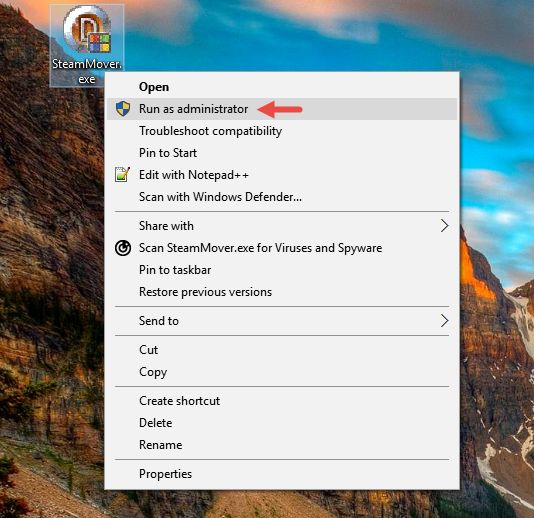
Steam Mover is awesome because it eliminates all the complexity and anyone can work with it, without much trouble. When you run Steam Mover, make sure to right-click (or long press) on it and click/tap on "Run as administrator".
Step 5. Use Steam Mover to create a symbolic link to your Sticky Notes
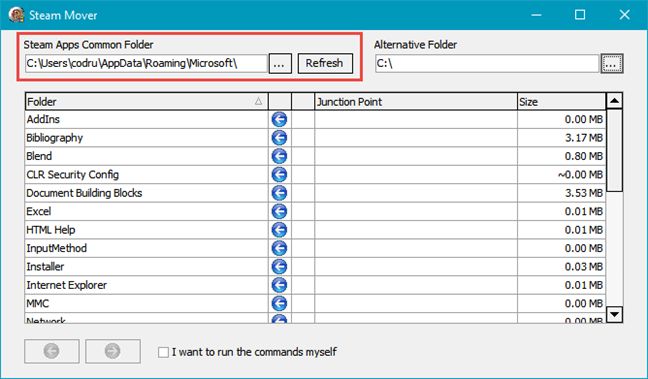
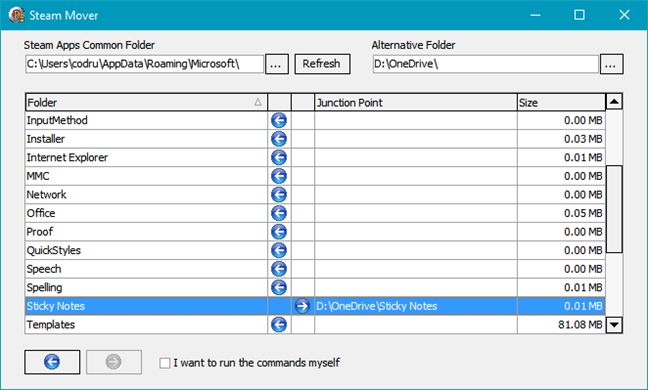
On the left side of the Steam Mover window, where it says "Steam Apps Common Folder", select the folder where Sticky Notes saves its data currently: "C:\Users\Your Username\AppData\Roaming\Microsoft". Make sure that you replace Your Username with your actual user's name. Do not select the Sticky Notes subfolder, just its parent - the Microsoft folder. You will see soon why.
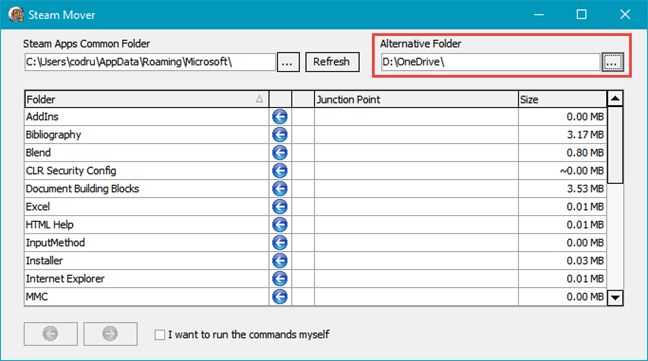
On the right, where it says "Alternative Folder" , select the folder where you want your Sticky Notes to be stored in the future. Here too, select just the parent of the folder where your notes will be stored.
For example, I want to save my notes in "D:\OneDrive\Sticky Notes" so that my notes get synced not only between local users, but also across my different Windows devices, with the help of my OneDrive account. In my case, that means that I chose to select "D:\OneDrive".
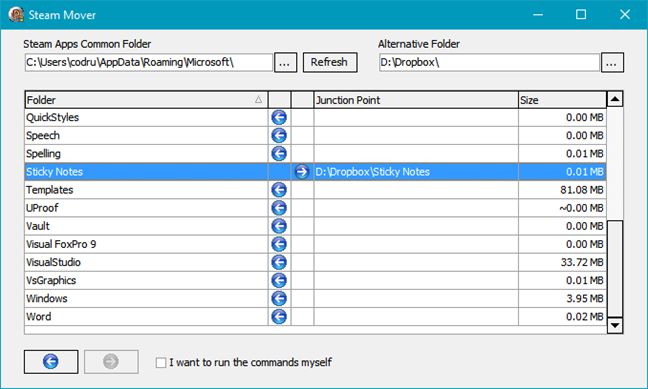
It's worth noting that, if you prefer other cloud storage services, you can use any of them in order to sync your Sticky Notes. For instance, you can use Dropbox or Google Drive. They work just as well as OneDrive. Here's how we made the move to Dropbox:
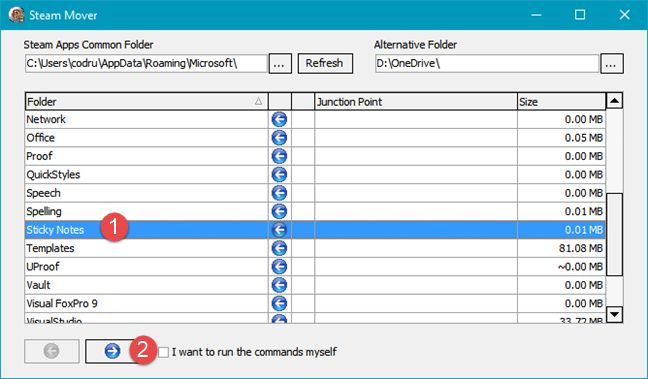
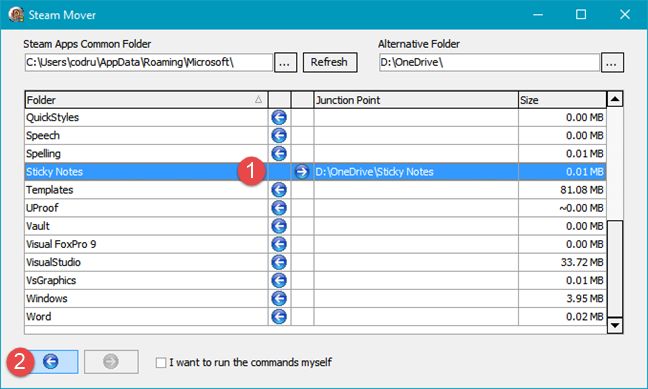
Once you've made your selections, Steam Mover displays the subfolders found on the folder you selected on the left. Find the Sticky Notes subfolder and select it with a click or tap. Then, on the bottom of the Steam Mover window, you will see an arrow that's pointing to the right. Click or tap on it.
On the right, you will see the new path where Sticky Notes will be saved. If you have no Sticky Notes subfolder in the parent folder selected on the right, the tool will create it automatically. If the subfolder is there, Steam Mover will notify you of its existence.
Step 6. Repeat this procedure on all computers and/or user accounts on which you want to sync your Sticky Notes
The Sticky Notes are now moved, but only for your user account. If you want to do the same thing with other user accounts, so that they work with the same set of Sticky Notes, log off from your user account and log in to the others, one by one, and repeat the procedure.
The same goes for all the computers between which you want to sync your Sticky Notes. Log in to those computers and repeat the procedure, using the same cloud storage account, whether it's OneDrive, Dropbox, Google Drive, etc.
Step 7. Copy the backed up Sticky Notes to the new location
Once you have set up all user accounts and/or computers, you will find that your Sticky Notes are now empty, missing. Take the backup file you created at Step 2 and copy it to the new folder where the Sticky Notes are stored.
Once the backup file is copied, you can resume using Sticky Notes. From now on they will be in sync between the user accounts and computers on which you ran this procedure.
Troubleshooting: "Not able to launch Sticky Notes. Issue with accessing the file"
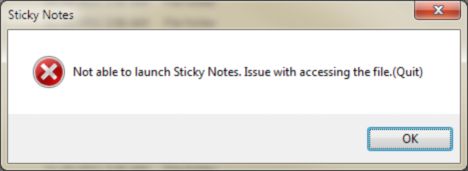
Chances are that, once you are done with the procedure, when you want to run Sticky Notes on some user account or computer, you receive the message displayed below.
Don't panic, because this is only a problem of permissions. The user account you are using doesn't have permissions to the new folder where you store your Sticky Notes. Read this tutorial: Take ownership and change permissions of files and folders. It will teach you how to give permissions for your user account to that folder.
Removing the symbolic link
At some point you may want to revert back and make Sticky Notes save its data in its original folder. To remove the symbolic link you created, run Steam Mover again, as shown in Step 4 and Step 5. Then, select the symbolic link you created and press the Left button, on the bottom of the window. Steam Mover will revert the symbolic link.
Repeat this on all the user accounts and computers where you want to revert back to the original setup.
Important t hings to consider!
There's one big problem with the workaround above. If multiple user accounts and/or computers work with Sticky Notes at the same time, the data is stored and synchronized only for the user who closed Sticky Notes last. It is very important that the notes are used once at a time. Working in parallel from multiple places on the same notes will ruin everything and you will lose data.
There is also a big benefit to this procedure. You can use the new folder to sync your notes in the cloud. Using OneDrive, Dropbox or Google Drive, you can select the new Sticky Notes folder and have it backed up and synced regularly. This way, you will never lose your notes ever again.
These are too many steps I think. Instead one can use an app that supports syncing of sticky notes. One example is Notezilla – https://www.conceptworld.com/Notezilla
Justin ·
Hey guys
I’m still not getting images when I save in Evernote. This seems to be the only site where that happens and earlier articles saved with images included without any problem.
Something seems to have changed recently???
Anonymous ·
It’s probably go to do with Cloudflare and its protection against sites/bots that try to steal images. It should work however if you try the print version.
Justin ·
No joy! Still no images, even with the print version!
I tried printing the “print page” using PDF in Win10 and get 1500kb of garbage……. unacceptable to “Save”.
Sorry, I’m out of ideas unless it has something to do with the “path” to download the images.














Discussion (4)
These are too many steps I think. Instead one can use an app that supports syncing of sticky notes. One example is Notezilla – https://www.conceptworld.com/Notezilla
Hey guys
I’m still not getting images when I save in Evernote. This seems to be the only site where that happens and earlier articles saved with images included without any problem.
Something seems to have changed recently???
It’s probably go to do with Cloudflare and its protection against sites/bots that try to steal images. It should work however if you try the print version.
No joy! Still no images, even with the print version!
I tried printing the “print page” using PDF in Win10 and get 1500kb of garbage……. unacceptable to “Save”.
Sorry, I’m out of ideas unless it has something to do with the “path” to download the images.