17.10.2022
Printers are a familiar presence in homes and offices all over the world. To be able to print anything on your printer, you must connect it to your computer and install it. The most common way to install a computer printer near you is by using a USB cable. If you do not know how to do it, this guide is for you: we show how to set up a local printer near you on any Windows computer using a USB connection. Let’s get started:
NOTE: This guide covers installing a local printer on a Windows 11 or Windows 10 computer and the features built into these operating systems for adding printers. We also cover how to add a local printer using manual settings and how to install a local printer using the software and drivers provided by its manufacturer (read the last method in the tutorial for that). By local printer, we mean the kind of printer you connect directly to your computer through a USB cable. If you have a wireless printer, you should read this guide: How to install a wireless printer in your Wi-Fi network.
1. Connect the local printer to your Windows PC (using a USB cable and a free USB port)
In both Windows 11 and Windows 10, adding a local printer is often as easy as connecting it to a USB port on your PC and then turning the printer on. The printer is silently installed if your computer identifies it correctly and finds the appropriate drivers. A couple of moments after connecting the printer to your Windows computer, it should be ready to go. You can now start using your local printer. However, if your local printer didn’t install, follow the next methods:
2. How to add a local printer in Windows using the operating system’s built-in features
Open the Settings app to check if your printer was installed correctly or to add a local printer manually. There are many ways to do that in Windows 11 and Windows 10, but one that’s easy and works in both operating systems is to press Windows + I on your keyboard.
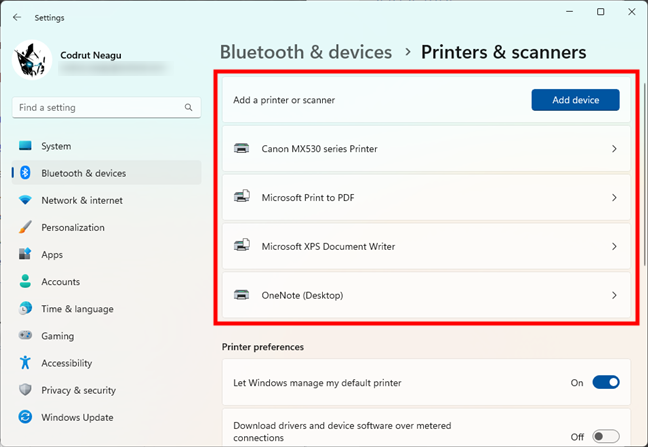
Then, if you’re using Windows 11, head to Bluetooth & devices and click or tap Printers & scanners on the right side of the window.
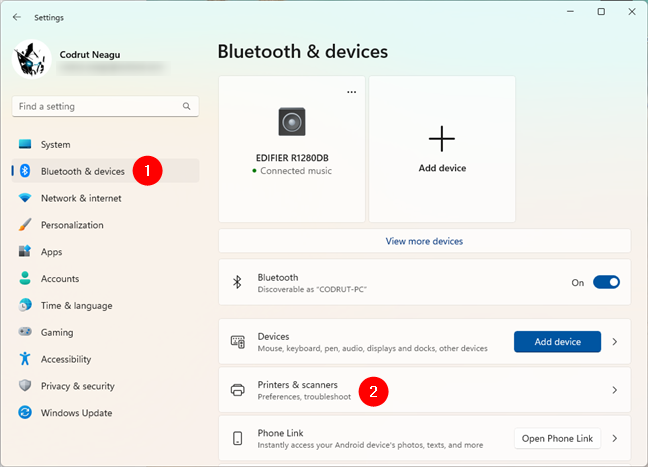
Go to Bluetooth & devices > Printers & scanners in Windows 11's Settings
If you’re using Windows 10, in the Settings app, open the Devices section, whose description says “Bluetooth, printers, mouse.” The printers are the part that interests us, so select Printers & scanners on the left side of the window to open the section with the same name on the right.
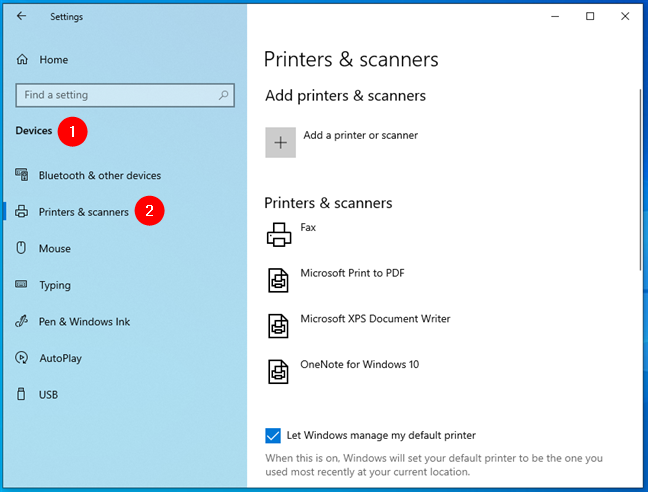
Go to Devices > Printers & scanners in Windows 10's Settings
Next, regardless of whether you’re using Windows 11 or Windows 10, you’ll see the printers already installed on your computer. Some are virtual printers, like Microsoft Print to PDF, or screenshot-capturing apps like OneNote.
List of printers and scanners installed
Now there are two possibilities:
- Windows has already installed the printer that you connected to the computer, or
- The printer you connected to a USB port on your PC has not been installed.
If you find yourself in the first situation, you are done: go ahead and use your printer.
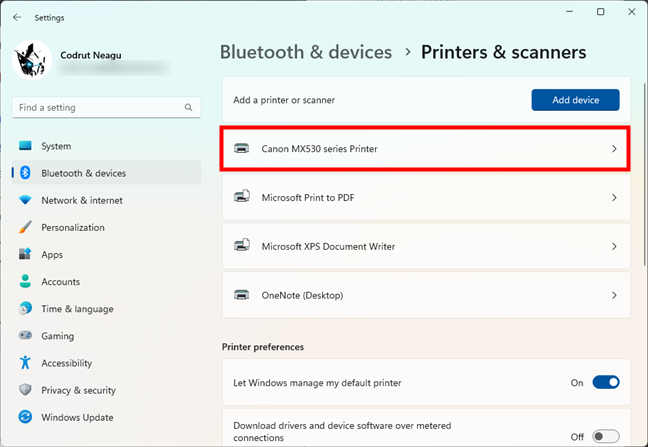
A USB printer installed on a Windows 11 computer
If you find yourself in the second situation, you won’t see your printer displayed. Turn on the printer, and if you’re using Windows 11, click or tap the Add device button next to Add a printer or scanner.
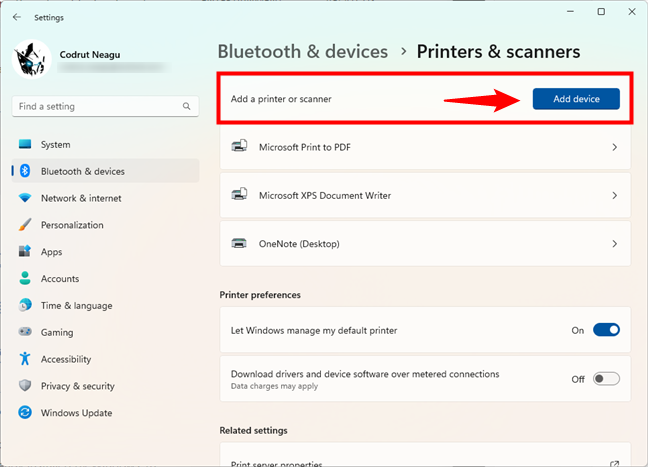
Add a printer or scanner on a Windows 11 computer
If you’re using Windows 10, click or tap the “+ Add a printer or scanner” button.
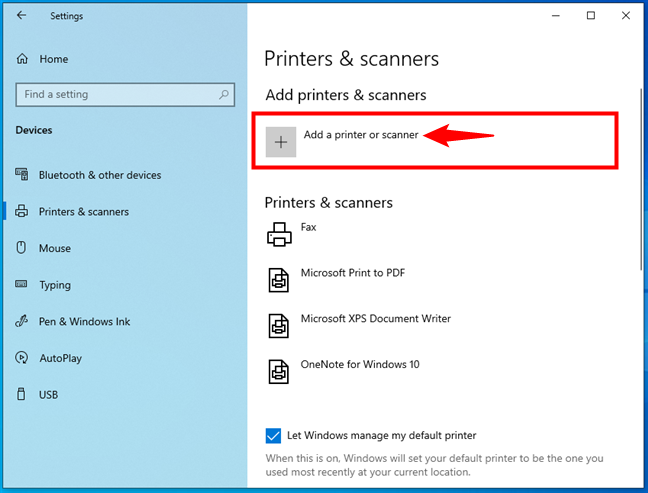
Add a printer or scanner on a Windows 10 computer
No matter if you’re using Windows 11 or Windows 10, the operating system begins “searching for printers and scanners,” and if it manages to find your local printer or scanner, it will try to install its drivers automatically. You can then see, in the list of printers and scanners, that the local printer has been added to your computer.

The local USB printer has been installed
If everything works out as it should, you can now use your local printer to, well, print from any app or program (and even from websites).
3. How to add a local printer with manual settings in Windows
If you have an older or more exotic printer, Windows might be unable to identify it and perform the printer installation on its own. In that case, in the “Printers & scanners” section of the Settings app, after searching for printers and scanners, click or tap on the “Add manually” button next to “The printer that I want isn’t listed.”

The printer that I want isn't listed in Windows 11
If you’re using Windows 10, click or tap on the link called “The printer that I want isn’t listed.”
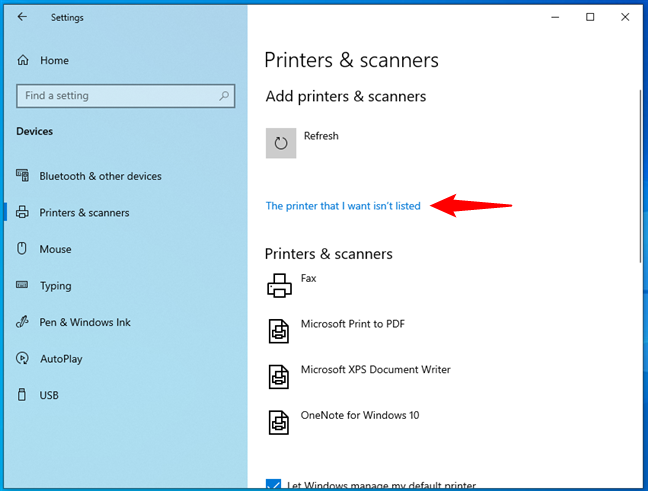
The printer that I want isn't listed in Windows 10
Then, the steps are identical in Windows 11 and Windows 10. First, the operating system will open a wizard called “Add Printer.” Here, you have a few different options for adding network printers, as well as local printers. Because you want to install a local printer, choose the option that says:
- “My printer is a little older. Help me find it.”, or
- “Add a local printer or network printer with manual settings.”
We recommend you choose the first one and leave the wizard to search for your printer. Then, follow the wizard’s instructions to configure it.
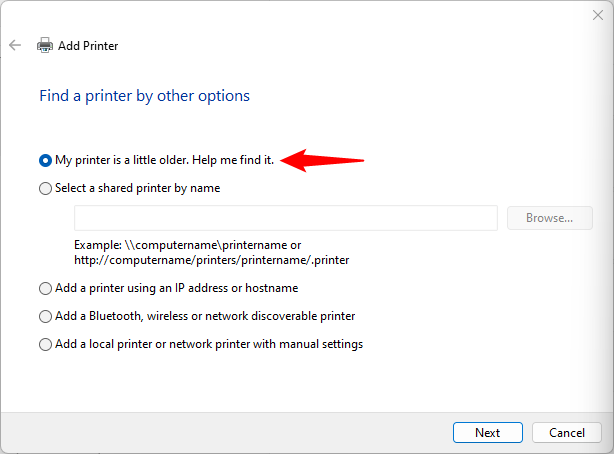
My printer is a little older. Help me find it.
You should also try the manual settings option if your computer still doesn’t detect the printer. Before doing that, check your printer’s documentation because you must enter some details about it.
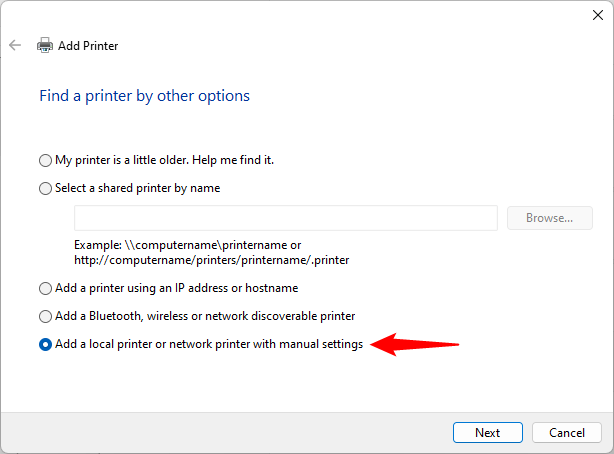
Add a local printer or network printer with manual settings
Follow the wizard and enter the details requested of you to add the printer to Windows. The first step is to choose one of the printer ports available on your PC or create a new one. Once you do that, press Next.
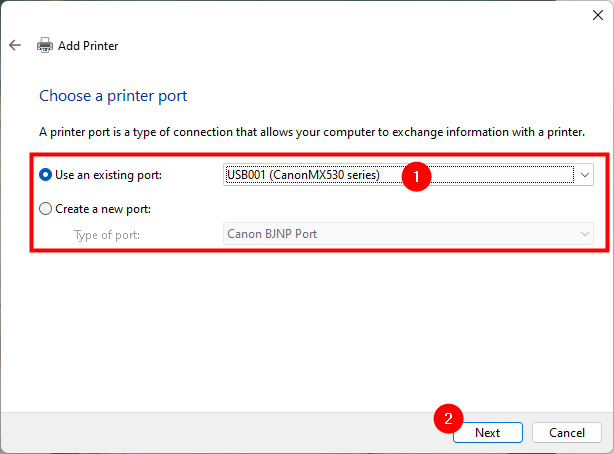
Use an existing port or Create a new port
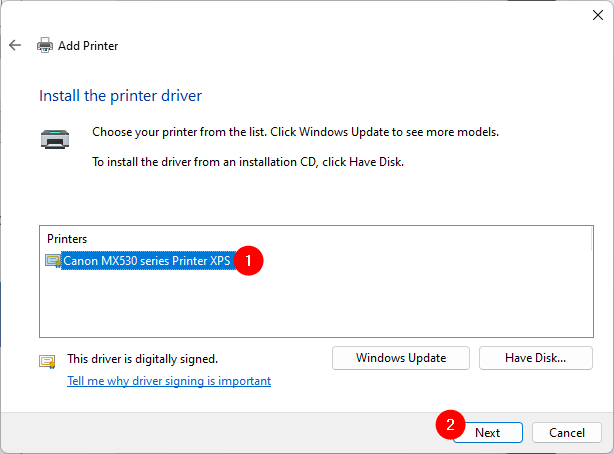
Then, Windows shows you a list of printer manufacturers and models. These are all printers for which it already has drivers. If you can find your local printer, select its model and press Next to install it.
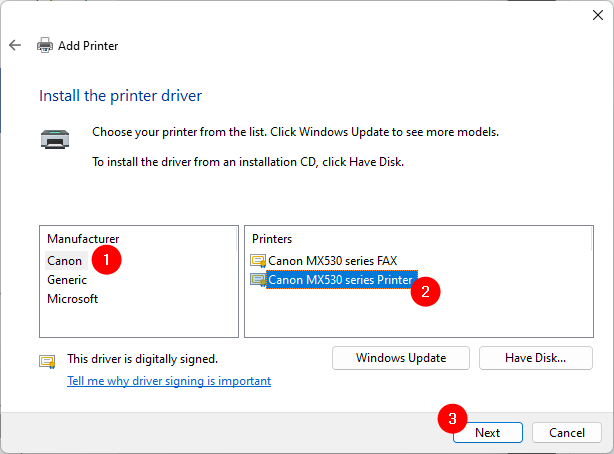
Install the printer driver from a list
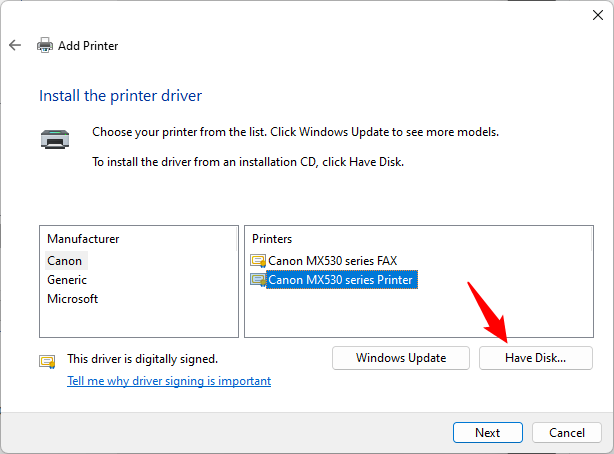
If you can’t find your printer on the list but have the drivers for it somewhere on your computer, click or tap on the “Have Disk” button instead.
Install the printer driver by manually selecting the driver's location
In the “Install From Disk” dialog, type the printer drivers’ location or press Browse and navigate to where you saved them. After doing that, click or tap on OK.
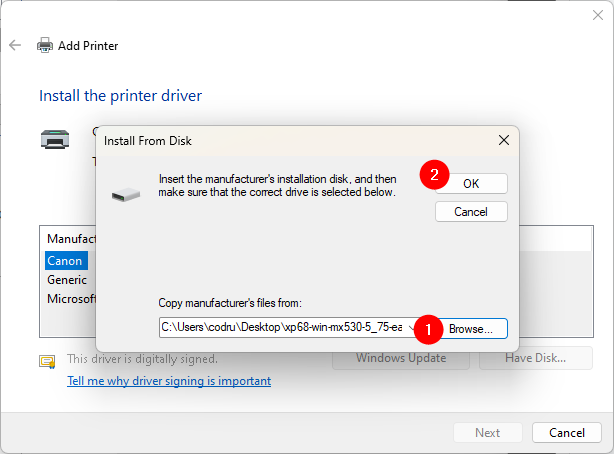
Choosing the location of the printer driver
Then, the wizard shows you the list of printer drivers found in your specified location. Select your printer model and click or tap on Next.
Selecting the printer driver to install
NOTE: Next, the “Add Printer” wizard might ask you, “Which version of the driver do you want to use?”. This dialog appears if you have already installed a printer driver in Windows. Otherwise, it should not show up. If you get this question, you can either choose to “Use the driver that is currently installed” or “Replace the current driver.”
Then, Windows asks you to “Type a printer name.” Enter the one you want and click or tap on Next.
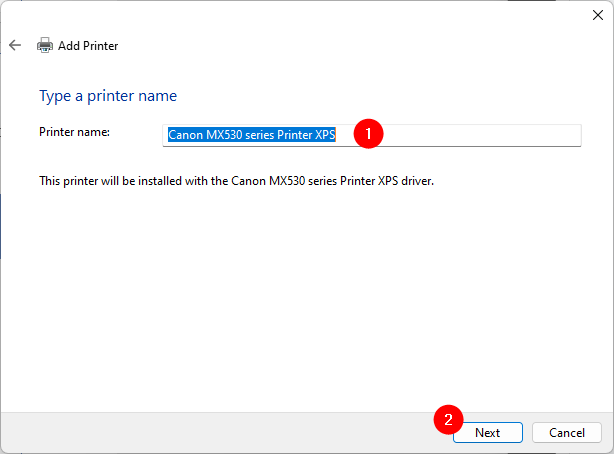
Entering a name for the manually added printer
Onto the next step: enter a few details (name, location, comments) about your local printer if you want to share your printer with your local network. Otherwise, choose “Do not share this printer.”
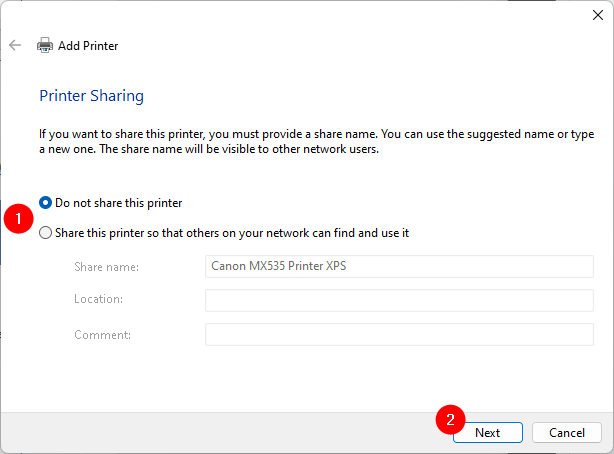
Choosing whether to share the local printer with the local network
That’s it: you’ve now managed to add your local printer to your Windows 11 or Windows 10 computer. The wizard tells you that and lets you “Print a test page” if you want. Otherwise, you can simply end the local printer installation wizard by clicking or tapping on Finish.
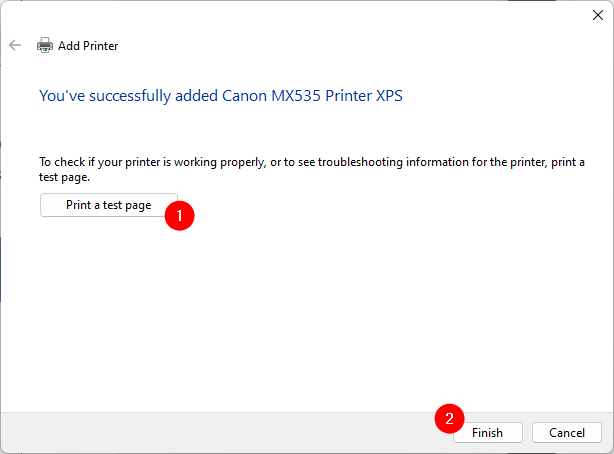
The printer has been manually installed in Windows
What to do if none of the printer installation methods we have shown you work? In that case, or if you also want to get access to all the software and features offered by your printer’s manufacturer, you should try the next one:
4. How to add a local printer using its setup software and drivers
If your printer came with its setup software, you might prefer using it to install your printer. This kind of software usually has additional tools, depending on your printer model. Get the media (CD or DVD) and insert it into your DVD reader or go online and download the drivers from your printer manufacturer's website. If you go for the latter method, make sure you download the right drivers and software for your exact printer model.
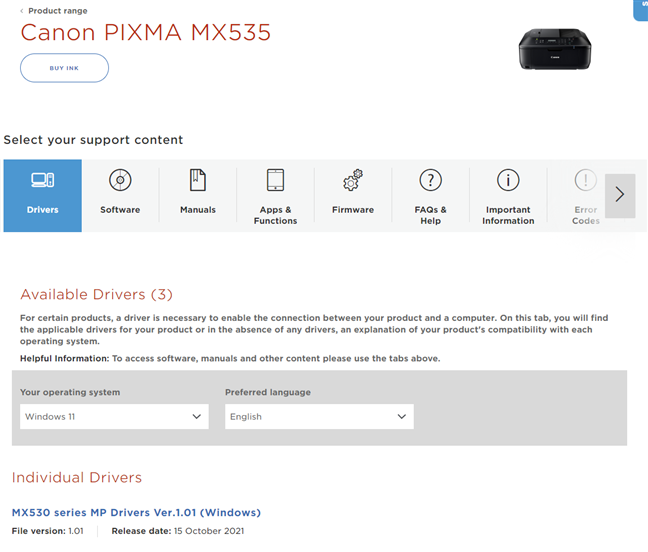
The driver webpage of a Canon printer
TIP: Here is a list of driver web pages for some of the most popular printers: Brother, Canon, Epson, HP, and Samsung.
Usually, both on optical media or when you download printer software, you get an executable file that you must run, named setup.exe or something similar. This starts an installation wizard, and depending on your printer model, you get more or fewer settings and options. For instance, the setup wizard for a Canon MX 535 printer asks me to select my “Place of Residence,” read the license terms, and Install the printer, but that’s it.
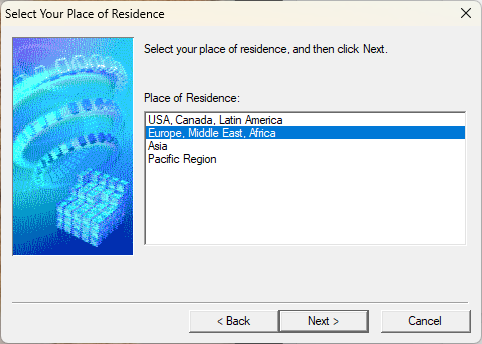
The installation wizard for a Canon printer
Some printers come with software that also lets you choose the programs that will be installed. Besides the drivers, printer setup wizards also usually bundle other applications for configuring the printer, personalizing prints, and scanning or dialing if you have a multifunction printer. If you get that option, always read what each application does and select only the ones you believe to be useful. Then, go through the printer installation wizard and add it to your Windows PC.
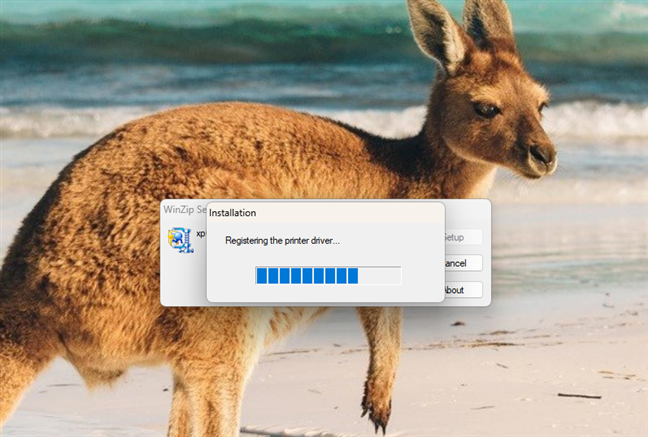
A Canon printer is being added to a Windows computer
When the local printer is added to your Windows PC, you can start using it as you like.
Do you have other questions about adding a local printer to a Windows computer?
As you have seen in this tutorial, installing a local printer is easy if you connect it to your Windows 11 or Windows 10 computer through a USB cable. However, you might have to install it manually if it is an older printer. Either way, now you know how to add a local printer to Windows. If you have questions, ask below in the comments section.