Talk about a complex thing to do: installing Windows over the network. Even installing it via a USB drive is simpler. However, this doesn't mean it cannot be done. Using a free tool named Serva and a bit of time and attention, anyone can set up his/her network environment so that Windows installations are performed with ease, from one network computer. Here's how the whole process works!
VERY IMPORTANT Prerequisites
There are many things you need to prepare beforehand, so that everything works smoothly. Please don't skip any of these elements or the likelihood of failure will be high:
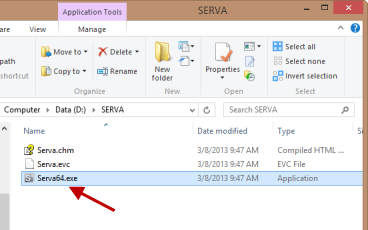
You need to download and extract a little tool named Serva. Download the appropriate version for your operating system (32-bit or 64-bit). You will notice that there are a "Non-Supporter" version and a "Supporter" version. The free one is the "Non-Supporter" version. It includes a small annoyance when you start it, plus a few limitations that won't impact you unless you are a network admin or IT professional who needs to install lots of operating systems on many network computers. If you are such a professional, go ahead and purchase the "Supporter" version which costs a fair $29.99.
This software is a bit finicky. It doesn't like long folder structures and installation folders, spaces and special characters. Therefore, extract it in a folder with a short name, directly on the root of one of your computer's partitions. For example, I extracted it at "D:SERVA". Choose a similar path on your computer.
How to install Windows over the network with Serva
You need the original installation files for the operating system(s) you want to install over the network. Have them at hand as you will need to copy them to a special folder, as they are, without modifications.
For the computers where you are about to install Windows over the network, identify their exact network card model(s). Then, download the appropriate drivers for the Windows version you are about to install on them. By default, Windows setup programs support a limited number of network cards. If your system is rather new, then it is very likely that it won't support its network card and the installation procedure will fail.
Every time you run Serva, run it as administrator. This way it has the required permissions to create files, save the settings you make, etc.
When you run Serva, make sure that it is not blocked by your firewall. The application must be set as allowed on the computer where it runs, otherwise it won't be able to transfer anything over the network.
The computer where the installation files are stored and the one where you want to install Windows must be part of the same network. This means that you have a router on your home network, managing network IP addresses and network traffic. If not, then you should directly connect the two computers with a crossover cable.
Step 1 - Run Serva & Make Its Initial Configuration
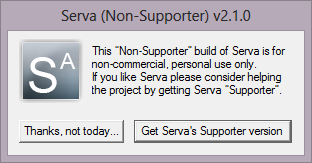
Run Serva as administrator. The free version will ask you to wait for 7 seconds before you can use it. Once the wait is over, click "Thanks, not today".
How to install Windows over the network with Serva
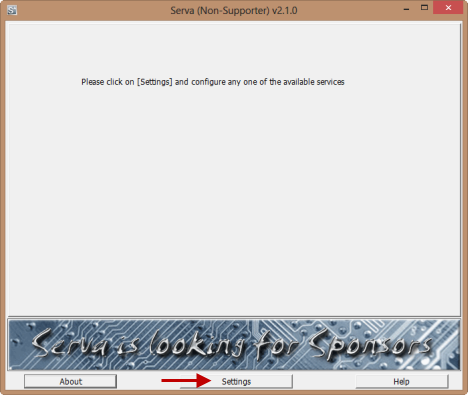
Its window is now open. Click Settings.
How to install Windows over the network with Serva
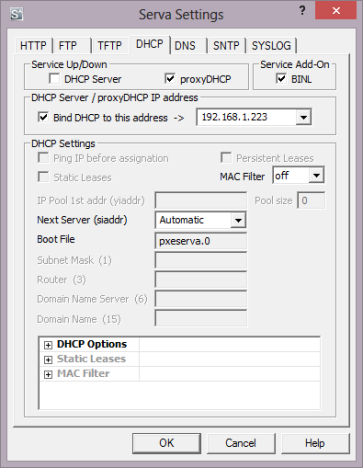
First, go to the DHCP tab. If your computers are part of the same network and the management of IP Addresses is taken care of by your router, enable these settings: proxyDHCP and BINL.
How to install Windows over the network with Serva
BINL is a special add-on that acts as a DHCP protocol extension and it is used by Serva during its preparation and maintenance procedures. proxyDHCP is a special setting that tells Serva that it doesn't need to act as a DCHP server in order to provide IP addresses to the computers connecting to it.
Even though Serva's developers don't recommending enabling this setting, we have learned in our testing that it helps eliminate some issues. Therefore, also enable the box which says "Bind DHCP to this address" and leave the default IP address that is provided.
How to install Windows over the network with Serva
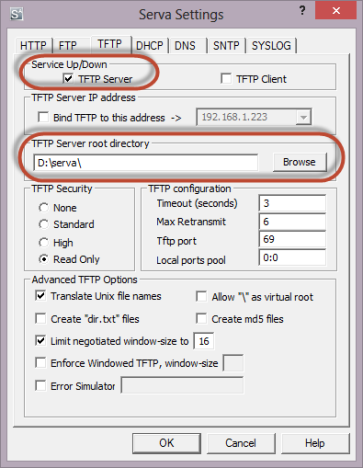
There is no need to modify other settings in this tab. Next, go to the TFTP tab.
TFTP comes from Trivial File Transfer Protocol and it is the protocol used by Serva to transfer files over the network. This protocol needs a bit of configuration as well.
First, check the box near TFTP Server. Then, you need to specify the so called "root" directory. This is the directory where you plan to store the Windows installation files. This folder can be the same folder where you extracted Serva or a new one. Keep in mind that you should use short paths and avoid using spaces and special characters (*, &, ", etc) in the directory name or its path.
How to install Windows over the network with Serva
To help eliminate problems in some networking environments, you might want to also check the box near "Bind TFTP to this address" and leave the default IP address unchanged.
How to install Windows over the network with Serva
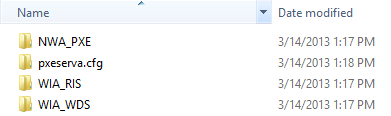
Press OK to save your settings. Then close Serva and start it again (as administrator). During the restart, it will create a special folder structure in the root folder you specified.
How to install Windows over the network with Serva
Amongst those folders, you must find one named WIA_WDS and another named WIA_RIS. If they are not found inside the root folder you specified, something went wrong with Serva's configuration. If all is well, go ahead and read the next section in this article.
Step 2 - Copy the Windows Installation Files
Go to the root folder you specified. Here, you need to copy the Windows installation files, as they are, without any modifications from your side.
If you want to install older versions of Windows like Windows XP or Windows 2000, you need to copy those files in the WIA_RIS folder. Since these operating systems are very old and we don't recommend using them, we won't provide specific instructions for them.
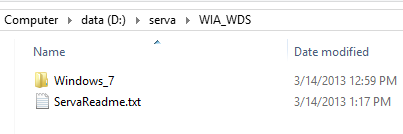
If you plan to install Windows Vista, Windows 7 or Windows 8, then open the WIA_WDS folder. There, create a new folder named according to the Windows version you want to copy. Use simple folder names, with no spaces or special characters. For example, I used Windows_7.
How to install Windows over the network with Serva
Create separate folders, with different names for all the Windows versions you plan to install over the network, using Serva.
Inside that folder, copy and paste all the installation files for the Windows version you want to install over the network. Simply go to the root of the installation disc, and copy its entire file and folder structure.
Step 3 - Start Serva
Start Serva again, as administrator and wait for it to detect the installation files you added. It will create its special folder structure, required to distribute the installation files over the network.
Then, close Serva and go to the next step.
Step 4 - Copy the Network Card Driver(s)
Next, you need to copy the network card drivers for the computer(s) on which you want to install Windows.
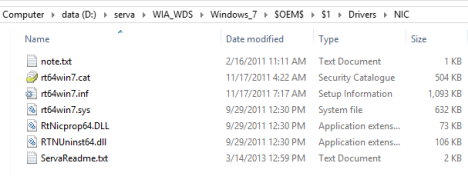
Go the folder where you copied the installation files. In my case it was "D:serva" (both the root and Serva installation folder), followed by "WIA_WDSWindows_7".
How to install Windows over the network with Serva
There, go to "$OEM$$1DriversNIC". If you can't find these folders, create them yourself.
Then, extract the network card drivers and place them inside. If your drivers come as a setup.exe or as a self-extractable archive, extract it first. Make sure the driver's ".inf" and ".cat" files are stored directly in the NIC folder.
Step 5 - Share WIA_WDS Folder with the Network
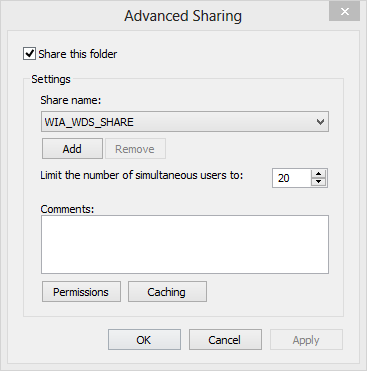
In order for Serva to distribute the Windows installation files over the network, they need to be shared with the network, so that other computers can access them. Unfortunately, Serva requires you to share the WIA_WDS folder (and not its subfolders or other folders) using a very specific share name: WIA_WDS_SHARE. Using any other share name means that the installation procedure is likely to fail.
How to install Windows over the network with Serva
To share this folder with the name we mentioned, you first need to enable advanced sharing in Windows and then share it. Here's how advanced sharing works in Windows: Share Libraries or Folders Using Advanced Sharing.
You must give the user Everyone read-only permissions. You can also share this folder with specific user accounts, whose login details you will use later on, during the network installation process. Again, read-only permissions are enough.
Step 6 - Start Serva
Start Serva again, using administrator permissions. It will detect the network drivers you added and make a few changes, so that the drivers are distributed correctly when you launch the installation process on other computers. You can now leave it open and waiting for network connections.
Next, go to the computer(s) where you want to install Windows.
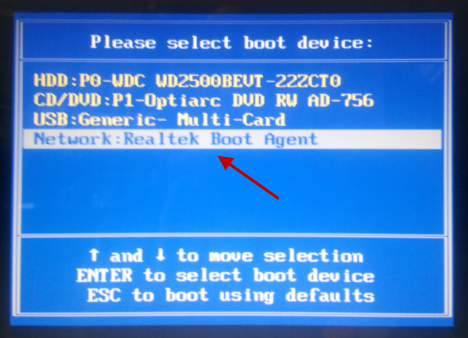
Step 7 - On the Target PC - Enable Lan Booting & Boot from the Network
Go to the computer where you want to install Windows and enter its BIOS. Make sure networking booting is enabled. This setting can be named "Boot from the network" or "Boot from PXE".
Then, start the computer and press the required key to bring up the Boot Menu. On most computers, you need to press F12 or F8, depending on the BIOS version. Select Network or PXE (again, this depends on your computer's BIOS), to boot from the network, using Serva.
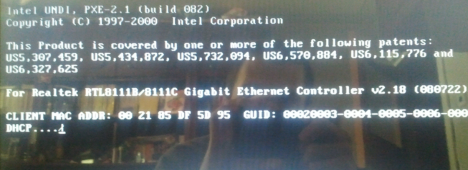
How to install Windows over the network with Serva
If all is well, you should see a screen similar to the one below, where the computer's MAC is displayed and the network card requests an IP address via DHCP.
How to install Windows over the network with Serva
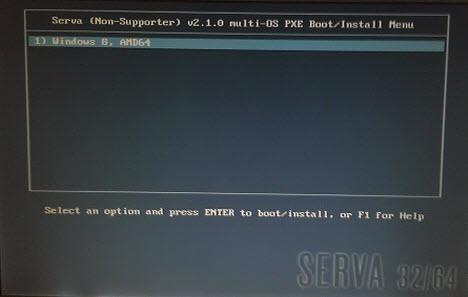
When the computer is connected to the network, Serva loads and displays a screen with the operating systems available for installation. Pick the one you want and press ENTER.
How to install Windows over the network with Serva
The installation files are loaded and a small window named ServaPENet is shown. At this step, Serva installs the network driver you added earlier, loads network resources and connects to the Windows installation folder. Depending on how you shared the WIA_WDS folder, it will ask you to provide a username and password to access it. Type the details of the user account you shared it with and connect.
If all went well, the Windows installation process is now started.
If you don't pay attention to all the steps in this procedure, some things are likely to fail. Here are some things we learned while experimenting with this tool:
If ServaPENet returns this error: "Failed No NIC/Driver, Aborting!", it means that you forgot to copy the network card drivers as instructed at Step 4. If you copied them and you still get the error, double check that you have the correct driver for the network card of the computer where you want to install Windows, for the Windows version you are about to install. Also, double check that you copied it to the correct folder. Then, restart Serva to make sure it detects the driver before the network installation procedure starts.
If, on the target computer, Serva is not able to load at all over the network, consider enabling the "Bind DHCP to this address" and "Bind TFTP to this address" settings in the DHCP and TFTP tabs.
If you connected two computers directly, with a crossover cable, you need to set Serva as DHCP server, in order for everything to work. This means setting the 1st address available in the IP pool, the pool size, and the subnet mask to be used when Serva assigns IP addresses.
How to install Windows over the network with Serva
One last piece of advice is to check the Serva logs. The messages shown there can help you troubleshoot different problems.
Another good tip is to restart Serva every time you change any of its settings and every time you add something to its root folder.
Since we are not the developers of this software, we cannot provide support for it and help you with all the issues you might encounter. If our guide does not help you, then double check Serva's documentation - Serva PXE/BINL - AN01: Windows Install and advanced configuration guide - Advanced Topics on TFTP.
Conclusion
As you can see from this guide, setting things up with Serva requires quite a bit of time and attention. However, it is the simplest way of installing any modern version of Windows over the network. It works great both for home networks and small or medium sized business networks.
If you know other useful tools for installing Windows over the network, don't hesitate to share them using the comments form below.
Excellent article, worked like a charm due to very detailed explanation. Just that with the ‘bind this ip’ in dhcp and tftp parts checked, it didn’t work, but when I unchecked it, it worked right away. Good work!
Shyam ·
Thank you Brother, it worked in first try. but even the NIC driver has not got .inf file it worked..
BobbyJo ·
Also, with legacy (older) hardware, TFTP will use an old block size and transfer will implicitly fail with an ERR. To alleviate this, set the TFTP Block Size to 512 Bytes.
sajagin ·
Hi guys,
thanks for the helpful topic!
I am writing to you regarding two messages I received in the Log after setting up Serva. It is regarding Step 3 from the description, where a log is being created.
My router is mainly IPv6, but it is working with IPv4 as well and with dynamic dhcp I guess, as every time the IPv4 changes. I would like to use Serva to install Windows over my network between two computers connected with LAN to the router.
Could you please help me with this issue?
Thank you very much for the time taken and your help.
Best regards
sajagin
Daniel ·
Ok, I tried now to run it as the tutorial describes, with two small changes. The one that Paul denoted above, and the second: IP address is not the default, but the current IP address of the PC (using ipconfig in cmd). It did the job so far.
After entering the credentials there comes following error: 0x4B8 A network-specific error occurred.
Ok guys, finally it worked out! The trick is, that in the credentials you have to enter only your username (no domains, no pc names, no special characters like @, &, etc.) and password. I enabled the administrator account to do it. The windows 10 admin rights are a bit tricky and that was the reason for the network errors. Good luck!
Anonymous ·
Thanks for sharing everything you did and what you have learned. It will surely help others.
Daniel ·
Sure! Big thanks to the guys from Serva support, who provided me some very useful feedback too. I can only recommend!
Paul ·
Just two comments:
1) The current community version of Serva (3.0.0) has a ridicously small allowed number of clients – 2!!! in reality it means max two machines that sent *any* DHCP messages will be served. But DHCP messages are constantly flowing in the network and it is not what you want. So always check out MAC address of the machine you want to install OS to, and specify it in Serva’s DHCP MAC filter.
2) The correct path to your custom NIC drivers is now:
$OEM$$Boot$$1$WinPEDriver$NIC
Except of this two points everything works like a charm! And I have no previous experiense with PXE booting 🙂
AlpZero ·
Thank you, this saved my weekend!!!
Shawn ·
Hahaaaa it worked, old pc wouldn’t accept USB boot and who uses dvd anymore. You saved me a lot of time thank you sir
Ciprian Adrian Rusen ·
Happy to help. 😉
Tom ·
>The bottom button isn’t visible somehow at my computer.
from Serva 3 and up click on Serva’s System-Menu icon (up-left)
>ProxyDHCP service did not reply to request on port 4011
you probably have a second PXE server in your net or Serva’s proxyDHCP port 4011 is blocked by your firewall
Aslam ·
Above Subject Issue plz solve
Farhan Afnan Iskandar ·
The bottom button isn’t visible somehow at my computer. How to make it visible? I’ve tried to resize the window, but I got nothing.
My computer running Windows XP on AMD Athlon II and with AMD-V enabled
Colin - Ottawa, Canada ·
Installed Windows 7, 10 and Server 2008r2 using this method.
Even enabled ftp. Your article had me up and running in 10 mins.
Most problems may be file sharing and check Window Services are RUNNING: Workstation, Server (these are by default) and again Network Type, — I used “Work”, had *no* results set to “Public”
Colin - Ottawa, Canada ·
Be sure your Network is set to “Work”
Thanks for this !
Really cool
I have this running of Server 2008r2
Abdul Habib ·
Very good, it worked for me.
nice job.
Calvin ·
Sorry but I am a complete noob to this but where would I get the network drivers and another thing everytime I try to network boot the computer it just gives me and Error
PXE-E53: No boot filename received
thanks for answering
Calvin ·
and it gives me 2 errors on serva too
[01/19 00:03:27.540] BINL Err: Expanding E:serverootWIA_WDSWindows7_SERVA_pxeboot.n12
[01/19 00:13:50.736] PDHCP Err: >> Too many clients; “Supporter” license required. Ignoring MAC ?/38:B1:DB:0D:C3:9B request
Anonymous ·
[01/19 00:03:27.540] BINL Err: Expanding E:serverootWIA_WDSWindows7_SERVA_pxeboot.n12
this tells you Serva couldn’t get a requiered component from your distro; are you using Serva with an MSDN/Retail, etd DVD? if you are using a heavily customized OEM distribution that you just downloaded from Internet they might have missing components required for PXE install
[01/19 00:13:50.736] PDHCP Err: >> Too many clients; “Supporter” license required. Ignoring MAC ?/38:B1:DB:0D:C3:9B request
That tells you the free version of Serva is ignoring that DHCP request because your network has more than 2 booting clients requiring PXE/DHCP services. Try your test on a isolated network or get Serva “Supporter”
Tom ·
Drivers? from the manufactures; that’s the best source, I personally avoid any other on-line service providing drivers.
You can get PXE-E53 when booting a PXE client and you forgot to tag the BINL service or if you are not using BINL but you forgot to define a booting “file” (NBP) or if you are in proxyDHCP mode and your client needs a firmware update for correctly dealing with it, or Serva stopped providing answers i.e. you are using the free version of Serva with more than 2 booting clients.
Ben ·
Just a note. When I had tftp, and dhcp binding to a specific address, serva failed to create it’s special directory structure and would post an error About the boot file not being correct. However unselecting those settings cleared it right up.
Tom ·
Just to avoid confusion; bounding service/s to a particular IP/s has “nothing” to do with Serva BINL services creating the directory support structure within a particular asset. In your case it worked for some other reason.
Marlon ·
Thank you a lot, your tutorial is very good and it worked very well. Thanks!
Seem Ahmed ·
1st I would to thank u for ur hard work to help us with ur great and easy tutorial
but, in step 4 I don’t know how to get or access to my network card driver folder. could u pls tell me from where i can get the files of my network card to copy it .
tom ·
If you need to add custom drivers you have to get them first from your NIC manufacturer. If you are trying to install on a Notebook or motherboard with integrated NIC then please get the drivers from the Notebook/motherboard manufacturer instead.
Remi ·
Hello -oh, and sorry for my bad english –
Thank you for this tuto. It’s really clear and easy…but, i have some troubles. I resolve some by myself, but this one i can’t : I have a “PXE-E53 error” on the client computer. It also said “no boot filename received”… I tried everything, I deactivate the firewall/antimalware, etc. I try several options with Serva, I try others sharing settings, for the WIA_WDS file… but nothing ! I still have this stupid PXE 53 error…
Any idea about how resolve this problem ?
Thank you again !
Remi ·
*I tried, sorry
And I forgot it, but this is Serva logs :
[10/16 11:59:04.337] BINL Inf: Preparation/Maintenance procedures “Start” **
[10/16 11:59:04.353] BINL Inf: Preparation/Maintenance procedures “End” **
[10/16 11:59:15.463] PDHCP Inf: Rcvd DHCPDISCOVER from IP 0.0.0.0, MAC ?/D8:CB:8A:81:9B:DB
[10/16 11:59:15.463] PDHCP Inf: Sending DHCPOFFER
[10/16 11:59:15.478] PDHCP Inf: Rcvd DHCPDISCOVER from IP 0.0.0.0, MAC ?/D8:CB:8A:81:9B:DB
[10/16 11:59:15.478] PDHCP Inf: Sending DHCPOFFER
[10/16 11:59:15.541] PDHCP Inf: Rcvd DHCPDISCOVER from IP 0.0.0.0, MAC ?/D8:CB:8A:81:9B:DB
[10/16 11:59:15.541] PDHCP Inf: Sending DHCPOFFER
[10/16 11:59:15.588] PDHCP Inf: Rcvd DHCPDISCOVER from IP 0.0.0.0, MAC ?/D8:CB:8A:81:9B:DB
[10/16 11:59:15.588] PDHCP Inf: Sending DHCPOFFER
[10/16 11:59:15.650] PDHCP Inf: Rcvd DHCPDISCOVER from IP 0.0.0.0, MAC ?/D8:CB:8A:81:9B:DB
[10/16 11:59:15.650] PDHCP Inf: Sending DHCPOFFER
[10/16 11:59:15.697] PDHCP Inf: Rcvd DHCPDISCOVER from IP 0.0.0.0, MAC ?/D8:CB:8A:81:9B:DB
[10/16 11:59:15.697] PDHCP Inf: Sending DHCPOFFER
[10/16 11:59:15.760] PDHCP Inf: Rcvd DHCPDISCOVER from IP 0.0.0.0, MAC ?/D8:CB:8A:81:9B:DB
[10/16 11:59:15.760] PDHCP Inf: Sending DHCPOFFER
But i don’t understand anything… In “Cause” :
“configure the routers IP helper table to contain the IP address of the RIS server. ”
Euhhh…
tom ·
if you receive “no boot filename received” that tells me you probably already have a different DHCP server providing PXE information with an empty filename field. Then your client is PXE booting from a different server than Serva
Awsome exactly what i need then 😉 thanks Tom i will try it out soon
Willem ·
Can it install Linux to ?
Oscar ·
@tom I got it fixed by disabling Avast completely.
Oscar ·
@tom this is just what i thought, but there is a problem: I installed windows from a friend’s serva PXE environment before. The only possible thing is the firewall issue, but I only have Windows Firewall and I turned it down for either public and private networks. I will see if avast free AV includes a firewall.
tom ·
@Nesto if your firewall is “really” open to TFTP traffic then your client probably needs a firmware update. check your firewall.
@Oscar your client is not receiving the proxyDHCP offer; then either your firewall is not completely open to proxyDHCP traffic (4011) or your client firmware is buggy,
Oscar ·
I cannot boot, the message is the next one:
[08/27 10:08:16.351] BINL Inf: Preparation/Maintenance procedures “Start” **
[08/27 10:08:16.398] BINL Inf: Preparation/Maintenance procedures “End” **
[08/27 10:08:58.445] PDHCP Inf: Rcvd DHCPDISCOVER from IP 0.0.0.0, MAC AsrockIn/00:25:22:9A:37:76
[08/27 10:08:58.445] PDHCP Inf: Sending DHCPOFFER
[08/27 10:09:00.351] PDHCP Inf: Rcvd DHCPDISCOVER from IP 0.0.0.0, MAC AsrockIn/00:25:22:9A:37:76
[08/27 10:09:00.351] PDHCP Inf: Sending DHCPOFFER
[08/27 10:09:04.367] PDHCP Inf: Rcvd DHCPDISCOVER from IP 0.0.0.0, MAC AsrockIn/00:25:22:9A:37:76
[08/27 10:09:04.367] PDHCP Inf: Sending DHCPOFFER
[08/27 10:09:12.382] PDHCP Inf: Rcvd DHCPDISCOVER from IP 0.0.0.0, MAC AsrockIn/00:25:22:9A:37:76
[08/27 10:09:12.382] PDHCP Inf: Sending DHCPOFFER
[08/27 10:09:28.429] PDHCP Inf: Rcvd DHCPDISCOVER from IP 0.0.0.0, MAC AsrockIn/00:25:22:9A:37:76
[08/27 10:09:28.429] PDHCP Inf: Sending DHCPOFFER
I disabled the firewall completely to se if that works. And it did not work. Any ideas?
Nesto ·
I have a trouble when boot in the PC, the PC receives the DHCP address but when try to connect to the TFTP server, says a error PXE32 TFTP OPEN TIMEOUT
I re-readed all the steps again and again and I can’t found the error, all is fine but I receiving this error .-.
Dakiy ·
did it work with .ISO ?
Simon ·
Very easy to follow, works perfectly. Thank you for the tutorial.
tom ·
@ajay when installing WDS OSs (Vista and up) the booting client needs to map WIA_WDS_SHARE then ServaPENet asks you for a user (and its non-empty password) able to connect to the mentioned share.
ajay ·
serva3264bit
work properly but at last they also asking for username and password how to find it please help me sir
Spike ·
If you are getting a prompr for “DomainUser” and than a corresponding password than these are credentials of the computer that you are using as the server. Domain = Computer name, User = Login username and Password = the password for the login. If you don’t have a password on that account, you must create one.
tom ·
@Stockton Let’s try to avoid a false concept; “unbound services is not a mandatory requisite for Serva”.
By default Serva binds its running services to “ALL” the available NICs on Serva’s PC. This means i.e. a DHCP “DISCOVERY” packet can reach Serva’s DHCP engine when coming from any available NIC. Sometimes we DO NOT want this “promiscuous” strategy and we prefer “binding” a particular service to just one NIC identified by its IP.
In your case if your DHCP & TFTP services were bound to NIC_1 but your PXE client was connected to Serva’s PC through NIC_2 sure you didn’t get from Serva any response but when you unbound the services then Serva started listening to all NICs and you got the services running correctly.
As you can surely see now you can get Serva running with bound or unbound services it all depends on your needs.
tom ·
@kaalia: for error 0x43 (“The network name cannot be found”) (from Serva’s webpage) this error can be seen when:
1) The share WIA_WDS_SHARE is not created or it is miss-configured.
2) Sometimes seen when the client “directly” connects to Serva’s PC by an Ethernet crossover cable (“back-to-back” scenario).
3) Sometimes seen when there is a router between the client and Serva’s PC.
to fix it try sequentially:
1) Checking the share WIA_WDS_SHARE is correctly created.
2) Adding the “WINS” DHCP option (44) to the Serva DHCP Server/proxyDHCP, pointing to Serva’s IP.
3) Enabling “WINS” services at Serva’s PC (see MS documentation for this)
kaalia ·
I get to the point of the install where it asks for the login and keep getting “error: 0x43 the network name cannot be found”. I’m entering the right username and password, but I can’t seem to get past this.
I have shared the WIA_WDS_SHARE folder correctly to only one user that has a password on the machine that Serva is running. Do I need to share the folder to ‘Everyone’ as well? I read in one of the comments that the PC WINS service needs to be turned on. If so, how do I turn it on? Any help would be appreciated.
anon ·
How to turn on WINS service?
Stockton ·
Thank you for this great description! It worked for me absolutely, only one small extension: The two “Bind TFTP/DHCP to this address” option had to be disabled for me. If I changed them for enabled, the target laptop can’t boot from the network.
Thank you!
Daniel Watson ·
Thanks for the article, had to figure out by reading from the Serva website that your user account MUST have a password if you want to connect properly. (I recieved 0x52F/ 0x520 errors otherwise)
tom ·
“DHCP Inf: Serva’s own interface MAC AsustekC/30:85:A9:EA:A6:75 : ignoring request”
That message tells you that one of the NICs on Serva’s PC is performing a DHCP request; Serva DHCP does not provide IPs to its own interfaces.
This happens i.e. when dealing with point-to-point connections; when the client boots-up the Ethernet link gets active and at the other end Serva’s NIC also powers up; in this case Serva’s NIC must have a user defined “fixed” IP and avoid trying to get its own IP by DHCP.
vishal ·
[03/21 07:14:44.884] BINL Inf: Preparation/Maintenance procedures “Start” **
[03/21 07:14:44.922] BINL Inf: Preparation/Maintenance procedures “End” **
[03/21 07:15:01.656] DHCP Inf: Serva’s own interface MAC AsustekC/30:85:A9:EA:A6:75 : ignoring request
[03/21 07:15:05.464] DHCP Inf: Serva’s own interface MAC AsustekC/30:85:A9:EA:A6:75 : ignoring request
[03/21 07:15:14.877] DHCP Inf: Serva’s own interface MAC AsustekC/30:85:A9:EA:A6:75 : ignoring request
[03/21 07:15:20.321] DHCP Inf: Serva’s own interface MAC AsustekC/30:85:A9:EA:A6:75 : ignoring request
[03/21 07:15:24.399] DHCP Inf: Rcvd DHCPREQUEST from IP 0.0.0.0, MAC Dell/D4:BE:D9:66:CF:24
[03/21 07:15:24.450] DHCP Inf: Serva’s own interface MAC AsustekC/30:85:A9:EA:A6:75 : ignoring request
[03/21 07:15:28.146] DHCP Inf: Rcvd DHCPREQUEST from IP 0.0.0.0, MAC Dell/D4:BE:D9:66:CF:24
[03/21 07:15:31.255] DHCP Inf: Serva’s own interface MAC AsustekC/30:85:A9:EA:A6:75 : ignoring request
[03/21 07:15:36.385] DHCP Inf: Rcvd DHCPREQUEST from IP 0.0.0.0, MAC Dell/D4:BE:D9:66:CF:24
[03/21 07:15:47.796] DHCP Inf: Serva’s own interface MAC AsustekC/30:85:A9:EA:A6:75 : ignoring request
[03/21 07:15:52.777] DHCP Inf: Rcvd DHCPREQUEST from IP 0.0.0.0, MAC Dell/D4:BE:D9:66:CF:24
[03/21 07:15:55.777] DHCP Inf: Rcvd DHCPREQUEST from IP 0.0.0.0, MAC Dell/D4:BE:D9:66:CF:24
[03/21 07:16:01.873] DHCP Inf: Rcvd DHCPINFORM from IP 192.168.1.2, MAC Dell/D4:BE:D9:66:CF:24
[03/21 07:16:12.428] DHCP Inf: Serva’s own interface MAC AsustekC/30:85:A9:EA:A6:75 : ignoring request
[03/21 07:16:16.464] DHCP Inf: Serva’s own interface MAC AsustekC/30:85:A9:EA:A6:75 : ignoring request
[03/21 07:16:20.231] DHCP Inf: Serva’s own interface MAC AsustekC/30:85:A9:EA:A6:75 : ignoring request
[03/21 07:16:21.619] DHCP Inf: Rcvd DHCPDISCOVER from IP 0.0.0.0, MAC Dell/D4:BE:D9:66:CF:24
[03/21 07:16:21.619] DHCP Inf: Address 0.0.0.0 has been REQUESTED
[03/21 07:16:21.620] DHCP Inf: Address 192.168.1.2 is being OFFERED
[03/21 07:16:24.465] DHCP Inf: Serva’s own interface MAC AsustekC/30:85:A9:EA:A6:75 : ignoring request
[03/21 07:16:25.683] DHCP Inf: Rcvd DHCPREQUEST from IP 0.0.0.0, MAC Dell/D4:BE:D9:66:CF:24
[03/21 07:16:25.683] DHCP Inf: Address 192.168.1.2 is being ACKED
[03/21 07:16:33.755] DHCP Inf: Serva’s own interface MAC AsustekC/30:85:A9:EA:A6:75 : ignoring request
[03/21 07:16:48.879] DHCP Inf: Serva’s own interface MAC AsustekC/30:85:A9:EA:A6:75 : ignoring request
[03/21 07:17:11.332] DHCP Inf: Serva’s own interface MAC AsustekC/30:85:A9:EA:A6:75 : ignoring request
[03/21 07:17:15.465] DHCP Inf: Serva’s own interface MAC AsustekC/30:85:A9:EA:A6:75 : ignoring request
[03/21 07:17:16.803] DHCP Inf: Rcvd DHCPREQUEST from IP 0.0.0.0, MAC Dell/D4:BE:D9:66:CF:24
[03/21 07:17:16.803] DHCP Inf: Address 192.168.1.2 is being ACKED
[03/21 07:17:23.255] DHCP Inf: Serva’s own interface MAC AsustekC/30:85:A9:EA:A6:75 : ignoring request
tom ·
you must extract the ISO content.
Ben ·
This is probably a dumb question but by “Windows Installation Files” in step 2 do I just copy the ISO I have (It’s just a Windows 8.1 unmodified ISO) from MSDN into that folder or do I extract the contents of it first and place those files in the folder I create?
Reprovo ·
Extract the files first.That’s what I did. I’m not sure If the program can detect the ISO and extract It automatically If you place It directly.
Reprovo ·
Thanks for the quick reference! Installation went surprisingly smooth
tom ·
@Rich: Sure you are installing a RIS OS (e.g. XP) then you need to create a “Null Session Share” called WIA_RIS_SHARE pointing to C:SERVA_ROOT. This is not rocket science like you said but it is a bit tricky; a very common mistake is making that share pointing to C:SERVA_ROOTWIA_RIS instead; that’s wrong. I encourage you to read Serva’s application notes and follow the instructions from https://vercot.com/~serva/advanced/NullSessionShares.html. If you are still in trouble please run a traffic capture with Wireshark and see the errors when XP tries to connect to WIA_RIS_SHARE. If the capture results cryptic to you please provide a link here or ask for help at Serva’s website.
@Hamza: you can see that log when Serva’s PC connects back-to-back to the client and Serva’s PC NIC does not have an static IP. Then when the client boots up Serva’s PC NIC powers up and tries to find an IP by DHCP; Serva refuses to provide IPs by DHCP to its own NICs. You can solve your issue if you assign a fixed IP to that NIC. Of course the assigned IP and the ones in Serva’s DHCP pool should belong to the same network. e.g. if your pool is 192.168.20.5 to 192.168.20.10 you could assign to the NIC 192.168.20.1
Hamza ·
It tried hard working on it but i keep getting this error on log file
DHCP Inf: Serva’s own interface MAC QuantaCo/C4:54:44:F4:88:D1 : Ignoring request
Rich ·
So I’ve tried this like 50 times already. Everything connects, serva sends the info to the target computer, and in the end, the target computer just hangs on the windows screen. Patrick has been excellent at responding, but ineffective at providing a solution. He mentions the share is not setup properly….. Sharing is not rocket science! Then he goes on about Null Session Shares. This tool looks so damn promising, but really, a fricking share is stopping the install? Any ideas?
tom ·
@miran Installing a customized windows from network is easy; Get a “fresh” windows install ISO and after copying its content under Serva control just customize the file Install.wim with the MS ADK tool DISM.exe. Dism will allow you to “slipstream” updates, drivers, applications, etc to the original “Seattle made” Install.wim. After your customization is finished just use Serva for net delivering your customized version of Windows.
miran ·
that is amazing work
I wanna install a customized window from network,
I mean install some apps and office on the OS then make an image, after that use this image to install on another PC from the network, rather than using a fresh OS. anyone can help me please how to make this image?
how to install windows backup for network bye serva ?
tom ·
@Jason; please be sure your asset directory does not include either spaces or non-ASCII characters as explained in Serva’s Application Note.
Lauro Abreu ·
OMG thank you! You saved my life!
I though that install over network was hard but is indeed very easy! Your tutorial is really easy to understand and to follow! I just installed Windows 10 in my machine with serva. I had to do one thing that isn’t in your tutorial to make it work, i had to put a password in my user so i could login to make the windows installation (you really should put this in the tutorial).
Anyway, thanks again!
Spike ·
I agree. This is by far the easiest way I have come across to network install an operating system. I also have to setup a login password for my user account that I used to PXE boot.
I was prompted with “DomainUser” and the “Password” dialog box during installation of Windows 7 which was quickly resolved by setting up a login password on my machine.
Jason ·
192.168.1.100:57094
Jason ·
From the TFTP (.1.100 is neither the source or target)
192.168.1.100:57094
Jason ·
from the log:
[01/26 19:49:27.838] TFTP Inf: : sent blks=116 blkSz=1408, Total 162508 bytes in 0s, err recovery=0
[01/26 19:49:27.841] TFTP Inf: Read file . Mode octet
[01/26 19:49:27.926] TFTP Warn: received duplicated request from 192.168.1.100:57097
[01/26 19:49:27.953] TFTP Inf: : sent blks=2 blkSz=1408, Total 1416 bytes in 0s, err recovery=0
[01/26 19:49:28.176] TFTP Inf: Read file . Mode octet
jason ·
I had this working once last year, can’t figure out my problem. When I get my OS choices on the target boot machine and select an OS to install, the menu simply reloads to the OS choices
tom ·
@ADDIE08; follow Serva’s Application Note to the latter, If you copy your asset files from a DVD be sure the copied file Boot.wim is not read only.
@yossi rachevsky; you have to add the missing drivers as explained here or at Serva’s webpage (troubleshooting section)
Slava ·
Very good step-by-step manual , everything worked from first time without any errors, just don’t miss anything by stepping, choose correct network adapter drivers, clean OS image, and everything will work like charm. Also I recommend setting BIOS defaults on computer into which want install OS..
Thanks for tips Ciprian Adrian Rusen
yossi rachevsky ·
all worked good until during windows installation I get an error from the installer saying that no device drivers were found… and no hard disks appear in the dialog where to install ! what can I do? thanks you
ADDIE08 ·
I also have the same problem w/ Purnendu Nath, (error 3 in CreateFile; The system cannot find the path specified.) then my screen stays at a blank screen.
hazim ·
hello
i cant find the inf file for network card i try to install on dell vostro 3300 !!
all exe ,
thanks
Spike ·
You need to find out the make and model of the network adapter and than download it from the manufacturer website. It is likely to be a Realtek or Intel network controller chip on the Dell.
tom ·
@Purnendu Nath: Your Log looks OK; what problem do you have?
@Chris: What are you trying to install; Look at Serva’s Log for clues; Do you see TFTP transfer errors? is your firewall open?
@eng. mohammed.a….: ServaPENet connects to the Serva’s PC hosted share WIA_WDS_SHARE, you should provide a username (or a “Domain/username” only if your Serva’s PC is under a domain schema) of any user with minimally reading rights over that share
eng. mohammed.alshereif ·
What is the Domain/user and password in dialog
servaPENet?
“DomainUser” refers to your computer name and the user account. For example your computer name is “Dell” and your user account is “John” than the the “DomainUser” will be “DellJohn”.
The password will be the password you use to login to the account “John”. If you do not have a password you must create one otherwise the program will not have the credentials to boot the operating system via the network.
Chris ·
I’m stuck at Trying to load” pxeserva.cfg/menu.def
It stays there until says “Boot failed: press a key to retry, or wait for reset…”
Purnendu Nath ·
I have some problem please solve it Iam using this method on VMWARE,
[10/29 01:49:08.281] PDHCP Inf: Rcvd DHCPDISCOVER from IP 0.0.0.0, MAC ?/00:0C:29:6B:F1:67
[10/29 01:49:08.281] PDHCP Inf: Sending DHCPOFFER
[10/29 01:49:08.281] PDHCP Inf: Broadcasting through local interface [192.168.58.1]
[10/29 01:49:08.281] PDHCP Inf: Broadcasting through local interface [192.168.107.1]
[10/29 01:49:10.340] PDHCP Inf: Rcvd DHCPREQUEST from IP 0.0.0.0, MAC ?/00:0C:29:6B:F1:67
[10/29 01:49:10.394] PDHCP Inf: Rcvd DHCPREQUEST from IP 192.168.107.128, MAC ?/00:0C:29:6B:F1:67
[10/29 01:49:10.394] PDHCP Inf: Sending DHCPACK, TFTP [192.168.107.1] bootfile [pxeserva.0]
[10/29 01:49:10.395] TFTP Inf: Read file . Mode octet
[10/29 01:49:10.447] TFTP Err: Peer returns ERROR -> aborting transfer
[10/29 01:49:10.448] TFTP Inf: Read file . Mode octet
[10/29 01:49:10.569] TFTP Inf: : sent blks=12 blkSz=1456, Total 16798 bytes in 0s, err recovery=0
[10/29 01:49:10.616] TFTP Inf: Read file . Mode octet
[10/29 01:49:10.671] TFTP Inf: : sent blks=1 blkSz=1408, Total 1173 bytes in 0s, err recovery=0
[10/29 01:49:10.676] TFTP Inf: Read file . Mode octet
[10/29 01:49:10.839] TFTP Inf: : sent blks=116 blkSz=1408, Total 162508 bytes in 0s, err recovery=0
[10/29 01:49:10.844] TFTP Inf: Read file . Mode octet
[10/29 01:49:10.941] TFTP Inf: : sent blks=1 blkSz=1408, Total 1173 bytes in 0s, err recovery=0
[10/29 01:49:13.858] TFTP Inf: Read file . Mode octet
[10/29 01:49:13.909] TFTP Inf: : sent blks=1 blkSz=1408, Total 1301 bytes in 0s, err recovery=0
[10/29 01:49:13.965] TFTP Inf: Read file . Mode octet
[10/29 01:49:14.067] TFTP Inf: : sent blks=18 blkSz=1456, Total 25772 bytes in 1s, err recovery=0
[10/29 01:49:14.102] TFTP Inf: Read file . Mode octet
[10/29 01:49:14.534] TFTP Inf: : sent blks=360 blkSz=1456, Total 523328 bytes in 0s, err recovery=0
[10/29 01:49:14.710] TFTP Inf: Read file . Mode octet
[10/29 01:49:14.713] TFTP Err: File : error 3 in CreateFile; The system cannot find the path specified.
[10/29 01:49:14.721] TFTP Inf: Read file . Mode octet
[10/29 01:49:14.773] TFTP Err: Peer returns ERROR -> aborting transfer
[10/29 01:49:14.773] TFTP Inf: Read file . Mode octet
[10/29 01:49:14.829] TFTP Inf: : sent blks=9 blkSz=1420, Total 12288 bytes in 0s, err recovery=0
[10/29 01:49:14.838] TFTP Inf: Read file . Mode octet
[10/29 01:49:14.839] TFTP Err: File : error 3 in CreateFile; The system cannot find the path specified.
[10/29 01:49:14.853] TFTP Inf: Read file . Mode octet
[10/29 01:49:14.854] TFTP Err: File : error 2 in CreateFile; The system cannot find the file specified.
[10/29 01:49:14.869] TFTP Inf: Read file . Mode octet
[10/29 01:49:14.981] TFTP Err: Peer returns ERROR -> aborting transfer
[10/29 01:49:14.981] TFTP Inf: Read file . Mode octet
[10/29 01:49:15.083] TFTP Err: Peer returns ERROR -> aborting transfer
[10/29 01:49:15.084] TFTP Inf: Read file . Mode octet
[10/29 01:49:15.468] TFTP Inf: : sent blks=2233 blkSz=1420, Total 3170304 bytes in 0s, err recovery=0
[10/29 01:49:15.468] TFTP Inf: Read file . Mode octet
[10/29 01:49:24.936] TFTP Inf: : sent blks=104117 blkSz=1420, Total 147845056 bytes in 9s, err recovery=0
[10/29 01:49:26.126] TFTP Inf: Read file . Mode octet
[10/29 01:49:26.129] TFTP Err: File : error 3 in CreateFile; The system cannot find the path specified.
tom ·
@Annoyed User; You are just senselessly bashing a software that works very well.
@slicedtoad; You were probably binding the IP of a NIC that was not connected to the booting client network.
@Tadeu, You see that if the Windows ISO that you are using is a heavily customized OEM version. Just use a Windows Retail, MSDN, etc ISO and you will not get that issue.
Tadeu ·
Hello everyone, mine does work, but when it appears the screen for the menu of systems, it shows that “Initial menu has no label entries!”. Can anyone help me please??. Thanks
slicedtoad ·
Great guide. The only thing I had to do differently was NOT `bind […] to this address`. When I had it bound, the pxe boot searched for a while and eventually quit saying it couldn’t find anything (something about “no file”.
Maybe you could add that to the troubleshooting section?
Annoyed User ·
This is the worst software in the whole Universe. Cannot recommend it to anyone, it is a plain piece of crap which works only when it decides to do so… Crossover, so now crappy router configuration… Even if I hd Bill Gates’ money, I wouldn’t pay for this joke…
trk204 ·
Follow the guide precisely guys, it works. If you’re missing directories, I’d bet you’re not running as admin. The closing and re-starting is important as well, thats when serva is creating said directories.
Coming from linux and I needed a one off solution to setup a win7 machine (unfortunately only had a win7 machine to do this, the cruel irony).
Followed the guide and was off and running in no time.
One note, the anonymous share didn’t connect for me. I set it to everyone:read, but wouldn’t work. Tried my local username/password and it worked.
Gabriel ·
Hi, at step 5 i don’t understand, we share WIA_WDS or we share WIA_WDS_SHARE because i don’t have this folder? Thank You.
tom ·
share the directory WIA_WDS “as” WIA_WDS_SHARE. the first one is the name of the directory and the second one is the name of the share; simple stuff.
xino ·
Hi, Thanks for helping us with this great article in advance, my question is: in DHCP tab there is a field to fill bootfile, in your screenshot seems like it is filled automatic, but in mine, i have to fill it and i dont have any boot file, where to find one ? My pxe boot is stucked in a msg: the system could not find pxeserva.0
Johannes van Tonder ·
Select (check) the BINL option.
victor ·
it happens sometimes on back-to-back situations;
just turn on Serva’s PC WINS service on
Mazi30 ·
Hey, how can I actually turn that on? I’ve looking everywhere for last day, nothing like that in settings or even serva documentation
david ·
error cannot find network name…any help?
victor ·
If you do not create the SMB share there’s not way to install a WDS Windows distribution as its Install.wim must be reached using that share. Only the first stage of the install (Bootmanager and ServaBoot.wim) uses TFTP. That’s how WDS works; and that’s exactly what Serva does.
Rusen, I strongly recommend you to “read” Serva’s site.
neetah ·
Hi
Great Article. I’m currently trying to install windows 7 using Serva but I cant seem to get the ServaPENET login credentials? I thought it would be the username and password of the computer that I am currently using! Kindly advise.
~G~ ·
M-$illy has an odd quirk, when connecting to a M$illy network where a username is expected, even if usernames/passwords are disabled, you’ll still need one, the best thing to do is create a password on your host machine for your logon, you can delete password once your finished with it.
eg:
Username: My UserName
Password: None
change to:
Username: My UserName
Password: My Password
obviously you can have whatever you desire the password to be for your account. Once you create a password on your account on the host machine, you can logon via network
Arthur ·
I don’t understand why step (5) is necessary. It creates a SMB file share but AFAIK network booting uses TFTP, so what’s the point of it?
Ciprian Adrian Rusen ·
Don’t follow that step and see if it works for you. I only tried to create the “safest/least error-prone” guide I could.
Vijaygeorge ·
Thanks man You rock working awesome….:-)
Shaun ·
Great article! I have run into a problem though.. At the ServaPENet driver install, when asked for login details, nothing works..
Not even after sharing with Everyone on source computer! Help
Nikola Malešević ·
I already thanked you on SuperUser, but here it is again. Very helpful and easy to follow! Thanks!
P.S. You guys should really upvote this: https://superuser.com/a/565923/58145
Ciprian Adrian Rusen ·
Thank you for the upvote and for the kind words. I’m happy this guide helped you. We worked a lot on it.
Vno ·
Thank you very much for this useful tutorial. I was having trouble re-installing Windows after messing up with dual boots. It didn’t let me boot up from CD/DVD anymore.
This wonderful article helped me a great deal. Have a nice day. 🙂
Vivek Thomas ·
Found this article from your post on superuser.com
Saved me a lot of time, thanks a lot! 🙂
Ciprian Adrian Rusen ·
I’m glad it helped. Thanks for visiting. 😉
Andy ·
I’m with Victor here; I think Serva and its documentation are both very good and easy to follow.
BTW your concepts at point 4) are wrong: Serva does not “supports” networks cards; Serva net boots the Boot.wim included within your distribution; it is your distribution Boot.wim the one that includes or not native support for your specific card. Just after you find your Boot.wim does not include the driver you need you add it but never before you really know the driver is missing !
Ciprian Adrian Rusen ·
I updated the article. Thanks for the feedback.
victor ·
Your recipe is OK but it has bits of misleading info like “run Serva as Admin” (that’s totally unnecessary), or suggesting that network installs are difficult (Serva has made things very easy on this field even for you).
I’m very happy with Serva; Today it is the fastest (and easy) way for getting an OS installed. Also I’d recommend reading the official documents before following tutorials like yours.
Ciprian Adrian Rusen ·
The Serva setup is difficult. It’s documentation is incomplete and way too technical and convoluted. In order to get it to work on one of our test systems, it took us hours of tweaking and troubleshooting.
That’s why we included some instructions you might consider unnecessary – so that we cover more exceptions than its official documentation does.
victor ·
With all due respect I think Serva documentation is the best documentation about PXE I’ve ever seen. It “teaches” you PXE. Of course is technical; because it is not a recipe. What you definitely cannot say is that it’s “incomplete or convoluted”; that is not true.
Posts like yours are good as “quick reference” but you cannot really get anything done without reading the official documents.
I think both of us should say a big “thank you Serva” before mentioning some of the things you write here.
Ciprian Adrian Rusen ·
Well, our views are different here. Serva’s documentation might be better than what you find in other places but it still needs a lot of work until it can be considered great.
Anyway, we did not write about Serva because it sucks. On the contrary: we found it to be the simplest tool for performing Windows installations in a network.


Discussion (114)
Excellent article, worked like a charm due to very detailed explanation. Just that with the ‘bind this ip’ in dhcp and tftp parts checked, it didn’t work, but when I unchecked it, it worked right away. Good work!
Thank you Brother, it worked in first try. but even the NIC driver has not got .inf file it worked..
Also, with legacy (older) hardware, TFTP will use an old block size and transfer will implicitly fail with an ERR. To alleviate this, set the TFTP Block Size to 512 Bytes.
Hi guys,
thanks for the helpful topic!
I am writing to you regarding two messages I received in the Log after setting up Serva. It is regarding Step 3 from the description, where a log is being created.
[09/07 11:23:28.969] BINL Inf: Preparation/Maintenance procedures “Start” **
[09/07 11:23:29.269] BINL Inf: Expandd OK, D:SoftwareOSWin 8.1WIA_WDSWindows8_SERVA_pxeboot.n12
[09/07 11:23:29.509] BINL Inf: Expandd OK, D:SoftwareOSWin 8.1WIA_WDSWindows8_SERVA_bootmgr.exe
[09/07 11:23:29.589] BINL Inf: Copied OK, D:SoftwareOSWin 8.1WIA_WDSWindows8_SERVA_bootboot.sdi
[09/07 11:23:29.899] BINL Inf: Expandd OK, D:SoftwareOSWin 8.1WIA_WDSWindows8_SERVA_bootmgfw.efi
[09/07 11:23:29.939] BINL Inf: Copied OK D:SoftwareOSWin 8.1BMMICROSOFTEFI64bootmgfw.efi 6.3.9600.17031
[09/07 11:23:29.949] BINL Inf: Copied OK D:SoftwareOSWin 8.1BMMICROSOFTEFI64bootmgfw.efi.org
[09/07 11:23:29.989] BINL Inf: Created OK, D:SoftwareOSWin 8.1WIA_WDSWindows8_SERVA_ServaBINL.dat
[09/07 11:23:34.519] BINL Inf: Injected OK, D:SoftwareOSWin 8.1WIA_WDSWindows8_SERVA_bootServaBoot.wim Added [2]WindowsSystem32ServaPENet.exe
[09/07 11:23:34.530] BINL Inf: Injected OK, D:SoftwareOSWin 8.1WIA_WDSWindows8_SERVA_bootServaBoot.wim Added [2]WindowsSystem32Winpeshl.ini
[09/07 11:23:34.541] BINL Inf: Injected OK, D:SoftwareOSWin 8.1WIA_WDSWindows8_SERVA_bootServaBoot.wim Added [2]Serva.txt
[09/07 11:23:34.576] BINL Inf: Created OK, D:SoftwareOSWin 8.1WIA_WDSWindows8_SERVA_bootbcd
[09/07 11:23:34.590] BINL Inf: Created OK, D:SoftwareOSWin 8.1BMPXESERVABIOSpxeserva.cfgmenu.def.bak
[09/07 11:23:34.591] BINL Inf: Created OK, D:SoftwareOSWin 8.1BMPXESERVABIOSpxeserva.cfgmenu.def
[09/07 11:23:34.591] BINL Inf: Created OK, D:SoftwareOSWin 8.1BMPXESERVABIOSpxeserva.cfgmenu.def
[09/07 11:23:34.592] BINL Warn: Serva assets not found when creating D:SoftwareOSWin 8.1BMPXESERVAEFI32pxeserva.cfgmenu.def
[09/07 11:23:34.593] BINL Inf: Created OK, D:SoftwareOSWin 8.1BMPXESERVAEFI32pxeserva.cfgmenu.def
[09/07 11:23:34.604] BINL Inf: Created OK, D:SoftwareOSWin 8.1BMPXESERVAEFI64pxeserva.cfgmenu.def.bak
[09/07 11:23:34.605] BINL Inf: Created OK, D:SoftwareOSWin 8.1BMPXESERVAEFI64pxeserva.cfgmenu.def
[09/07 11:23:34.605] BINL Inf: Created OK, D:SoftwareOSWin 8.1BMPXESERVAEFI64pxeserva.cfgmenu.def
[09/07 11:23:34.766] BINL Err: WIA_WDS_SHARE wrong setup; 127.0.0.1:445 SMB share not found
[09/07 11:23:34.767] BINL Inf: Preparation/Maintenance procedures “End” **
My router is mainly IPv6, but it is working with IPv4 as well and with dynamic dhcp I guess, as every time the IPv4 changes. I would like to use Serva to install Windows over my network between two computers connected with LAN to the router.
Could you please help me with this issue?
Thank you very much for the time taken and your help.
Best regards
sajagin
Ok, I tried now to run it as the tutorial describes, with two small changes. The one that Paul denoted above, and the second: IP address is not the default, but the current IP address of the PC (using ipconfig in cmd). It did the job so far.
After entering the credentials there comes following error: 0x4B8 A network-specific error occurred.
It is regarded to:
Connecting to Serva’s Windows Installation Asset ERROR!
(screenshot here: https://mega.nz/#!6ZpyRIjD!4f5Wir5ovYS3CiPzvLiXH2nxSXba4MjJZrGRJZCxoZ4)
What does it mean? Could you please give me a hint here? Thanks a lot!
Best, Daniel
Correct screenshot link: https://mega.nz/#!WBhkFADT!B74HVXV1FDLLmBd29wMvgcTr8QnPcjAEM-NM9NdB17U
Ok guys, finally it worked out! The trick is, that in the credentials you have to enter only your username (no domains, no pc names, no special characters like @, &, etc.) and password. I enabled the administrator account to do it. The windows 10 admin rights are a bit tricky and that was the reason for the network errors. Good luck!
Thanks for sharing everything you did and what you have learned. It will surely help others.
Sure! Big thanks to the guys from Serva support, who provided me some very useful feedback too. I can only recommend!
Just two comments:
1) The current community version of Serva (3.0.0) has a ridicously small allowed number of clients – 2!!! in reality it means max two machines that sent *any* DHCP messages will be served. But DHCP messages are constantly flowing in the network and it is not what you want. So always check out MAC address of the machine you want to install OS to, and specify it in Serva’s DHCP MAC filter.
2) The correct path to your custom NIC drivers is now:
$OEM$$Boot$$1$WinPEDriver$NIC
Except of this two points everything works like a charm! And I have no previous experiense with PXE booting 🙂
Thank you, this saved my weekend!!!
Hahaaaa it worked, old pc wouldn’t accept USB boot and who uses dvd anymore. You saved me a lot of time thank you sir
Happy to help. 😉
>The bottom button isn’t visible somehow at my computer.
from Serva 3 and up click on Serva’s System-Menu icon (up-left)
>ProxyDHCP service did not reply to request on port 4011
you probably have a second PXE server in your net or Serva’s proxyDHCP port 4011 is blocked by your firewall
Above Subject Issue plz solve
The bottom button isn’t visible somehow at my computer. How to make it visible? I’ve tried to resize the window, but I got nothing.
My computer running Windows XP on AMD Athlon II and with AMD-V enabled
Installed Windows 7, 10 and Server 2008r2 using this method.
Even enabled ftp. Your article had me up and running in 10 mins.
Most problems may be file sharing and check Window Services are RUNNING: Workstation, Server (these are by default) and again Network Type, — I used “Work”, had *no* results set to “Public”
Be sure your Network is set to “Work”
Thanks for this !
Really cool
I have this running of Server 2008r2
Very good, it worked for me.
nice job.
Sorry but I am a complete noob to this but where would I get the network drivers and another thing everytime I try to network boot the computer it just gives me and Error
PXE-E53: No boot filename received
thanks for answering
and it gives me 2 errors on serva too
[01/19 00:03:27.540] BINL Err: Expanding E:serverootWIA_WDSWindows7_SERVA_pxeboot.n12
[01/19 00:13:50.736] PDHCP Err: >> Too many clients; “Supporter” license required. Ignoring MAC ?/38:B1:DB:0D:C3:9B request
[01/19 00:03:27.540] BINL Err: Expanding E:serverootWIA_WDSWindows7_SERVA_pxeboot.n12
this tells you Serva couldn’t get a requiered component from your distro; are you using Serva with an MSDN/Retail, etd DVD? if you are using a heavily customized OEM distribution that you just downloaded from Internet they might have missing components required for PXE install
[01/19 00:13:50.736] PDHCP Err: >> Too many clients; “Supporter” license required. Ignoring MAC ?/38:B1:DB:0D:C3:9B request
That tells you the free version of Serva is ignoring that DHCP request because your network has more than 2 booting clients requiring PXE/DHCP services. Try your test on a isolated network or get Serva “Supporter”
Drivers? from the manufactures; that’s the best source, I personally avoid any other on-line service providing drivers.
You can get PXE-E53 when booting a PXE client and you forgot to tag the BINL service or if you are not using BINL but you forgot to define a booting “file” (NBP) or if you are in proxyDHCP mode and your client needs a firmware update for correctly dealing with it, or Serva stopped providing answers i.e. you are using the free version of Serva with more than 2 booting clients.
Just a note. When I had tftp, and dhcp binding to a specific address, serva failed to create it’s special directory structure and would post an error About the boot file not being correct. However unselecting those settings cleared it right up.
Just to avoid confusion; bounding service/s to a particular IP/s has “nothing” to do with Serva BINL services creating the directory support structure within a particular asset. In your case it worked for some other reason.
Thank you a lot, your tutorial is very good and it worked very well. Thanks!
1st I would to thank u for ur hard work to help us with ur great and easy tutorial
but, in step 4 I don’t know how to get or access to my network card driver folder. could u pls tell me from where i can get the files of my network card to copy it .
If you need to add custom drivers you have to get them first from your NIC manufacturer. If you are trying to install on a Notebook or motherboard with integrated NIC then please get the drivers from the Notebook/motherboard manufacturer instead.
Hello -oh, and sorry for my bad english –
Thank you for this tuto. It’s really clear and easy…but, i have some troubles. I resolve some by myself, but this one i can’t : I have a “PXE-E53 error” on the client computer. It also said “no boot filename received”… I tried everything, I deactivate the firewall/antimalware, etc. I try several options with Serva, I try others sharing settings, for the WIA_WDS file… but nothing ! I still have this stupid PXE 53 error…
Any idea about how resolve this problem ?
Thank you again !
*I tried, sorry
And I forgot it, but this is Serva logs :
[10/16 11:59:04.337] BINL Inf: Preparation/Maintenance procedures “Start” **
[10/16 11:59:04.353] BINL Inf: Preparation/Maintenance procedures “End” **
[10/16 11:59:15.463] PDHCP Inf: Rcvd DHCPDISCOVER from IP 0.0.0.0, MAC ?/D8:CB:8A:81:9B:DB
[10/16 11:59:15.463] PDHCP Inf: Sending DHCPOFFER
[10/16 11:59:15.478] PDHCP Inf: Rcvd DHCPDISCOVER from IP 0.0.0.0, MAC ?/D8:CB:8A:81:9B:DB
[10/16 11:59:15.478] PDHCP Inf: Sending DHCPOFFER
[10/16 11:59:15.541] PDHCP Inf: Rcvd DHCPDISCOVER from IP 0.0.0.0, MAC ?/D8:CB:8A:81:9B:DB
[10/16 11:59:15.541] PDHCP Inf: Sending DHCPOFFER
[10/16 11:59:15.588] PDHCP Inf: Rcvd DHCPDISCOVER from IP 0.0.0.0, MAC ?/D8:CB:8A:81:9B:DB
[10/16 11:59:15.588] PDHCP Inf: Sending DHCPOFFER
[10/16 11:59:15.650] PDHCP Inf: Rcvd DHCPDISCOVER from IP 0.0.0.0, MAC ?/D8:CB:8A:81:9B:DB
[10/16 11:59:15.650] PDHCP Inf: Sending DHCPOFFER
[10/16 11:59:15.697] PDHCP Inf: Rcvd DHCPDISCOVER from IP 0.0.0.0, MAC ?/D8:CB:8A:81:9B:DB
[10/16 11:59:15.697] PDHCP Inf: Sending DHCPOFFER
[10/16 11:59:15.760] PDHCP Inf: Rcvd DHCPDISCOVER from IP 0.0.0.0, MAC ?/D8:CB:8A:81:9B:DB
[10/16 11:59:15.760] PDHCP Inf: Sending DHCPOFFER
I find this : https://support.microsoft.com/en-us/kb/259670
But i don’t understand anything… In “Cause” :
“configure the routers IP helper table to contain the IP address of the RIS server. ”
Euhhh…
if you receive “no boot filename received” that tells me you probably already have a different DHCP server providing PXE information with an empty filename field. Then your client is PXE booting from a different server than Serva
@Willem in fact you can install/boot a lot more than “Linux too”; see here
https://vercot.com/~serva/an/NonWindowsPXE3.html
Awsome exactly what i need then 😉 thanks Tom i will try it out soon
Can it install Linux to ?
@tom I got it fixed by disabling Avast completely.
@tom this is just what i thought, but there is a problem: I installed windows from a friend’s serva PXE environment before. The only possible thing is the firewall issue, but I only have Windows Firewall and I turned it down for either public and private networks. I will see if avast free AV includes a firewall.
@Nesto if your firewall is “really” open to TFTP traffic then your client probably needs a firmware update. check your firewall.
@Oscar your client is not receiving the proxyDHCP offer; then either your firewall is not completely open to proxyDHCP traffic (4011) or your client firmware is buggy,
I cannot boot, the message is the next one:
[08/27 10:08:16.351] BINL Inf: Preparation/Maintenance procedures “Start” **
[08/27 10:08:16.398] BINL Inf: Preparation/Maintenance procedures “End” **
[08/27 10:08:58.445] PDHCP Inf: Rcvd DHCPDISCOVER from IP 0.0.0.0, MAC AsrockIn/00:25:22:9A:37:76
[08/27 10:08:58.445] PDHCP Inf: Sending DHCPOFFER
[08/27 10:09:00.351] PDHCP Inf: Rcvd DHCPDISCOVER from IP 0.0.0.0, MAC AsrockIn/00:25:22:9A:37:76
[08/27 10:09:00.351] PDHCP Inf: Sending DHCPOFFER
[08/27 10:09:04.367] PDHCP Inf: Rcvd DHCPDISCOVER from IP 0.0.0.0, MAC AsrockIn/00:25:22:9A:37:76
[08/27 10:09:04.367] PDHCP Inf: Sending DHCPOFFER
[08/27 10:09:12.382] PDHCP Inf: Rcvd DHCPDISCOVER from IP 0.0.0.0, MAC AsrockIn/00:25:22:9A:37:76
[08/27 10:09:12.382] PDHCP Inf: Sending DHCPOFFER
[08/27 10:09:28.429] PDHCP Inf: Rcvd DHCPDISCOVER from IP 0.0.0.0, MAC AsrockIn/00:25:22:9A:37:76
[08/27 10:09:28.429] PDHCP Inf: Sending DHCPOFFER
I disabled the firewall completely to se if that works. And it did not work. Any ideas?
I have a trouble when boot in the PC, the PC receives the DHCP address but when try to connect to the TFTP server, says a error PXE32 TFTP OPEN TIMEOUT
I re-readed all the steps again and again and I can’t found the error, all is fine but I receiving this error .-.
did it work with .ISO ?
Very easy to follow, works perfectly. Thank you for the tutorial.
@ajay when installing WDS OSs (Vista and up) the booting client needs to map WIA_WDS_SHARE then ServaPENet asks you for a user (and its non-empty password) able to connect to the mentioned share.
serva3264bit
work properly but at last they also asking for username and password how to find it please help me sir
If you are getting a prompr for “DomainUser” and than a corresponding password than these are credentials of the computer that you are using as the server. Domain = Computer name, User = Login username and Password = the password for the login. If you don’t have a password on that account, you must create one.
@Stockton Let’s try to avoid a false concept; “unbound services is not a mandatory requisite for Serva”.
By default Serva binds its running services to “ALL” the available NICs on Serva’s PC. This means i.e. a DHCP “DISCOVERY” packet can reach Serva’s DHCP engine when coming from any available NIC. Sometimes we DO NOT want this “promiscuous” strategy and we prefer “binding” a particular service to just one NIC identified by its IP.
In your case if your DHCP & TFTP services were bound to NIC_1 but your PXE client was connected to Serva’s PC through NIC_2 sure you didn’t get from Serva any response but when you unbound the services then Serva started listening to all NICs and you got the services running correctly.
As you can surely see now you can get Serva running with bound or unbound services it all depends on your needs.
@kaalia: for error 0x43 (“The network name cannot be found”) (from Serva’s webpage) this error can be seen when:
1) The share WIA_WDS_SHARE is not created or it is miss-configured.
2) Sometimes seen when the client “directly” connects to Serva’s PC by an Ethernet crossover cable (“back-to-back” scenario).
3) Sometimes seen when there is a router between the client and Serva’s PC.
to fix it try sequentially:
1) Checking the share WIA_WDS_SHARE is correctly created.
2) Adding the “WINS” DHCP option (44) to the Serva DHCP Server/proxyDHCP, pointing to Serva’s IP.
3) Enabling “WINS” services at Serva’s PC (see MS documentation for this)
I get to the point of the install where it asks for the login and keep getting “error: 0x43 the network name cannot be found”. I’m entering the right username and password, but I can’t seem to get past this.
I have shared the WIA_WDS_SHARE folder correctly to only one user that has a password on the machine that Serva is running. Do I need to share the folder to ‘Everyone’ as well? I read in one of the comments that the PC WINS service needs to be turned on. If so, how do I turn it on? Any help would be appreciated.
How to turn on WINS service?
Thank you for this great description! It worked for me absolutely, only one small extension: The two “Bind TFTP/DHCP to this address” option had to be disabled for me. If I changed them for enabled, the target laptop can’t boot from the network.
Thank you!
Thanks for the article, had to figure out by reading from the Serva website that your user account MUST have a password if you want to connect properly. (I recieved 0x52F/ 0x520 errors otherwise)
“DHCP Inf: Serva’s own interface MAC AsustekC/30:85:A9:EA:A6:75 : ignoring request”
That message tells you that one of the NICs on Serva’s PC is performing a DHCP request; Serva DHCP does not provide IPs to its own interfaces.
This happens i.e. when dealing with point-to-point connections; when the client boots-up the Ethernet link gets active and at the other end Serva’s NIC also powers up; in this case Serva’s NIC must have a user defined “fixed” IP and avoid trying to get its own IP by DHCP.
[03/21 07:14:44.884] BINL Inf: Preparation/Maintenance procedures “Start” **
[03/21 07:14:44.922] BINL Inf: Preparation/Maintenance procedures “End” **
[03/21 07:15:01.656] DHCP Inf: Serva’s own interface MAC AsustekC/30:85:A9:EA:A6:75 : ignoring request
[03/21 07:15:05.464] DHCP Inf: Serva’s own interface MAC AsustekC/30:85:A9:EA:A6:75 : ignoring request
[03/21 07:15:14.877] DHCP Inf: Serva’s own interface MAC AsustekC/30:85:A9:EA:A6:75 : ignoring request
[03/21 07:15:20.321] DHCP Inf: Serva’s own interface MAC AsustekC/30:85:A9:EA:A6:75 : ignoring request
[03/21 07:15:24.399] DHCP Inf: Rcvd DHCPREQUEST from IP 0.0.0.0, MAC Dell/D4:BE:D9:66:CF:24
[03/21 07:15:24.450] DHCP Inf: Serva’s own interface MAC AsustekC/30:85:A9:EA:A6:75 : ignoring request
[03/21 07:15:28.146] DHCP Inf: Rcvd DHCPREQUEST from IP 0.0.0.0, MAC Dell/D4:BE:D9:66:CF:24
[03/21 07:15:31.255] DHCP Inf: Serva’s own interface MAC AsustekC/30:85:A9:EA:A6:75 : ignoring request
[03/21 07:15:36.385] DHCP Inf: Rcvd DHCPREQUEST from IP 0.0.0.0, MAC Dell/D4:BE:D9:66:CF:24
[03/21 07:15:47.796] DHCP Inf: Serva’s own interface MAC AsustekC/30:85:A9:EA:A6:75 : ignoring request
[03/21 07:15:52.777] DHCP Inf: Rcvd DHCPREQUEST from IP 0.0.0.0, MAC Dell/D4:BE:D9:66:CF:24
[03/21 07:15:55.777] DHCP Inf: Rcvd DHCPREQUEST from IP 0.0.0.0, MAC Dell/D4:BE:D9:66:CF:24
[03/21 07:16:01.873] DHCP Inf: Rcvd DHCPINFORM from IP 192.168.1.2, MAC Dell/D4:BE:D9:66:CF:24
[03/21 07:16:12.428] DHCP Inf: Serva’s own interface MAC AsustekC/30:85:A9:EA:A6:75 : ignoring request
[03/21 07:16:16.464] DHCP Inf: Serva’s own interface MAC AsustekC/30:85:A9:EA:A6:75 : ignoring request
[03/21 07:16:20.231] DHCP Inf: Serva’s own interface MAC AsustekC/30:85:A9:EA:A6:75 : ignoring request
[03/21 07:16:21.619] DHCP Inf: Rcvd DHCPDISCOVER from IP 0.0.0.0, MAC Dell/D4:BE:D9:66:CF:24
[03/21 07:16:21.619] DHCP Inf: Address 0.0.0.0 has been REQUESTED
[03/21 07:16:21.620] DHCP Inf: Address 192.168.1.2 is being OFFERED
[03/21 07:16:24.465] DHCP Inf: Serva’s own interface MAC AsustekC/30:85:A9:EA:A6:75 : ignoring request
[03/21 07:16:25.683] DHCP Inf: Rcvd DHCPREQUEST from IP 0.0.0.0, MAC Dell/D4:BE:D9:66:CF:24
[03/21 07:16:25.683] DHCP Inf: Address 192.168.1.2 is being ACKED
[03/21 07:16:33.755] DHCP Inf: Serva’s own interface MAC AsustekC/30:85:A9:EA:A6:75 : ignoring request
[03/21 07:16:48.879] DHCP Inf: Serva’s own interface MAC AsustekC/30:85:A9:EA:A6:75 : ignoring request
[03/21 07:17:11.332] DHCP Inf: Serva’s own interface MAC AsustekC/30:85:A9:EA:A6:75 : ignoring request
[03/21 07:17:15.465] DHCP Inf: Serva’s own interface MAC AsustekC/30:85:A9:EA:A6:75 : ignoring request
[03/21 07:17:16.803] DHCP Inf: Rcvd DHCPREQUEST from IP 0.0.0.0, MAC Dell/D4:BE:D9:66:CF:24
[03/21 07:17:16.803] DHCP Inf: Address 192.168.1.2 is being ACKED
[03/21 07:17:23.255] DHCP Inf: Serva’s own interface MAC AsustekC/30:85:A9:EA:A6:75 : ignoring request
you must extract the ISO content.
This is probably a dumb question but by “Windows Installation Files” in step 2 do I just copy the ISO I have (It’s just a Windows 8.1 unmodified ISO) from MSDN into that folder or do I extract the contents of it first and place those files in the folder I create?
Extract the files first.That’s what I did. I’m not sure If the program can detect the ISO and extract It automatically If you place It directly.
Thanks for the quick reference! Installation went surprisingly smooth
@Rich: Sure you are installing a RIS OS (e.g. XP) then you need to create a “Null Session Share” called WIA_RIS_SHARE pointing to C:SERVA_ROOT. This is not rocket science like you said but it is a bit tricky; a very common mistake is making that share pointing to C:SERVA_ROOTWIA_RIS instead; that’s wrong. I encourage you to read Serva’s application notes and follow the instructions from https://vercot.com/~serva/advanced/NullSessionShares.html. If you are still in trouble please run a traffic capture with Wireshark and see the errors when XP tries to connect to WIA_RIS_SHARE. If the capture results cryptic to you please provide a link here or ask for help at Serva’s website.
@Hamza: you can see that log when Serva’s PC connects back-to-back to the client and Serva’s PC NIC does not have an static IP. Then when the client boots up Serva’s PC NIC powers up and tries to find an IP by DHCP; Serva refuses to provide IPs by DHCP to its own NICs. You can solve your issue if you assign a fixed IP to that NIC. Of course the assigned IP and the ones in Serva’s DHCP pool should belong to the same network. e.g. if your pool is 192.168.20.5 to 192.168.20.10 you could assign to the NIC 192.168.20.1
It tried hard working on it but i keep getting this error on log file
DHCP Inf: Serva’s own interface MAC QuantaCo/C4:54:44:F4:88:D1 : Ignoring request
So I’ve tried this like 50 times already. Everything connects, serva sends the info to the target computer, and in the end, the target computer just hangs on the windows screen. Patrick has been excellent at responding, but ineffective at providing a solution. He mentions the share is not setup properly….. Sharing is not rocket science! Then he goes on about Null Session Shares. This tool looks so damn promising, but really, a fricking share is stopping the install? Any ideas?
@miran Installing a customized windows from network is easy; Get a “fresh” windows install ISO and after copying its content under Serva control just customize the file Install.wim with the MS ADK tool DISM.exe. Dism will allow you to “slipstream” updates, drivers, applications, etc to the original “Seattle made” Install.wim. After your customization is finished just use Serva for net delivering your customized version of Windows.
that is amazing work
I wanna install a customized window from network,
I mean install some apps and office on the OS then make an image, after that use this image to install on another PC from the network, rather than using a fresh OS. anyone can help me please how to make this image?
You can make an ISO with any IMAGE creating software from your original Windows CD. There are options to include some drivers in the image for example with command prompt or other ways. There are a lot tutorials in the internet, where you can take a look in.
For Windows 10 you can use this: https://answers.microsoft.com/en-us/windows/forum/windows_10-windows_install/how-to-create-windows-10-installation-dvdusb-flash/8210aa78-9f06-4e60-af0f-bbced92adbb1
I get this:
[02/12 13:15:32.138] TFTP Err: connect returns 10051: A socket operation was attempted to an unreachable network.
This was a dumb mistake which was fixed. Now I get:
[02/12 13:32:21.056] TFTP Inf: Read file pxeserva.0. Mode octet
how to install windows backup for network bye serva ?
@Jason; please be sure your asset directory does not include either spaces or non-ASCII characters as explained in Serva’s Application Note.
OMG thank you! You saved my life!
I though that install over network was hard but is indeed very easy! Your tutorial is really easy to understand and to follow! I just installed Windows 10 in my machine with serva. I had to do one thing that isn’t in your tutorial to make it work, i had to put a password in my user so i could login to make the windows installation (you really should put this in the tutorial).
Anyway, thanks again!
I agree. This is by far the easiest way I have come across to network install an operating system. I also have to setup a login password for my user account that I used to PXE boot.
I was prompted with “DomainUser” and the “Password” dialog box during installation of Windows 7 which was quickly resolved by setting up a login password on my machine.
192.168.1.100:57094
From the TFTP (.1.100 is neither the source or target)
192.168.1.100:57094
from the log:
[01/26 19:49:27.838] TFTP Inf:: sent blks=116 blkSz=1408, Total 162508 bytes in 0s, err recovery=0. Mode octet: sent blks=2 blkSz=1408, Total 1416 bytes in 0s, err recovery=0. Mode octet
[01/26 19:49:27.841] TFTP Inf: Read file
[01/26 19:49:27.926] TFTP Warn: received duplicated request from 192.168.1.100:57097
[01/26 19:49:27.953] TFTP Inf:
[01/26 19:49:28.176] TFTP Inf: Read file
I had this working once last year, can’t figure out my problem. When I get my OS choices on the target boot machine and select an OS to install, the menu simply reloads to the OS choices
@ADDIE08; follow Serva’s Application Note to the latter, If you copy your asset files from a DVD be sure the copied file Boot.wim is not read only.
@yossi rachevsky; you have to add the missing drivers as explained here or at Serva’s webpage (troubleshooting section)
Very good step-by-step manual , everything worked from first time without any errors, just don’t miss anything by stepping, choose correct network adapter drivers, clean OS image, and everything will work like charm. Also I recommend setting BIOS defaults on computer into which want install OS..
Thanks for tips Ciprian Adrian Rusen
all worked good until during windows installation I get an error from the installer saying that no device drivers were found… and no hard disks appear in the dialog where to install ! what can I do? thanks you
I also have the same problem w/ Purnendu Nath, (error 3 in CreateFile; The system cannot find the path specified.) then my screen stays at a blank screen.
hello
i cant find the inf file for network card i try to install on dell vostro 3300 !!
all exe ,
thanks
You need to find out the make and model of the network adapter and than download it from the manufacturer website. It is likely to be a Realtek or Intel network controller chip on the Dell.
@Purnendu Nath: Your Log looks OK; what problem do you have?
@Chris: What are you trying to install; Look at Serva’s Log for clues; Do you see TFTP transfer errors? is your firewall open?
@eng. mohammed.a….: ServaPENet connects to the Serva’s PC hosted share WIA_WDS_SHARE, you should provide a username (or a “Domain/username” only if your Serva’s PC is under a domain schema) of any user with minimally reading rights over that share
What is the Domain/user and password in dialog
servaPENet?
please relpy on [email protected]
“DomainUser” refers to your computer name and the user account. For example your computer name is “Dell” and your user account is “John” than the the “DomainUser” will be “DellJohn”.
The password will be the password you use to login to the account “John”. If you do not have a password you must create one otherwise the program will not have the credentials to boot the operating system via the network.
I’m stuck at Trying to load” pxeserva.cfg/menu.def
It stays there until says “Boot failed: press a key to retry, or wait for reset…”
I have some problem please solve it Iam using this method on VMWARE,
[10/29 01:49:08.281] PDHCP Inf: Rcvd DHCPDISCOVER from IP 0.0.0.0, MAC ?/00:0C:29:6B:F1:67. Mode octet -> aborting transfer. Mode octet: sent blks=12 blkSz=1456, Total 16798 bytes in 0s, err recovery=0. Mode octet: sent blks=1 blkSz=1408, Total 1173 bytes in 0s, err recovery=0. Mode octet: sent blks=116 blkSz=1408, Total 162508 bytes in 0s, err recovery=0. Mode octet: sent blks=1 blkSz=1408, Total 1173 bytes in 0s, err recovery=0. Mode octet: sent blks=1 blkSz=1408, Total 1301 bytes in 0s, err recovery=0. Mode octet: sent blks=18 blkSz=1456, Total 25772 bytes in 1s, err recovery=0. Mode octet: sent blks=360 blkSz=1456, Total 523328 bytes in 0s, err recovery=0. Mode octet : error 3 in CreateFile; The system cannot find the path specified.. Mode octet -> aborting transfer. Mode octet : sent blks=9 blkSz=1420, Total 12288 bytes in 0s, err recovery=0. Mode octet : error 3 in CreateFile; The system cannot find the path specified.. Mode octet : error 2 in CreateFile; The system cannot find the file specified.. Mode octet -> aborting transfer. Mode octet -> aborting transfer. Mode octet: sent blks=2233 blkSz=1420, Total 3170304 bytes in 0s, err recovery=0. Mode octet: sent blks=104117 blkSz=1420, Total 147845056 bytes in 9s, err recovery=0. Mode octet : error 3 in CreateFile; The system cannot find the path specified.
[10/29 01:49:08.281] PDHCP Inf: Sending DHCPOFFER
[10/29 01:49:08.281] PDHCP Inf: Broadcasting through local interface [192.168.58.1]
[10/29 01:49:08.281] PDHCP Inf: Broadcasting through local interface [192.168.107.1]
[10/29 01:49:10.340] PDHCP Inf: Rcvd DHCPREQUEST from IP 0.0.0.0, MAC ?/00:0C:29:6B:F1:67
[10/29 01:49:10.394] PDHCP Inf: Rcvd DHCPREQUEST from IP 192.168.107.128, MAC ?/00:0C:29:6B:F1:67
[10/29 01:49:10.394] PDHCP Inf: Sending DHCPACK, TFTP [192.168.107.1] bootfile [pxeserva.0]
[10/29 01:49:10.395] TFTP Inf: Read file
[10/29 01:49:10.447] TFTP Err: Peer returns ERROR
[10/29 01:49:10.448] TFTP Inf: Read file
[10/29 01:49:10.569] TFTP Inf:
[10/29 01:49:10.616] TFTP Inf: Read file
[10/29 01:49:10.671] TFTP Inf:
[10/29 01:49:10.676] TFTP Inf: Read file
[10/29 01:49:10.839] TFTP Inf:
[10/29 01:49:10.844] TFTP Inf: Read file
[10/29 01:49:10.941] TFTP Inf:
[10/29 01:49:13.858] TFTP Inf: Read file
[10/29 01:49:13.909] TFTP Inf:
[10/29 01:49:13.965] TFTP Inf: Read file
[10/29 01:49:14.067] TFTP Inf:
[10/29 01:49:14.102] TFTP Inf: Read file
[10/29 01:49:14.534] TFTP Inf:
[10/29 01:49:14.710] TFTP Inf: Read file
[10/29 01:49:14.713] TFTP Err: File
[10/29 01:49:14.721] TFTP Inf: Read file
[10/29 01:49:14.773] TFTP Err: Peer returns ERROR
[10/29 01:49:14.773] TFTP Inf: Read file
[10/29 01:49:14.829] TFTP Inf:
[10/29 01:49:14.838] TFTP Inf: Read file
[10/29 01:49:14.839] TFTP Err: File
[10/29 01:49:14.853] TFTP Inf: Read file
[10/29 01:49:14.854] TFTP Err: File
[10/29 01:49:14.869] TFTP Inf: Read file
[10/29 01:49:14.981] TFTP Err: Peer returns ERROR
[10/29 01:49:14.981] TFTP Inf: Read file
[10/29 01:49:15.083] TFTP Err: Peer returns ERROR
[10/29 01:49:15.084] TFTP Inf: Read file
[10/29 01:49:15.468] TFTP Inf:
[10/29 01:49:15.468] TFTP Inf: Read file
[10/29 01:49:24.936] TFTP Inf:
[10/29 01:49:26.126] TFTP Inf: Read file
[10/29 01:49:26.129] TFTP Err: File
@Annoyed User; You are just senselessly bashing a software that works very well.
@slicedtoad; You were probably binding the IP of a NIC that was not connected to the booting client network.
@Tadeu, You see that if the Windows ISO that you are using is a heavily customized OEM version. Just use a Windows Retail, MSDN, etc ISO and you will not get that issue.
Hello everyone, mine does work, but when it appears the screen for the menu of systems, it shows that “Initial menu has no label entries!”. Can anyone help me please??. Thanks
Great guide. The only thing I had to do differently was NOT `bind […] to this address`. When I had it bound, the pxe boot searched for a while and eventually quit saying it couldn’t find anything (something about “no file”.
Maybe you could add that to the troubleshooting section?
This is the worst software in the whole Universe. Cannot recommend it to anyone, it is a plain piece of crap which works only when it decides to do so… Crossover, so now crappy router configuration… Even if I hd Bill Gates’ money, I wouldn’t pay for this joke…
Follow the guide precisely guys, it works. If you’re missing directories, I’d bet you’re not running as admin. The closing and re-starting is important as well, thats when serva is creating said directories.
Coming from linux and I needed a one off solution to setup a win7 machine (unfortunately only had a win7 machine to do this, the cruel irony).
Followed the guide and was off and running in no time.
One note, the anonymous share didn’t connect for me. I set it to everyone:read, but wouldn’t work. Tried my local username/password and it worked.
Hi, at step 5 i don’t understand, we share WIA_WDS or we share WIA_WDS_SHARE because i don’t have this folder? Thank You.
share the directory WIA_WDS “as” WIA_WDS_SHARE. the first one is the name of the directory and the second one is the name of the share; simple stuff.
Hi, Thanks for helping us with this great article in advance, my question is: in DHCP tab there is a field to fill bootfile, in your screenshot seems like it is filled automatic, but in mine, i have to fill it and i dont have any boot file, where to find one ? My pxe boot is stucked in a msg: the system could not find pxeserva.0
Select (check) the BINL option.
it happens sometimes on back-to-back situations;
just turn on Serva’s PC WINS service on
Hey, how can I actually turn that on? I’ve looking everywhere for last day, nothing like that in settings or even serva documentation
error cannot find network name…any help?
If you do not create the SMB share there’s not way to install a WDS Windows distribution as its Install.wim must be reached using that share. Only the first stage of the install (Bootmanager and ServaBoot.wim) uses TFTP. That’s how WDS works; and that’s exactly what Serva does.
Rusen, I strongly recommend you to “read” Serva’s site.
Hi
Great Article. I’m currently trying to install windows 7 using Serva but I cant seem to get the ServaPENET login credentials? I thought it would be the username and password of the computer that I am currently using! Kindly advise.
M-$illy has an odd quirk, when connecting to a M$illy network where a username is expected, even if usernames/passwords are disabled, you’ll still need one, the best thing to do is create a password on your host machine for your logon, you can delete password once your finished with it.
eg:
Username: My UserName
Password: None
change to:
Username: My UserName
Password: My Password
obviously you can have whatever you desire the password to be for your account. Once you create a password on your account on the host machine, you can logon via network
I don’t understand why step (5) is necessary. It creates a SMB file share but AFAIK network booting uses TFTP, so what’s the point of it?
Don’t follow that step and see if it works for you. I only tried to create the “safest/least error-prone” guide I could.
Thanks man You rock working awesome….:-)
Great article! I have run into a problem though.. At the ServaPENet driver install, when asked for login details, nothing works..
Not even after sharing with Everyone on source computer! Help
I already thanked you on SuperUser, but here it is again. Very helpful and easy to follow! Thanks!
P.S. You guys should really upvote this:
https://superuser.com/a/565923/58145
Thank you for the upvote and for the kind words. I’m happy this guide helped you. We worked a lot on it.
Thank you very much for this useful tutorial. I was having trouble re-installing Windows after messing up with dual boots. It didn’t let me boot up from CD/DVD anymore.
This wonderful article helped me a great deal. Have a nice day. 🙂
Found this article from your post on superuser.com
Saved me a lot of time, thanks a lot! 🙂
I’m glad it helped. Thanks for visiting. 😉
I’m with Victor here; I think Serva and its documentation are both very good and easy to follow.
BTW your concepts at point 4) are wrong: Serva does not “supports” networks cards; Serva net boots the Boot.wim included within your distribution; it is your distribution Boot.wim the one that includes or not native support for your specific card. Just after you find your Boot.wim does not include the driver you need you add it but never before you really know the driver is missing !
I updated the article. Thanks for the feedback.
Your recipe is OK but it has bits of misleading info like “run Serva as Admin” (that’s totally unnecessary), or suggesting that network installs are difficult (Serva has made things very easy on this field even for you).
I’m very happy with Serva; Today it is the fastest (and easy) way for getting an OS installed. Also I’d recommend reading the official documents before following tutorials like yours.
The Serva setup is difficult. It’s documentation is incomplete and way too technical and convoluted. In order to get it to work on one of our test systems, it took us hours of tweaking and troubleshooting.
That’s why we included some instructions you might consider unnecessary – so that we cover more exceptions than its official documentation does.
With all due respect I think Serva documentation is the best documentation about PXE I’ve ever seen. It “teaches” you PXE. Of course is technical; because it is not a recipe. What you definitely cannot say is that it’s “incomplete or convoluted”; that is not true.
Posts like yours are good as “quick reference” but you cannot really get anything done without reading the official documents.
I think both of us should say a big “thank you Serva” before mentioning some of the things you write here.
Well, our views are different here. Serva’s documentation might be better than what you find in other places but it still needs a lot of work until it can be considered great.
Anyway, we did not write about Serva because it sucks. On the contrary: we found it to be the simplest tool for performing Windows installations in a network.