VPNs, or Virtual Private Networks, have become widely used tools that help people securely access a private network and share sensitive data through public networks. The main idea is that VPNs can generate virtual P2P (point-to-point) connections, or so-called encrypted tunnels, that allow you to use the internet as a medium for transporting data that is hard to intercept and access by third parties. It also allows you to spoof your physical location because the VPN provider replaces your real IP address. Luckily, Windows 10 makes it easy for users to create, configure, and use VPN connections. If the question that brought you this tutorial is "How do I manually add a VPN?", read on and see how to make Windows 10 and VPNs work together:
NOTE: The features and screenshots shared in this article are found in Windows 10 with May 2020 Update. If you are using an older version of Windows 10, some of the features we present might not be available, or they may have different names.
Things you need if you want to set up a VPN in Windows 10
To be able to connect to a Virtual Private Network (VPN), regardless of whether it is owned by the company you work for or if it is a custom connection that you have set up, you have to know the following details:
- The IP address of the VPN server to which you are going to connect;
- The connection name and your VPN account details: username and password;
- Any custom configuration you might need to perform to establish a secure connection to that VPN.
If you have all these particular details, the only other thing you need is a functioning internet connection. Just pointing out the obvious, it is impossible to connect to a VPN server if you are not already connected to the internet. If you managed to gather all the proper credentials, feel free to continue on your journey towards using a VPN service with this guide's help. Let's see how to create and configure a VPN connection in Windows 10:
How to add a VPN connection in Windows 10
Before creating a VPN connection, make sure that you have logged into Windows 10 with an administrator account. Then, open the Settings app. A quick way to do it is to click or tap on its shortcut from the Start Menu.
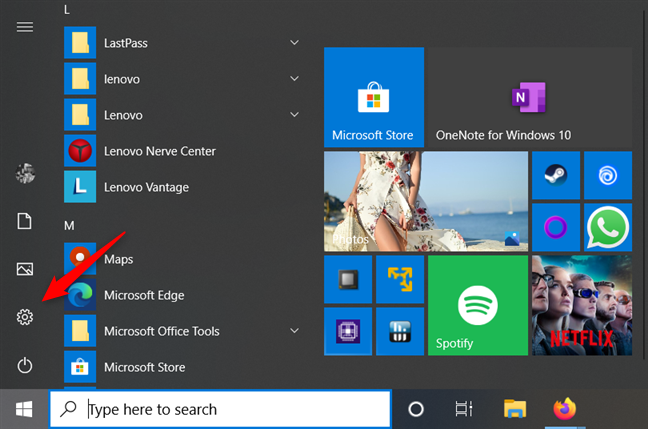
The Settings button from Windows 10's Start Menu
In the Settings window, click or tap the section labeled Network & Internet.
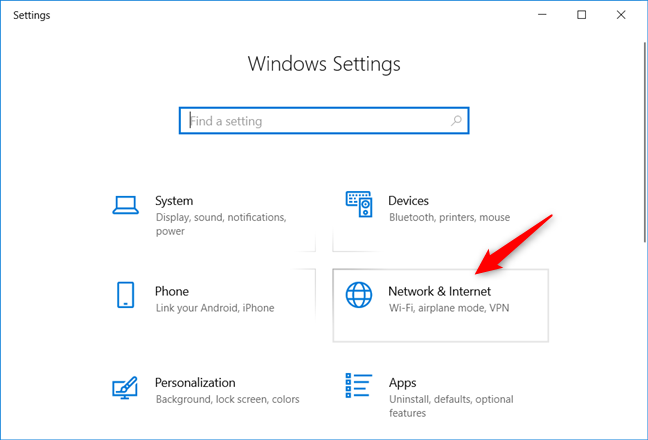
The Network & Internet category from the Windows 10 Settings
In the Network & Internet section, several subsections are found on the left side of the window. Click or tap on the one called VPN.
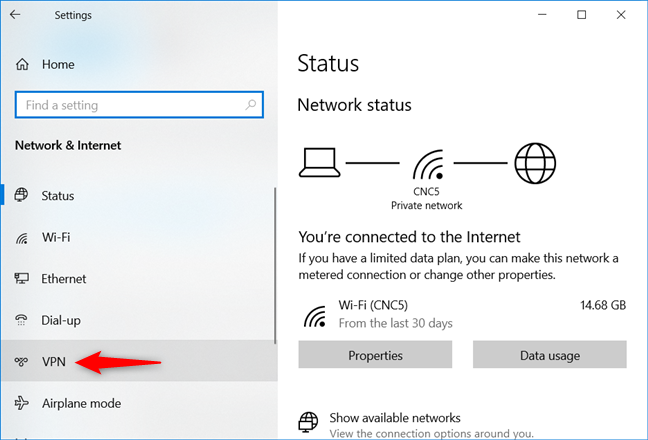
Selecting VPN in Network & Internet
In the VPN subsection, click or tap the button on top, labeled "+ Add a VPN connection."
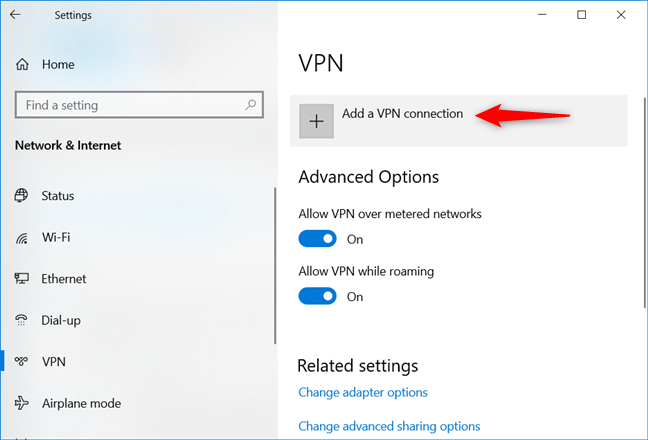
Choosing to Add a VPN connection
The Settings app launches a wizard called "Add a VPN connection," in which you get to enter your VPN connection details. Usually, before you start setting up a VPN connection in Windows 10, you should already know the right VPN provider that you can use to secure your online presence.
NOTE: Depending on each particular provider, you might either receive an URL address that is similar to any standard website like vpn.example.com, or a numerical IP address, like 111.222.333.444. However, you should know that VPN services differ a lot in terms of quality and price, and you must have a lot of patience to find one that works well with your online habits and internet connection speed.
Coming back to the tutorial and the VPN connection setup window, you must first choose a VPN provider. In the first field of the "Add a VPN connection" wizard, which is labeled VPN provider, select the "Windows (built-in)" option from the drop-down menu (it's the only one available anyway).
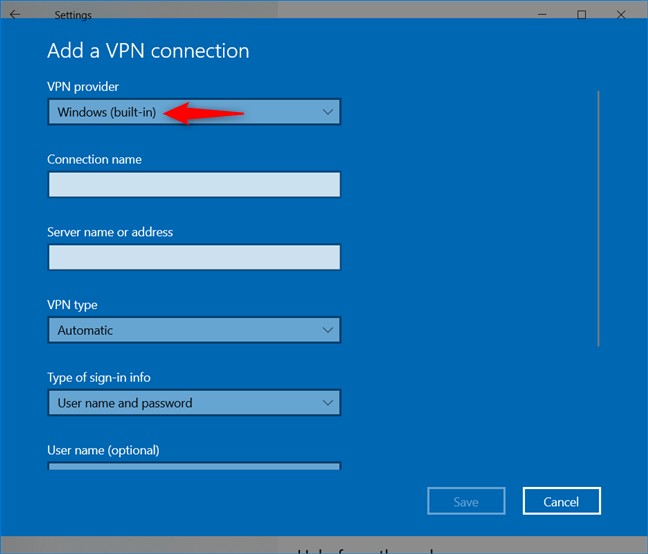
Add a VPN connection: Select Windows as a VPN provider
In the next field, labeled "Connection name," enter a name for the VPN connection that you are creating. You can choose to call it anything you like. We decided to call it Digital Citizen VPN.
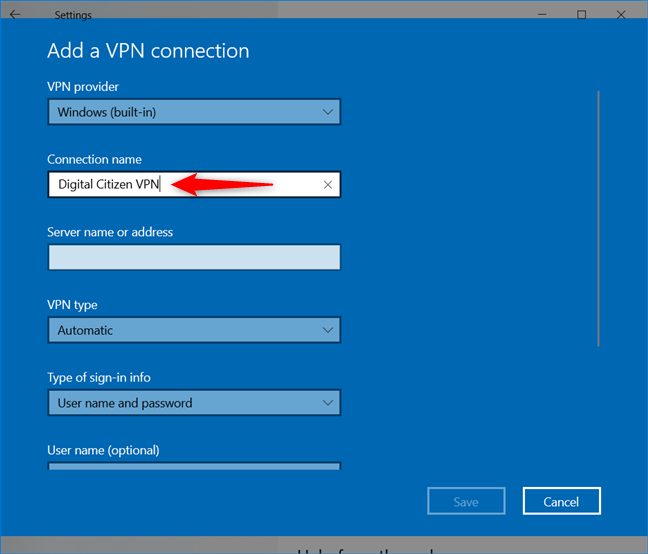
Add a VPN connection: Type a Connection name
Enter the VPN server address in the "Server name or address." Make sure that you double-check that it matches precisely the one offered by your VPN service.
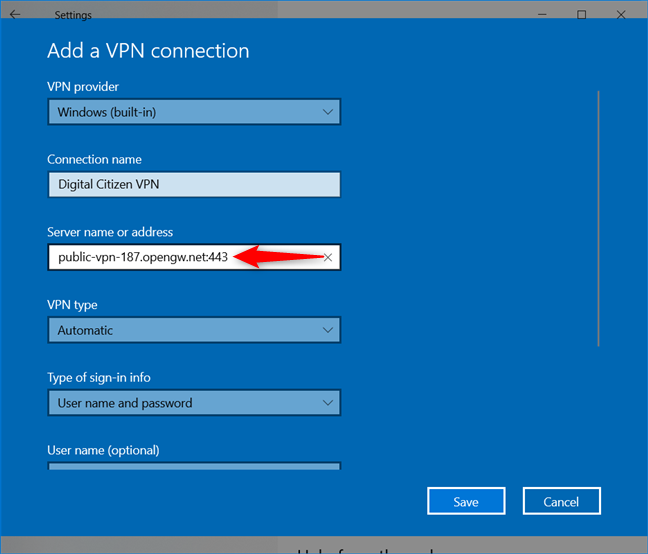
Add a VPN connection: Enter the Server name or address
In the "VPN type" field, select the type of VPN connection that you are creating. We chose SSTP (Secure Socket Tunneling Protocol) because this is one of the most commonly used methods of implementing virtual private networks on Windows. If you do not know what type your VPN connection is, leave this option set to Automatic, and Windows 10 should determine it on its own.
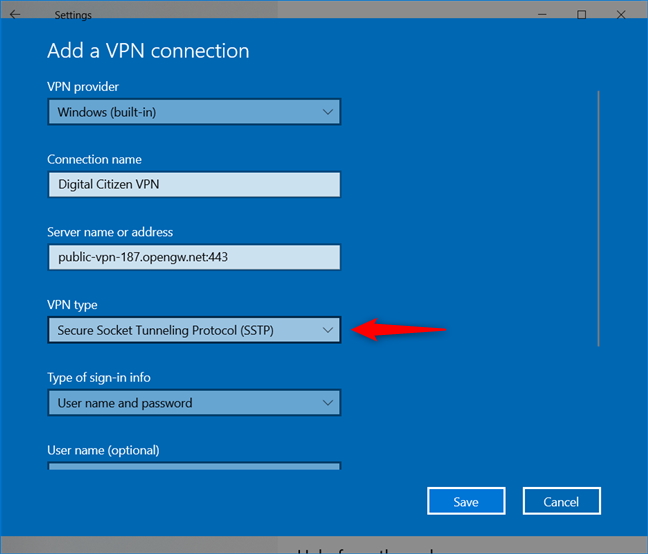
Add a VPN connection: Select the VPN type
All VPN providers require you to use a predefined method of authentication to connect to their virtual private networks. In the next field, the one called "Type of sign-in info," you should select a method that matches the one offered by the VPN provider. The service we used for this tutorial supplies a username and password for its users, so we selected this option from the list.
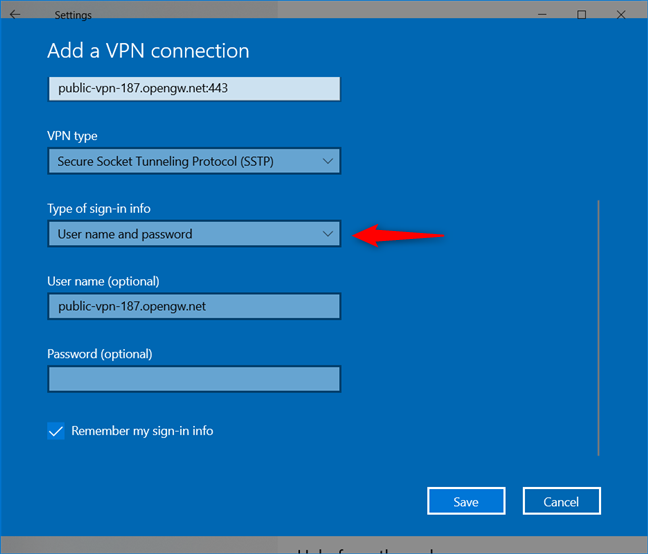
Add a VPN connection: Choosing how the VPN handles signing in
Note that the Username and Password fields are optional, meaning that if you leave these fields blank, you will be prompted to enter your username and password each time you connect to the VPN service. Whether you choose to have this information saved or not is entirely up to you. It ultimately is just a matter of how secure you want your system to be. If you have chosen to enter a username and a password, you should also check the box labeled "Remember my sign-in info" to have the operating system store your credentials.
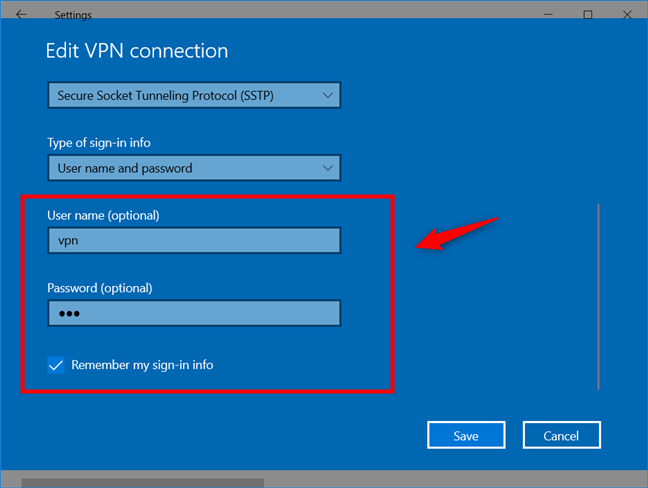
Add a VPN connection: Enter the User name and Password
Once you have entered all the required information, click or tap the Save button from the bottom-right corner.
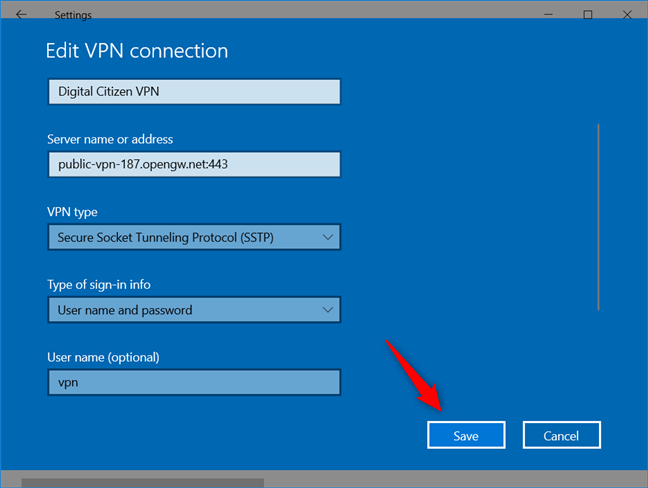
Add a VPN connection: Saving the VPN connection
The VPN connection is created and saved, and you are brought back to the Settings app. You can now start using the VPN connection. Read the next sections of this guide to see how to connect to a VPN, change its advanced settings, disconnect from the VPN, and delete the VPN connection when you no longer need to use it.
NOTE: If you're a technical person and like working with scripts, you can also add and use a VPN connection in Windows 10 using PowerShell. Unfortunately, the procedure is a bit too complex for regular users, so it's outside the scope of our guide. If you want to know more, check this GitHub page. It explains what you have to do: install a PowerShell module named VPNCredentialsHelper, so that you can then run commands like Add-VpnConnection and Set-VpnConnectionUsernamePassword.
How to connect to a VPN in Windows 10
After you have successfully created the new VPN connection, Windows 10 returns you to the "Network & Internet" window at the VPN subsection. There, click or tap on the new virtual private network connection on the window's right side.
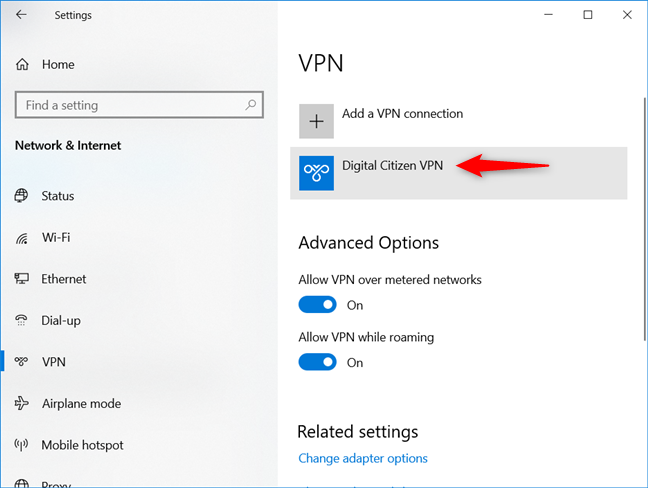
Selecting a VPN connection
When selected, the VPN connection shows a few buttons: Connect, Advanced options, and Remove. Click or tap on the first button, Connect, to connect to the VPN server using the provided details and credentials.
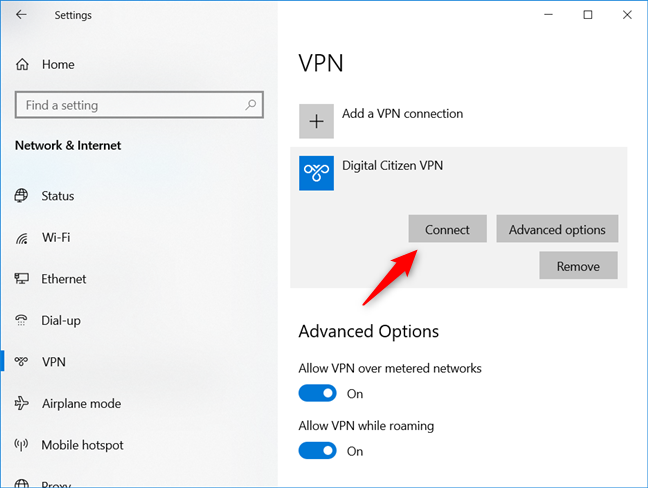
Connecting to a VPN in Windows 10
If you opted out of having Windows remember your username and password, you are prompted to enter them. Then, the VPN connection is started, and after a few seconds, it should be up and running. When that happens, Windows 10 shows you that you are connected.
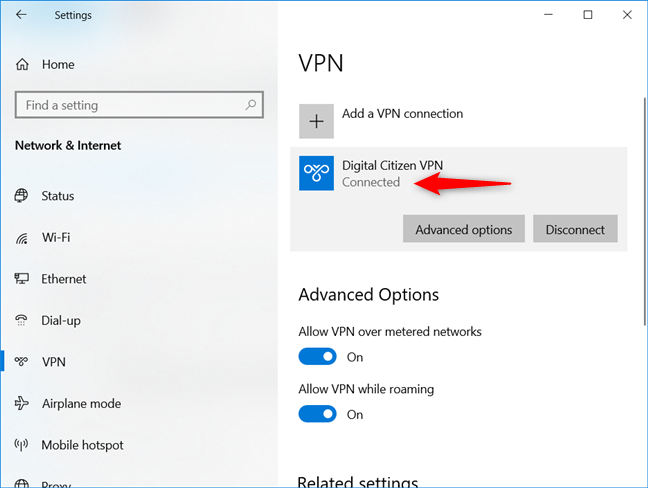
Windows 10 is connected to a VPN
If you prefer, you can also connect to the VPN from the Windows 10 system tray at the bottom-right corner of your desktop. Click or tap on the network icon and, in the network flyout that is displayed, you should see the VPN connection that you have just created. Click or tap on it and then press the Connect button.
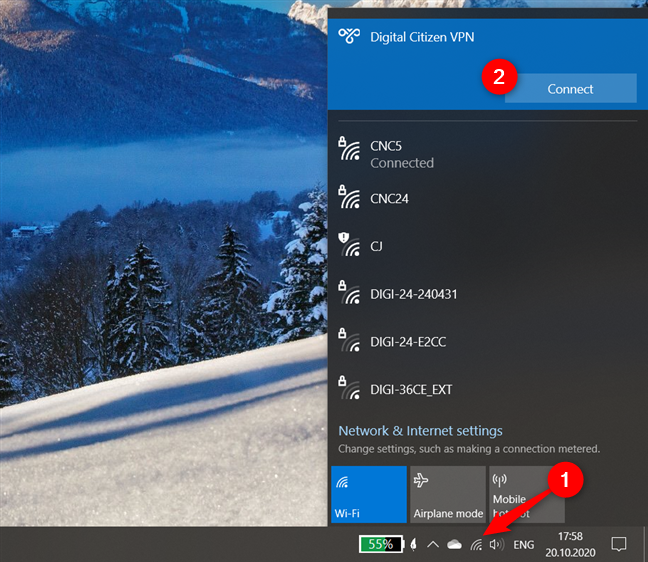
Connecting to a VPN from Windows 10's networks flyout
How to disconnect from a VPN in Windows 10
If you want to disconnect from a running VPN connection, click or tap on its Disconnect button from the Settings app, and the connection is shut down immediately.
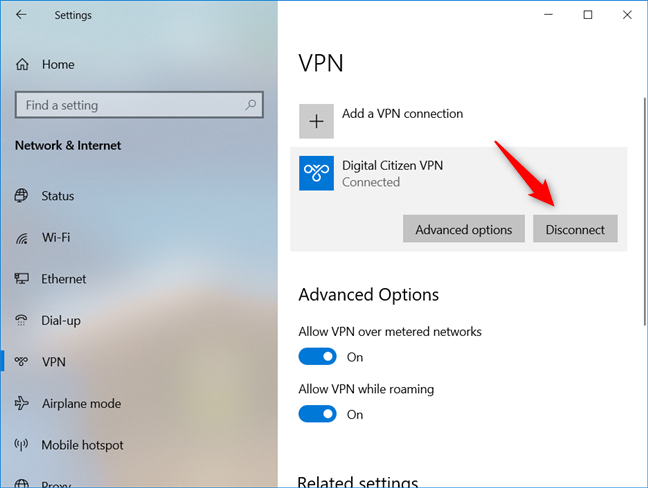
Disconnecting from a VPN in Windows 10
If you prefer a faster way to do it, you can also disconnect from the VPN directly from your desktop. Click or tap on the network icon from your system tray, and, in the network flyout that is displayed, you should see the VPN connection to which you are presently connected. Click or tap on it, and then press the Disconnect button.
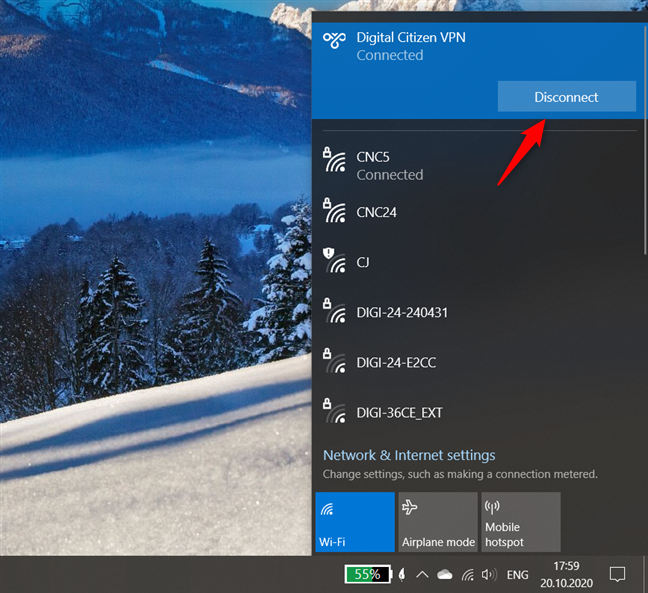
Disconnecting from a VPN from the networks flyout
How to change the advanced settings of your VPN connection
If you need to manage other VPN related configurations, such as the proxy settings for your VPN connection, open the Settings app and go to "Network & Internet" -> VPN. Click or tap on your VPN connection, and then press the "Advanced options" button.
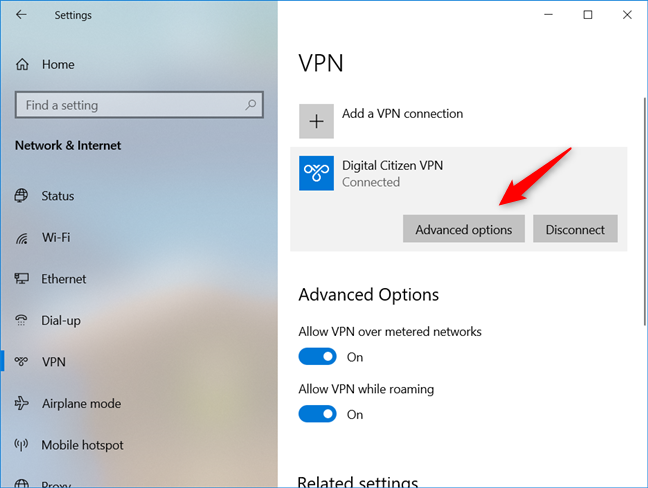
Opening the Advanced options of a VPN in Windows 10
Then, you can adjust the settings of your VPN connection without having to recreate it. You can change all its properties, such as its name, server address, username, and so on, and you can also configure network and firewall settings if you want to.
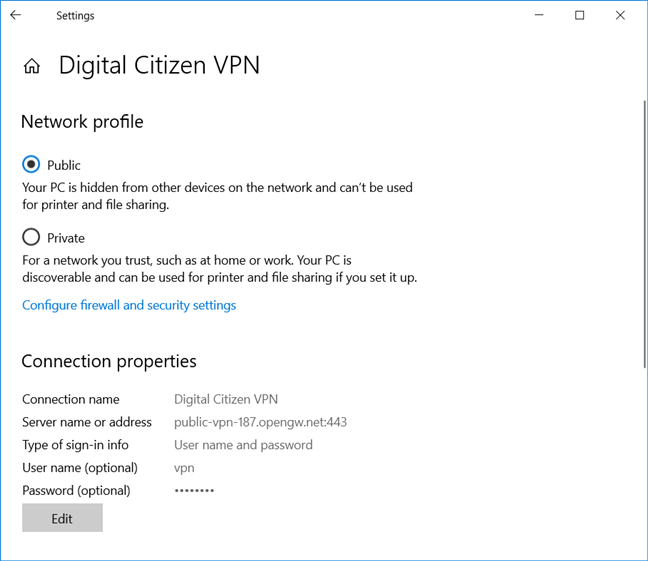
Editing a VPN connection in Windows 10
How to delete a VPN connection from Windows 10
If you no longer need one of the VPN connections you created on your Windows 10 PC, you can remove it. To do that, open the Settings app and go to "Network & Internet" -> VPN. Then, click or tap on the VPN connection and press the Remove button.
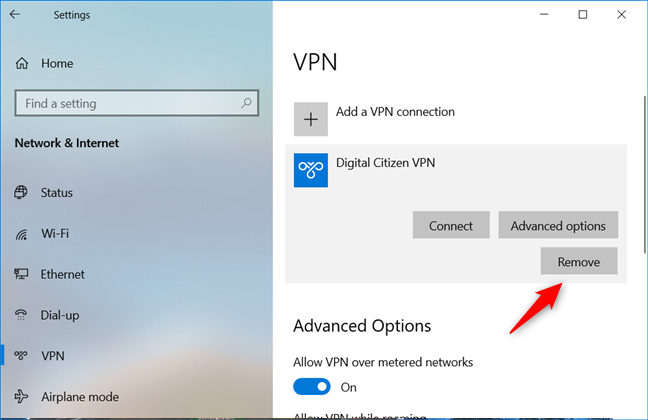
Choosing to Remove a VPN connection from a Windows 10 PC
The VPN connection disappears immediately, and it can no longer be used.
Are you using VPN connections on your Windows 10 PC regularly?
As you can see, creating a VPN connection in Windows 10 is easy and does not require advanced computer skills. If you have found an excellent VPN service, you can use it in a matter of just a few minutes after setting it up in Windows 10. Be careful when entering the connection details because any erroneous data makes it impossible for you to connect to the VPN server. Are you using VPN connections on your Windows 10 computers and devices? Why are you using them? Use the comments section to share your reasons or for any questions on this subject.


 30.10.2020