04.11.2024
Do you need to know how to access UEFI (BIOS) on your computer, because you want or need to adjust hardware settings, manage your boot devices, or maybe even overclock your processor? If you’re wondering how to enter BIOS on a Windows 10 device, know that there are several ways to do so. In this tutorial, I’ll show you all the different methods I know for entering the UEFI BIOS on a Windows 10 PC, from using advanced startup settings to command-line shortcuts. So, whether you want to reboot into UEFI or to learn how to enter the BIOS without rebooting, read on to find out the info you need:
NOTE: If you’re not technically inclined, I recommend that you first read this article: What is BIOS? What is UEFI? How are they different?.
1. How to open UEFI (BIOS) from boot on a Windows 10 PC
If you want to access UEFI/BIOS from boot (before Windows 10 starts), you can use special keys during your computer’s startup process. This is particularly useful when you can’t boot into Windows. Here’s how to do it:
Start or restart your computer. Depending on your device’s make and model, you may see a prompt during startup telling you which key to press to enter BIOS/UEFI (it’s usually F1, F2, F10, ESC, or Delete).

Some PCs show the UEFI/BIOS key at boot
Press the specified key as soon as the prompt appears.
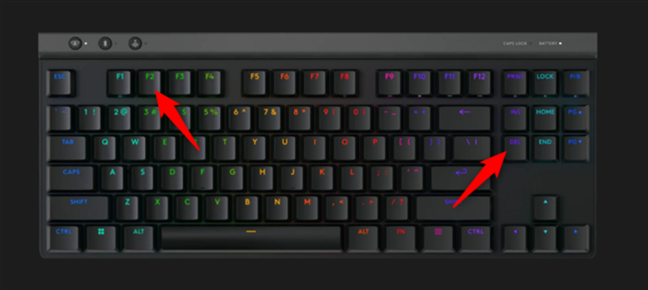
Usually, pressing the F2 or Del key at boot open UEFI/BIOS
If you don’t know the correct key or the prompt doesn’t appear, here are common keys used by popular manufacturers:
- ASUS: F2 or Delete (sometimes, Insert or F10)
- HP: ESC or F10 (in some cases, F1, F2, F6, or F11)
- Dell: F2 or F12 (sometimes, F1, F3, or Delete)
- Acer: F2 or Delete
- Toshiba: F2 (in some cases, F1 or ESC)
- Samsung: F2
- Lenovo: F1 or F2 (sometimes, Fn + F2)
- MSI: Delete
Note that you may need to press the key repeatedly to ensure you catch the right moment, before the operating system starts loading.
2. How to enter the UEFI/BIOS from Windows 10’s Settings
One of the easiest ways to access UEFI/BIOS is through the Windows 10 Settings app. Here’s how:
Open the Settings (Win + I) and access Update & Security.
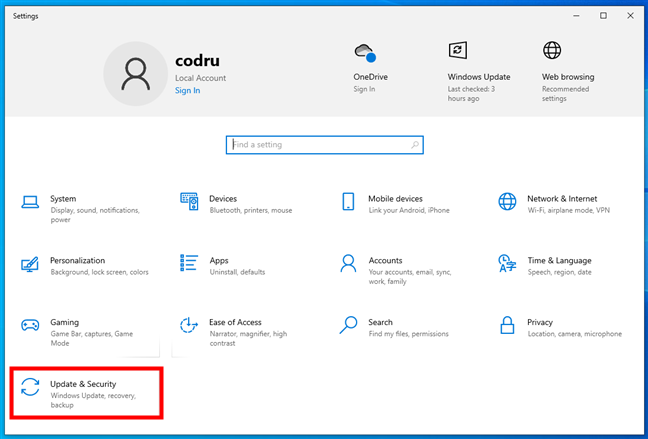
Go to Update & Security in Windows 10's Settings
Select Recovery in the left sidebar, and click or tap Restart now under Advanced startup, on the right.

Press Restart now under Advanced startup
Windows 10 restarts and takes you to the Choose an option screen. Select Troubleshoot (Reset your PC or see advanced options).

Select Troubleshoot
On the Troubleshoot screen, click or tap Advanced options.
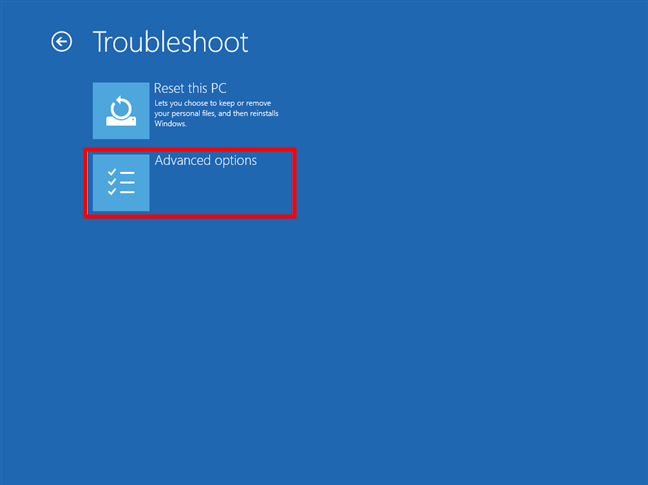
Go to Advanced options
Now, choose UEFI Firmware Settings.
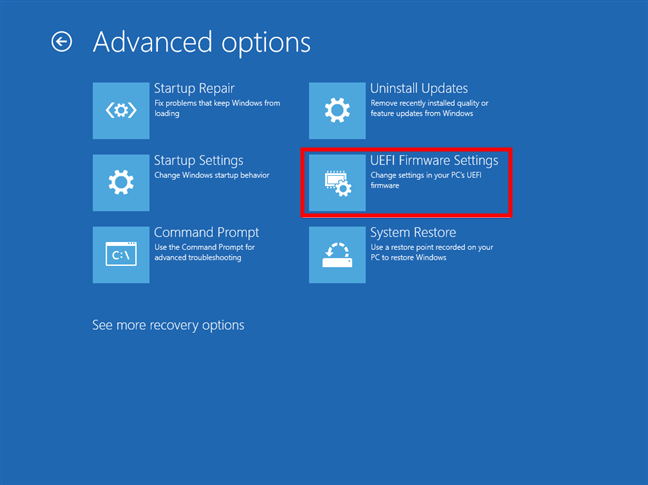
Click or tap UEFI Firmware Settings
Windows 10 now informs you that you have to Restart to change UEFI firmware settings. Press Restart to proceed.
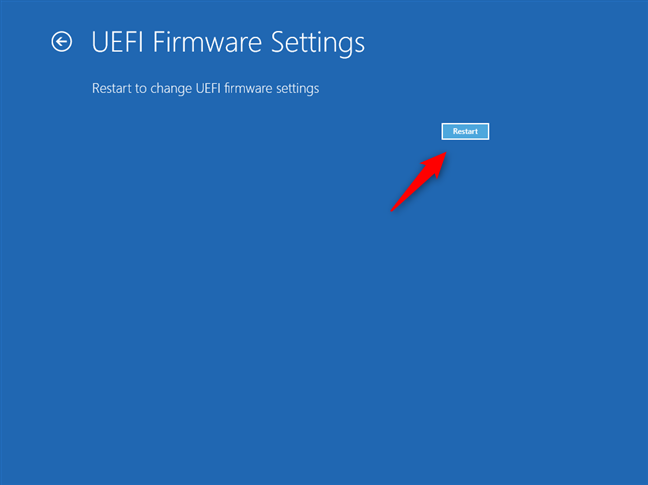
Restart to UEFI BIOS
Your PC will reboot directly into UEFI/BIOS.
3. How to restart into UEFI/BIOS in Windows 10 (Shift + Restart)
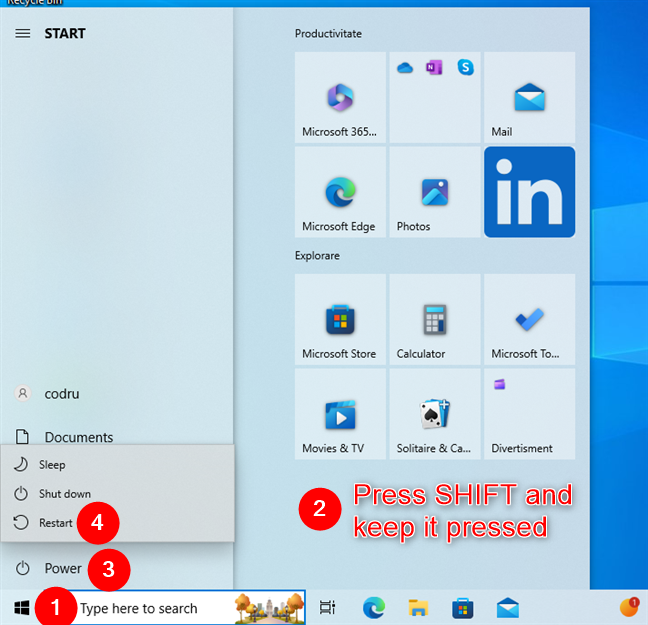
If the previous methods look too complicated, or if you need to access the UEFI (BIOS) without signing into your Windows 10 account, you can use a shortcut to reach it. Hold down Shift on your keyboard, and then click or tap the Restart option from the sign-in screen. While holding the Shift key down, click or tap on the Power button in the bottom-right corner of the screen, and choose Restart in the menu.
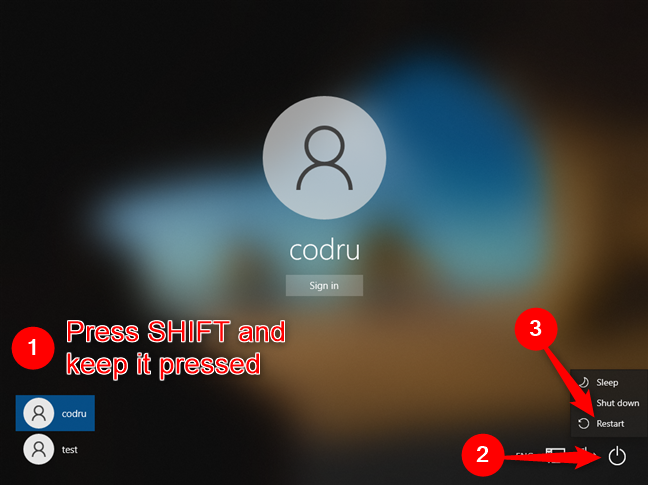
Restart while holding down Shift on Windows 10's sign-in screen
Alternatively, you can sign in and then Shift + Restart. While logged in, open the Start Menu and press Shift. While Shift is pressed, use the Restart option from the Power options in the Start Menu.
How to access Windows 10's UEFI/BIOS from the Start Menu
After restarting, Windows 10 displays the blue Advanced startup menu. Go to Troubleshoot > Advanced options > UEFI Firmware Settings, and then press Restart - these steps are illustrated in the previous section of this tutorial. Windows 10 restarts again and takes you to the UEFI/BIOS.
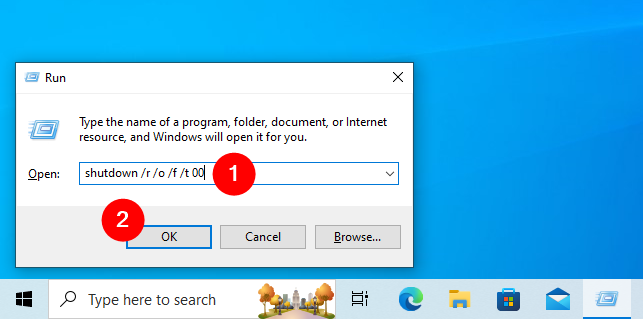
4. How to open UEFI/BIOS from Windows 10’s Run window
You can also reach UEFI BIOS on your Windows 10 PC, laptop, or tablet from the Run window. There are several ways to access it, but I prefer the Windows + R shortcut. In the Open field, type:
…and click/tap OK or press Enter on your keyboard.
Get into UEFI/BIOS from Windows 10's Run box
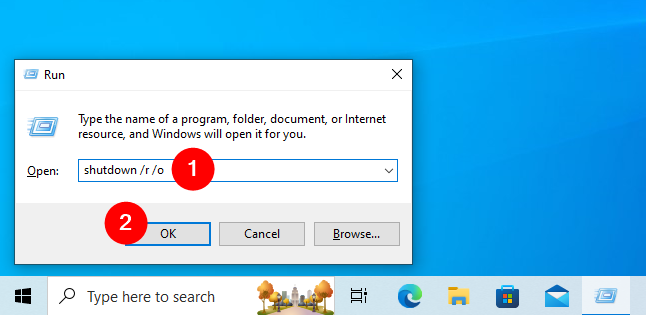
If the command above is too long to remember, enter:
However, note that this command takes more time to finalize than the previous one.
Restart into UEFI (BIOS) with a shorter but more time-consuming command
That’s because this time, Windows 10 displays a notification to let you know you are about to be signed out, and you need to wait. It doesn’t instantly execute like the previous command.

Windows 10 shut down notification
After the restart, you are taken to the blue Advanced startup menu. Access Troubleshoot > Advanced options > UEFI Firmware Settings, and then press Restart - these steps are detailed in the second section of this tutorial. Windows 10 restarts again and loads the UEFI BIOS.
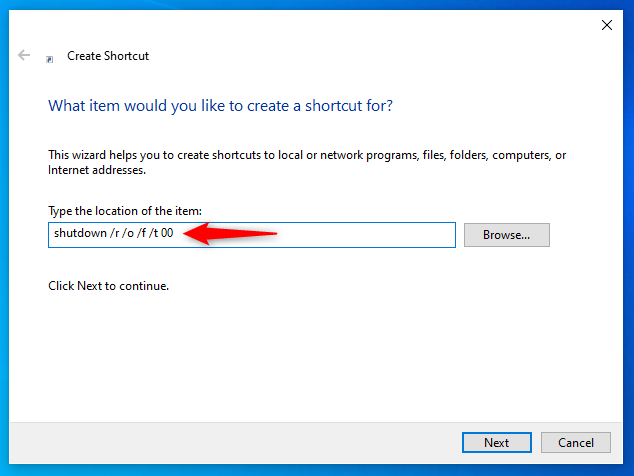
5. How to enter UEFI/BIOS from Windows 10 using a shortcut
One of the fastest methods to enter the UEFI (BIOS) on a Windows 10 computer is by creating and using a shortcut. I’ve shown all the necessary steps in a detailed tutorial: Shortcuts for the UEFI BIOS & Windows 10’s Recovery Environment. However, if you’re short on time, here’s a quick summary: create a regular desktop shortcut on your Windows 10 PC and set its target to the command:
… the same I’ve already covered in the previous chapter of this guide.
Shortcut for UEFI (BIOS) in Windows 10
After creating the shortcut, simply double-click or double-tap it. This brings up the Choose an option screen. From there, navigate to Troubleshoot > Advanced options > UEFI Firmware Settings and click Restart. Your computer reboots, and once it does, it automatically enters the UEFI (BIOS) environment.
6. How to enter the UEFI (BIOS) from Windows 10’s Command Prompt, PowerShell, or Terminal
If you prefer the Command Prompt or PowerShell, feel free to use the same commands to access UEFI/BIOS with these tools. Open the Command Prompt or PowerShell, and use it to run the command:
Your Windows 10 device immediately restarts, and you’re taken to the Advanced startup (Choose an option) screen.
Running the command for accessing UEFI/BIOS in Windows 10's CMD
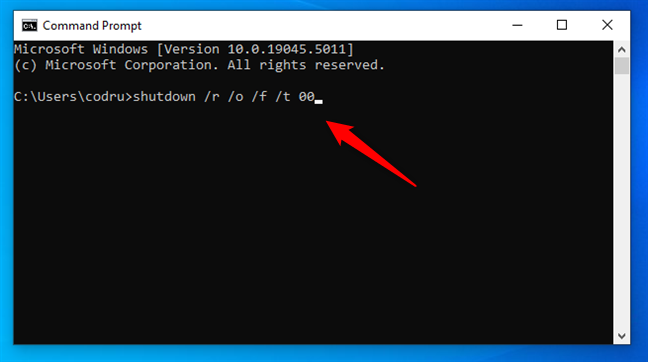
Alternatively, you can also type this command:
…in Command Prompt or PowerShell, and then press Enter. In this case, Windows 10 displays a brief notification to let you know you are about to be signed out. Take the time to close any unsaved file before your device restarts.
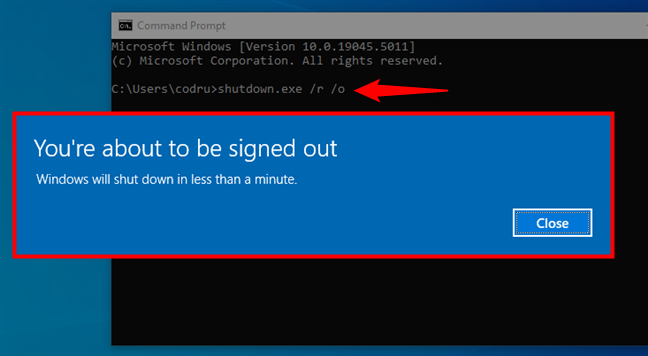
Windows 10 informs you that it will shut down
Either way, once Windows 10 restarts and loads the Advanced startup menu, go to Troubleshoot > Advanced options > UEFI Firmware Settings, and then press Restart, as detailed in the second section of this tutorial. Your PC, laptop, or tablet restarts, taking you to the UEFI BIOS.
7. How to get to the UEFI firmware settings on a Surface Pro (eligible models)
If you are using a Surface Pro or a Surface Book, there is a simple way to access the UEFI BIOS. First, make sure your Surface device is shut down. Look on its sides to find the Volume Up (+) button, and press-and-hold it.
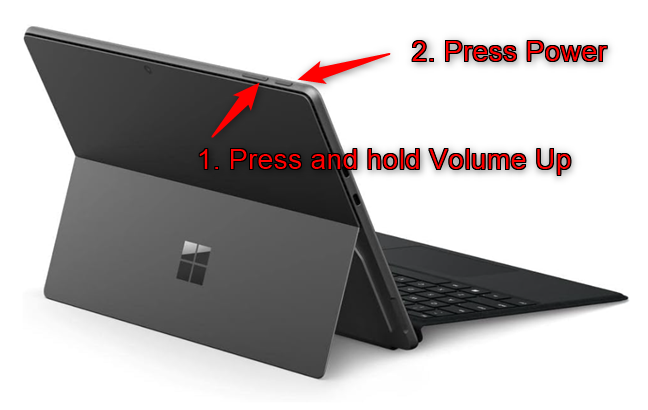
Push Power while holding down the Volume Up button
Then, press and release the Power button. Keep pressing the Volume Up (+) button until you see either the Microsoft or the Surface logo on the screen. Release the button, and the UEFI BIOS is now started on your Surface device.
Why did you need to get to the UEFI/BIOS settings of your Windows 10 PC?
Now, you know how to open UEFI BIOS in Windows 10, not only through one method, but in multiple ways. From clicking the UEFI Firmware Settings link in Windows 10’s recovery environment to using the Command Prompt, you have the means to access your system’s UEFI (BIOS) whenever you require it. The question is why did you look for this information online? Do you need to do some troubleshooting, optimize your system’s performance, or simply configure some of your hardware? If you don’t mind, please let me know your reasons for having to open UEFI/BIOS in the comments section below. Oh, and if you have questions, don’t hesitate to ask.