

You spent money on fast RAM. You compared specs, picked a kit with a respectable speed rating, watched it get installed. And right now, unless you have specifically gone into your BIOS and changed one setting, that RAM is running significantly slower than what you paid for.
This is not a defect. It is just how PC memory works by default, and it affects an enormous number of systems sitting in homes and on desks right now, quietly underperforming because nobody told them to do otherwise.
The setting that fixes it is called XMP. It takes about two minutes to enable. Here is what it is and why it matters.
Why Your RAM Runs Slow Out of the Box
Every stick of RAM conforms to a baseline standard set by an organisation called JEDEC. These are conservative speeds guaranteed to work in essentially any system regardless of CPU, motherboard, or configuration. For DDR4, the JEDEC default is typically 2133MHz or 2400MHz. For DDR5, it is 4800MHz.
When you buy a RAM kit advertised as DDR4-3600 or DDR5-6000, those speeds are real. The RAM can genuinely run at them. But your motherboard does not know that by default. It plays it safe and runs the RAM at the JEDEC baseline until you specifically tell it otherwise.
So that DDR5-6000 kit you paid a premium for? On a fresh build with an untouched BIOS, it is running at 4800MHz. You are leaving roughly 20% of your RAM's speed on the table from day one.
What XMP Actually Is
XMP stands for Extreme Memory Profile. Intel created and standardised it back in 2007. The concept is straightforward. RAM manufacturers test their modules at the advertised speeds, then save those exact settings, the clock speed, timings, and voltage, directly onto a small chip on the RAM stick called the SPD, Serial Presence Detect.
When you enable XMP in your BIOS, you are telling the motherboard to read those manufacturer-tested settings from the RAM itself and apply them. It is not guesswork. It is not experimental tuning. You are loading a profile that the people who made the RAM already validated and confirmed works at that speed.
Technically, running RAM above JEDEC defaults counts as overclocking. That is why it requires a manual step to enable. But calling XMP overclocking in the traditional sense is a bit misleading. You are not pushing hardware beyond its design limits. You are running it at the speed it was built, tested, and sold to operate at.
XMP, EXPO, and DOCP: What Is the Difference?
XMP is Intel's standard. If you have an Intel CPU, XMP is what you are looking for in your BIOS.
AMD introduced their own equivalent called EXPO, Extended Profiles for Overclocking, alongside DDR5 and the Ryzen 7000 series. It works identically to XMP but is optimised for how AMD's Ryzen processors handle memory, particularly in relation to the Infinity Fabric, which is AMD's internal interconnect that benefits specifically from memory running at certain speeds.
If you have an older AMD system on AM4 with DDR4, you may see DOCP instead, which stands for Direct OverClock Profile. Some motherboards, particularly ASUS ones, label it this way. It does the same job: it applies the XMP profile stored on the RAM to the AMD system.
Some RAM kits ship with both XMP and EXPO profiles stored on the same stick. In that case, pick the one that matches your platform for the cleanest result, though either usually works through compatibility mode.
Does It Actually Make a Difference?
For everyday tasks like browsing, watching video, and office work, the difference is minimal. These tasks are not particularly memory-sensitive and you are unlikely to notice.
Where XMP makes a tangible difference is in gaming and CPU-heavy workloads. Games that are CPU-bound, meaning the CPU is the limiting factor rather than the GPU, can see 10 to 15 percent better frame rates at the minimum framerate figures, the 1% lows that determine how smooth a game actually feels in practice. The average framerate improves too, but the more noticeable benefit is in eliminating the sudden stutters caused by memory bottlenecks.
For AMD Ryzen systems in particular, memory speed has a direct relationship with how fast the Infinity Fabric runs, which affects overall system responsiveness beyond just gaming. The sweet spot for Ryzen 7000 and 9000 series processors is around DDR5-6000, which happens to maintain a 1:1 ratio between memory speed and Infinity Fabric speed, and enabling EXPO is what gets you there.
For video editing, 3D rendering, large data workloads, and anything that moves a lot of data through RAM, faster memory bandwidth from XMP makes a consistent measurable difference.
How to Enable XMP in Your BIOS
The process is the same whether you are enabling XMP, EXPO, or DOCP. The specific location varies slightly between motherboard manufacturers but the principle is identical.
1: Enter Your BIOS
Restart your PC. As the system starts up, before Windows begins loading, press the Delete key repeatedly. Some motherboards use F2 instead. The correct key is usually displayed briefly on screen during startup. If Windows loads before you get there, restart and try again.
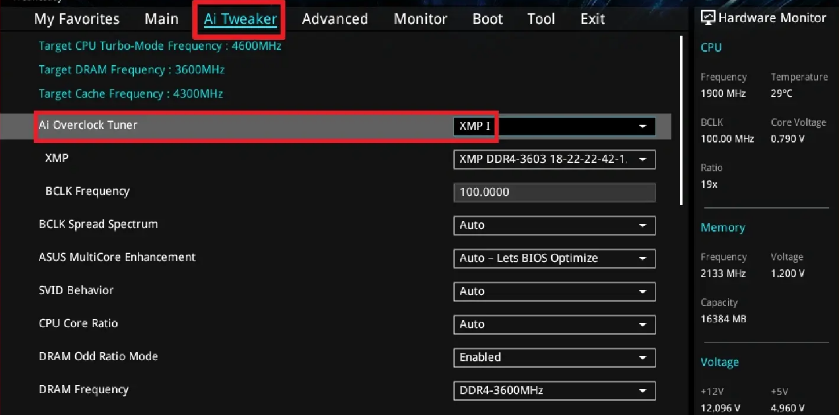
2: Find the XMP or EXPO Setting
Most modern motherboards from ASUS, MSI, Gigabyte, and ASRock put the XMP setting directly on the main EZ Mode screen, visible immediately. Look for a button or toggle labelled XMP, EXPO, DOCP, or A-XMP. On ASUS boards it is often prominently displayed near the top. On MSI boards look for a section labelled DRAM XMP. Gigabyte boards it is typically under the MIT section.
If you are in an Advanced Mode view and cannot find it easily, switch to EZ Mode first. Press F7 on most boards to toggle between the two.
3: Select Your Profile
Click or toggle XMP to enable it. If your RAM kit includes multiple profiles you will see options like XMP Profile 1 and XMP Profile 2, or EXPO 1 and EXPO 2. Profile 1 is typically the highest rated speed. Profile 2, if present, is often a more conservative setting that trades some speed for stability. Start with Profile 1.
4: Save and Exit
Press F10 to save your settings and restart. The system will reboot at the new memory speed.
5: Verify It Worked
Once Windows loads, download the free CPU-Z application. Open it and click the Memory tab. You will see a value labelled DRAM Frequency. Multiply that number by two. The result should match your RAM's advertised speed. If it does, XMP is working. If it still shows the default speed, return to the BIOS and check the setting was saved correctly.
What If the System Becomes Unstable?
Very occasionally, particularly with four RAM sticks rather than two, or with especially high-speed kits, enabling XMP can cause instability. The system might restart during POST, crash during Windows loading, or produce a blue screen.
If this happens, do not panic. Most motherboards automatically detect a failed boot and offer to reset to defaults, or do so automatically after three failed attempts. If not, you can clear the BIOS by removing the small round lithium battery from the motherboard for 60 seconds, which resets all settings.
Once back to defaults, try enabling XMP again but select the more conservative Profile 2 if available, or manually set the RAM speed one notch lower than the advertised maximum. Running DDR5-6000 kit at DDR5-5600 still represents a significant improvement over the 4800MHz default and is often fully stable where the maximum speed was not.
Does Enabling XMP Void Your Warranty?
No. Running your RAM at its XMP-rated speed is exactly what the manufacturer intended and tested. The speed printed on the packaging is the XMP speed, not the JEDEC default. You are not overclocking beyond specification, you are running at specification. RAM manufacturers explicitly support this and it does not void the warranty on the memory.
Some motherboard manufacturers include a disclaimer noting that running above JEDEC defaults is technically outside base specification, but in practice this has no practical consequence for consumer users.
Final Thoughts
XMP is one of the most overlooked free performance upgrades available to PC users. You have already paid for the RAM. You already have the hardware capable of running at the speed advertised. All that is standing between you and that performance is a single toggle in your BIOS that most people never touch because nobody told them it existed.
Two minutes in the BIOS, one setting, and your RAM finally runs the way it was designed to.
Frequently Asked Questions
How do I know if XMP is already enabled?
Open CPU-Z, go to the Memory tab, and look at the DRAM Frequency value. Multiply it by two. If the result matches your RAM's advertised speed, XMP is enabled. If it shows the JEDEC default, which for DDR5 would be around 4800MHz, it is not.
Is XMP safe? Will it damage my RAM or CPU?
Yes, XMP is safe for the vast majority of users. The voltages and timings applied by XMP are within the specifications validated by the RAM manufacturer. It does not damage RAM or the CPU's memory controller under normal conditions. Higher-speed kits do put more load on the memory controller, but this is within expected operating parameters.
What if I have AMD and my RAM shows XMP rather than EXPO?
This is common. Many DDR5 kits ship with XMP profiles optimised for Intel, which AMD boards can still apply through compatibility mode. Look for EXPO in your BIOS if available, but if only XMP appears, enabling it will still apply the correct speed settings. Some AMD boards label this option DOCP or A-XMP rather than XMP.
Does XMP need to be re-enabled after a BIOS update?
Sometimes. BIOS updates frequently reset settings to defaults as part of the update process. After updating your BIOS, it is worth checking the XMP setting to confirm it is still enabled.
My RAM advertises two speeds, such as DDR5-5600 and DDR5-6000. Which do I choose?
These correspond to the two XMP profiles stored on the kit. Profile 1 is typically the faster DDR5-6000 speed. Profile 2 is the more conservative DDR5-5600 option. Start with Profile 1. If you experience any instability, drop to Profile 2. Both represent a significant improvement over the JEDEC default.


Discussion (0)
Be the first to comment.