


If you write code on Windows 11, you have probably noticed that building a project, cloning a large repository, or installing packages through npm or NuGet can feel slower than it should. Part of that is not your hardware. It is the file system. Windows uses NTFS by default, which was designed decades ago for general purpose file storage, not for the constant rapid reading, writing, and modification of thousands of small files that modern software development involves. Dev Drive is Microsoft's answer to this. It is a special type of storage volume built into Windows 11 that is purpose-built for developer workloads and can make a meaningful difference in build times and tool responsiveness. This guide explains what Dev Drive is, how it works, what to put on it, and how to create one.
What Is Dev Drive?
Dev Drive is a storage volume in Windows 11 that uses the ReFS file system instead of the standard NTFS file system. ReFS stands for Resilient File System and is a more modern file system that Microsoft designed for performance and data integrity at scale. It handles the constant creation, modification, and deletion of small files more efficiently than NTFS, which is exactly what happens when you compile code, run builds, or use package managers.
When you create a Dev Drive, Windows applies a set of configurations specifically suited for development. The most significant is that Microsoft Defender Antivirus switches to a performance mode for the Dev Drive, which reduces the overhead of real-time scanning on files being rapidly accessed during builds. Instead of scanning every individual file operation as it happens, Defender applies more efficient scanning strategies that maintain protection without the performance cost of continuous real-time scanning on every file read and write.
Microsoft's own testing found Dev Drive can perform up to 41 percent faster than a regular NTFS drive for common developer operations under certain conditions. In practice, improvements vary depending on your specific workflow, tools, and hardware, but faster build times and snappier package manager operations are the most commonly reported gains.
Dev Drive was introduced in Windows 11 22H2 and is available on Windows 11 Pro, Enterprise, and Education editions. It requires at least 8GB of RAM, with 16GB recommended, and a minimum of 50GB of free disk space to create one. You need local administrator privileges to create a Dev Drive.
How Dev Drive Differs From a Regular Drive
Your regular C drive uses NTFS. NTFS is reliable and broadly compatible but carries overhead from features that development workflows do not need, such as the file system filters that antivirus software hooks into to scan every file operation in real time.
Dev Drive uses ReFS, which has several optimizations that make it better for developer workloads. It handles metadata operations more efficiently, which matters when your build system is constantly querying and updating file information. It supports block cloning, introduced in Windows 11 24H2, which allows the file system to copy files as a low-cost metadata operation rather than physically reading and rewriting data. This makes cloning repositories and copying build artifacts significantly faster.
The performance mode for Microsoft Defender on Dev Drive is also a genuine difference. When Defender operates in performance mode on a trusted Dev Drive, it moves away from synchronous per-file scanning and uses more efficient strategies. The result is less I/O overhead during builds without leaving your files unprotected.
It is important to understand what Dev Drive is not. This is not a replacement for your system drive. It is not designed for general file storage like documents and photos. It is not for installing applications or developer tools themselves. This feature specifically intended to store source code, project files, package caches, and build outputs.
What to Store on a Dev Drive
The types of files that benefit most from Dev Drive are the ones your development tools access constantly during their operation.
Source code repositories are the most obvious candidate. Storing your Git repositories on a Dev Drive means that operations like cloning, checking out branches, and running Git status on large repos are faster because the file system handles the rapid file access more efficiently.
Package manager caches are another major win. When npm installs packages for a Node.js project, it reads and writes thousands of small files. The same is true for pip in Python, NuGet in .NET, and Cargo in Rust. By redirecting the cache directories for these tools to your Dev Drive, you speed up installs and restores significantly. For npm, you set the cache location with npm config set cache D:\DevDrive.npm-cache replacing the path with your Dev Drive location. Similar environment variable or configuration changes exist for most other package managers.
Build outputs and intermediate files are also well suited to a Dev Drive. Compiled binaries, object files, and other artifacts generated during the build process involve heavy I/O and benefit from the faster file operations ReFS provides.
Visual Studio recognizes a Dev Drive automatically when you create one and suggests it as the default location for new projects. VS Code and other editors work normally with files stored on a Dev Drive without any additional configuration.
What Not to Store on a Dev Drive
Developer tools and SDKs should generally stay on your main NTFS drive unless you have a specific reason to move them. Tools installed on your system drive benefit from the security guarantees of NTFS and integrate better with Windows security infrastructure.
General files such as documents, photos, downloads, and application data have no performance benefit from being on a Dev Drive. Dev Drive is optimized for developer workloads specifically, and using it as general storage provides no advantage and wastes the space you have allocated.
You cannot convert an existing NTFS drive to a Dev Drive. The Dev Drive designation is applied at the time of formatting, so you cannot take an existing volume and change it to ReFS without destroying its contents. You must create a new volume.
How to Create a Dev Drive in Windows 11
Step 1: Check Your Requirements
Before creating a Dev Drive, confirm you are running Windows 11 22H2 or later on Pro, Enterprise, or Education edition, that you have at least 8GB of RAM installed, and that you have at least 50GB of free disk space available either as unallocated space on an existing disk or space you can free by resizing a partition. Open Settings and go to System, then About, to confirm your Windows edition and version.
Step 2: Open Disk and Volume Settings
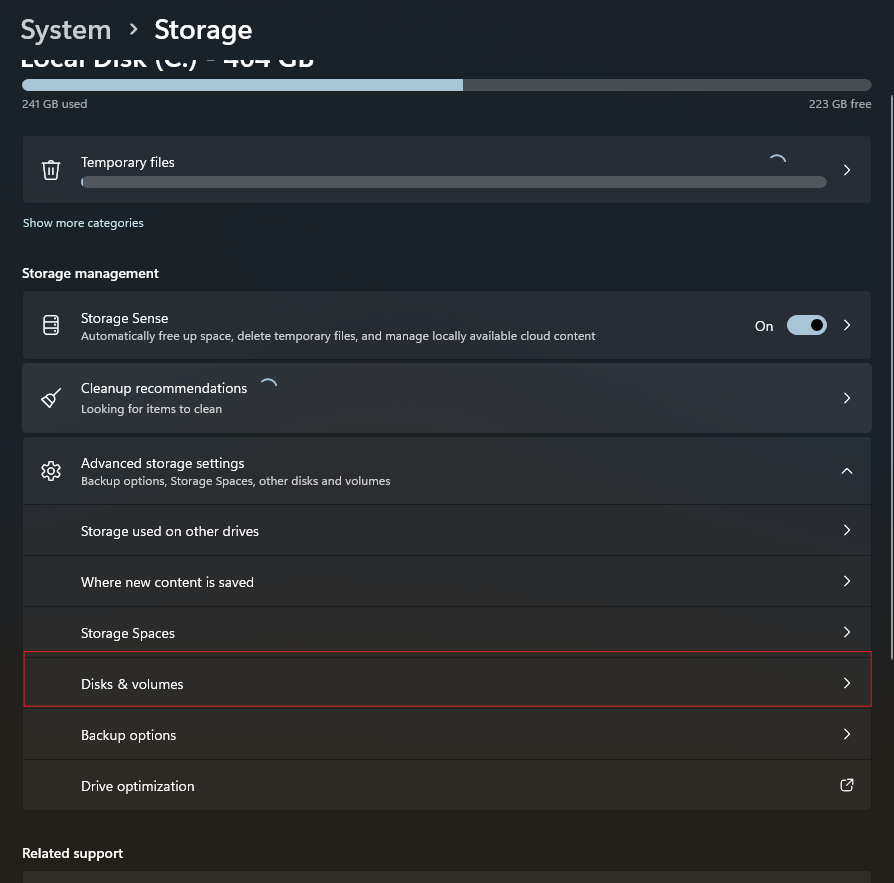
Open Settings with Windows key + I. Go to System, then Storage. Scroll down and click Advanced storage settings to expand that section. Click Disks and volumes. This shows you all the storage volumes currently on your PC.
Step 3: Create the Dev Drive
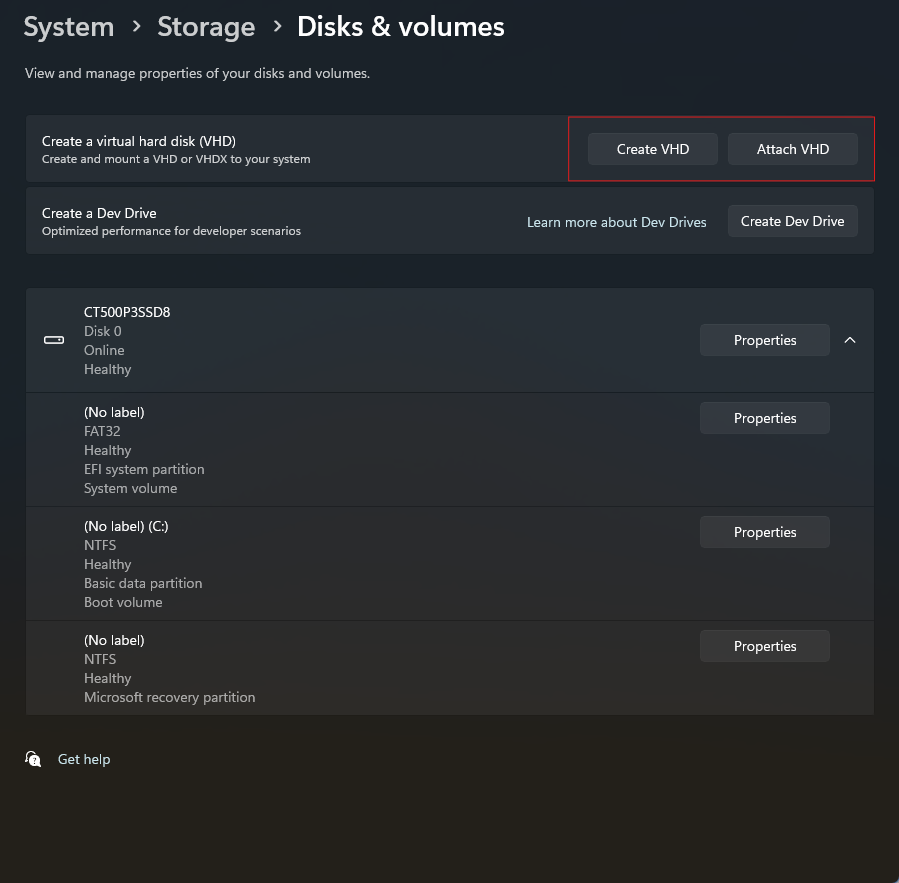
Click Create Dev Drive at the top of the Disks and volumes page. A setup wizard opens. You will be asked where to create the Dev Drive. You have three options.
Creating a new VHD (Virtual Hard Disk) creates a virtual disk file stored on your existing drive. This is the most flexible option because it is easy to move, resize, and delete. Choose VHDX format as it is more resilient and supports larger sizes. Dynamic expansion lets the file grow as you add content rather than immediately consuming its full allocated size. This is the recommended approach for most users.
Resizing an existing volume frees up space from an existing partition to create a new one. This gives you a proper dedicated partition on your physical disk which offers slightly better performance than a VHD since there is no virtualization layer. However, resizing partitions can be complex and carries some risk.
Using unallocated space requires that you have already freed unallocated space on a disk. If you have a second drive with free space, this is an easy path to a dedicated partition.
Step 4: Configure the Dev Drive
Give the Dev Drive a name such as DevDrive and assign it a drive letter. Set the size to at least 50GB, with more recommended if you work on large projects or need space for multiple repositories and their dependencies. Click Format to create the Dev Drive.
The drive appears in File Explorer like any other drive, labelled with its name and the drive letter you assigned. Windows automatically marks it as trusted and configures Defender's performance mode for it.
Redirecting Package Manager Caches to Dev Drive
To get the most out of your Dev Drive, redirect the cache directories of the package managers you use most. This is where the performance improvement is most noticeable in everyday development.
For npm, open a terminal and run the command npm config set cache D:\DevDrive.npm followed by npm config set prefix D:\DevDrive.npm-global, replacing D:\DevDrive with your actual Dev Drive letter.
For pip in Python, set the environment variable PIP_CACHE_DIR to a folder on your Dev Drive. You can do this in Windows Settings under System, then Advanced system settings, then Environment Variables.
For NuGet in .NET and Visual Studio, set the NUGET_PACKAGES environment variable to a folder on your Dev Drive.
Once these caches are redirected, subsequent package installs and restores pull from your faster Dev Drive rather than a location on your NTFS system drive.
Dev Drive vs Regular Drive: A Quick Comparison
| Feature | Dev Drive (ReFS) | Regular Drive (NTFS) |
|---|---|---|
| File system | ReFS | NTFS |
| Optimized for | Developer workloads | General purpose |
| Antivirus mode | Performance mode (less overhead) | Standard real-time scanning |
| Block cloning | Yes (Windows 11 24H2+) | No |
| Best for | Source code, package caches, build outputs | Documents, apps, system files |
| Can install apps on it | Not recommended | Yes |
| Available on | Windows 11 Pro, Enterprise, Education | All editions |
| Minimum size | 50GB | No minimum |
Final Thoughts
Dev Drive is not a dramatic transformation of your workflow. It is a well-considered quality-of-life improvement for developers who spend significant time waiting for builds to complete, packages to install, or repositories to clone. If you work with large codebases, frequently install dependencies, or run intensive build pipelines on Windows 11, the combination of ReFS optimizations and Defender's performance mode delivers real time savings that add up over a working day. Setting it up takes around five minutes and the only ongoing effort is redirecting your package manager caches. For developers on Windows 11 Pro or higher, it is worth doing.
Frequently Asked Questions
Which Windows 11 editions support Dev Drive?
Dev Drive is available on Windows 11 Pro, Enterprise, and Education editions running version 22H2 or later. It is not available on Windows 11 Home. You also need at least 8GB of RAM and 50GB of free disk space to create one.
Can I convert my existing C drive to a Dev Drive?
No. Dev Drive formatting happens only at the time of creating a new volume. You cannot convert an existing NTFS volume to ReFS without erasing all of its contents. You need to create a new volume, either as a VHD, a resized partition, or from unallocated disk space.
Is it safe to use Dev Drive? Does it reduce antivirus protection?
Dev Drive uses Microsoft Defender's performance mode rather than turning off antivirus entirely. Defender still scans files on a Dev Drive but does so more efficiently to reduce the overhead on build operations. Your files remain protected. You can review and adjust the antivirus settings for your Dev Drive in Windows Security at any time.
What is the difference between creating a Dev Drive as a VHD versus a partition?
A VHD stores your Dev Drive as a virtual disk file on your existing drive. It is easier to move, resize, and delete but has a small performance overhead from the virtualization layer. A physical partition on a disk gives marginally better performance since it uses the disk directly, but resizing partitions is more complex and carries a small risk of data loss if not done carefully.
Should I install Visual Studio or VS Code on the Dev Drive?
No. Developer tools and applications should remain on your main NTFS system drive. Dev Drive is intended for your project files, source code repositories, and package caches, not for the tools themselves. Visual Studio automatically recognizes your Dev Drive and suggests it for storing new project files, but the VS installation itself should stay on your C drive.


Discussion (0)
Be the first to comment.