

If you have ever zoomed into a logo and noticed it stays perfectly sharp no matter how large you make it, that is a vector graphic at work. Unlike a photograph or a screenshot, which is made of pixels and gets blurry when stretched, a vector graphic is built from mathematical paths and can scale to any size without losing a single sharp edge. Billboards, logos, icons, product packaging, and most professional design work uses vectors for exactly this reason.
Adobe Illustrator is the industry standard tool for creating them. It is also expensive, subscription-only, and considerably more complex than most people need. Inkscape is the free alternative, and it is genuinely capable. Designers, illustrators, engineers, and hobbyists around the world use it daily to produce work that would be indistinguishable from anything made in Illustrator. It has been in active development since 2003 and is completely free, open-source, and available on Windows, macOS, and Linux.
What Vector Graphics Actually Are
Before using Inkscape it helps to understand what makes vector graphics different from the images most people are used to working with.
A regular photo or image is made of pixels, tiny coloured squares arranged in a grid. Zoom in far enough and you see the grid. Stretch the image beyond its original size and it becomes blurry because you are asking software to invent pixels that were never there. This is called a raster or bitmap image.
A vector graphic contains no pixels. Instead it stores shapes as mathematical descriptions: a circle with a radius of 50 units, a rectangle 200 by 100 units, a curved path through a set of coordinates. When you display a vector graphic, the software recalculates the shapes at whatever size is needed. Zoom to 1000 percent and the edges are still perfectly clean. Print it on a business card or a six-metre banner from the same file and the quality is identical.
This makes vectors the right choice for anything with hard edges and solid colours: logos, icons, typography treatments, diagrams, infographics, illustrations, patterns, and anything destined for print. For photographs and anything with continuous tone, raster formats like JPEG and PNG are still appropriate.
Inkscape's native file format is SVG, Scalable Vector Graphics, which is the standard format for vector graphics on the web. SVG files are readable text files and work directly in every modern browser.
What Inkscape Can Do
Inkscape's feature set covers everything most designers need for professional vector work.
The drawing tools include rectangles, ellipses, polygons, stars, spirals, and freehand paths. Bezier curves and the pen tool allow precise control over complex shapes. The node editor lets you manipulate individual points on any path after you have drawn it, adjusting handles to change the curve at each point.
Boolean path operations are one of the most useful features for logo and icon work. You can combine two shapes into one using Union, subtract one shape from another using Difference, or keep only the overlapping area using Intersection. These operations let you construct complex shapes from simple building blocks rather than drawing everything freehand.
Text handling is comprehensive. You can set text in any installed font, adjust kerning and letter spacing, flow text inside a shape, or run text along a curved path. For web and UI work this is particularly useful.
The Trace Bitmap tool converts a raster image, a hand-drawn sketch, a photograph, or a scanned logo into vector paths automatically. The results need refinement but it is a genuine time-saver when you have artwork that needs to become a vector file.
Layers work the same as in other design software. You can organise elements across multiple layers, lock and hide individual layers, and manage complex compositions by keeping related elements together.
For output, Inkscape exports to SVG, PNG, PDF, EPS, and several other formats. PNG export with a specified DPI is the standard route for web graphics. PDF works for print. SVG is what you keep as your editable master file.
How to Get and Install Inkscape
Download Inkscape from inkscape.org. It is available for Windows, macOS, and Linux. On Windows it is also available through the Microsoft Store. There is no account to create, no subscription, and no payment of any kind. Download the installer, run it, and you are done.
The current version as of 2026 is 1.4. The interface has been progressively refined over recent years and is now noticeably more polished than it was even a few versions ago.
Getting to Know the Interface
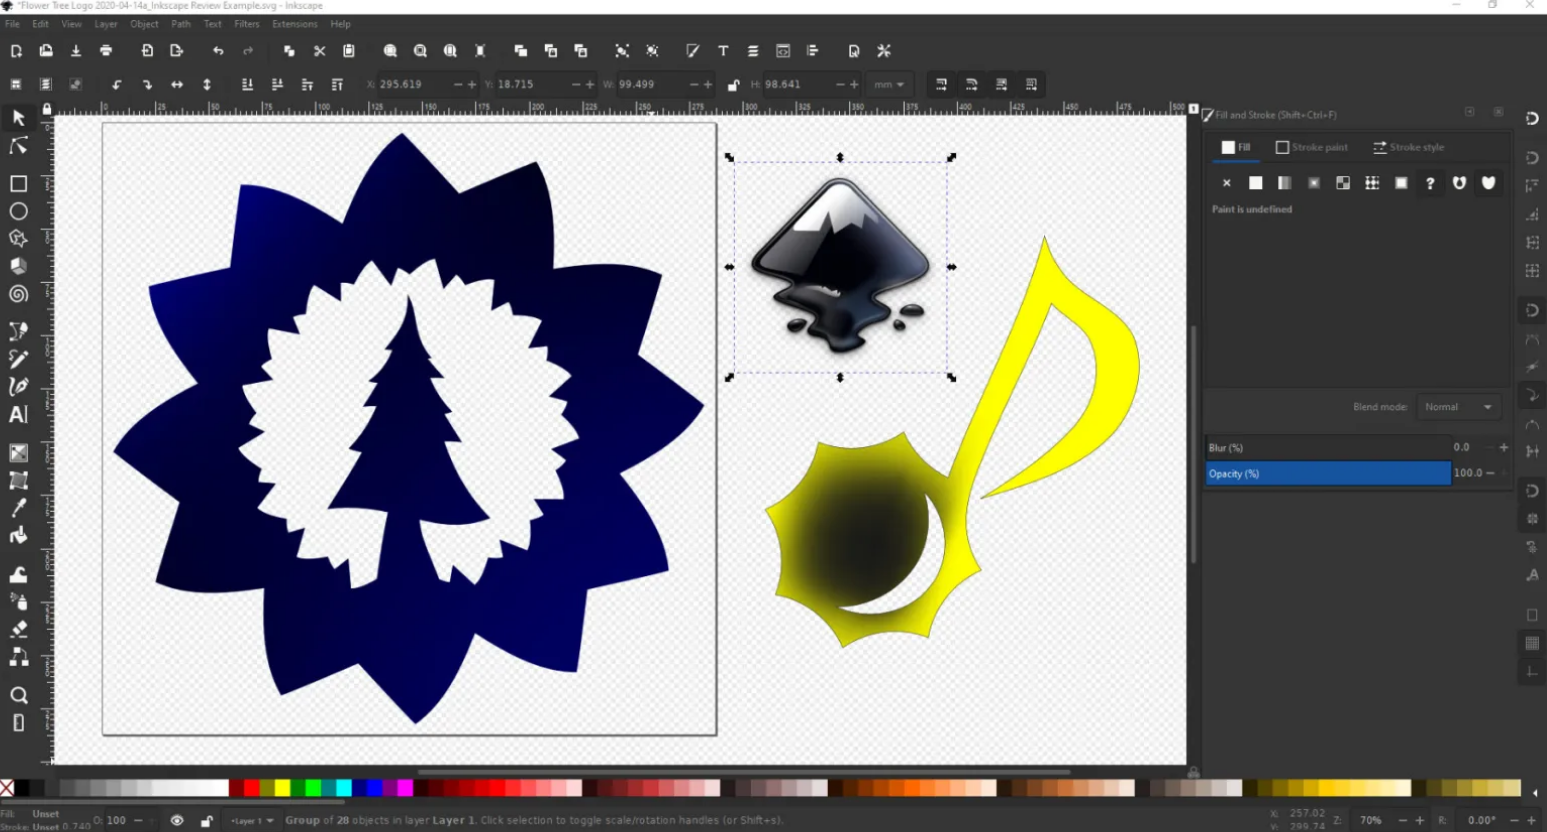
When you open Inkscape for the first time the layout is similar to most design applications, though the density of tools can feel overwhelming initially. The key areas to understand are the canvas in the centre where you draw, the toolbox running down the left side, the tool controls bar across the top which changes depending on which tool is active, and the colour palette along the bottom.
The most important keyboard shortcut to memorise is F1 or S, which activates the selection tool. When you are not sure why clicking on things is not working, pressing F1 almost always fixes it because you have accidentally switched to a different tool.
The zoom controls work with plus and minus keys, or by scrolling with the mouse wheel while holding Control. Press 3 on the keyboard to zoom so the drawing fills the screen, or 5 to fit the entire page in view.
How to Create Your First Design
Step 1: Set Up Your Canvas
Go to File and select Document Properties, or press Shift and Control and D together. This opens the document settings where you can set the canvas size. If you are making a logo, a custom size of 500 by 500 pixels works as a starting point. If you are designing for print, set the size to your actual print dimensions and change the unit to millimetres.
Step 2: Draw Basic Shapes
Select the Rectangle tool from the left toolbar or press R. Click and drag on the canvas to draw a rectangle. Hold Control while dragging to constrain it to a perfect square. With the shape selected, you can see and edit its width, height, and position in the toolbar at the top.
For a circle, press E to activate the Ellipse tool and drag on the canvas. Again, holding Control while dragging gives you a perfect circle.
The Fill and Stroke panel controls colour. Open it with Shift and Control and F. The Fill tab controls the inside colour of a shape and the Stroke paint tab controls the border. Click the flat colour button and use the sliders or type a hex colour code to set the colour you want.
Step 3: Work With Paths
Paths are the fundamental building block of vector graphics. Every shape can be converted to a path, which then allows you to manipulate individual points and curves.
Select any shape and go to Path and then Object to Path. This converts the shape to an editable path. Press N or F2 to activate the Node editor, and you will see small square handles appear at the corners and edges. Click and drag any node to move it. Click the middle of a segment and drag to introduce a curve.
The Bezier tool, activated by pressing B, lets you draw paths by clicking to place nodes. Click to create a sharp corner. Click and drag to create a curved point with handles you can adjust. Press Enter or double-click to finish a path.
Step 4: Use Boolean Operations to Build Complex Shapes
This is where vector design becomes genuinely powerful. Draw a large circle. Draw a smaller circle overlapping it. Select both shapes by clicking the first, then holding Shift and clicking the second. Go to Path and select Difference. The smaller circle is punched out of the larger one, leaving a ring shape.
The same logic applies to Union, which merges two shapes into one, and Intersection, which keeps only the part where they overlap. These three operations alone are enough to build the majority of logo and icon shapes you are likely to need.
Step 5: Add and Format Text
Press T to activate the Text tool. Click anywhere on the canvas and start typing. Use the toolbar at the top to change the font, size, and style. To run text along a curved path, first draw the path you want the text to follow, then select both the text and the path, and go to Text and then Put on Path. The text flows along the curve automatically.
Step 6: Export Your Finished Design
Always save the working file as an Inkscape SVG first, using File and then Save As, to preserve every editable element.
For a PNG export, go to File and then Export PNG Image, or press Shift and Control and E. Set your desired resolution in DPI, with 96 being standard for screens and 300 for print, and click Export. The exported PNG is a flat raster image at the size and quality you specified.
For print PDF output, go to File and then Save As and choose the PDF format from the file type dropdown.
Where Inkscape Falls Short Compared to Illustrator
Inkscape is free and capable, but being honest about its limitations helps you set realistic expectations.
The interface has improved considerably but still lags behind Illustrator in polish and workflow refinement. Certain tasks, particularly complex typography work and advanced gradient meshes, are more cumbersome in Inkscape. The selection and alignment tools are slightly less intuitive. Performance on very complex files with many paths can slow down noticeably.
File compatibility with Adobe formats is imperfect. Inkscape can open AI and EPS files but the results are not always faithful to the original, particularly for complex files. If you are working with clients or colleagues who use Illustrator, exporting to SVG or PDF and having them import that is more reliable than exchanging native files.
None of these are reasons not to use Inkscape. For the vast majority of vector work, including logos, icons, illustrations, infographics, and print layouts, Inkscape is entirely capable and the workflow is solid. The limitations become relevant at the professional edge where you are doing very specialised work or need seamless file exchange with an Illustrator-based team.
Who Inkscape Is For
Inkscape is genuinely useful for anyone who needs to create scalable graphics without the cost of Adobe's subscription. Freelancers making logos and brand materials, small businesses designing their own marketing collateral, developers creating icons and SVG assets for web projects, students learning design, and hobbyists working on prints, stickers, or laser cutting files all use Inkscape regularly and effectively.
If you are already paying for an Adobe Creative Cloud subscription and Illustrator is part of it, there is little reason to switch. But if you need a capable vector tool and have no desire to pay a monthly fee for it, Inkscape covers the ground.
Frequently Asked Questions
Can Inkscape open Adobe Illustrator files?
Inkscape can open AI and EPS files, but the compatibility is imperfect. Simple files usually import well. Complex files with advanced Illustrator features may not translate faithfully. For the most reliable cross-compatibility, exporting from Illustrator to SVG or PDF and importing that into Inkscape typically gives better results than opening AI files directly.
Is Inkscape suitable for complete beginners with no design experience?
Yes, though there is a learning curve. The basic tools for drawing shapes, applying colours, and adding text are straightforward to learn within a few hours. More advanced techniques like path manipulation and boolean operations take longer to master but are well-documented through Inkscape's official tutorials and a large community of video guides online.
Can I use Inkscape files for commercial purposes?
Yes. Inkscape is open-source software and using it for commercial work is entirely permitted. The SVG files you create are your own and can be used commercially without any restrictions from the software itself.
What is the difference between SVG and PNG output from Inkscape?
SVG is a vector format that preserves all the editable paths and shapes. It scales to any size without quality loss and is the format used for web graphics and further editing. PNG is a raster format that converts your vector design to a grid of pixels at a fixed resolution. PNG is what you use when you need to share an image that people can view anywhere, print, or upload to platforms that do not support SVG.
Does Inkscape work on Windows 11?
Yes. Inkscape runs on Windows 10 and Windows 11 and is available through the Microsoft Store as well as the direct download on inkscape.org. There are also native versions for macOS and Linux.


Discussion (0)
Be the first to comment.