

If you have an iPhone and a Windows PC, you may be looking for a way to connect, sync, and use them together. One way to do that is to use the Phone Link app made by Microsoft. Although it’s still a work in progress, and there are some limitations regarding what you can do with it, this app offers a couple of interesting features. As long as your iPhone is nearby, the app grants you access to your iPhone’s notifications, lets you read and send text messages, and also allows you to make and receive calls from your PC. Interested? Here’s what you need if you want to pair your iPhone to your computer with Phone Link:
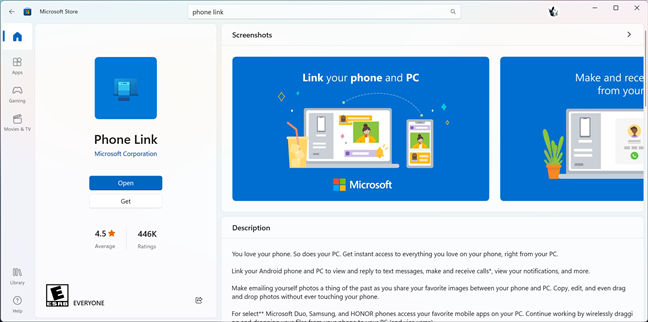
 The Phone Link app in Microsoft Store
Before anything else, if you want to sync your iPhone to your computer, here’s what you should know about the system requirements of Phone Link:
The Phone Link app in Microsoft Store
Before anything else, if you want to sync your iPhone to your computer, here’s what you should know about the system requirements of Phone Link:
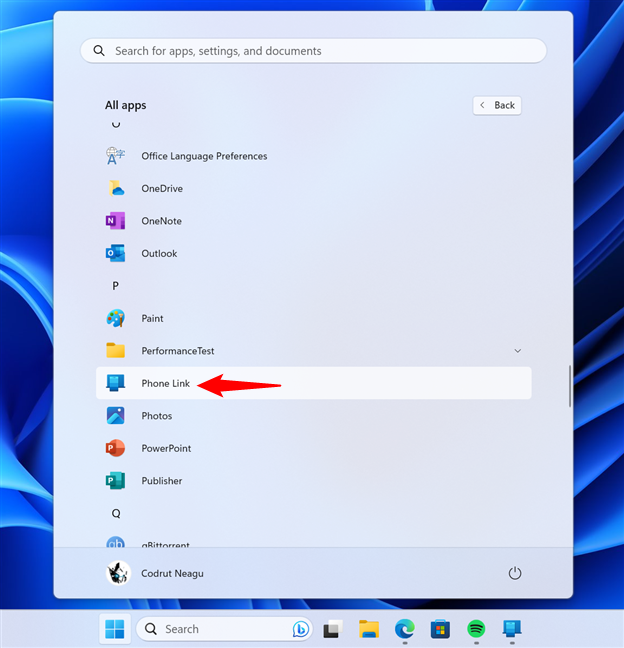
 The Phone Link shortcut in Windows 11
Alternatively, you can type “phone link” inside the taskbar Search bar, and then click or tap the Phone Link result.
The Phone Link shortcut in Windows 11
Alternatively, you can type “phone link” inside the taskbar Search bar, and then click or tap the Phone Link result.
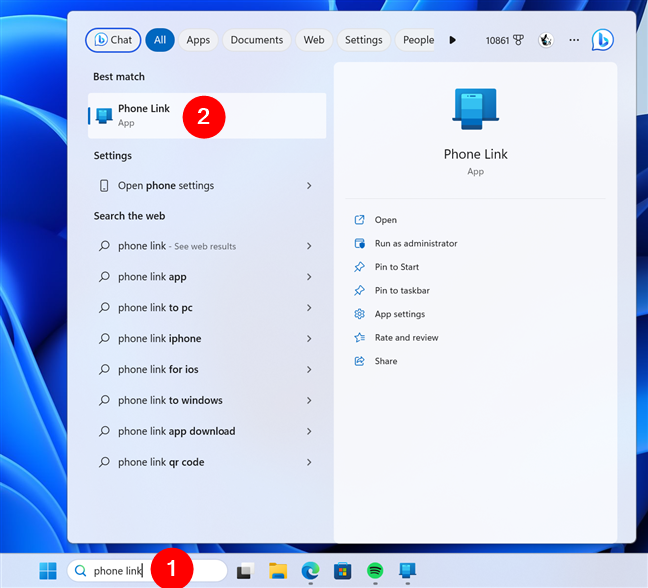
 Access Phone Link from the Search bar
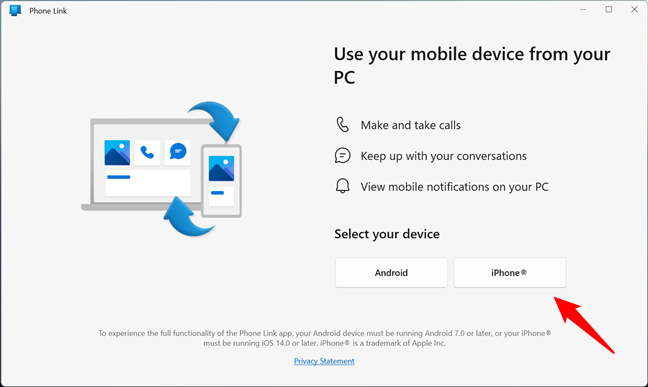
 Select iPhone in Phone Link
Then, Phone Link asks you to pair your devices. For that, it creates a temporary QR code that you need to scan with your iPhone.
Select iPhone in Phone Link
Then, Phone Link asks you to pair your devices. For that, it creates a temporary QR code that you need to scan with your iPhone.
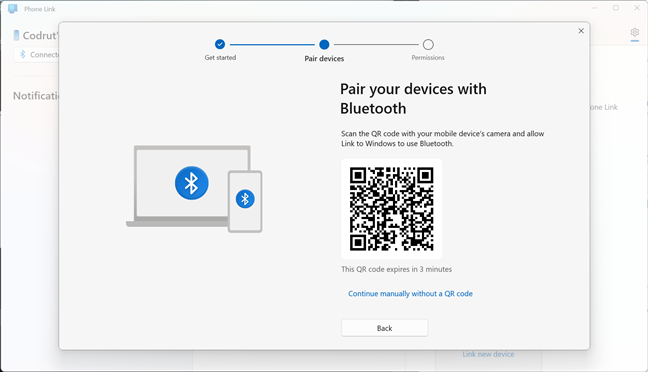
 QR code shown by Phone Link
TIP: Here are the best free QR scanners for iPhone.
Your Windows 11 PC is now ready to link with your iPhone. Next, you need to set up your iPhone too. Switch over to your iPhone and follow the next steps:
QR code shown by Phone Link
TIP: Here are the best free QR scanners for iPhone.
Your Windows 11 PC is now ready to link with your iPhone. Next, you need to set up your iPhone too. Switch over to your iPhone and follow the next steps:
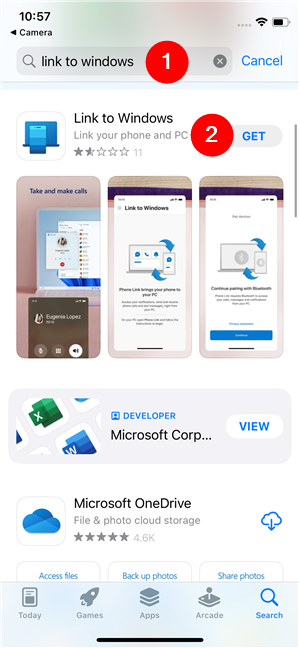
 The Link to Windows app in the App Store
Once Link to Windows is installed, launch it and get ready to pair your iPhone to the Windows 11 PC.
The Link to Windows app in the App Store
Once Link to Windows is installed, launch it and get ready to pair your iPhone to the Windows 11 PC.

 Use Link to Windows to Scan QR code
After scanning the QR code, Link to Windows informs you that it “requires Bluetooth to access your calls, messages, and notifications from your PC.” Tap on Continue and then on OK to allow Link to Windows to use your iPhone’s Bluetooth.
Use Link to Windows to Scan QR code
After scanning the QR code, Link to Windows informs you that it “requires Bluetooth to access your calls, messages, and notifications from your PC.” Tap on Continue and then on OK to allow Link to Windows to use your iPhone’s Bluetooth.
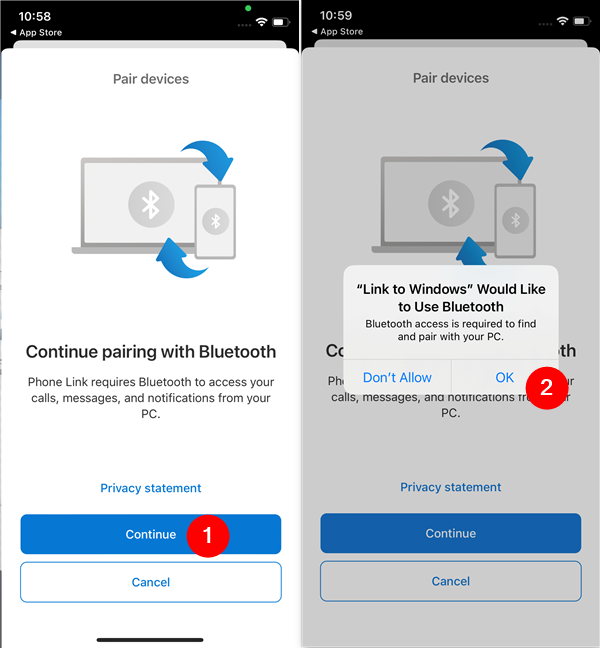 Allow Link to Windows to use Bluetooth for pairing
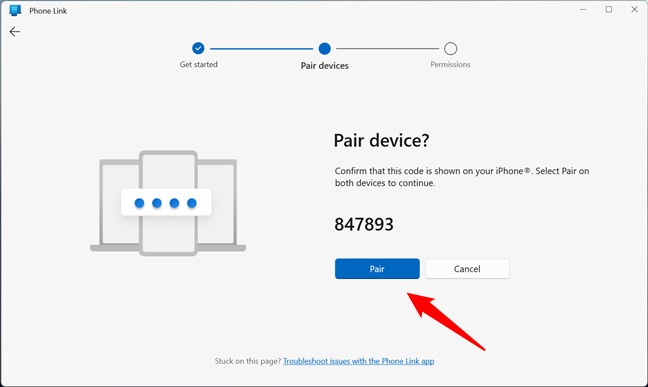 Confirm the unique code on the iPhone and Windows 11 PC
Once you do that, your iPhone and your Windows 11 computer pair up.
Confirm the unique code on the iPhone and Windows 11 PC
Once you do that, your iPhone and your Windows 11 computer pair up.
 The iPhone and the Windows 11 PC are paired
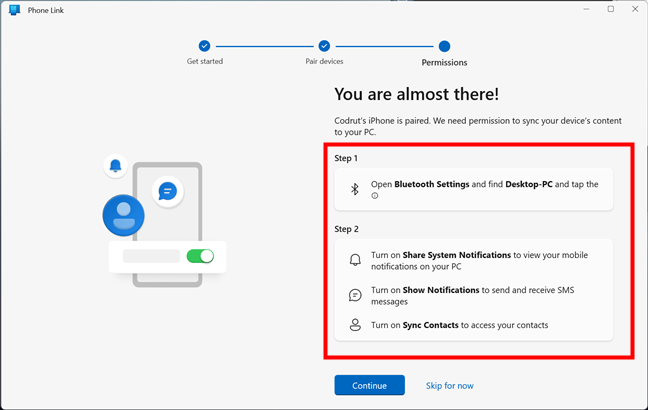
If you take a look at the Phone Link app on your Windows 11 computer, you see a similar story. The app informs you that your devices have been paired, and then shows you how to grant the required permissions on your iPhone. Don’t click/tap on Continue yet: before you do that, follow the steps presented by the Phone Link app, also described in detail in the next paragraph of this tutorial.
The iPhone and the Windows 11 PC are paired
If you take a look at the Phone Link app on your Windows 11 computer, you see a similar story. The app informs you that your devices have been paired, and then shows you how to grant the required permissions on your iPhone. Don’t click/tap on Continue yet: before you do that, follow the steps presented by the Phone Link app, also described in detail in the next paragraph of this tutorial.
 Instructions on how to grant permissions on the iPhone
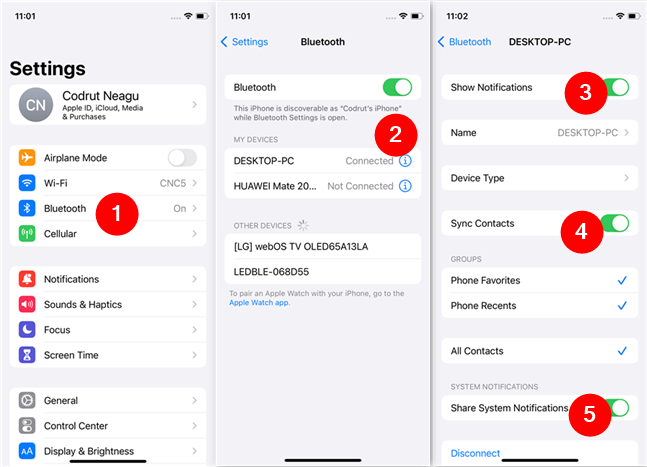
On your iPhone, open the Settings app and tap on Bluetooth (noted 1 in the next screenshot). On the Bluetooth page, look for the name of your Windows 11 computer and tap the small “i” (information) button next to it (noted 2 in the screenshot below). This should load a new screen with a series of settings that allow you to change what kind of data can be shared by the two devices over Bluetooth. Here, make sure you turn on the following switches:
Instructions on how to grant permissions on the iPhone
On your iPhone, open the Settings app and tap on Bluetooth (noted 1 in the next screenshot). On the Bluetooth page, look for the name of your Windows 11 computer and tap the small “i” (information) button next to it (noted 2 in the screenshot below). This should load a new screen with a series of settings that allow you to change what kind of data can be shared by the two devices over Bluetooth. Here, make sure you turn on the following switches:
 Grant the required permissions on the iPhone
 Your iPhone is now paired with your PC
Next, you get a welcome-aboard message from the Phone Link app, and you can choose whether you want to open the app every time you sign in to Windows 11. Check the box if you want that, and then press the Get started button.
Your iPhone is now paired with your PC
Next, you get a welcome-aboard message from the Phone Link app, and you can choose whether you want to open the app every time you sign in to Windows 11. Check the box if you want that, and then press the Get started button.
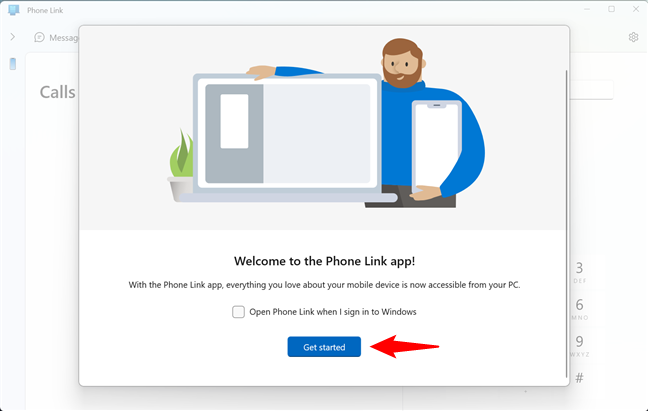
 Choose whether to load Phone Link at startup and Get started
Then, the Phone Link app loads its dashboard, defaulting to the Messages page, similar to what you see in this screenshot:
Choose whether to load Phone Link at startup and Get started
Then, the Phone Link app loads its dashboard, defaulting to the Messages page, similar to what you see in this screenshot:
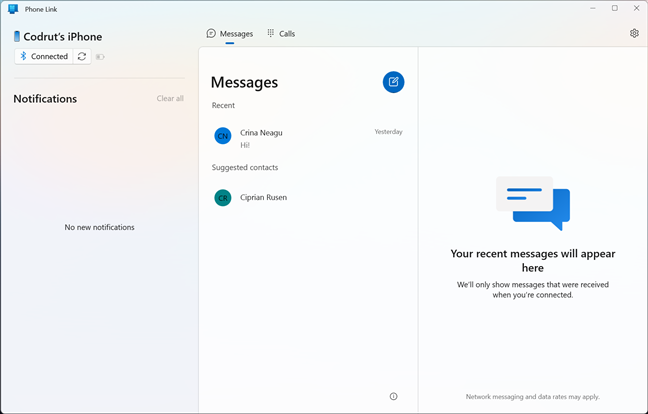
 The Phone Link app used with an iPhone
Finally, you can start using your iPhone on your Windows 11 PC. The app will show you the notifications received on your iPhone, as well as allow you to read and send SMS messages and make or answer phone calls directly from your PC. If you’d like more details about all that, read this article: How to use your iPhone on Windows 11 with Phone Link.
The Phone Link app used with an iPhone
Finally, you can start using your iPhone on your Windows 11 PC. The app will show you the notifications received on your iPhone, as well as allow you to read and send SMS messages and make or answer phone calls directly from your PC. If you’d like more details about all that, read this article: How to use your iPhone on Windows 11 with Phone Link.
What is Phone Link? Requirements for syncing an iPhone to a PC
Microsoft’s Phone Link is an app that allows you to connect, sync, and use your smartphone directly from your Windows PC. It works with Android devices, as well as iPhones. When it comes to Android smartphones, the app has a multitude of features that work very well, including the ability to make phone calls, read and send messages, browse photos, and even mirror the screen of your smartphone on Windows. For iPhones, however, Phone Link is a work in progress that’s just starting to shape up. Right now, connecting an iPhone to a Windows PC lets you make and receive phone calls, read and send text messages, and get notifications from your iPhone on your PC. Still, the future will probably bring new features for iPhones, similar to the ones available for Android.- To connect an iPhone to a PC, your computer must run Windows 11. The Phone Link app for Windows 10 works only with Android devices.
- Your iPhone must be running iOS 14 or newer, which means very old iPhones (iPhone 6 and previous models) are not supported. For this tutorial, I used an iPhone 12 mini with iOS 16.5.1 installed.
- You must have the Phone Link app installed on your Windows 11 PC. While the app should be installed by default on your computer, you can also get or update it from the Microsoft Store. For all the available features and an optimal user experience, ensure you have version 1.23031.2 or newer.
- On your iPhone, you have to install an app called Link to Windows.
- To connect and sync your iPhone to your Windows 11 PC, you must have or create a Microsoft account. You need one in order to log in on your Windows 11 PC; otherwise, the Phone Link app won’t even start. On top of that, you also need a Microsoft account to sign in to the Link to Windows app on your iPhone. However, it’s not mandatory to use the same Microsoft account on both devices.
- The Windows 11 computer and the iPhone that you intend to connect to must be nearby and have Bluetooth turned on. It’s also preferable that both devices have internet access.
How to connect an iPhone to a Windows 11 PC
If all of the above criteria are met, here are the steps you should take to connect your iPhone to your Windows 11 computer:Step 1. Open Phone Link on your Windows 11 PC
The first step is to open the Phone Link app on your Windows 11 computer. While there are many ways to do that, one of the easiest is to click or tap on its shortcut in the Start Menu. Open the Start Menu, access its All apps list, and then locate and click or tap the Phone Link shortcut.Step 2. Get your Windows 11 PC ready for pairing with your iPhone
When you open the Phone Link app for the first time, it asks you what type of phone you’re going to connect to your PC. Click or tap on iPhone to continue.Step 3. Install and open Link to Windows on your iPhone
Launch the App Store and use its search to find the Link to Windows app. You can also follow this direct link if you prefer: Link to Windows. Either way, once you find the app, tap the Get button to install it on your iPhone.Step 4. Set up Link to Windows on your iPhone
The Link to Windows app for iPhone starts with a screen like the one on the left side of the next screenshot. Tap the “Scan QR code” button, and allow the app to access your iPhone’s camera. Tap OK and point your camera to the QR code displayed on your Windows 11 computer.Step 5. Pair your iPhone to your Windows 11 PC
The last step of the pairing process is to confirm that this is what you want. 🙂 Both your iPhone and your Windows 11 computer should display the same unique numeric code. Tap Pair on your iPhone and click or tap Pair on your Windows 11 PC.Step 6. Allow Phone Link to access data on your iPhone
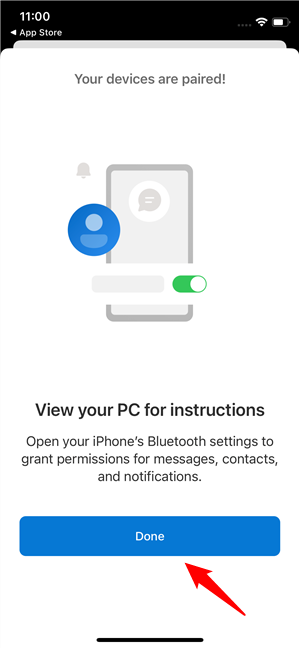
On your iPhone, you should now see a screen that starts with “Your devices are paired!” followed by a brief message informing you to “View your PC for instructions” on how to “Open your iPhone’s Bluetooth settings to grant permissions for messages, contacts, and notifications.”- Show Notifications (3)
- Sync Contacts (4)
- Share System Notifications (5)
Step 7. Final steps before you can use the iPhone on your Windows 11 PC
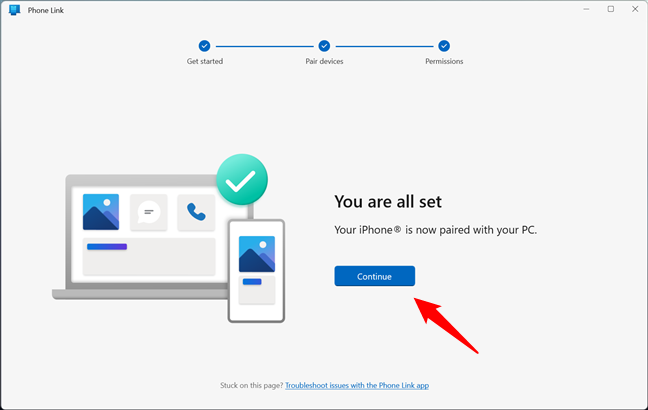
Once you do all that, the Phone Link app on your Windows 11 computer lets you know that “You are all set” and that “Your iPhone is now paired with your PC.” Underneath these messages, there’s a Continue button: click or tap on it.

Discussion (1)
I’ve tried this a couple of times and it will never work. Windows says it is connected but phone link doesn’t see it.