

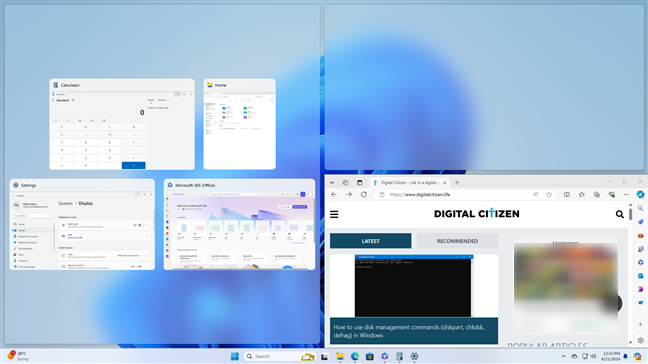
The Windows 11 split screen feature (Snap) is designed to make multitasking easier than ever before. You can view and access up to four app windows at the same time, saving time and increasing your overall productivity. Furthermore, the Snap layouts and Snap suggestions features let you quickly arrange your apps in different ways. Read this guide to find out how to split screen on Windows 11 and view apps side by side:

 The Snap windows feature in Windows 11
Furthermore, while earlier versions of the operating system offered more limited options, Windows 11 makes multitasking easier with up to six Snap layouts and three Snap suggestions for arranging your apps.
The Snap windows feature in Windows 11
Furthermore, while earlier versions of the operating system offered more limited options, Windows 11 makes multitasking easier with up to six Snap layouts and three Snap suggestions for arranging your apps.
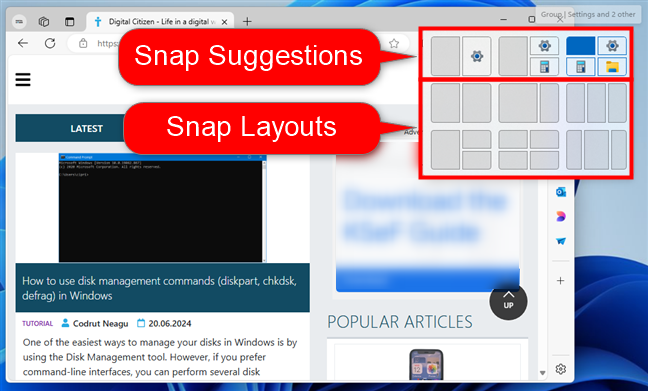
 Snap Suggestions and Snap Layouts in Windows 11
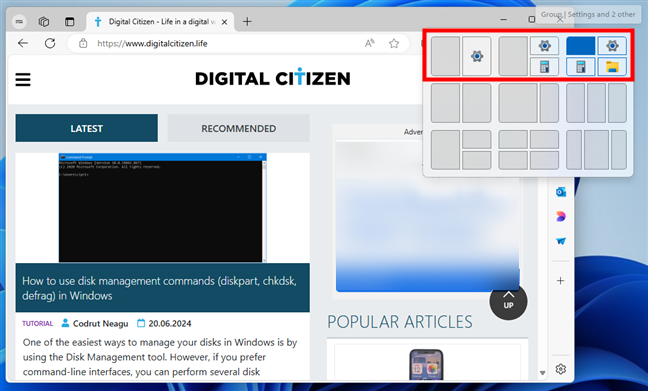
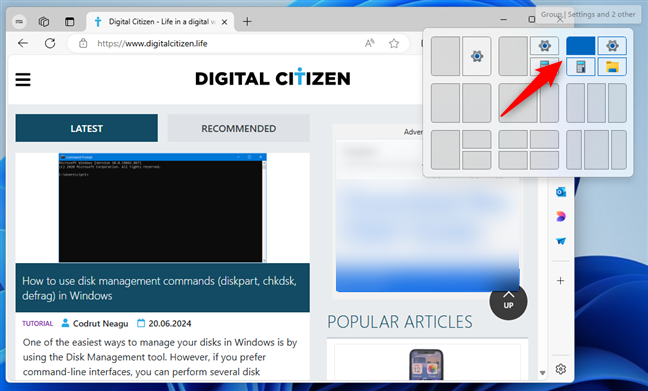
On a screen with a large Full HD, 1440p, or 4K resolution, you get six available layouts to choose from, as well as three different layout suggestions, as shown in the screenshot below.
Snap Suggestions and Snap Layouts in Windows 11
On a screen with a large Full HD, 1440p, or 4K resolution, you get six available layouts to choose from, as well as three different layout suggestions, as shown in the screenshot below.

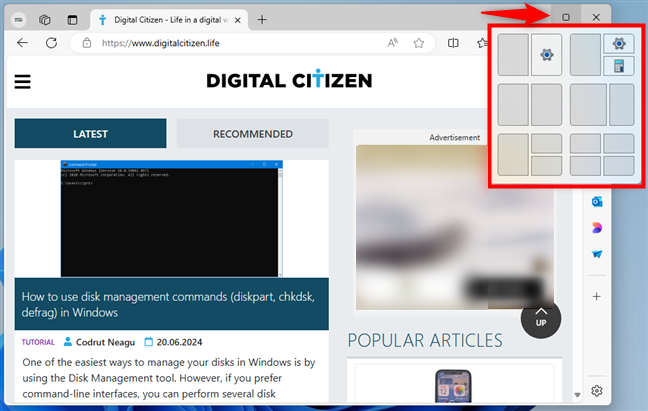
 Use the maximize button to reveal the Snap layouts
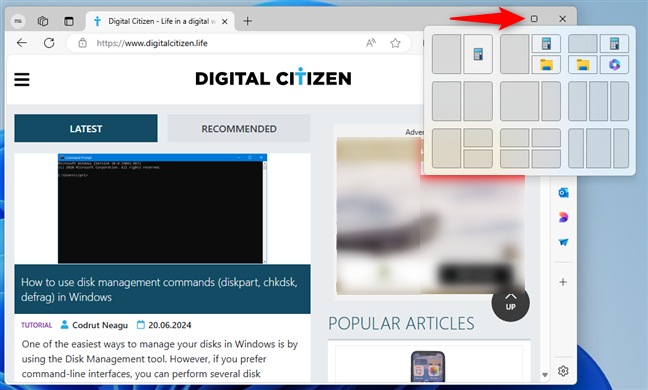
However, if you’re using a smaller display with a resolution lower than Full HD (1920x1080 pixels), you get only four Snap layouts and two Snap suggestions.
Use the maximize button to reveal the Snap layouts
However, if you’re using a smaller display with a resolution lower than Full HD (1920x1080 pixels), you get only four Snap layouts and two Snap suggestions.
 On smaller screens, you get fewer split screen layouts
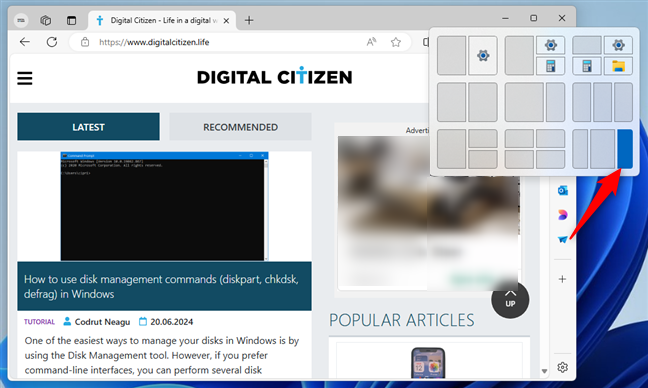
IMPORTANT: The display scaling settings from Windows 11 also impact the number of layouts. For example, if you set a scaling of 125% or 200% on a 1080p or 1440p display, you may get only four Snap layouts and two Snap suggestions. That’s because Windows 11 considers there isn’t enough space on the screen for all six layouts and three suggestions available on larger screens.
On smaller screens, you get fewer split screen layouts
IMPORTANT: The display scaling settings from Windows 11 also impact the number of layouts. For example, if you set a scaling of 125% or 200% on a 1080p or 1440p display, you may get only four Snap layouts and two Snap suggestions. That’s because Windows 11 considers there isn’t enough space on the screen for all six layouts and three suggestions available on larger screens.
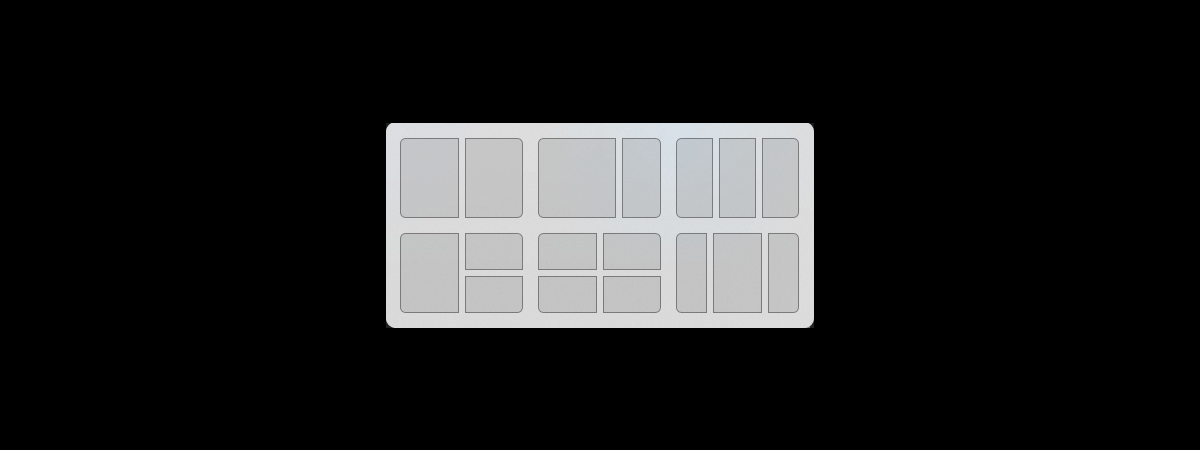
 The Snap layouts available in Windows 11
 Snap suggestions in Windows 11
Some people may like the way Windows 11 handles the Snap suggestions, but I’m not one of them. While they can theoretically be useful, it depends on your way of working on the desktop. In my case, Snap suggestions aren’t something that makes my life easier, as I don’t keep many apps open at the same time and don’t need to split the screen often. Therefore, my subjective opinion is that the Snap suggestions only add clutter to the interface. I could live without them and wouldn’t miss Snap suggestions at all.🙂
Snap suggestions in Windows 11
Some people may like the way Windows 11 handles the Snap suggestions, but I’m not one of them. While they can theoretically be useful, it depends on your way of working on the desktop. In my case, Snap suggestions aren’t something that makes my life easier, as I don’t keep many apps open at the same time and don’t need to split the screen often. Therefore, my subjective opinion is that the Snap suggestions only add clutter to the interface. I could live without them and wouldn’t miss Snap suggestions at all.🙂
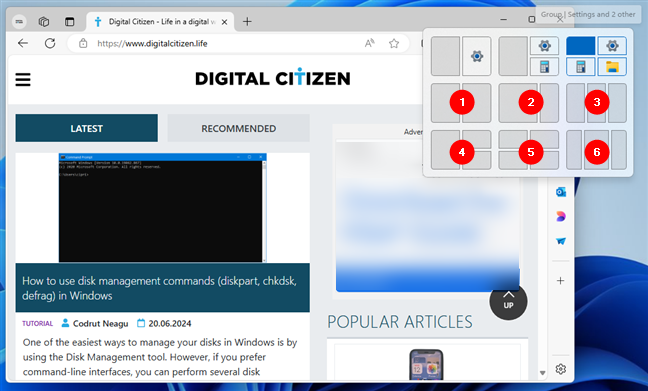
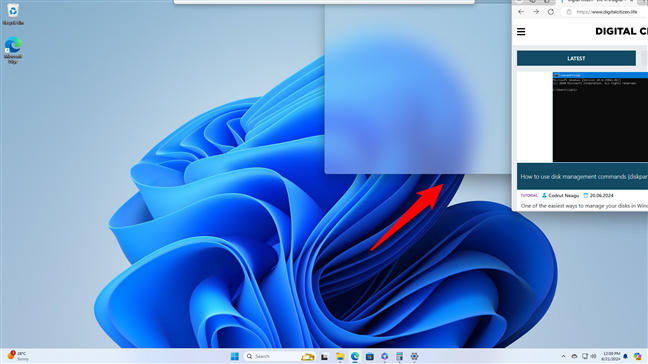
 Hover the Maximize button to access Snap options
In the pop-up, click or tap on the exact position where you want your window to be shown in the chosen layout. For instance, I can set my Microsoft Edge window as the right app window from the last layout.
Hover the Maximize button to access Snap options
In the pop-up, click or tap on the exact position where you want your window to be shown in the chosen layout. For instance, I can set my Microsoft Edge window as the right app window from the last layout.
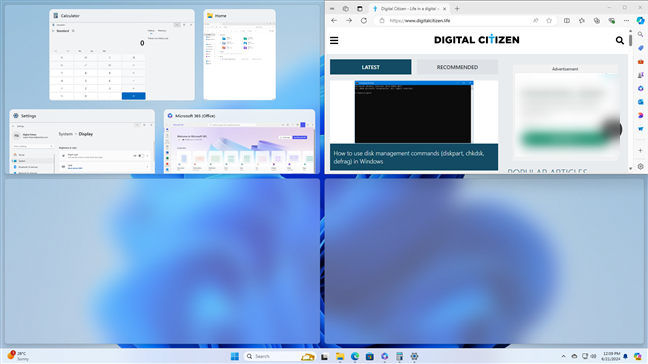
 Select the position of the window within a layout
The window is immediately snapped into the spot you chose. The remaining app windows are then displayed in the other available areas, and you can click or tap the ones you want in each layout section.
Select the position of the window within a layout
The window is immediately snapped into the spot you chose. The remaining app windows are then displayed in the other available areas, and you can click or tap the ones you want in each layout section.
 The app window is positioned in the selected section
Alternatively, if one of the Snap suggestions matches the layout you want to use for the windows on your screen, you can choose that instead of manually positioning everything.
The app window is positioned in the selected section
Alternatively, if one of the Snap suggestions matches the layout you want to use for the windows on your screen, you can choose that instead of manually positioning everything.
 Choosing a Snap suggestion
When choosing a Snap suggestion, Windows 11 applies it instantly. Here’s the result of selecting the third Snap suggestion earlier:
Choosing a Snap suggestion
When choosing a Snap suggestion, Windows 11 applies it instantly. Here’s the result of selecting the third Snap suggestion earlier:
 The screen is split according to the Snap suggestion selected
That’s pretty much all… snapping windows on your screen using standard layouts or the suggestions made by Windows 11 is quite easy. Yet, it’s always relative to how you work on your computer, so it’s up to you what layouts or suggestions you prefer at any given time. Next, let’s see…
The screen is split according to the Snap suggestion selected
That’s pretty much all… snapping windows on your screen using standard layouts or the suggestions made by Windows 11 is quite easy. Yet, it’s always relative to how you work on your computer, so it’s up to you what layouts or suggestions you prefer at any given time. Next, let’s see…
 Snap a window to the left or right section of the screen
Then, click or tap on the window you want on the other half of the screen.
Snap a window to the left or right section of the screen
Then, click or tap on the window you want on the other half of the screen.
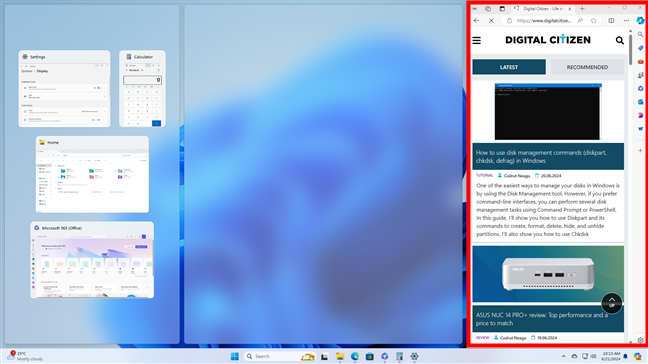
 Two apps side by side splitting the screen
You can also select either of the windows you just snapped and use Win + Up arrow or Win + Down arrow to reposition it in the upper or lower corner of the screen. Follow these instructions to snap windows to the four corners of the screen, as seen below.
Two apps side by side splitting the screen
You can also select either of the windows you just snapped and use Win + Up arrow or Win + Down arrow to reposition it in the upper or lower corner of the screen. Follow these instructions to snap windows to the four corners of the screen, as seen below.
 Snap up to four windows using keyboard shortcuts
TIP: Do you still have a Windows 10 computer? Check this guide to learn about how to split screen on Windows 10.
Snap up to four windows using keyboard shortcuts
TIP: Do you still have a Windows 10 computer? Check this guide to learn about how to split screen on Windows 10.
 The transparent overlay appears in the corner where you dragged the window
The window is snapped into place, and you can then choose the apps for the other available layout sections by clicking or tapping on the one you want for each free spot.
The transparent overlay appears in the corner where you dragged the window
The window is snapped into place, and you can then choose the apps for the other available layout sections by clicking or tapping on the one you want for each free spot.
 Choose the apps for the other free sections
Alternatively, instead of dragging the window to a side or corner of the screen, drag it over the translucent bar at the top of the screen.
Choose the apps for the other free sections
Alternatively, instead of dragging the window to a side or corner of the screen, drag it over the translucent bar at the top of the screen.
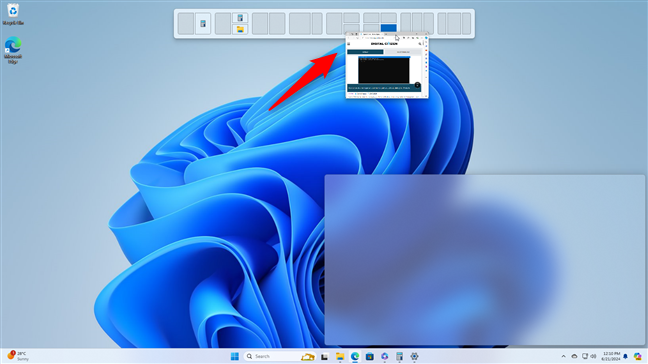
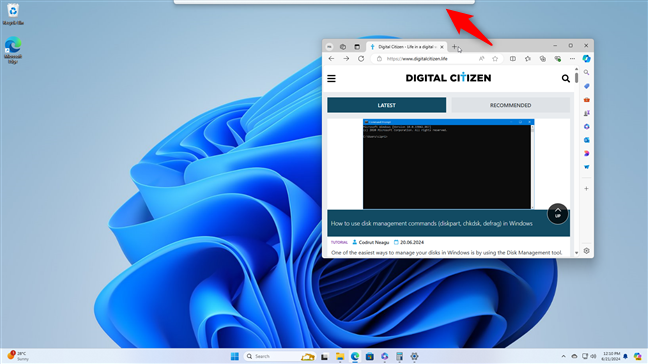 Drag the window to the top of the screen
Windows 11 will then show you a bar with Snap layouts and Snap suggestions that you can choose. Hover over the one you prefer and you’ll see a live preview of what you’ll get.
Drag the window to the top of the screen
Windows 11 will then show you a bar with Snap layouts and Snap suggestions that you can choose. Hover over the one you prefer and you’ll see a live preview of what you’ll get.
 Select a Snap layout or suggestion
If you’ve made up your mind, click or tap the layout or suggestion you want, and Windows 11 will snap the windows into place.
Select a Snap layout or suggestion
If you’ve made up your mind, click or tap the layout or suggestion you want, and Windows 11 will snap the windows into place.
 The window is snapped into place
TIP: Did you know that you can also split your screen when you’re using two or more screens/monitors? Snapping windows on a computer with multiple monitors is done pretty much the same as on a single display. Still, if you’d like specific guidance on that, here’s how to split screen on multiple monitors.
The window is snapped into place
TIP: Did you know that you can also split your screen when you’re using two or more screens/monitors? Snapping windows on a computer with multiple monitors is done pretty much the same as on a single display. Still, if you’d like specific guidance on that, here’s how to split screen on multiple monitors.
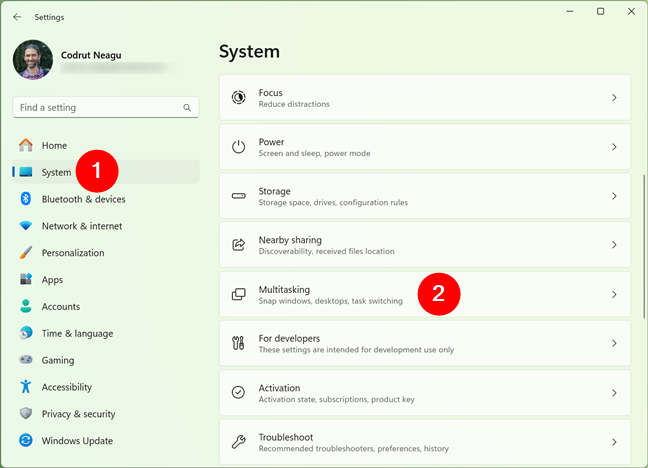
 Access Multitasking in Settings
Make sure the Snap windows switch at the top is On. Then, click or tap on this section to expand it.
Access Multitasking in Settings
Make sure the Snap windows switch at the top is On. Then, click or tap on this section to expand it.
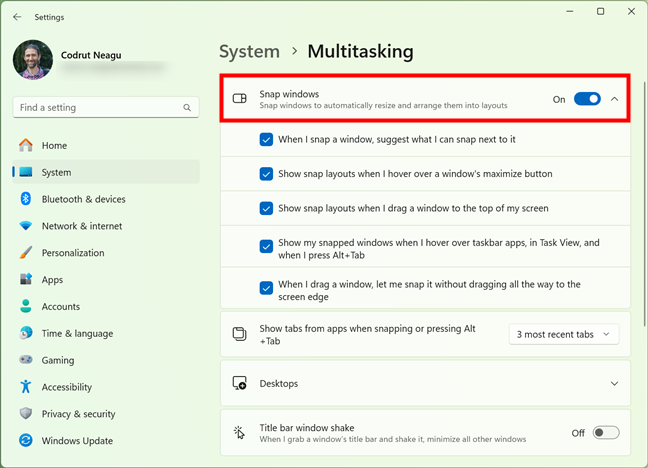 Activate the Snap master switch
I recommend enabling all the options in the Snap windows section to use the Windows 11 split screen feature efficiently. Click or tap on any of the options to check or uncheck it:
Activate the Snap master switch
I recommend enabling all the options in the Snap windows section to use the Windows 11 split screen feature efficiently. Click or tap on any of the options to check or uncheck it:
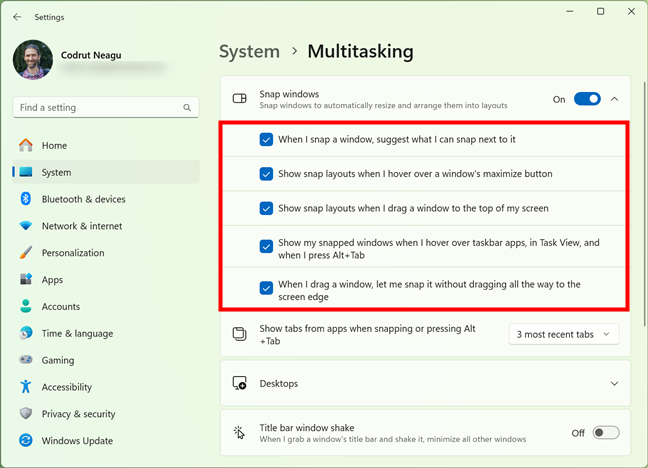 Check the boxes under Snap windows
That’s pretty much everything there is to say about the split screen Windows 11 Snap feature, so to wrap things up…
Check the boxes under Snap windows
That’s pretty much everything there is to say about the split screen Windows 11 Snap feature, so to wrap things up…
What is Snap in Windows 11 and how does it work?
Snap is a feature that helps you organize and manage multiple open windows on your screen more efficiently. It allows you to quickly snap windows into different layouts, making multitasking easier. In Windows 11, Snap lets you split your screen into up to four different sections.Snap layouts in Windows 11
The regular Snap layouts let you split your screen by selecting where windows go by hand. In the next screenshot, I’ve numbered the standard Snap layouts available in Windows 11:- Two windows side by side, each taking half of the screen, one on the left and one on the right.
- Two windows: the one on the left takes two-thirds of the screen, while the one on the right takes one-third.
- Three windows arranged vertically, each taking a third of the screen.
- Three windows side by side, one taking the left half of the screen, while the other two taking a quarter each on the right of the screen.
- Four windows, each taking up a quarter of the screen.
- Three windows split the screen vertically, the left and right ones covering almost a third of the surface available, while the centered window takes half of the available screen estate.
Snap suggestions in Windows 11
The Snap suggestions automatically propose layouts for your current app and the others you have open on your Windows 11 computer. These suggestions let you pin multiple apps next to each other in one swift action. The current app is snapped into place, and the suggested apps appear right alongside it, in the layout you choose. This saves you from having to manually select an app for each area.How to split screen in Windows 11 using Snap layouts and suggestions
If you’re wondering how to split screen on Windows 11 as fast as possible, the Snap layouts feature is the answer. You can use the Windows + Z keyboard shortcut to see the available options for splitting your screen. Moreover, the feature is perfectly integrated with the maximize button for easier use. Hover the cursor over the maximize button in the top-right corner of an app window, and the Snap layouts are immediately displayed.How to split the screen in Windows 11 using keyboard shortcuts
You can also snap app windows into place using keyboard shortcuts, but you get fewer options than you do with Snap layouts. Go to the first window you want to snap and press Win + Left arrow or Win + Right arrow to snap a window to that half of the screen.How to split the screen on Windows 11 using the cursor
If you prefer to snap using the mouse or your touch screen, you can do so by dragging and dropping windows to the desired screen section. Click or press on a window's title bar to grab it and drag it to either a corner or to the left or right edge of the screen. In the transparent overlay that appears, you can see a preview of the window’s placement. Drop the app to snap the window into the indicated space.Enable split screen (Snap) and other related settings in Windows 11
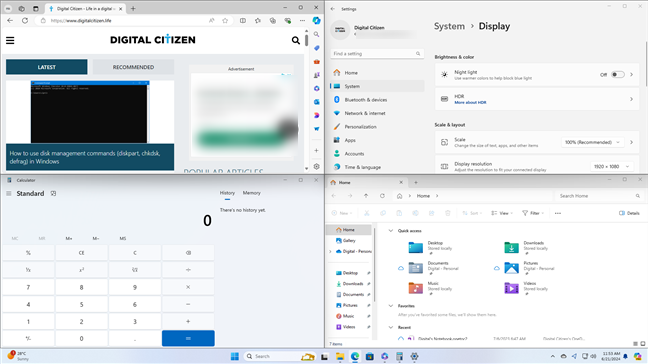
The Windows 11 split screen settings should be enabled by default, but you can double-check from the Settings app. First, open Settings by simultaneously pressing Win + I on your keyboard. The app opens in the System tab. Scroll down and click or tap on Multitasking.- When I snap a window, suggest what I can snap next to it - enables the Snap Assist function. When you snap a window, it displays thumbnails of your other open windows, making it simple to select another app to fill the remaining space.
- Show snap layouts when I hover over a window’s maximize button - enables the Snap layouts and Snap suggestions features.
- Show snap layouts when I drag a window to the top of my screen - gives you access to the layouts bar I’ve talked about in the previous chapter of this guide.
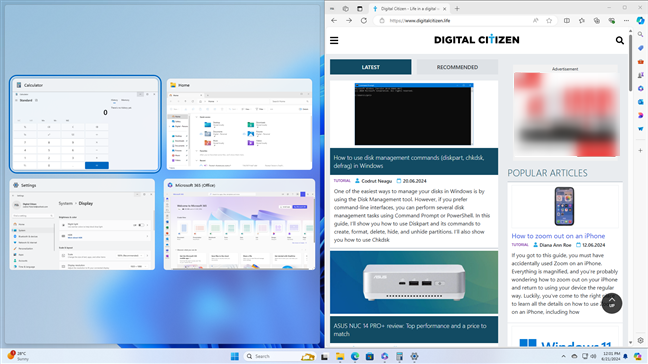
- Show my snapped windows when I hover over taskbar apps, in Task View, and when I press Alt+Tab - treats a snap layout like a separate group, allowing you to get back to that view.
- When I drag a window, let me snap it without dragging all the way to the screen edge - makes it easier to snap windows with your cursor.
Discussion (1)
Good article. Looking forward to Windows 11. It looks promising.