MacOS Mojave includes a new app called Screenshot, designed to unify the screenshot and screen recording features. The Screenshot app has an intuitive overlay interface and makes it easier than ever to make video recordings of your screen, whether you are creating tutorials or sharing your experiences with tech support. In this guide, we show you how to use the Screenshot app to record a video of the screen, on your Mac:
NOTE: This guide covers macOS Mojave or newer. The functions shared in our guide do not work on older versions of macOS.
How to access the Screenshot app in macOS Mojave
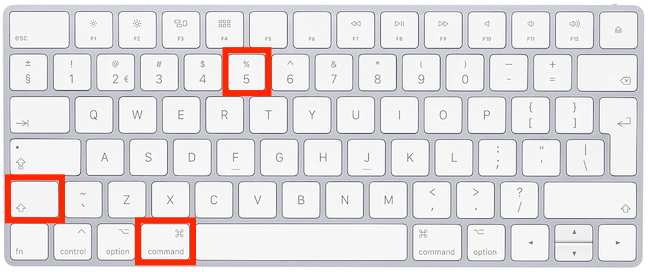
There are many ways to access the Screenshot app in Mac OS, and we cover them in How to take screenshots on your Mac with the Screenshot app. The easiest, however, is to use the default keyboard shortcut: Command (⌘)-Shift-5. Press these keys and the app opens.
The keyboard shortcut for the Screenshot app
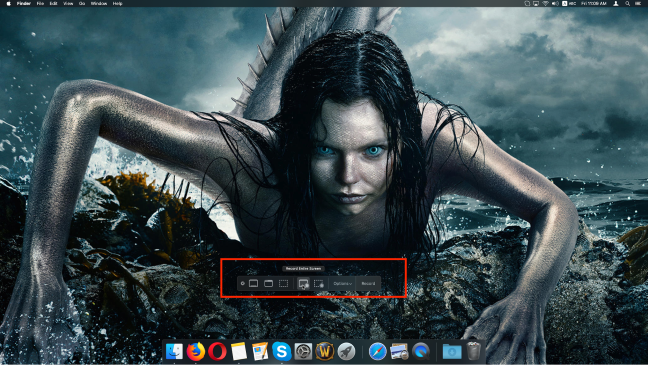
After launching the app, a toolbar is displayed at the bottom of your screen. You can hover over each button in the toolbar to get a short description of what it does. You can also grab the toolbar (the left-hand side edge allows for the best grip) to drag it somewhere else on your screen.
The toolbar of the Screenshot app
How to record the entire screen of a Mac
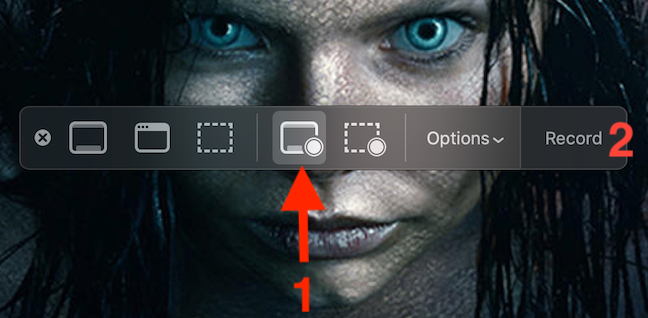
Clicking the "Record Entire Screen" button, from the second section of the toolbar, transforms your pointer into a small camera. Next, either press Return on your keyboard, click Record or click or tap anywhere on the screen to start creating a video recording.
Record Entire Screen on a Mac
IMPORTANT: If you use multiple displays, click inside a screen to start recording that screen. If you press Record while using multiple displays, a drop-down menu asks you to select the display you wish to record.
To ensure you make the correct selection, you can hover over each option: the corresponding display becomes highlighted, while the other(s) become dark.
For multiple screens, choose the display to record from the drop-down menu
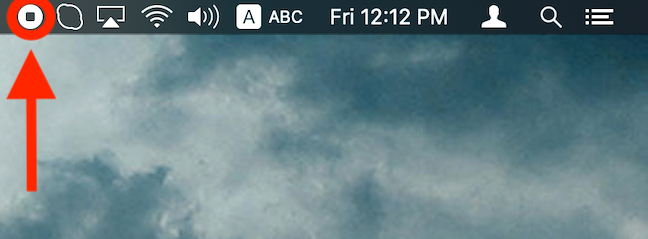
When your recording starts, a Stop button appears in your Mac's menu bar, in the upper right section of the screen. Once you captured what you wanted to record in your video, click the Stop button to save the recording.
The Stop button in the menu bar from macOS Mojave
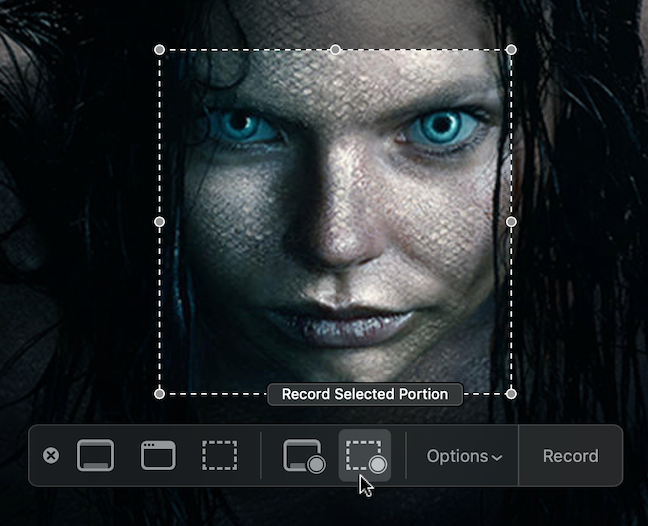
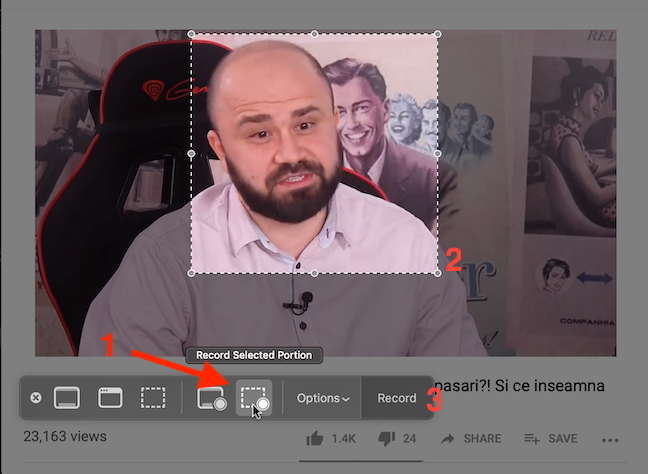
How to record a portion of your screen
Clicking the "Record Selected Portion" button from the Screenshot toolbar allows you to draw a frame on the screen, and create a recording of what is happening inside the frame.
The Record Selected Portion button
If no frame is visible, your pointer turns into a crosshair, allowing you to select an area on the screen. This action automatically frames the selected area. Inside the frame, the pointer transforms into a small hand, allowing you to click and drag the target area. Moving the pointer to the frame edges transforms it into arrows, allowing you to drag the edges and adjust the area of the recording. When you are satisfied with your selection, press Return on your keyboard, or click or tap the Record button on the Screenshot toolbar.
Recording a portion of your screen on your Mac
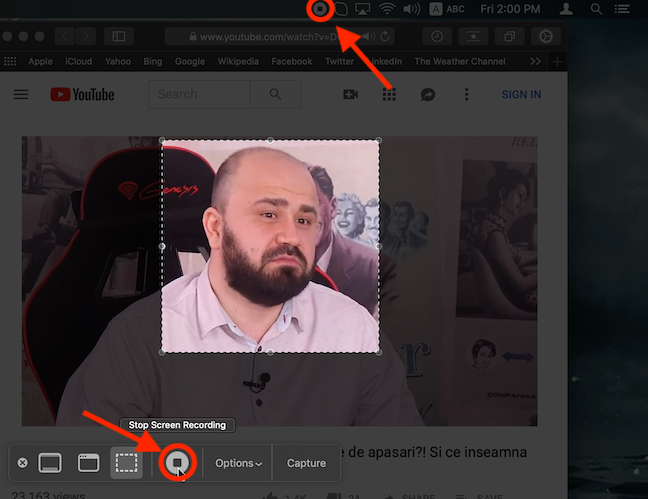
The recording starts for the framed area. To stop the screen recording and save your file, you can either press the Stop button in the menu bar on the top, or bring up the Screenshot toolbar again, with the shortcut Command (⌘)-Shift-5, and press the "Stop Screen Recording" button displayed there.
Press <em>Stop</em> to finish and save your recording
NOTE: To demonstrate this feature and its possible uses (together with his trust in me portraying him in a good light 😀 ), our chief-editor Ciprian has allowed me to use his YouTube debut video for this tutorial. I did my best to capture him in funny situations. I hope that both you and he enjoyed my trolling attempt. 🙂
How to customize the way video recordings are made
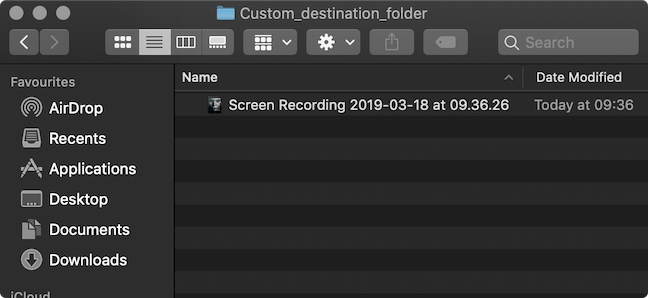
The video screen recordings made on your Mac are saved automatically as QuickTime MOV files with the format "Screen Recording date at time.mov." For example, if you see a file named "Screen Recording 2019-03-18 at 09.36.26.mov", that means the screen recording was started on the fifteenth of March, 2019, at 09:36:26.
A Screen Recording in Finder
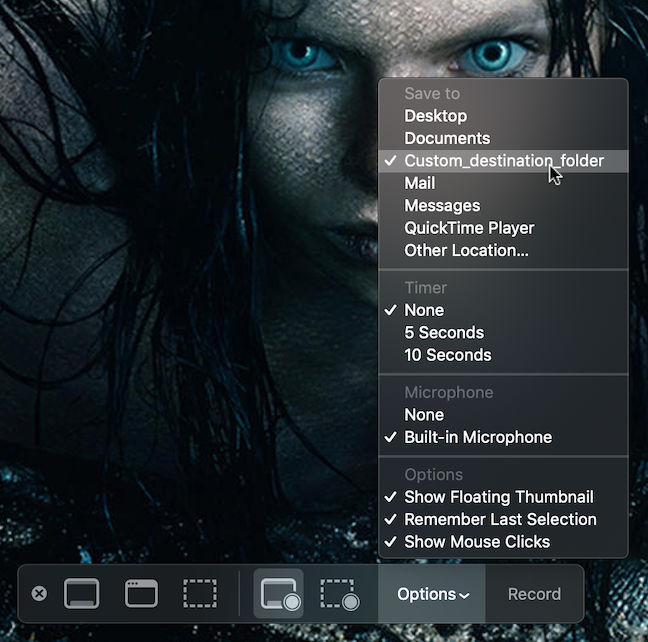
If you want to customize how screen video recordings are made on your Mac, click the _Options_ button in the _Screenshot_ app. The menu that opens allows you to change several settings. Let's explain them one by one:
Customize how screen recordings are made on a Mac
Save to - you can choose where your screen video recordings are saved. By default, they are saved to your Desktop, but you can choose Documents or a custom folder of your choosing. Other useful saving locations include apps like Mail and Messages, enabling you to send the screen recording to someone else quickly. If QuickTime Player is selected, the screen recording opens with this app, giving you further options.
Timer - this section allows you to set a delay for your screen recordings. You can choose None to start recording immediately, or you can select a delay of 5 or 10 seconds after clicking the Record button. If you select to delay the moment your screen recording starts, a timer with the duration of the delay is displayed next to the Record button. After clicking to record, a countdown appears, and your screen recording starts when the countdown completes. Hovering over the countdown gives you the option to Cancel the recording.
Microphone - this section allows you to add audio to your screen recordings. Choose None if you do not want your recordings to include audio. If you select the Built-in Microphone option (or one of the available audio recording devices connected to your Mac), you can record your voice or other audio when making the screen recording.
The last section is named Options, and it includes three settings:
Show Floating Thumbnail - when this option is selected, a thumbnail of the screen recording you just made appears for a few seconds in the lower right section of the screen, as soon as the recording stops. The floating thumbnail can be swiped away to the right if you want it to disappear faster, or it can be dragged to move that particular screen recording to another location. Clicking the thumbnail opens the recording, giving you the option to trim it, before saving or sharing it.
Remember Last Selection - when enabled, this option remembers the exact location of your previous screen recording selection, when using the "Record Selected Portion" option. It is useful when you are recording an event that keeps happening in the same section of the screen, like an error or a friend's webcam feed. When this option is disabled, there is no frame visible when you click the "Record Selected Portion" button.
Show Mouse Clicks - when this option is enabled, mouse clicks become visible in the screen recording in the form of a circle surrounding your cursor every time you click.
How do you insert fun into your daily job?
If you took the time to read this entire guide and you are still with us, thank you! We appreciate it, and we hope you enjoyed reading it as much as we enjoyed writing it. Speaking of enjoyable moments, we took this opportunity to troll our chief-editor a bit, taking advantage of both his busy schedule and his permission to use a video he is featured in. It took us significantly longer to capture unflattering images of him to include in this tutorial, but we encourage everyone to find joy in their daily job. Before closing, take a moment to let us know in the comments what you do to have a bit of fun during your daily work routine. 🙂


Discussion (0)
Be the first to comment.