


If you’re wondering how to take a screenshot on Mac without having to memorize complicated keyboard shortcuts, the answer is simple: use the built-in Screenshot app. Designed as a user-friendly toolbar, Apple’s Screenshot app lets you customize any screen shot on Mac with just a few clicks, helping you capture exactly what you want. This guide illustrates how to take a screenshot on a Mac, while also exploring other practical options in the Screenshot app, like how to set the screenshot location on Mac:
NOTE: This tutorial was created using macOS Big Sur, but the Screenshot app has been included in every version starting macOS Mojave, so check your macOS version to make sure you have it. In addition to taking a screenshot on Mac, the app can also be used to make a video recording of your screen.
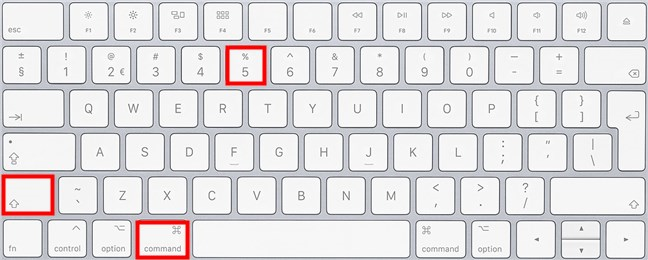
 Press the highlighted keys to open the app and quickly capture the screen on Mac
Another quick way is to click on the magnifying glass icon shown on Mac’s menu bar, in the upper right section of your screen, to open Spotlight. Search for the Screenshot app and access it by clicking on the appropriate result.
Press the highlighted keys to open the app and quickly capture the screen on Mac
Another quick way is to click on the magnifying glass icon shown on Mac’s menu bar, in the upper right section of your screen, to open Spotlight. Search for the Screenshot app and access it by clicking on the appropriate result.
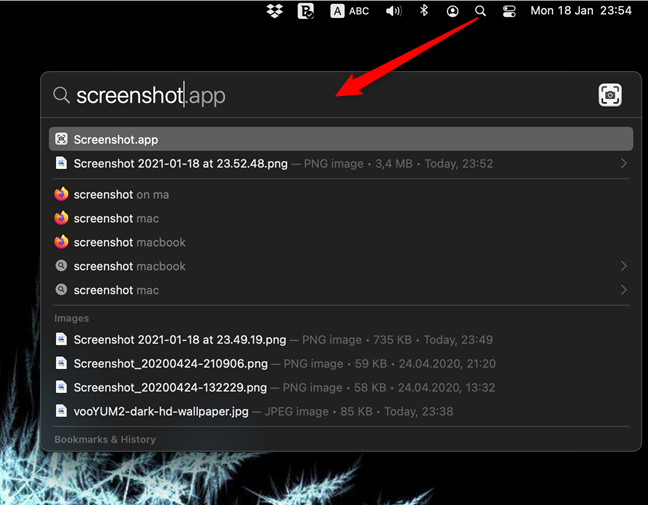
 In the Spotlight Search, access the Screenshot app
You can also open your Applications folder by pressing the F4 key. The app is found in the Other folder, but it’s easier to use the search field at the top of the screen and then click on the Screenshot result.
In the Spotlight Search, access the Screenshot app
You can also open your Applications folder by pressing the F4 key. The app is found in the Other folder, but it’s easier to use the search field at the top of the screen and then click on the Screenshot result.
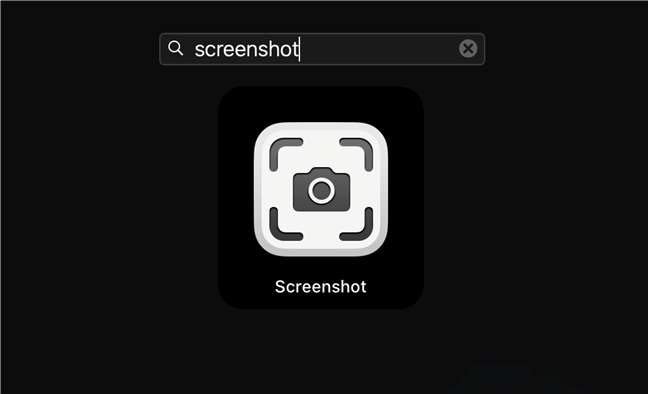
 Find the app for taking a Screenshot on Mac
NOTE: If your Mac has a Touch Bar, you can create a shortcut for the Screenshot app on it from System Preferences. Access Keyboard, click on the “Customize Control Strip” button, and then drag-and-drop the Screenshot option to the Touch Bar. Press Done and, from now on, you can tap on the icon to launch a basic version of the Screenshot app, which looks slightly different in the Touch bar, but offers many of the same features.
Either of these methods opens the subtle Screenshot app, which is nothing more than a small toolbar that pops up on the lower half of your display. Before we get started on how to do a screenshot on Mac using this app, get familiar with its overlay interface. Hovering over each button of the toolbar provides a short description of what it does.
Find the app for taking a Screenshot on Mac
NOTE: If your Mac has a Touch Bar, you can create a shortcut for the Screenshot app on it from System Preferences. Access Keyboard, click on the “Customize Control Strip” button, and then drag-and-drop the Screenshot option to the Touch Bar. Press Done and, from now on, you can tap on the icon to launch a basic version of the Screenshot app, which looks slightly different in the Touch bar, but offers many of the same features.
Either of these methods opens the subtle Screenshot app, which is nothing more than a small toolbar that pops up on the lower half of your display. Before we get started on how to do a screenshot on Mac using this app, get familiar with its overlay interface. Hovering over each button of the toolbar provides a short description of what it does.
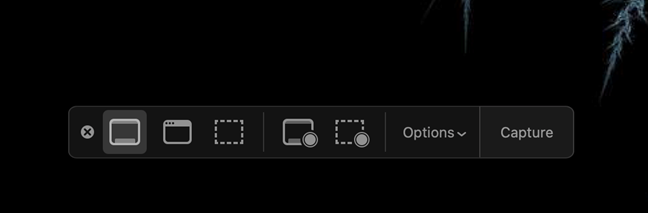
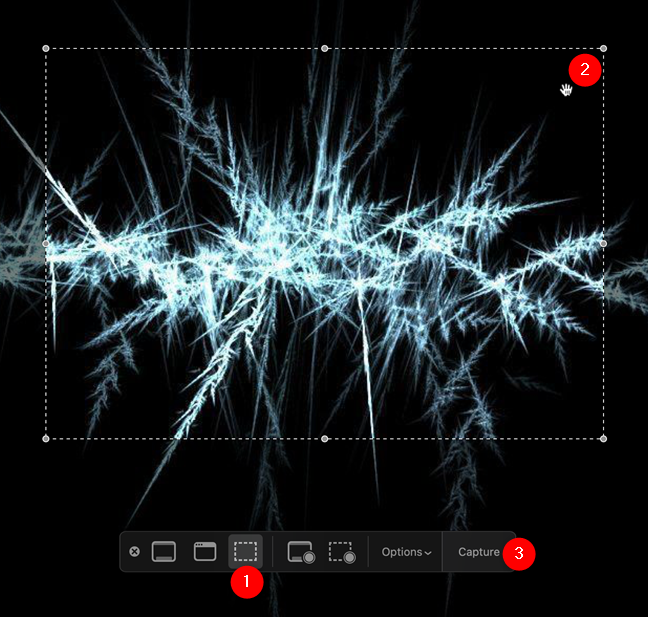
 The overlay interface used to get a Mac screen shot
If the toolbar’s placement is inconvenient, grab it (the left-hand side edge allows for the best grip) and drag it somewhere else on your screen. To exit the Screenshot app and cancel taking a screenshot on Mac, you can press Esc (Escape) on your keyboard or click the X button on the left of the toolbar.
The overlay interface used to get a Mac screen shot
If the toolbar’s placement is inconvenient, grab it (the left-hand side edge allows for the best grip) and drag it somewhere else on your screen. To exit the Screenshot app and cancel taking a screenshot on Mac, you can press Esc (Escape) on your keyboard or click the X button on the left of the toolbar.
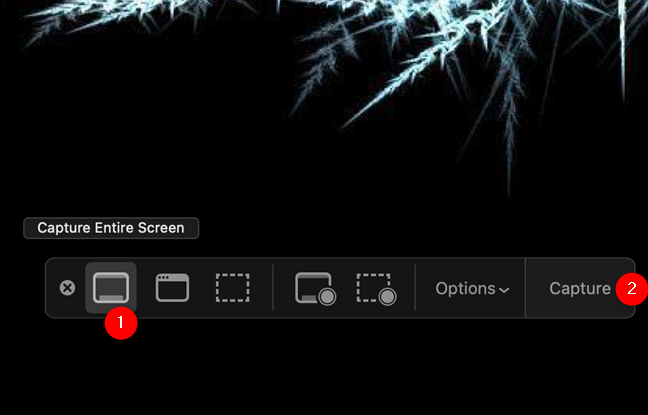
 Get the whole screen shot on Mac with Capture Entire Screen
When you’re using multiple displays, you can take a Mac screen capture by clicking inside the screen you want to save. Pressing on Capture while using multiple screens creates more screenshots at the same time, one for each of your displays.
Get the whole screen shot on Mac with Capture Entire Screen
When you’re using multiple displays, you can take a Mac screen capture by clicking inside the screen you want to save. Pressing on Capture while using multiple screens creates more screenshots at the same time, one for each of your displays.
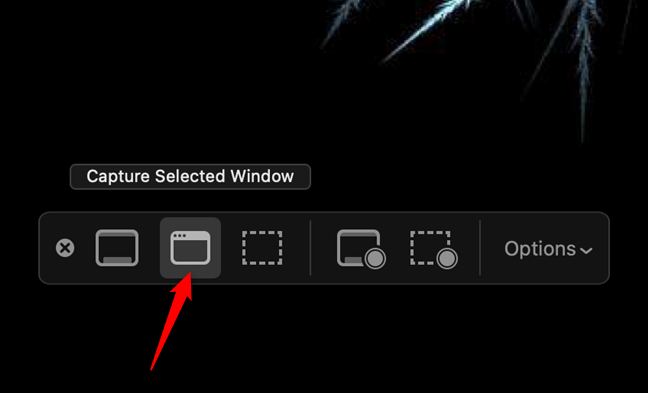
 On Mac, take a screenshot of an app with Capture Selected Window
When you click on this option, the Capture button disappears from the menu, and your mouse pointer turns into a small camera as soon as you move it away from the Screenshot toolbar.
Different windows and menus (including the dock) become highlighted when you hover over them. Clicking on the app window you want saves a Mac screen capture of its contents immediately.
On Mac, take a screenshot of an app with Capture Selected Window
When you click on this option, the Capture button disappears from the menu, and your mouse pointer turns into a small camera as soon as you move it away from the Screenshot toolbar.
Different windows and menus (including the dock) become highlighted when you hover over them. Clicking on the app window you want saves a Mac screen capture of its contents immediately.
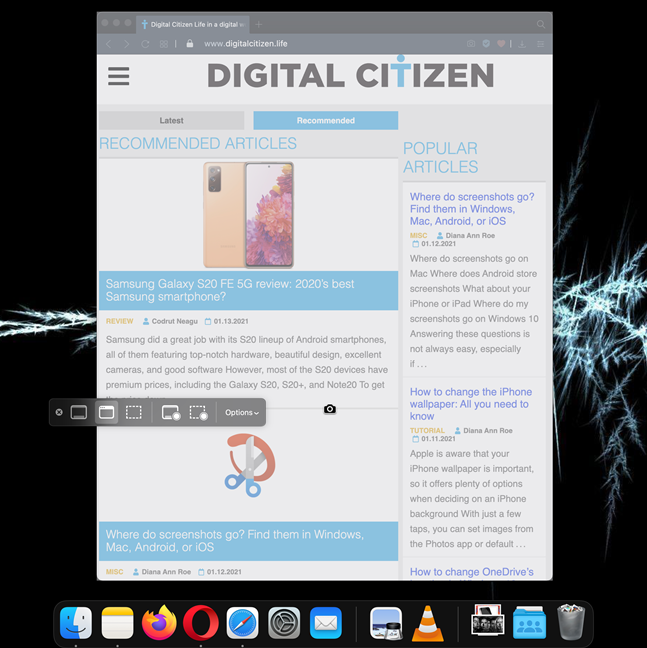
 Everything you see in an app window is saved as a screen capture on Mac
If you get your Mac screen shot using the “Capture Selected Window” option, the resulting image includes the element’s shadow. To take a screenshot on Mac without the shadow, press and hold Option on your keyboard while clicking to capture that window or menu.
Everything you see in an app window is saved as a screen capture on Mac
If you get your Mac screen shot using the “Capture Selected Window” option, the resulting image includes the element’s shadow. To take a screenshot on Mac without the shadow, press and hold Option on your keyboard while clicking to capture that window or menu.
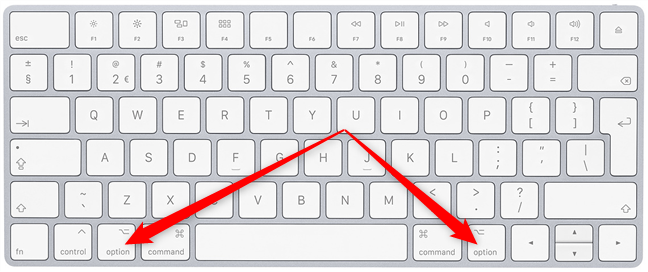
 How do I take a screenshot on my Mac without a shadow? Press-and-hold either Option key
This allows you to get rid of the shadowy frame around the image and can be useful if you upload images to certain websites. For a better perspective, see the comparison below, where you see the same screen shot on Mac with and without the shadow on its edges.
How do I take a screenshot on my Mac without a shadow? Press-and-hold either Option key
This allows you to get rid of the shadowy frame around the image and can be useful if you upload images to certain websites. For a better perspective, see the comparison below, where you see the same screen shot on Mac with and without the shadow on its edges.
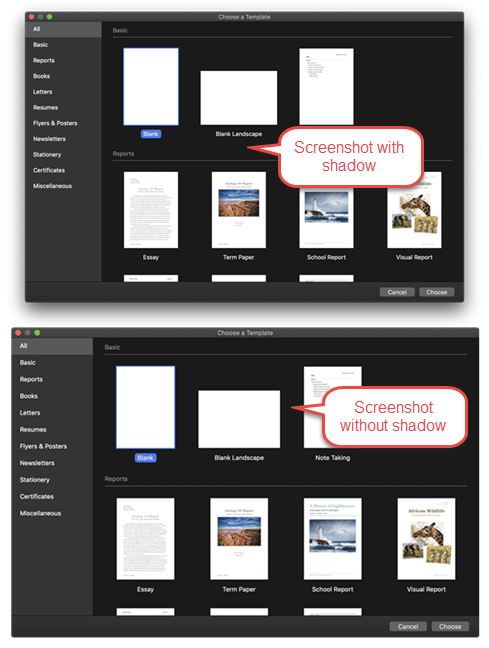
 Learn how to take a screenshot on a Mac with or without a window shadow
TIP: As long as the Screenshot app is active, pressing Spacebar on your keyboard allows you to toggle between “Capture Selected Window” and the “Capture Selected Portion” option we discuss next.
Learn how to take a screenshot on a Mac with or without a window shadow
TIP: As long as the Screenshot app is active, pressing Spacebar on your keyboard allows you to toggle between “Capture Selected Window” and the “Capture Selected Portion” option we discuss next.
 How to take a screen shot on Mac when you want to capture a specific area
TIP: The Screenshot app is not the only built-in way to save what’s on your screen in macOS. However, it is the only one able to remember a previously selected area when you screenshot a portion of your screen. If you’re wondering how to screen capture on Mac using the other tools Apple provides in macOS, read our guide on how to screenshot on Mac.
How to take a screen shot on Mac when you want to capture a specific area
TIP: The Screenshot app is not the only built-in way to save what’s on your screen in macOS. However, it is the only one able to remember a previously selected area when you screenshot a portion of your screen. If you’re wondering how to screen capture on Mac using the other tools Apple provides in macOS, read our guide on how to screenshot on Mac.

 Customize how to take a screenshot on a Mac and the default save location
The first section is called Save to and is by far the most sought after option, because it lets you manage where your screenshots are saved. The default location for any screen shot in Mac is Desktop, but you can easily set it to Documents or choose any custom folder by accessing Other Location. Better yet, you have options for storing any screen shot on Mac in the Clipboard, sending it with the Mail or Messages apps, and opening it immediately with the Preview app for editing.
Customize how to take a screenshot on a Mac and the default save location
The first section is called Save to and is by far the most sought after option, because it lets you manage where your screenshots are saved. The default location for any screen shot in Mac is Desktop, but you can easily set it to Documents or choose any custom folder by accessing Other Location. Better yet, you have options for storing any screen shot on Mac in the Clipboard, sending it with the Mail or Messages apps, and opening it immediately with the Preview app for editing.
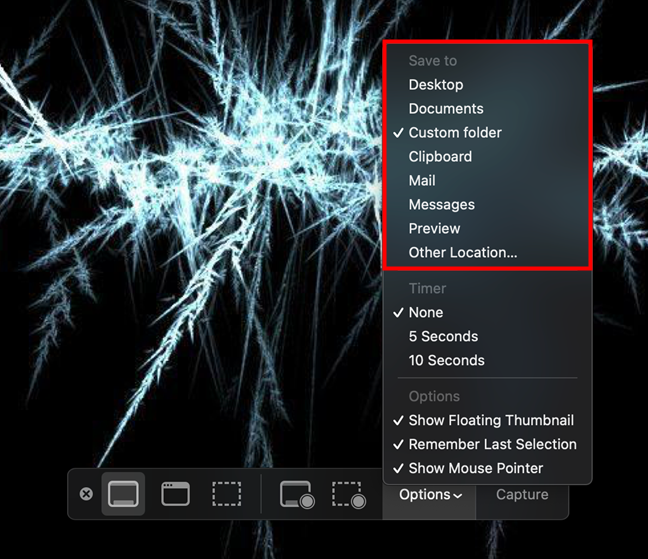 How to set screenshot location on Mac
TIP: Regardless of the option you check, you can also press-and-hold Control on your keyboard at the same time you’re taking a Mac screen capture, if you want the result saved to your clipboard instead. In case you’re wondering how to find screenshots on other devices as well (iPhones, Android smartphones, Windows 10 PCs), check out our guide about screenshot locations.
The Timer section allows you to set a delay for your screenshots. You can check None to take a screenshot on Mac immediately, as well as select a delay of 5 or 10 seconds after pressing Capture. Click on the countdown showing how long until your screenshot is taken to Cancel the process.
The last section is named Options and includes three settings:
How to set screenshot location on Mac
TIP: Regardless of the option you check, you can also press-and-hold Control on your keyboard at the same time you’re taking a Mac screen capture, if you want the result saved to your clipboard instead. In case you’re wondering how to find screenshots on other devices as well (iPhones, Android smartphones, Windows 10 PCs), check out our guide about screenshot locations.
The Timer section allows you to set a delay for your screenshots. You can check None to take a screenshot on Mac immediately, as well as select a delay of 5 or 10 seconds after pressing Capture. Click on the countdown showing how long until your screenshot is taken to Cancel the process.
The last section is named Options and includes three settings:
How to access the Screenshot app in macOS
There is more than one way to access the Screenshot app if you want to take a screen capture on Mac. The most straightforward method is to use the default keyboard shortcut: Command (⌘) + Shift + 5.How to get a full screen capture on Mac with the Screenshot app
If you want to capture your Mac’s entire screen, the first step is to click the “Capture Entire Screen” button, which transforms your mouse pointer into a small camera. There are now three options to get the Mac screen shot: you can click anywhere on the screen, hit Return on your keyboard, or press Capture on the right of the toolbar.How to take a screenshot on Mac of any open app window or menu
If you’re only interested to take a screenshot on Mac of a specific app window, you can open it and then use the obvious “Capture Selected Window” button in the Screenshot app.How to capture a portion of your screen when taking a screenshot on Mac
The “Capture Selected Portion” button in the Screenshot app lets you draw a frame on your display and take a screenshot on Mac of what is found inside the borders. If no frame is visible, your pointer turns into a crosshair, allowing you to highlight any area of your screen. Click-and-hold and then drag the cursor to create a rectangular selection. This action automatically frames the selected portion, but you can adjust its edges and corners to fit your needs. Inside the selection, your mouse pointer transforms into a small hand, indicating you can move the target area anywhere you want. Click-and-hold to grab the frame, and then drag and drop it to its new location. When you are done, press the Return key or click on Capture.Bonus: How to set screenshot location on Mac and other useful options
Now that you know how to capture the screen on Mac using the tool’s basic options, let’s see what else you can do with the Screenshot app. By default, screenshots made on your Mac are automatically saved on your desktop as PNG files with the format “Screenshot date at time.png” - e.g., an image named “Screenshot 2021-01-06 at 13.07.25.png” was created on the sixth of January, 2021, at 13:07:25. On the right side of the toolbar, click on the Options button to reveal a dropdown menu where you can change several settings, including the default location of your screen captures on macOS.- Show Floating Thumbnail - when this option is selected, a thumbnail of the screenshot you just captured appears for a few seconds in the lower-right section of your screen. This can be a useful little preview if you are trying to capture a specific event but can become a problem if you need to take successive screenshots. Swipe the floating thumbnail to the right if you want it to disappear faster, or drag it to move the respective screenshot into another location or app. Clicking the thumbnail opens the Mac screen capture, giving you access to basic editing options.
- Remember Last Selection - if you check this option, the Screenshot app remembers the exact location of your previous “Capture Selected Portion” selection. This comes in handy when you take screenshots of the same dynamic area, like a YouTube video or a webcam feed. If this option is disabled, there is no frame visible when you click the Capture Selected Portion button.
- Show Mouse Pointer - when this option is selected, the mouse pointer becomes visible in the screenshots you capture.


Discussion (3)
Recently switching to the mac after 30(!) years on windows, I found the built in screenshot app to be awkward and feature poor. After checking out quite a few free and paid apps, I found Monosnap to be a much better screenshot app and it’s free!
I like the chicks in the wallpaper, but I have no idea about the movie. 🙂
Thank you for taking the time to comment, Joe! You are officially the first person to comment on my post and it is a big deal to me that someone took the time to read the entire thing so yay! If you like the chicks, you will probably like the movie also. I find it visually stunning.
*whispers* The name of the movie is Sucker Punch but shhh! don’t tell anyone cause we have a bet going. 😉