




Setting up a home server rack creates a cleaner, safer, and easier-to-manage environment for your servers and networking gear. A well-designed rack improves airflow, cable routing, and serviceability while keeping your equipment secure.
This guide walks you through the full process, from choosing the right rack to installing hardware, power, cooling, and network components.
Step 1: Pick the right rack size and type
Your rack selection determines how much equipment you can mount today and how easily you can expand later. Choose a rack that fits your available space and supports the depth and weight of your hardware.
Measure your available space
Check height, width, and depth before buying. A proper fit avoids airflow issues and keeps the rack safe to move into place.

Check weight, depth, and equipment compatibility
Verify depth ratings for UPS units, servers, and switches. Confirm rail compatibility so you avoid mounting problems.
Step 2: Plan cooling, airflow, and noise control
Proper airflow reduces overheating and improves lifespan. Noise control makes the rack practical for home offices and basements.
Choose a cool, low-humidity placement
Select an area with stable temperatures and enough space for airflow. Avoid closets without ventilation.
Improve airflow with fans and cable routing
Use front-to-back airflow where possible. Clean cable paths allow cool air to move freely across components.
Reduce noise for home environments
Quiet-mode fans, vibration pads, and sound-dampening panels lower overall noise. These additions make 24/7 hardware less intrusive.
Step 3: Install power distribution and backup systems
Stable power keeps your home lab operating smoothly and protects against outages.
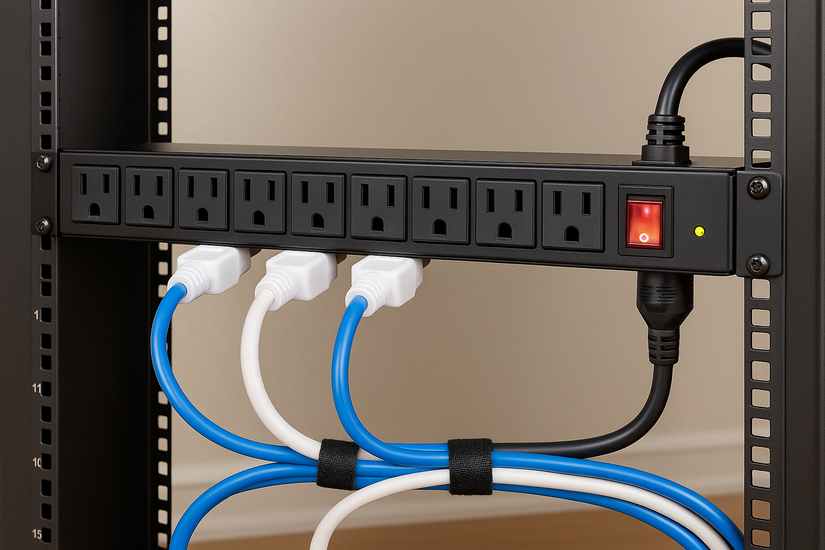
Mount a PDU and route power safely
A rack-mount PDU simplifies power routing and keeps cords organized. Balanced loads prevent breaker tripping.
Add a UPS for battery backup
A UPS protects your gear from power loss and voltage spikes. It gives you enough time to power down systems safely.
Step 4: Mount your hardware securely
A well-layered rack improves cooling and cable flow.
Install rails and shelves
Rails support servers directly, while shelves handle hardware that lacks rack brackets. Proper leveling ensures safe mounting.
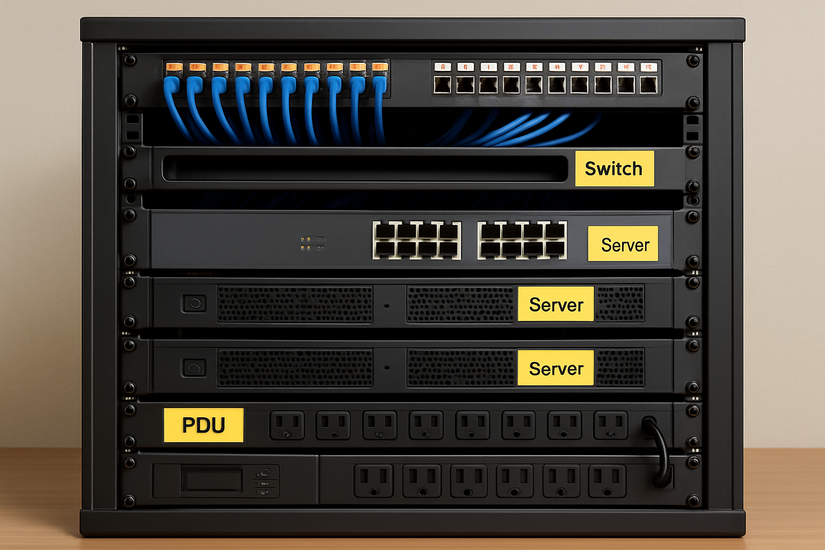
Mount servers, switches, and firewalls
Place heavier equipment near the bottom for stability. Mount switches near the top for clean cable drops.

Secure small accessories
Modems, NUCs, and Raspberry Pi units fit neatly on shelves or Velcro mounts. This keeps everything accessible.
Step 5: Set up networking and switch layout
A strong network layout supports faster troubleshooting and easier upgrades.
Plan switch placement and port usage
Place switches where you can reach ports quickly. Label ports and maintain a simple port map.
Configure basic networking
Set static IPs for servers and plan VLANs for the organization. This eliminates conflicts and keeps your topology predictable.
Step 6: Organize cables for reliability and airflow
Proper cable management prevents strain and makes maintenance faster.
Use vertical and horizontal cable managers
Cable managers give your rack structure and prevent loose wiring. They improve airflow across components.
Label everything clearly
Label cables, ports, and PDUs with clear tags. Organized labeling avoids guesswork during future changes.
Step 7: Monitor power, temperatures, and uptime
Monitoring helps catch issues early and prevents unexpected downtime.
Use temperature and network monitoring tools
Simple dashboards show system temperatures and network load. Tracking these metrics keeps your rack stable over time.
Step 8: Plan for future upgrades
Planning for growth saves money and prevents full rack replacements.
Leave space for expansion
Reserve a few U-spaces for storage arrays, new switches, or future servers. Expansion space keeps your build flexible.
Choose modular components
Modular PDUs, shelves, and rails simplify future changes. These additions reduce effort during upgrades.
Safety and maintenance best practices
- Clean fans and check cable strain: Dust and loose cables increase heat and risk hardware damage. Quick cleaning keeps everything stable.
- Review power distribution regularly: Check PDU loads to ensure balanced usage. Stable power improves performance and reduces shutdowns.
Summary
- Measure your space and select a compatible rack.
- Place the rack in a cool, ventilated area with noise control.
- Install a PDU and UPS for stable power.
- Mount servers, switches, and accessories using rails or shelves.
- Route network and power cables with clear labels.
Conclusion
A well-planned server rack makes your home lab cleaner, cooler, and more reliable. With organized power, airflow, and cable layout, your system runs smoothly and stays easier to upgrade.
Most setups stabilize within a day of installation, so you can start running services without downtime.


Discussion (0)
Be the first to comment.