

The BIOS is the first software your computer runs when you press the power button. It checks your hardware, prepares everything for the operating system, and lets you configure how your PC behaves at a fundamental level. Changing your boot order to install Windows from a USB drive, enabling virtualization for running virtual machines, adjusting RAM speed settings, or setting a BIOS password all happen here.
Getting into the BIOS on an ASUS device running Windows 11 is straightforward once you know the right approach. There are three reliable methods and the one that works best depends on your situation.
What You Might Need the BIOS For
Before diving in, a quick rundown of why people access BIOS helps frame what to expect once you are inside.
Changing boot order is the most common reason. If you are installing Windows from a USB drive or booting from an external device, the BIOS needs to know to look at that device first before the internal drive.
Enabling virtualization is necessary for running virtual machines through software like VMware or VirtualBox. ASUS devices often have this disabled by default. Intel VT-x and AMD-V are the settings to look for.
Enabling XMP or EXPO tells your RAM to run at its advertised speed rather than the default slower JEDEC speed. Without this enabled, a 6000MHz DDR5 kit runs at 4800MHz.
Disabling Secure Boot or enabling Fast Boot are common requirements when installing certain Linux distributions or troubleshooting startup issues.
Resetting overclocked settings that have caused instability is another reason people need BIOS access, since a reset here returns everything to factory defaults.
Method 1: The F2 Key at Startup (Fastest)
This is the standard method for almost every ASUS laptop and desktop released in the last decade. F2 is the default BIOS key for ASUS devices. On a small number of older ASUS desktops, it is the Delete key instead.
Step 1: Shut Down Completely
Do not restart from within Windows. Shut the computer down fully. Click Start, then the Power icon, then Shut down. Wait for the device to power off completely before proceeding.
This matters because Windows 11's Fast Startup feature, which is enabled by default, does not perform a full shutdown. If you restart from within Windows, the system resumes from a hibernation state rather than doing a clean boot, which can prevent the BIOS key from registering.
Step 2: Press the Power Button and Immediately Tap F2
Press the power button to start the computer. The moment you press it, begin tapping F2 repeatedly. Do not hold it down. Tap it consistently every half second or so until the BIOS screen appears.
The window to press F2 is short, sometimes under two seconds on modern SSDs. If Windows begins loading before you see the BIOS, shut down completely and try again. Tapping faster helps on devices with quick boot times.
Step 3: Navigate the ASUS BIOS
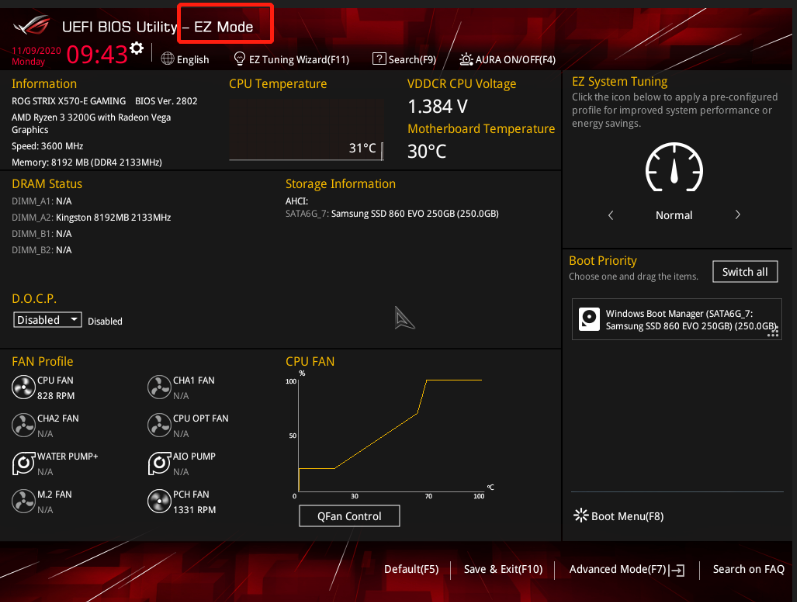
The ASUS UEFI BIOS opens in one of two views. EZ Mode shows a simplified overview of your system with temperature, fan speeds, and basic settings. Advanced Mode, accessible by pressing F7, gives you full access to all settings organised into tabs including Main, Advanced, Boot, Security, and Tool.
Use your mouse or keyboard arrow keys to navigate. Changes take effect when you save and exit. Always use Exit and Save Changes, not Exit Discarding Changes, unless you want to undo what you adjusted.
Method 2: Through Windows 11 Settings (No Timing Required)
If tapping F2 repeatedly at startup is not working, possibly because Fast Startup is interfering or the boot is too quick to catch, Windows 11 provides a route into the BIOS through its Settings menu. This method is slower but guaranteed to work regardless of boot speed.
Step 1: Open Settings
Press Windows and I together to open Settings. Alternatively, click Start and select Settings from the pinned apps.
Step 2: Go to System, Then Recovery
Click System in the left sidebar. Scroll down and click Recovery on the right side of the screen.
Step 3: Click Restart Now Under Advanced Startup
In the Recovery page, find the Advanced startup section. Click Restart now. Windows asks you to confirm. Click Restart now again.
The PC restarts into a blue recovery environment called Windows Recovery Environment, or WinRE.
Step 4: Navigate to UEFI Firmware Settings
On the blue Choose an option screen, click Troubleshoot. Then click Advanced options. Click UEFI Firmware Settings. Click Restart.
The computer restarts directly into the BIOS. There is no timing required and no key to press. Windows hands control directly to the BIOS firmware.
Method 3: Using the Shift and Restart Trick
This is the quickest way to reach the recovery environment if you are already using the computer and do not want to go through Settings.
Step 1: Hold Shift and Click Restart
Click Start, then the Power icon. Hold the Shift key on your keyboard and click Restart while keeping Shift held. Windows restarts directly into the blue recovery screen rather than booting normally.
Step 2: Navigate to UEFI Firmware Settings
Follow the same path as Method 2 from the blue screen: Troubleshoot, then Advanced options, then UEFI Firmware Settings, then Restart. The BIOS opens immediately.
If F2 Is Not Working
A few specific situations prevent the F2 method from working cleanly.
Fast Startup is interfering. Windows 11's Fast Startup puts the system into a hybrid state between shutdown and hibernation. A shutdown triggered by the Start menu with Fast Startup enabled is not a true cold boot. To disable Fast Startup, open Control Panel, go to Power Options, click Choose what the power buttons do, and uncheck Turn on fast startup. After this, a proper shutdown gives F2 more reliable timing.
The SSD is booting too quickly. NVMe SSDs boot modern systems so fast that the BIOS key window is extremely short. Using Method 2 or Method 3 through Windows Settings completely eliminates this problem.
The wrong key. Most ASUS laptops use F2. A small number of older ASUS desktop motherboards use Delete instead. If F2 is not working on a desktop, try Delete. On some 2-in-1 ASUS devices like the Transformer Book, the keyboard must be physically attached before pressing F2 will work.
Once You Are Inside the BIOS
The ASUS UEFI BIOS has two main views.
EZ Mode is the default view. It shows your system at a glance including CPU temperature, RAM configuration, fan speeds, and storage devices. Common settings like boot order can be changed by dragging and dropping drive icons. The AI Overclocking feature on some boards is also accessible here.
Advanced Mode, reached by pressing F7, gives access to every available setting. CPU configuration, RAM timing, PCIe settings, Secure Boot, fast boot settings, and everything else is in here. If you are enabling XMP or EXPO for your RAM, look under the Ai Tweaker or Overclocking tab.
When you have made your changes, press F10 to save and exit. The PC restarts with the new settings applied. If something goes wrong and the system becomes unstable, ASUS devices detect failed boots and typically offer to reset BIOS settings automatically on the next startup, or you can press F9 inside the BIOS to load default settings.
Frequently Asked Questions
What is the BIOS key for ASUS laptops?
The standard BIOS key for ASUS laptops is F2. Press it repeatedly immediately after pressing the power button, before Windows begins loading. On a small number of older ASUS desktop motherboards, the key is Delete instead of F2. If neither works, use the Windows Settings route through System, Recovery, and Advanced Startup to reach UEFI Firmware Settings without needing to time a keypress.
Why does Windows 11 start loading before I can press F2?
Windows 11 with an NVMe SSD boots very quickly, leaving a very short window to press the BIOS key. Disabling Fast Startup in Windows Power Options helps. The most reliable solution is to access BIOS through Windows Settings, which bypasses the timing problem entirely by having Windows hand control directly to the firmware.
Will entering the BIOS delete my files or reset Windows?
No. Simply entering the BIOS and exiting without changing anything has no effect on your files or Windows installation. The BIOS only affects hardware configuration. Changes you make in the BIOS affect how hardware behaves, not the files stored on your drive.


Discussion (0)
Be the first to comment.