




If you’ve already used AMUSE for generating images, the next feature that really changes how you work is AI Filters.
This isn’t your typical “apply a preset and done” kind of filter. It’s closer to reinterpreting an image using AI, which means the results can feel more like a transformation than a simple adjustment.
Once you understand how to use it properly, it becomes one of the most powerful parts of AMUSE.
What AI Filters in AMUSE Actually Do
Before jumping into steps, it helps to understand what’s happening.
Traditional filters:
- Adjust color, contrast, saturation
AI Filters:
- Reprocess the image using a model
- Apply style, detail, or structural changes
- Can alter the look, not just the tone
So instead of just “editing,” you’re essentially asking the AI to reinterpret your image.
When You Should Use AI Filters
This feature works best when you want to:
- Change the style of an image (realistic → artistic, etc.)
- Enhance details or clarity
- Improve visual quality
- Experiment with different looks quickly
It’s not meant for small corrections. It’s meant for creative transformation.
Step-by-Step: How to Apply AI Filters in AMUSE
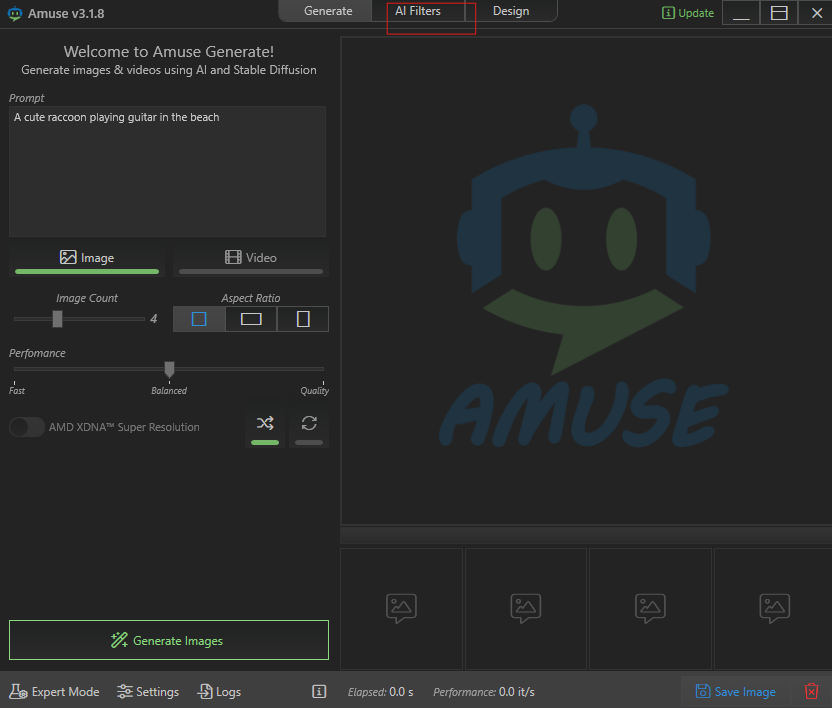
Step 1: Open the AI Filters Tab
At the top of the interface, you’ll see sections like:
- Generate
- AI Filters
- Design
Click on AI Filters.
This switches you from creating images to modifying existing ones.
Step 2: Import Your Image
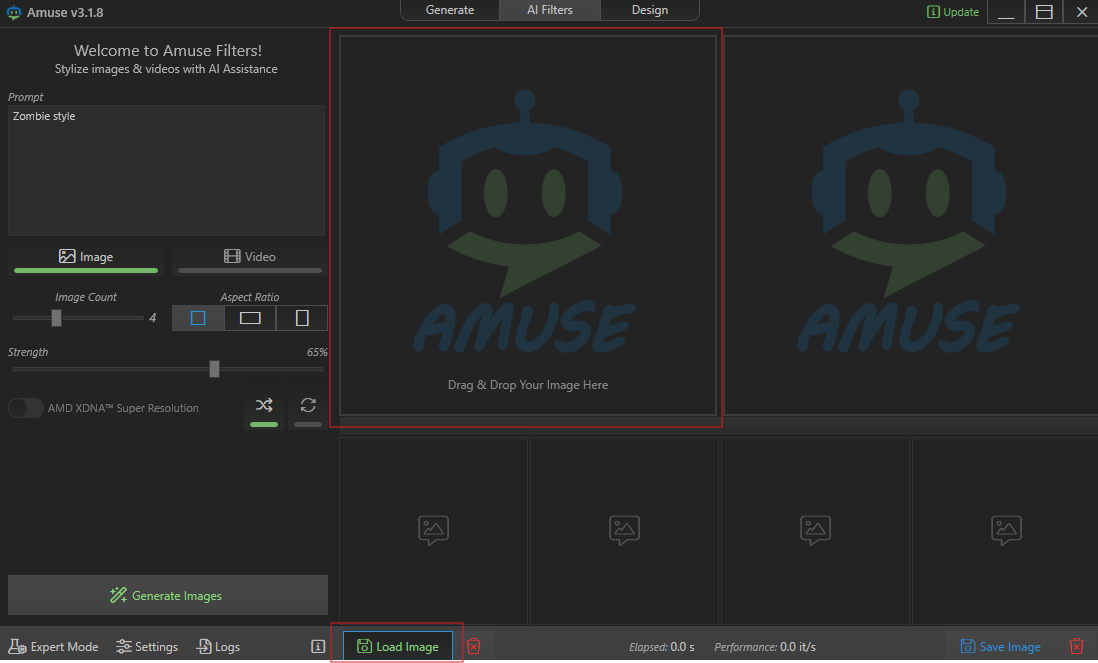
You’ll need an image to work with.
- Click Upload or drag and drop your image
- The image will appear in the workspace
This becomes your base input.
Step 3: Choose or Define a Filter Style
Depending on your version, you’ll either:
- Select a predefined filter/style
or - Enter a prompt describing the transformation
For example:
- “Make this look like a cinematic scene”
- “Convert to anime style”
- “Enhance sharpness and lighting”
This is where AMUSE behaves more like a generative tool than a traditional editor.
Step 4: Adjust Performance Settings
Just like in image generation, you’ll see a performance slider:
- Fast → quicker, less refined
- Balanced → moderate quality
- Quality → slower, more detailed
If you care about final output, it’s worth leaning toward Balanced or Quality.
Step 5: Enable Enhancements (Optional)
If available, turn on:
- Super Resolution / AI Upscaling
This improves:
- Sharpness
- Detail
- Overall clarity
It’s especially useful if your original image is low resolution.
Step 6: Apply the Filter
Click the apply/generate button.
AMUSE will:
- Process the image
- Apply the AI transformation
- Output a new version
This may take a few seconds or longer depending on your settings and hardware.
Step 7: Review and Iterate
This is where most people stop too early.
Instead:
- Compare results
- Adjust prompt or settings
- Run again if needed
AI filtering is iterative. The best results often come after 2–3 passes.
What Makes AI Filters Feel Different
The biggest difference is control.
With normal filters:
- You accept what’s given
With AI filters:
- You guide the outcome
You’re not just applying effects. You’re shaping how the image is interpreted.
Real-World Examples
Here’s how people actually use this feature:
- Turning a normal photo into digital art
- Enhancing AI-generated images for final output
- Creating stylized versions of the same image
- Improving lighting and texture in one step
It’s especially useful when you want results that feel designed, not edited.
Common Mistakes to Avoid
Being Too Vague
A prompt like:
- “Make it better”
won’t give strong results.
Instead, be specific:
- “Improve lighting and add cinematic shadows”
Using Fast Mode for Final Output
Fast mode is fine for previews, but not for final images.
Overprocessing
Applying too many filters repeatedly can:
- Distort details
- Reduce quality
Sometimes less is better.
When AI Filters Work Best
You’ll get the best results when:
- Your base image is clear
- Your prompt is specific
- You’re willing to iterate
It’s not a one-click process. It’s a guided one.
Final Thoughts
The AI Filters feature in AMUSE is one of those tools that feels simple at first, but becomes much more powerful once you understand how to use it properly.
It’s not about applying filters.
It’s about reshaping images using AI.
Once you get comfortable with prompts and settings, it turns into something far more flexible than traditional editing tools.
And that’s where it really starts to stand out.
FAQs
What are AI Filters in AMUSE
They use AI to transform and enhance images beyond basic editing.
Do I need a high-end PC
For best results, yes, especially for quality mode.
Can I undo changes
Yes, original images remain unchanged.
Are filters instant
No, they require processing time.
Can I use custom prompts
Yes, and that’s where most of the control comes from.



Discussion (0)
Be the first to comment.