

Many Internet Service Providers (ISPs) still rely on PPPoE connections (Point-to-Point Protocol over Ethernet) to authenticate users and provide access to the internet. If this is the case for your ISP, you’ll need to use the PPPoE credentials they gave you: a unique username and password that allow your Windows 10 computer to connect. In this tutorial, I’ll show you, step by step, how to set up a PPPoE Windows 10 connection, how to connect and disconnect from it, and even how to remove it completely if you no longer need it:
NOTE: Before anything else, I recommend reading this article: What is PPPoE and what does it do?. It serves as a good introduction or just as a refresher on what PPPoE is and why your internet connection may rely on it.

 Open Settings and go to Network & Internet
Select Dial-up on the left, then click or tap Set up a new connection on the right.
Open Settings and go to Network & Internet
Select Dial-up on the left, then click or tap Set up a new connection on the right.

 Set up a new connection in the Dial-up settings section
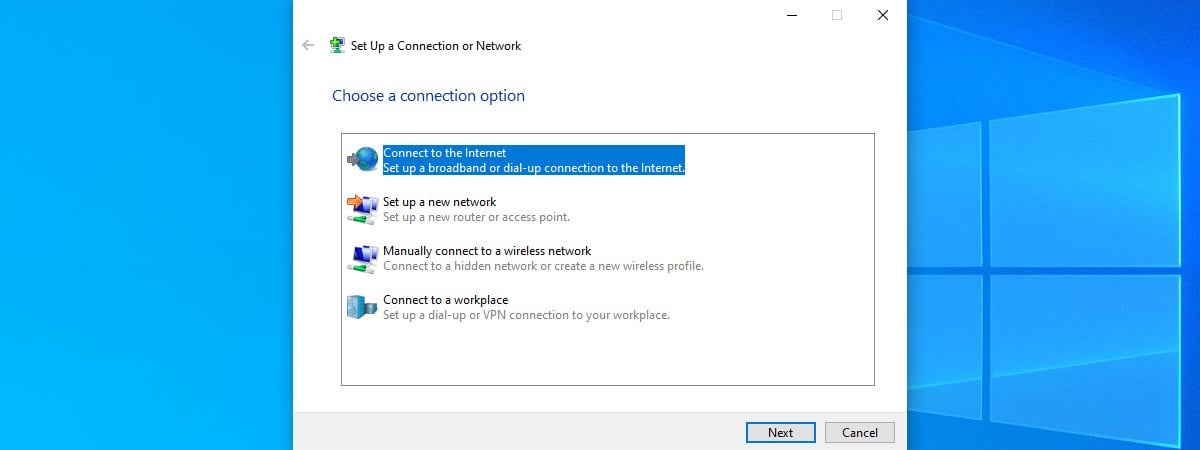
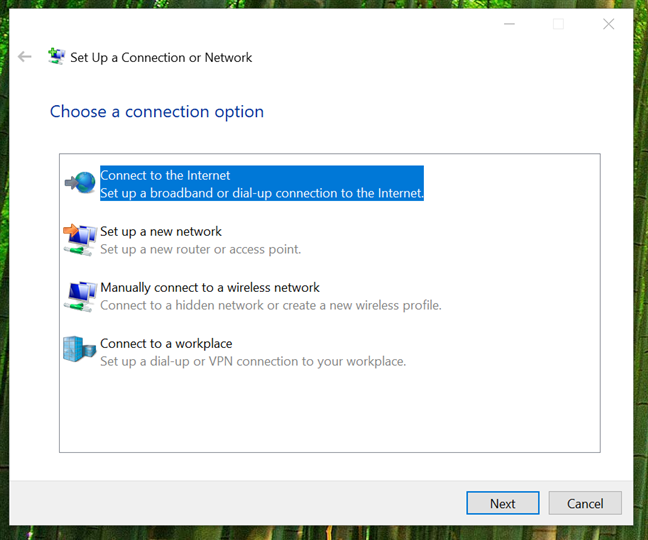
You’ll now see the Set Up a Connection or Network wizard.
Set up a new connection in the Dial-up settings section
You’ll now see the Set Up a Connection or Network wizard.
 The Connect to the Internet option
Note that, if you prefer the old-school method, you can also access the wizard from the Control Panel. Go to Network and Internet > Network and Sharing Center, then click or tap Set up a new connection or network.
The Connect to the Internet option
Note that, if you prefer the old-school method, you can also access the wizard from the Control Panel. Go to Network and Internet > Network and Sharing Center, then click or tap Set up a new connection or network.

 Set up a new connection or network in the Control Panel
No matter which way you start it, the wizard is the same from here on.
In the wizard, select Connect to the Internet and click or tap Next.
Set up a new connection or network in the Control Panel
No matter which way you start it, the wizard is the same from here on.
In the wizard, select Connect to the Internet and click or tap Next.

 Connect to the Internet
On the next screen, choose Broadband (PPPoE).
Connect to the Internet
On the next screen, choose Broadband (PPPoE).

 Choose Broadband (PPPoE)
Now comes the important part: entering the PPPoE credentials provided by your ISP. Type your User name and Password, exactly as given.
Choose Broadband (PPPoE)
Now comes the important part: entering the PPPoE credentials provided by your ISP. Type your User name and Password, exactly as given.
 The username and password assigned by the ISP
A few extra options are available:
The username and password assigned by the ISP
A few extra options are available:
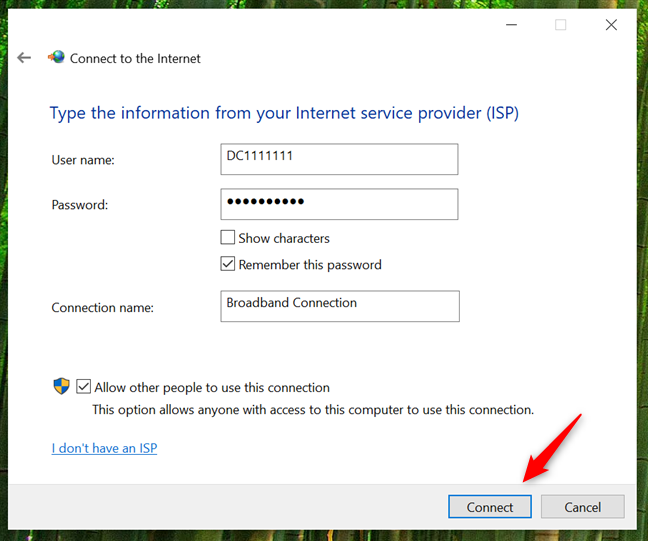
 Initiating the PPPoE connection
Windows now verifies your PPPoE credentials and tests the connection.
Initiating the PPPoE connection
Windows now verifies your PPPoE credentials and tests the connection.

 Waiting for the PPPoE connection to be established
If everything is correct, you’ll see the confirmation: “The connection to the Internet is ready to use.” At this point, you can close the wizard.
Waiting for the PPPoE connection to be established
If everything is correct, you’ll see the confirmation: “The connection to the Internet is ready to use.” At this point, you can close the wizard.

 The connection to the Internet is ready to use
With the PPPoE connection up and running, you can go ahead and use any web browser or any app that needs internet access.
The connection to the Internet is ready to use
With the PPPoE connection up and running, you can go ahead and use any web browser or any app that needs internet access.
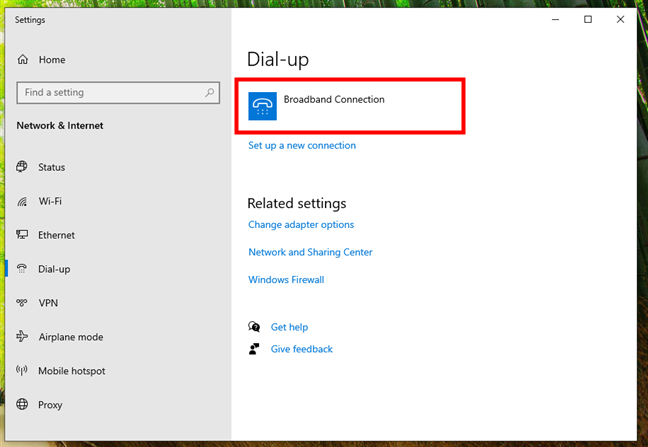
 The PPPoE Connection is shown in the networks list from the taskbar
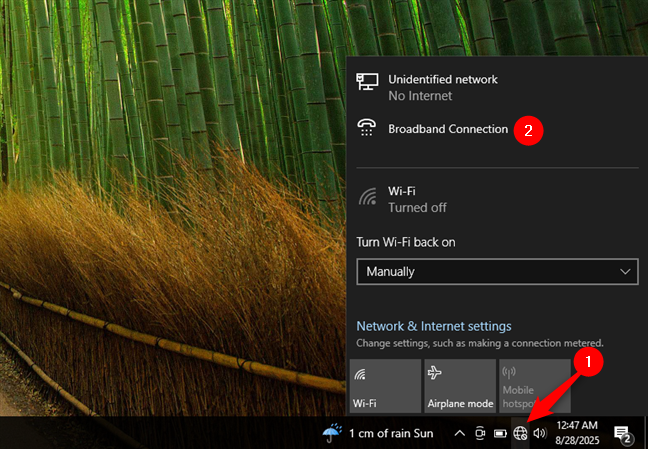
This opens the Dial-up section in Settings. Here, select your connection by clicking or tapping its name.
The PPPoE Connection is shown in the networks list from the taskbar
This opens the Dial-up section in Settings. Here, select your connection by clicking or tapping its name.
 Select the PPPoE connection
Now, click or tap Connect.
Select the PPPoE connection
Now, click or tap Connect.
 Start the PPPoE connection in Windows 10
If you checked Remember this password earlier, Windows 10 logs you in automatically. Otherwise, you’ll need to enter your PPPoE credentials again.
Start the PPPoE connection in Windows 10
If you checked Remember this password earlier, Windows 10 logs you in automatically. Otherwise, you’ll need to enter your PPPoE credentials again.
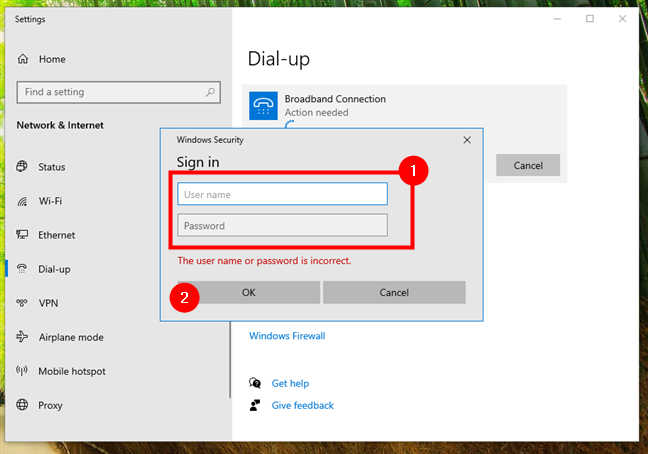
 The username and password assigned by the ISP
Once connected, you’ll see the Connected status.
The username and password assigned by the ISP
Once connected, you’ll see the Connected status.
 The PPPoE connection is enabled and working
TIP: If you want your PC to connect automatically at startup, read our guide on how to make a PPPoE broadband connection dial automatically in Windows 10.
The PPPoE connection is enabled and working
TIP: If you want your PC to connect automatically at startup, read our guide on how to make a PPPoE broadband connection dial automatically in Windows 10.

 Click the network icon, then the PPPoE connection
Finally, once you have reached the Dial-up options, click or tap on Disconnect.
Click the network icon, then the PPPoE connection
Finally, once you have reached the Dial-up options, click or tap on Disconnect.
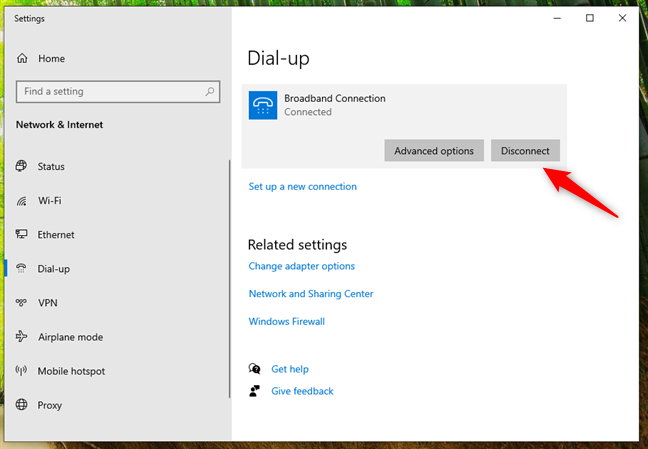 Disconnecting from the PPPoE connection
Alternatively, you can open Settings and go to Network & internet > Dial-up and press the Disconnect button next to your PPPoE connection.
There are no other steps involved in this process, and Windows 10 immediately closes the connection.
Disconnecting from the PPPoE connection
Alternatively, you can open Settings and go to Network & internet > Dial-up and press the Disconnect button next to your PPPoE connection.
There are no other steps involved in this process, and Windows 10 immediately closes the connection.

 Deleting a PPPoE connection in Windows 10
Windows will warn you that “If you remove this VPN connection, you’ll need to set it up again to reconnect.” Don’t worry, it’s just a small typo: the system is referring to your PPPoE connection, not a VPN. Confirm by pressing Remove, and the connection is gone.
Deleting a PPPoE connection in Windows 10
Windows will warn you that “If you remove this VPN connection, you’ll need to set it up again to reconnect.” Don’t worry, it’s just a small typo: the system is referring to your PPPoE connection, not a VPN. Confirm by pressing Remove, and the connection is gone.
 Confirm the removal of the PPPoE connection
That being said…
Confirm the removal of the PPPoE connection
That being said…
How to set up a PPPoE internet connection in Windows 10
The first step in setting up a PPPoE connection is opening the Connect to the Internet wizard. The quickest way is to launch the Settings app by pressing Windows + I on your keyboard. In the Settings window, go to Network & Internet.- Show characters lets you check if you typed your password correctly.
- Remember this password ensures Windows 10 won’t ask for it each time you connect.
- You can rename the connection by typing a custom name instead of the default Broadband Connection.
- If you want the connection available for everyone using the PC, check Allow other people to use this connection (requires administrator rights).
How to connect to a PPPoE connection in Windows 10
Once the PPPoE connection is created, you need to connect to it each time you want internet access (unless you configure it to connect automatically). Click or tap the Network icon on the taskbar, then select your PPPoE connection. It’s usually named Broadband Connection, unless you changed it.How to disconnect from a PPPoE internet connection
To disconnect from a running PPPoE connection in Windows 10, click or tap on the Networks icon from your taskbar, and then click or tap on your PPPoE connection.How to delete a PPPoE connection in Windows 10
If you no longer need a PPPoE Windows 10 connection, removing it is simple. Open Settings > Network & Internet > Dial-up, select your connection, and click Remove.

Discussion (6)
I tried to set up but didn’t work,
Password and user name given coming up invalid,
Talk to your internet provider, and get the correct username and password.
Hello, Thank you for the tutorial. I have successfully connected to the internet directly via PPPoE.
I have two LAN ports(onboard and PCI-LAN). The problem is, can I have two connections at the same time (both use PPPoE)?
Thank u so much.. been looking for this all over… And it was so simple.. I was just not selecting the broadband option, small mistake held me up for hours. Really grateful, cheers
Happy to help.
How do i automate the above mentioned PPPoE connection automatically log in when windows start?